Difference between revisions of "Recon (1 of 3) (Sansha's Nation) (Level 4)"
From EVE University Wiki
m (Hirmuolio pine moved page Recon (1 of 3) (Sansha Nation) (level 4) to Recon (1 of 3) (Sansha's Nation) (level 4): 's) |
|||
| Line 2: | Line 2: | ||
__NOTOC__{{survival copy}} | __NOTOC__{{survival copy}} | ||
| − | + | <div style="margin:0; background-color:#333322; border:1px solid #888888; font-style:normal; text-align:left; padding:1em 1em 1em 1em; overflow:hidden; color:#ffffff; margin-right:100px; margin-left:100px">Please do final edit and remove Survival Headers tag</div> | |
| − | |||
| − | |||
| − | |||
| − | |||
| − | |||
| − | |||
| − | |||
| − | |||
| − | + | ===Part 1 (Recon Level 4)=== | |
| − | Part 2 & 3 (Recon Level 4) are the same for all factions | + | {{Template:Missiondetails |
| + | |Level= 4 | ||
| + | |Type= Encounter | ||
| + | |Objective= | ||
| + | |Faction= Sansha | ||
| + | |DamageToDeal= {{Damagetype|Th|Em}} | ||
| + | |DamageToResist= {{Damagetype|Th|Em}} | ||
| + | |WebPoint= Elite Frigates | ||
| + | |EWAR= Tracking Disruptor (Elite Cruisers) | ||
| + | |ShipSizeLimit= | ||
| + | |ShipSuggestion= Navy Apocalypse, CNR, Dominix (if fighting spawns) | ||
| + | |Rewards= | ||
| + | |Extra= Deadspace | ||
| + | }} | ||
| + | {{NPCTableCSS}} | ||
| + | |||
| + | Video: [[https://www.youtube.com/watch?v=TuC62x_bs9Y Kronos Part 1,2 & 3]] | ||
| + | |||
| + | [[Recon_(2-3_of_3)_(level_4)|Part 2 & 3 (Recon Level 4)]] are the same for all factions. | ||
===Pocket 1=== | ===Pocket 1=== | ||
| − | + | Blitz | |
| − | + | *Pocket 1: Just fly to the warp gate and activate it. | |
| − | + | *Pocket 2: Warp off after receiving the mission completed message/journal update. | |
| − | + | Aggro | |
| + | *Auto aggro from Spawn 1 after several seconds. New spawns will appear at an interval between 60-90 secs. These spawns will start from the three Shipyard structures, each about 20-30km from the warp-in point. | ||
| − | + | *Drones will get aggroed by the later spawns, so retrieve/deploy them as necessary to avoid damage. | |
| − | |||
| − | |||
| − | + | Warning | |
| + | *Once Spawn 1 has been initiated, the Shipyards will keep spawning ships regardless of your location. If you had warped out, there will be a full gang waiting when next you warp-in. | ||
| + | *The full gang's DPS estimate is 900-1100dps. | ||
| − | + | image url="http://eve-survival.org/screenshots/Recon4p1sa1-1.jpg " title="Recon 1 of 3 (Sansha) - Pocket 1)" alt="Pocket 1 Spawn Locations" | |
| − | |||
| − | |||
| − | |||
| − | Spawn | + | {{NPCTableHead|Spawn 1 (Auto-aggro)}} |
| − | + | {{NPCTableRow| Elite Cruiser |1|Centum Loyal Fiend/Hellhound }} | |
| − | + | {{NPCTableRow| Battlecruiser |1|Centatis Daemon/Behemoth }} | |
| + | {{NPCTableRow| Battleship |1|Centus Tyrant/Dread Lord }} | ||
| + | |} | ||
| − | Spawn | + | {{NPCTableHead|Spawn 2 (Auto-aggro)}} |
| − | + | {{NPCTableRow| Elite Cruiser |1|Centum Loyal Slaughter/Execrator|EWAR=TD }} | |
| − | + | {{NPCTableRow| Battleship |2|Centus Tyrant/Overlord/Dark Lord }} | |
| + | |} | ||
| − | Spawn | + | {{NPCTableHead|Spawn 3 (Auto-aggro)}} |
| − | + | {{NPCTableRow| Elite Cruiser |1|Centum Loyal Fiend/Hellhound }} | |
| − | + | {{NPCTableRow| Battleship |2|Centus Tyrant }} | |
| + | |} | ||
| − | + | {{NPCTableHead|Spawn 4 (Auto-aggro)}} | |
| − | + | {{NPCTableRow| Elite Cruiser |1|Centum Loyal Fiend/Hellhound }} | |
| − | + | {{NPCTableRow| Battleship |2|Centus Tyrant }} | |
| − | + | |} | |
| + | |||
| + | Blitz | ||
| + | *You do not need to kill any hostile ships in this pocket. The warp gate is unlocked and sits about 24km from the warp-in point. | ||
| + | *You can use any fast frigate/cruiser (over 500m/s) to evasively tank Spawn 1 and quickly cover the distance to warp off through the gate. | ||
| + | *Mission is flagged completed once you have activated the gate and warped into Pocket 2. | ||
===Pocket 2=== | ===Pocket 2=== | ||
| − | You will receive the mission completed message/journal update. | + | You will receive the mission completed message/journal update. Then you can just warp off without needing to kill any hostile ships in this pocket. |
| − | |||
| − | |||
| − | |||
| − | |||
| − | |||
| − | Spawn 1 | + | Auto aggro from Spawn 1 after several seconds. Next spawn will appear in 60-90 secs. |
| − | |||
| − | |||
| − | + | image url="http://eve-survival.org/screenshots/Recon4p1sa1-2.jpg " title="Recon 1 of 3 (Sansha) - Pocket 2)" alt="Pocket 2 Spawn Locations" | |
| − | |||
| − | |||
| − | + | {{NPCTableHead|Spawn 1 (Auto-aggro)}} | |
| − | + | {{NPCTableRow| Elite Cruiser|3| (Centum Loyal Slaughter)|EWAR=TD|EWAR2=Neut }} | |
| + | {{NPCTableRow| Battleship |3|Centus Overlord }} | ||
| + | |} | ||
| − | + | {{NPCTableHead|Spawn 2 (Auto-aggro)}} | |
| − | + | {{NPCTableRow| Elite Frigate |4|Centti Loyal Scavanger |point=yes}} | |
| − | + | {{NPCTableRow| Elite Cruiser |4|Centum Loyal Torturer }} | |
| + | |} | ||
| − | + | *Mineable Asteroid - Pocket 2 has a huge asteroid field full of veldspar | |
| − | - | ||
| − | + | *Bounty - 13.248.375 ISK | |
| − | 6,100,000.00 | + | *Loot + Salvage - 6,100,000.00 |
[[Category:Mission reports]] | [[Category:Mission reports]] | ||
Revision as of 20:51, 9 November 2017
name=Recon (1 of 3), Level 4 Template:Survival copy
Part 1 (Recon Level 4)
| Level | 4 |
| Type | Encounter |
| Faction | Sansha |
| Best damage to deal | |
| Damage to resist | |
| Warp disruption | Elite Frigates |
| EWAR | Tracking Disruptor (Elite Cruisers) |
| Ship suggestion | Navy Apocalypse, CNR, Dominix (if fighting spawns) |
| Extra | Deadspace |
Video: [Kronos Part 1,2 & 3]
Part 2 & 3 (Recon Level 4) are the same for all factions.
Pocket 1
Blitz
- Pocket 1: Just fly to the warp gate and activate it.
- Pocket 2: Warp off after receiving the mission completed message/journal update.
Aggro
- Auto aggro from Spawn 1 after several seconds. New spawns will appear at an interval between 60-90 secs. These spawns will start from the three Shipyard structures, each about 20-30km from the warp-in point.
- Drones will get aggroed by the later spawns, so retrieve/deploy them as necessary to avoid damage.
Warning
- Once Spawn 1 has been initiated, the Shipyards will keep spawning ships regardless of your location. If you had warped out, there will be a full gang waiting when next you warp-in.
- The full gang's DPS estimate is 900-1100dps.
image url="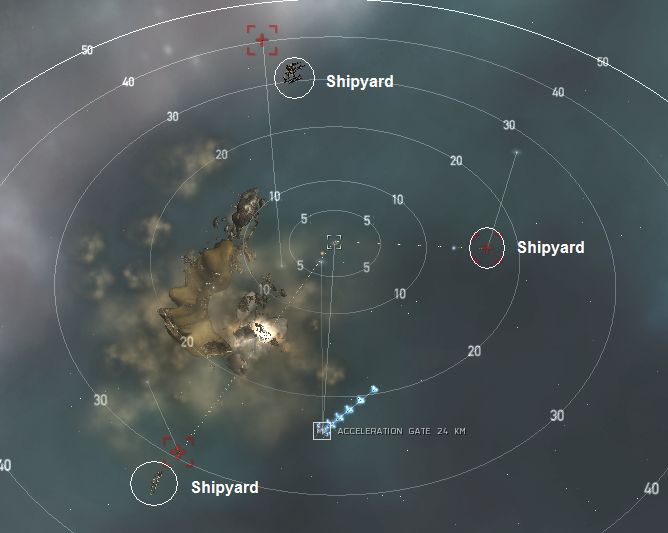 " title="Recon 1 of 3 (Sansha) - Pocket 1)" alt="Pocket 1 Spawn Locations"
Spawn 1 (Auto-aggro)
| WD | EWAR | L
| ||
|---|---|---|---|---|
| 1 x Elite Cruiser Centum Loyal Fiend/Hellhound | ||||
| 1 x Battlecruiser Centatis Daemon/Behemoth | ||||
| 1 x Battleship Centus Tyrant/Dread Lord | ||||
Spawn 2 (Auto-aggro)
| WD | EWAR | L
| ||
|---|---|---|---|---|
| 1 x Elite Cruiser Centum Loyal Slaughter/Execrator | ||||
| 2 x Battleship Centus Tyrant/Overlord/Dark Lord | ||||
Spawn 3 (Auto-aggro)
| WD | EWAR | L
| ||
|---|---|---|---|---|
| 1 x Elite Cruiser Centum Loyal Fiend/Hellhound | ||||
| 2 x Battleship Centus Tyrant | ||||
Spawn 4 (Auto-aggro)
| WD | EWAR | L
| ||
|---|---|---|---|---|
| 1 x Elite Cruiser Centum Loyal Fiend/Hellhound | ||||
| 2 x Battleship Centus Tyrant | ||||
Blitz
- You do not need to kill any hostile ships in this pocket. The warp gate is unlocked and sits about 24km from the warp-in point.
- You can use any fast frigate/cruiser (over 500m/s) to evasively tank Spawn 1 and quickly cover the distance to warp off through the gate.
- Mission is flagged completed once you have activated the gate and warped into Pocket 2.
Pocket 2
You will receive the mission completed message/journal update. Then you can just warp off without needing to kill any hostile ships in this pocket.
Auto aggro from Spawn 1 after several seconds. Next spawn will appear in 60-90 secs.
image url="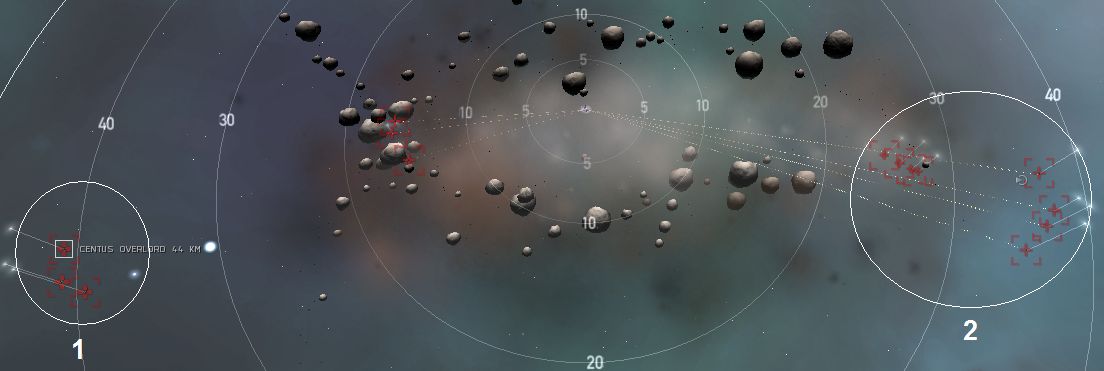 " title="Recon 1 of 3 (Sansha) - Pocket 2)" alt="Pocket 2 Spawn Locations"
Spawn 1 (Auto-aggro)
| WD | EWAR | L
| ||
|---|---|---|---|---|
| 3 x Elite Cruiser (Centum Loyal Slaughter) | ||||
| 3 x Battleship Centus Overlord | ||||
Spawn 2 (Auto-aggro)
| WD | EWAR | L
| ||
|---|---|---|---|---|
| 4 x Elite Frigate Centti Loyal Scavanger | ||||
| 4 x Elite Cruiser Centum Loyal Torturer | ||||
- Mineable Asteroid - Pocket 2 has a huge asteroid field full of veldspar
- Bounty - 13.248.375 ISK
- Loot + Salvage - 6,100,000.00