Difference between revisions of "Tutorial - New Player Experience - until Aug 2018"
Shauny Tsero (talk | contribs) |
|||
| (44 intermediate revisions by 6 users not shown) | |||
| Line 1: | Line 1: | ||
| − | = | + | {{Deprecated|user=[[User:Shauny Tsero|Shauny Tsero, Mentor Manager]] ([[User talk:Shauny Tsero|talk]]) 17:48, 2 February 2020 (UTC)|newinfo=[[New Player Experience Tutorial - Seeker Investigation]]}} |
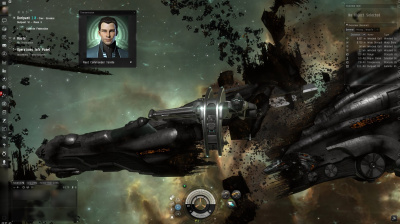
| − | + | [[File:Tutorial-start.jpg|thumb|right|400px|Starting the EVE tutorial.]]The '''EVE tutorial''' (also known as the "New Player Experience", or "Inception") is a story-driven experience which introduces you to the very basics of playing EVE and to the EVE universe. Unless you've already played EVE it's highly recommended that you follow the tutorial, as the game has many particular mechanics which you may not be used to, even if you've played other computer games. The tutorial is available to any brand-new character. | |
| − | + | You start the tutorial in space in a [[corvettes|corvette]], the sole survivor of an attack on your fleet by [[Drifters]]. Through voiceovers, the game will introduce you to the basic concepts you need to play EVE. The tutorial gives you step-by-step instructions, you should follow them carefully. However, the tutorial is often a bit light on context (while it may tell you to do something, it often doesn't explain why or when you might normally want to do this). Therfore, if you'd like to know more about what the tutorial asks you to do, follow the list below, and/or click on the links for an even more in-depth explanation of the concepts covered by the tutorial. | |
| − | |||
| − | |||
| − | + | For a more general guide to getting started in the game, see [[Getting Started in EVE Online]]. | |
| − | |||
| − | |||
| − | + | == Tips and general notes == | |
| − | : | + | {{Color box|color=#ff3535|border=#ff0000|text=#000000|width=25%|Any friendly on grid in the final suicide mission will get killed and podded!}} |
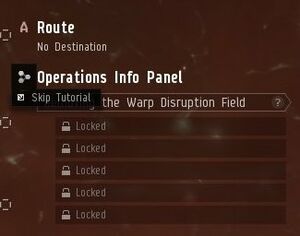
| + | * [[File:Skip-tutorial.jpg|thumb|right|Skipping the tutorial completely.]] To skip the tutorial completely, click on the tutorial icon in the info panel and click "Skip Tutorial". However, keep in mind that there is no way to resume the tutorial (not even through a GM support ticket <!-- yes, I tried :) -->) after you've skipped it. | ||
| + | * If a part of the tutorial gets stuck (for instance, if it doesn't recognise that you've completed a step), do the following: | ||
| + | ** Wait a few seconds. Some parts of the user interface can occasionally be a little sluggish. | ||
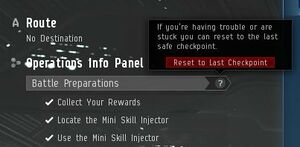
| + | ** [[File:Reset-tutorial.jpg|thumb|right|Reset a tutorial step.]] Reset the tutorial step (which will take you back one or two steps in the tutorial) by clicking on the question mark (?) button in the info panel. | ||
| + | ** If all else fails, submit a support ticket to the game masters (GM) through the [https://support.eveonline.com/ EVE support website], and they will manually reset your tutorial to allow you to continue. | ||
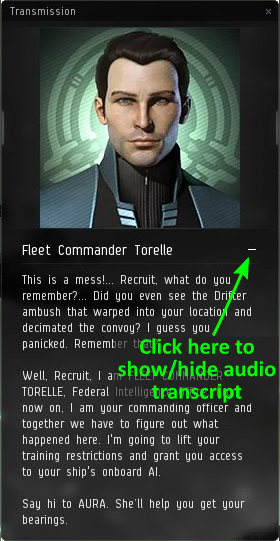
| + | * [[File:Tutorial-transcript.png|right|thumb|Showing/hiding the audio transcript.]] The voiceover windows have a three-line icon at the bottom; click this button to show a text transcript of the voiceover. | ||
| + | * The tutorial is somewhat unusual, as it includes voiceovers, interface hints, and a structured story to follow; "normal" gameplay in EVE is much more player-directed and free-form. The blue interface hints are not present during gameplay after the tutorial; if, during the tutorial, they obstruct another window, rotate the camera to get them out of the way. | ||
| + | * While the EVE user interface (UI) cannot be modded, it can be customised by moving and resizing windows. The more you play the more you will get a feel for how you like setting up your interface, but there are two things you should do to the default UI from an early stage: | ||
| + | ** Make the overview window as large as practical, and play around with the column widths to prevent the text from being clipped too much. | ||
| + | ** Increase the size of the chat window, and change the chat window settings (using the icons at the top-left of the chat window) to reduce the amount of screen space taken up by character portraits. | ||
| − | + | == Topics covered by the tutorial == | |
| − | + | === Aftermath of Drifter attack === | |
| + | * [[Camera]] control | ||
| + | ** Zooming and rotating the camera around your ship, using your mouse. | ||
| + | ** Moving the camera to other objects (using the "look at" command). | ||
| + | * Piloting your ship. Spaceships in EVE fly more like submarines than spaceships, as they have a maximum speed, and will slow down and stop when their engines are turned off. Also, while your ship can collide with other ships and objects, this causes no damage. | ||
| + | ** [[Manual Piloting|Manual piloting]], by double-clicking in space, which will cause your ship to turn and fly away from your current camera position (irrespective of where in space you double-click). As a beginner you will only use this rarely. | ||
| + | ** [[Advanced_Piloting_Techniques#Approach|Semi-automatic piloting]], such as approaching or orbiting another ship or structure. Your ship's current command is displayed near the bottom middle of the screen. | ||
| + | ** Setting your ship's speed (via the throttle setting, from stop to its maximum speed). | ||
| + | * Interacting with objects, either through the radial menu or the right-click menu. | ||
| + | ** Virtually every context-sensitive command in EVE can be accessed by right-clicking. | ||
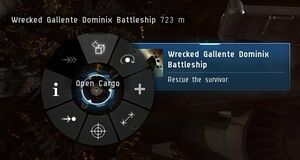
| + | ** [[File:Tutorial-open-cargo-radial-menu.jpg|thumb|right|Opening a cargo container using the radial menu.]] The most common context-sensitive commands can also be accessed (in many, but not all, cases) through the radial menu. To use the radial menu, press and hold the left mouse button on the object you wish to interact with, move the mouse to the desired command, and releasing the mouse button. | ||
| + | * Retrieving the contents of containers (or other objects) in space (this is referred to as "looting"; despite the name, it may not necessarily involve theft or other criminal activity). Your ship must be within 2500 m of an object to retrieve its contents; if you're further away, your ship will first fly automatically towards the object. | ||
| + | * Using the [[overview]] to find and interact with nearby objects, which can often be ''much'' easier than finding them in space. You may want to enlarge the overview window and resize the columns to see more information at once. | ||
| + | * [[Targeting]] ships (or other objects in space), which is necessary if you want to (for instance) fire your weapons at them. Any ships you have locked will appear as circles in the top-right of your screen. | ||
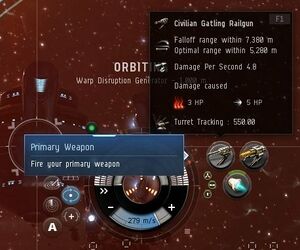
| + | * [[File:Tutorial-fire-weapon-tooltip.jpg|thumb|right|Click your weapon to fire at the currently selected target. Note your weapon's range on the tooltip.]] Firing your ship's [[turrets|weapons]] at both stationary and moving targets. Your weapons have a maximum range; hover over the icon to see it, and keep your ships (e.g. with the "orbit" command) within this range. | ||
| + | * Taking and dealing damage. Your ship (as well as enemy ships) is protected by shields, armor, and structure (collectively referred to as "[[tanking|tank]]"), which are depleted sequentially by incoming weapon fire; once a ship's structure has been depleted, it will be destroyed. Your ship's tank is represented by three concentric circles at the bottom of the user interface. Shields slowly regenerate over time; armor and structure must be repaired once they've taken damage. <!-- this may need a link to a UI overview page. --> | ||
| + | * Using an [[Afterburner Details|afterburner module]] to increase your ship's speed. Using this module uses energy from your ship's [[capacitor]], which regenerates over time. Your capacitor's current charge level is shown in the middle of the tanking circles (at the bottom of the user interface). | ||
| + | * Warping to another location within the same star system, and docking at a station. | ||
| − | == | + | === Space station === |
| − | + | * Training [[Skills and Learning|skills]], being given a skillbook, and injecting it. Viewing your skills through the character sheet. Skills in EVE are trained in real time, even when you are not logged into the game. | |
| + | * Viewing and managing your [[Managing Your Assets|items]] <!-- this too needs a link to a UI overview page --> | ||
| + | ** Your ship's cargo bay can store a limited amount of stuff (measured by volume). | ||
| + | ** Your item and ship hangars in a station have effectively unlimited storage, but are location-specific (i.e. items stored in one station cannot be remotely accessed from another station). | ||
| + | ** Items and ships which you receive from "out of the game" (e.g. [[PLEX]], refer-a-friend rewards, or some of the rewards from the tutorial) can be found in your "redeem items" window. | ||
| + | * [[Fitting Guidelines|Fitting]] a module on a ship | ||
| + | * The Info Panel (on the left-hand side of the user interface) shows where you should fly to next; right-click or use the radial menu on the location to warp/fly your ships to the location. | ||
| + | * [[Manufacturing]] a module from a blueprint original (BPO) | ||
| + | ** Almost everything in EVE (including BPOs) can be bought on the [[trading|market]]. While some items on the market (including BPOs) are sold by NPCs at fixed prices, most items are sold by other players, causing their prices to fluctuate with supply and demand. | ||
| − | + | === Missions === | |
| − | + | * Using a stargate to jump to another star system. Unlike in other space games, you can only travel inside a star system (using warp drive) or jump between star systems (using, for the most part, stargates); you cannot travel to an arbitrary point between star systems. | |
| − | + | * Using the [[autopilot]] to: | |
| − | + | ** Plot a course to a more distant star system. Plotting a course highlights the next stargate on your journey yellow in your overview, allowing you to easily find your way even on a lengthy journey. | |
| − | + | ** Automatically fly your ship to your destination. While this can be a very hands-off way of flying, it takes much longer than "manually" warping from stargate to stargate, as the autopilot will always warp you to 10 km off the next stargate, requiring an additional sub-light-speed flight to the stargate before you can jump to the next star system. Potentially unfriendly players will use this time you spend slowly flying towards a stargate to potentially [[Suicide Gank|attack and destroy]] your ship to steal your cargo; therefore, in most cases it's recommended that you only use the autopilot to plot a course, not to actually fly your ship. | |
| − | + | * Warping into a [[deadspace]] area using an acceleration gate. | |
| − | + | * Using a hacking module to [[Hacking#Relic Sites and Data Sites: Hacking|hack]] into a structure | |
| − | + | * Using a mini skill injector to receive 25,000 unallocated skill points, which you can use to advance your skill training (by approximately 14 Hours for [[Clone States|Omega characters]]; 28 Hours for Alpha characters, as these train skills more slowly). You can also purchase regular [[Skill_Injector#Skill_Injectors|skill injectors]] from the market to gain additional unallocated skill points, although these cost a substantial amount of ISK. | |
| − | + | * Receiving a new ship, [[assembling]] it, and using it. All ships and modules are sold/manufactured in a "packaged" state (think: IKEA flat-pack furniture); before a ship can be used, it must be assembled (modules are assembled automatically when fitted to a ship). | |
| − | + | * Using a Stasis Webifier ("[[web]]") module to slow down an enemy ship. Webs are often used to make enemy ships easier to hit with weapons. | |
| − | + | * Having your ship and [[pod]] destroyed, causing your character's consciousness to transfer to its [[medical clone]]. | |
| − | + | * Recommending that you fly to the station with the nearest [[Career Agents]] to do their missions. You will also receive some useful modules and ships (including a [[Venture]] mining frigate with mining modules) as a reward. | |
| − | + | ** The career agents are the next step in the EVE tutorial, and it's highly recommended that you do their missions. | |
| − | |||
| − | |||
| − | |||
| − | |||
| − | |||
| − | |||
| − | |||
| − | |||
| − | |||
| − | + | [[Category:Getting Started]] | |
| − | |||
| − | |||
| − | |||
| − | |||
| − | |||
| − | |||
| − | |||
| − | |||
| − | |||
| − | |||
| − | |||
| − | |||
| − | |||
| − | |||
| − | |||
| − | |||
| − | |||
| − | |||
| − | |||
| − | |||
| − | |||
| − | |||
| − | |||
| − | |||
| − | |||
| − | |||
| − | |||
| − | |||
| − | |||
| − | |||
| − | |||
| − | |||
| − | |||
| − | |||
| − | |||
| − | |||
| − | |||
| − | |||
| − | |||
| − | |||
| − | |||
| − | |||
| − | |||
| − | |||
| − | |||
| − | |||
| − | |||
| − | |||
| − | |||
| − | |||
| − | |||
| − | |||
| − | |||
| − | |||
| − | |||
| − | |||
| − | |||
| − | |||
| − | |||
| − | |||
| − | |||
| − | |||
| − | |||
| − | |||
| − | |||
| − | |||
| − | |||
| − | |||
| − | |||
| − | |||
| − | |||
| − | |||
| − | |||
| − | |||
| − | |||
| − | |||
| − | |||
| − | |||
| − | |||
| − | |||
| − | |||
| − | |||
| − | |||
| − | |||
| − | |||
| − | |||
| − | |||
| − | |||
| − | |||
| − | |||
| − | |||
| − | |||
| − | |||
| − | |||
| − | |||
| − | |||
| − | |||
| − | |||
| − | |||
| − | |||
| − | |||
| − | |||
| − | |||
| − | |||
| − | |||
| − | |||
| − | |||
| − | |||
| − | |||
| − | |||
| − | |||
| − | |||
| − | |||
| − | |||
| − | |||
| − | |||
| − | |||
| − | |||
| − | |||
| − | |||
| − | |||
| − | |||
| − | |||
| − | |||
| − | |||
| − | |||
| − | |||
| − | |||
| − | |||
| − | |||
| − | |||
| − | |||
| − | |||
| − | |||
| − | |||
| − | |||
| − | |||
| − | |||
| − | |||
| − | |||
| − | [[Category: | ||
Revision as of 17:48, 2 February 2020
The EVE tutorial (also known as the "New Player Experience", or "Inception") is a story-driven experience which introduces you to the very basics of playing EVE and to the EVE universe. Unless you've already played EVE it's highly recommended that you follow the tutorial, as the game has many particular mechanics which you may not be used to, even if you've played other computer games. The tutorial is available to any brand-new character.
You start the tutorial in space in a corvette, the sole survivor of an attack on your fleet by Drifters. Through voiceovers, the game will introduce you to the basic concepts you need to play EVE. The tutorial gives you step-by-step instructions, you should follow them carefully. However, the tutorial is often a bit light on context (while it may tell you to do something, it often doesn't explain why or when you might normally want to do this). Therfore, if you'd like to know more about what the tutorial asks you to do, follow the list below, and/or click on the links for an even more in-depth explanation of the concepts covered by the tutorial.
For a more general guide to getting started in the game, see Getting Started in EVE Online.
Contents
Tips and general notes
- To skip the tutorial completely, click on the tutorial icon in the info panel and click "Skip Tutorial". However, keep in mind that there is no way to resume the tutorial (not even through a GM support ticket ) after you've skipped it.
- If a part of the tutorial gets stuck (for instance, if it doesn't recognise that you've completed a step), do the following:
- Wait a few seconds. Some parts of the user interface can occasionally be a little sluggish.
- Reset the tutorial step (which will take you back one or two steps in the tutorial) by clicking on the question mark (?) button in the info panel.
- If all else fails, submit a support ticket to the game masters (GM) through the EVE support website, and they will manually reset your tutorial to allow you to continue.
- The voiceover windows have a three-line icon at the bottom; click this button to show a text transcript of the voiceover.
- The tutorial is somewhat unusual, as it includes voiceovers, interface hints, and a structured story to follow; "normal" gameplay in EVE is much more player-directed and free-form. The blue interface hints are not present during gameplay after the tutorial; if, during the tutorial, they obstruct another window, rotate the camera to get them out of the way.
- While the EVE user interface (UI) cannot be modded, it can be customised by moving and resizing windows. The more you play the more you will get a feel for how you like setting up your interface, but there are two things you should do to the default UI from an early stage:
- Make the overview window as large as practical, and play around with the column widths to prevent the text from being clipped too much.
- Increase the size of the chat window, and change the chat window settings (using the icons at the top-left of the chat window) to reduce the amount of screen space taken up by character portraits.
Topics covered by the tutorial
Aftermath of Drifter attack
- Camera control
- Zooming and rotating the camera around your ship, using your mouse.
- Moving the camera to other objects (using the "look at" command).
- Piloting your ship. Spaceships in EVE fly more like submarines than spaceships, as they have a maximum speed, and will slow down and stop when their engines are turned off. Also, while your ship can collide with other ships and objects, this causes no damage.
- Manual piloting, by double-clicking in space, which will cause your ship to turn and fly away from your current camera position (irrespective of where in space you double-click). As a beginner you will only use this rarely.
- Semi-automatic piloting, such as approaching or orbiting another ship or structure. Your ship's current command is displayed near the bottom middle of the screen.
- Setting your ship's speed (via the throttle setting, from stop to its maximum speed).
- Interacting with objects, either through the radial menu or the right-click menu.
- Virtually every context-sensitive command in EVE can be accessed by right-clicking.
- The most common context-sensitive commands can also be accessed (in many, but not all, cases) through the radial menu. To use the radial menu, press and hold the left mouse button on the object you wish to interact with, move the mouse to the desired command, and releasing the mouse button.
- Retrieving the contents of containers (or other objects) in space (this is referred to as "looting"; despite the name, it may not necessarily involve theft or other criminal activity). Your ship must be within 2500 m of an object to retrieve its contents; if you're further away, your ship will first fly automatically towards the object.
- Using the overview to find and interact with nearby objects, which can often be much easier than finding them in space. You may want to enlarge the overview window and resize the columns to see more information at once.
- Targeting ships (or other objects in space), which is necessary if you want to (for instance) fire your weapons at them. Any ships you have locked will appear as circles in the top-right of your screen.
- Firing your ship's weapons at both stationary and moving targets. Your weapons have a maximum range; hover over the icon to see it, and keep your ships (e.g. with the "orbit" command) within this range.
- Taking and dealing damage. Your ship (as well as enemy ships) is protected by shields, armor, and structure (collectively referred to as "tank"), which are depleted sequentially by incoming weapon fire; once a ship's structure has been depleted, it will be destroyed. Your ship's tank is represented by three concentric circles at the bottom of the user interface. Shields slowly regenerate over time; armor and structure must be repaired once they've taken damage.
- Using an afterburner module to increase your ship's speed. Using this module uses energy from your ship's capacitor, which regenerates over time. Your capacitor's current charge level is shown in the middle of the tanking circles (at the bottom of the user interface).
- Warping to another location within the same star system, and docking at a station.
Space station
- Training skills, being given a skillbook, and injecting it. Viewing your skills through the character sheet. Skills in EVE are trained in real time, even when you are not logged into the game.
- Viewing and managing your items
- Your ship's cargo bay can store a limited amount of stuff (measured by volume).
- Your item and ship hangars in a station have effectively unlimited storage, but are location-specific (i.e. items stored in one station cannot be remotely accessed from another station).
- Items and ships which you receive from "out of the game" (e.g. PLEX, refer-a-friend rewards, or some of the rewards from the tutorial) can be found in your "redeem items" window.
- Fitting a module on a ship
- The Info Panel (on the left-hand side of the user interface) shows where you should fly to next; right-click or use the radial menu on the location to warp/fly your ships to the location.
- Manufacturing a module from a blueprint original (BPO)
- Almost everything in EVE (including BPOs) can be bought on the market. While some items on the market (including BPOs) are sold by NPCs at fixed prices, most items are sold by other players, causing their prices to fluctuate with supply and demand.
Missions
- Using a stargate to jump to another star system. Unlike in other space games, you can only travel inside a star system (using warp drive) or jump between star systems (using, for the most part, stargates); you cannot travel to an arbitrary point between star systems.
- Using the autopilot to:
- Plot a course to a more distant star system. Plotting a course highlights the next stargate on your journey yellow in your overview, allowing you to easily find your way even on a lengthy journey.
- Automatically fly your ship to your destination. While this can be a very hands-off way of flying, it takes much longer than "manually" warping from stargate to stargate, as the autopilot will always warp you to 10 km off the next stargate, requiring an additional sub-light-speed flight to the stargate before you can jump to the next star system. Potentially unfriendly players will use this time you spend slowly flying towards a stargate to potentially attack and destroy your ship to steal your cargo; therefore, in most cases it's recommended that you only use the autopilot to plot a course, not to actually fly your ship.
- Warping into a deadspace area using an acceleration gate.
- Using a hacking module to hack into a structure
- Using a mini skill injector to receive 25,000 unallocated skill points, which you can use to advance your skill training (by approximately 14 Hours for Omega characters; 28 Hours for Alpha characters, as these train skills more slowly). You can also purchase regular skill injectors from the market to gain additional unallocated skill points, although these cost a substantial amount of ISK.
- Receiving a new ship, assembling it, and using it. All ships and modules are sold/manufactured in a "packaged" state (think: IKEA flat-pack furniture); before a ship can be used, it must be assembled (modules are assembled automatically when fitted to a ship).
- Using a Stasis Webifier ("web") module to slow down an enemy ship. Webs are often used to make enemy ships easier to hit with weapons.
- Having your ship and pod destroyed, causing your character's consciousness to transfer to its medical clone.
- Recommending that you fly to the station with the nearest Career Agents to do their missions. You will also receive some useful modules and ships (including a Venture mining frigate with mining modules) as a reward.
- The career agents are the next step in the EVE tutorial, and it's highly recommended that you do their missions.
