m Update some minor terms and descriptions. |
m Update todo. |
||
| (13 intermediate revisions by 2 users not shown) | |||
| Line 1: | Line 1: | ||
This | This is the personal draft space for elaborating the idea. | ||
Any suggestion is highly appreciated! | |||
Widget will be | TODO : | ||
* Widget will be available on github or something... | |||
* Need to explain more on how to interpret the figure. | |||
* Add examples for orbiting objects. | |||
* Explain the intuition of the figure (use the images from the discord discussion thread), before explaining the formula. | |||
'''Note:''' On this page, the terms "''orbiting speed''" and "''orbiting velocity''" are used interchangeably. They both refer to the target’s movement speed along its orbital path. Also, the term "''stationary''" is used instead of "''static''" to more accurately describe ships that are not moving. | |||
== Visualization formula derivation == | == Visualization formula derivation == | ||
It is recommended to read the [[Turret_mechanics#Hit_chance]] section beforehand, as this explanation assumes a basic understanding of turret mechanics. | It is recommended to read the [[Turret_mechanics#Hit_chance]] section beforehand, as this explanation assumes a basic understanding of turret mechanics. | ||
According to the [[Turret_mechanics#Hit_Math|hit chance formula]], we have: | According to the [[Turret_mechanics#Hit_Math|hit chance formula]], we have: | ||
:<math> \displaystyle \text{Chance to hit} = 0.5^{\displaystyle \left( \left( \frac{\text{Angular} \times 40,000 \text{ m}}{\text{Tracking} \times \text{Signature}} \right)^2 + \left(\frac{\max(0,\ \text{Distance} - \text{Optimal})}{\text{Falloff}} \right)^2\right)} </math> | :<math> \displaystyle \text{Chance to hit} = 0.5^{\displaystyle \left( \left( \frac{\text{Angular} \times 40,000 \text{ m}}{\text{Tracking} \times \text{Signature}} \right)^2 + \left(\frac{\max(0,\ \text{Distance} - \text{Optimal})}{\text{Falloff}} \right)^2\right)} </math> | ||
<br> | |||
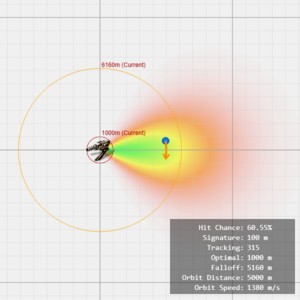
[[File:Turret tracking visualization.png|thumb|alt=The heatmap of hit chance, from a stationary 200mm Autocannon I without any ammo or skill, tracking an orbiting object at a distance of 5000 meter and 1380m/s speed, is 60.55%.|The heatmap of hit chance, from a stationary attacker, tracking an orbiting object. <br> | |||
Note that the orbiting velocity (orange arrow arc) lies within the yellow area of the heatmap, which represents mediocre hit chance.]] | |||
To visualize this complex formula intuitively, we apply the following constraints to simplify the setup: | To visualize this complex formula intuitively, we apply the following constraints to simplify the setup: | ||
| Line 20: | Line 32: | ||
First, consider the distance term. | First, consider the distance term. | ||
:<math> | :<math>\left(\frac{\max(0,\ \text{Distance} - \text{Optimal})}{\text{Falloff}} \right)^2</math> | ||
\left(\frac{\max(0,\ \text{Distance} - \text{Optimal})}{\text{Falloff}} \right)^2 | |||
</math> | |||
This term shows that hit chance decreases the further the target is beyond optimal range. This relationship can be visualized along a 1D axis. | This term shows that hit chance decreases the further the target is beyond optimal range. This relationship can be visualized along a 1D axis. | ||
| Line 37: | Line 44: | ||
We can visualize the target's orbiting motion as an arc. The length of this arc over one second represents the target’s orbital velocity. For a given orbital velocity, the angular velocity (how quickly the target moves across the turret’s aim) increases as the orbital radius (distance to the attacker) decreases: | We can visualize the target's orbiting motion as an arc. The length of this arc over one second represents the target’s orbital velocity. For a given orbital velocity, the angular velocity (how quickly the target moves across the turret’s aim) increases as the orbital radius (distance to the attacker) decreases: | ||
:<math> | :<math> | ||
\text{Angular Velocity} = \frac{\text{ | \text{Angular Velocity} = \frac{\text{Orbiting Velocity}}{\text{Orbiting Distance}} | ||
</math> | </math> | ||
This means, the closer the target is while orbiting at the same speed, the harder it is for the turret to track. | This means, the closer the target is while orbiting at the same speed, the harder it is for the turret to track. | ||
| Line 46: | Line 53: | ||
By combining the 1D distance-based falloff term with the 2D angular velocity-based tracking cone, we can visualize the hit chance on a 2D plane using a heatmap. | By combining the 1D distance-based falloff term with the 2D angular velocity-based tracking cone, we can visualize the hit chance on a 2D plane using a heatmap. | ||
== | <references group="Note"/> | ||
== Visualized comparison == | |||
<!-- Table layouts are very rigid and thus very unfriendly towards different screen widths, especially smaller ones. Consider using flex containers as in this demo. | |||
P.S. My spelling checker is telling me that orbiting should only have one t. Evon R'al --> | |||
<!-- Thank you for the suggestion, I'll fix it :D --> | |||
Different turret types have different property. The following visualizations demonstrate how turret performance is affected by weapon type, weapon size, and target signature radius, using consistent conditions: a stationary target at 5000 meters and 100 signature radius unless otherwise specified. | |||
''Note: the profile of turrets do not account for any character skills, ship hull bonuses, modules, or ammunition effects.'' | |||
* Autocannons have a very short optimal range and long falloff, thus having a bigger yellow to orange area. | |||
* Pulse lasers have long optimal and short falloff, and the worst tracking, which results in long but narrow cone of green area. | |||
* Blasters have the best tracking but worst range, showed by the short and wide cone. | |||
<div style="display: flex; flex-wrap: wrap;"> | |||
<div>[[File:Turret tracking visualization small autocannon vs static.png|thumb|Small autocannon v.s. stationary object]]</div> | |||
<div>[[File:Turret tracking visualization small pulse vs static.png|thumb|Small pulse laser v.s. stationary object]]</div> | |||
<div>[[File:Turret tracking visualization small blaster vs static.png|thumb|Small blaster v.s. stationary object]]</div> | |||
</div> | |||
* Base case (small autocannon). | |||
* Small artillery turrets, with longer optimal range but poorer tracking compare to the autocannons, show narrow firing arcs. | |||
* Medium autocannons extend the falloff range by a decent amount, inheriting the long yellow to orange profile of the small variant, but with greatly decreased tracking. | |||
<div style="display: flex; flex-wrap: wrap;"> | |||
<div>[[File:Turret tracking visualization small autocannon vs static.png|thumb|Small autocannon v.s. stationary object]]</div> | |||
<div>[[File:Turret tracking visualization small artillery vs static object.png|thumb|Small artillery v.s. stationary object]]</div> | |||
<div>[[File:Turret tracking visualization medium autocannon vs static object.png|thumb|Medium autocannon v.s. stationary object]]</div> | |||
</div> | |||
* Small autocannon against default 100m signature object. | |||
* Small autocannon against Amarr shuttle (25m signature). | |||
* Small autocannon against Praxis battleship (465m signature). | |||
<div style="display: flex; flex-wrap: wrap;"> | |||
<div>[[File:Turret tracking visualization small autocannon vs static.png|thumb|Small autocannon v.s. stationary object]]</div> | |||
<div>[[File:Turret tracking visualization small autocannon vs static shuttle.png|thumb|Small autocannon v.s. stationary Amarr shuttle]]</div> | |||
<div>[[File:Turret tracking visualization small autocannon vs static praxis.png|thumb|Small autocannon v.s. stationary Praxis battleship]]</div> | |||
[[File:Turret tracking visualization small autocannon vs static.png|thumb|Small autocannon v.s. | </div> | ||
[[File:Turret tracking visualization small | |||
[[File:Turret tracking visualization | |||
== Title 3 == | == Title 3 == | ||
Latest revision as of 14:36, 3 June 2025
This is the personal draft space for elaborating the idea. Any suggestion is highly appreciated!
TODO :
- Widget will be available on github or something...
- Need to explain more on how to interpret the figure.
- Add examples for orbiting objects.
- Explain the intuition of the figure (use the images from the discord discussion thread), before explaining the formula.
Note: On this page, the terms "orbiting speed" and "orbiting velocity" are used interchangeably. They both refer to the target’s movement speed along its orbital path. Also, the term "stationary" is used instead of "static" to more accurately describe ships that are not moving.
Visualization formula derivation
It is recommended to read the Turret_mechanics#Hit_chance section beforehand, as this explanation assumes a basic understanding of turret mechanics.
According to the hit chance formula, we have:

Note that the orbiting velocity (orange arrow arc) lies within the yellow area of the heatmap, which represents mediocre hit chance.
To visualize this complex formula intuitively, we apply the following constraints to simplify the setup:
- The attacker is stationary.[Note 1]
- The target is either stationary or moving in a perfect circular orbit around the attacker.
- The scenario takes place on a 2D plane.[Note 2]
First, consider the distance term.
This term shows that hit chance decreases the further the target is beyond optimal range. This relationship can be visualized along a 1D axis.
Next, consider the tracking term:
We can visualize the target's orbiting motion as an arc. The length of this arc over one second represents the target’s orbital velocity. For a given orbital velocity, the angular velocity (how quickly the target moves across the turret’s aim) increases as the orbital radius (distance to the attacker) decreases:
This means, the closer the target is while orbiting at the same speed, the harder it is for the turret to track.
From this, we can interpret the turret's tracking stat as a kind of "maximum allowable angular velocity" it can handle. Visually, this forms a 2D cone shape where hit chance remains high within the cone and falls off outside of it.
By combining the 1D distance-based falloff term with the 2D angular velocity-based tracking cone, we can visualize the hit chance on a 2D plane using a heatmap.
Visualized comparison
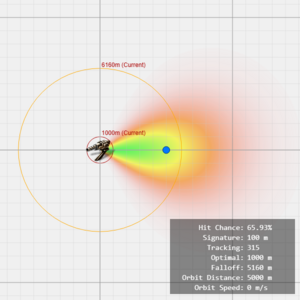
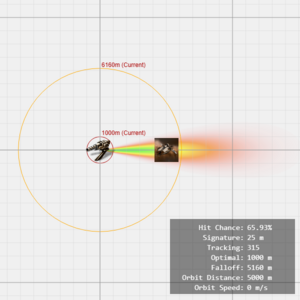
Different turret types have different property. The following visualizations demonstrate how turret performance is affected by weapon type, weapon size, and target signature radius, using consistent conditions: a stationary target at 5000 meters and 100 signature radius unless otherwise specified.
Note: the profile of turrets do not account for any character skills, ship hull bonuses, modules, or ammunition effects.
- Autocannons have a very short optimal range and long falloff, thus having a bigger yellow to orange area.
- Pulse lasers have long optimal and short falloff, and the worst tracking, which results in long but narrow cone of green area.
- Blasters have the best tracking but worst range, showed by the short and wide cone.
- Base case (small autocannon).
- Small artillery turrets, with longer optimal range but poorer tracking compare to the autocannons, show narrow firing arcs.
- Medium autocannons extend the falloff range by a decent amount, inheriting the long yellow to orange profile of the small variant, but with greatly decreased tracking.
- Small autocannon against default 100m signature object.
- Small autocannon against Amarr shuttle (25m signature).
- Small autocannon against Praxis battleship (465m signature).
Title 3
Some more description...
Some more description...
Some more description...


