Difference between revisions of "UniWiki:Editing Guide"
(→Images) |
(→Images) |
||
| Line 76: | Line 76: | ||
Of course, you can always look at the source of an article (click the edit link) and look up markup codes that aren't described here. | Of course, you can always look at the source of an article (click the edit link) and look up markup codes that aren't described here. | ||
| − | To upload your | + | To upload your image: |
[[File:UploadFile.png]] | [[File:UploadFile.png]] | ||
Revision as of 09:08, 19 June 2012
Template:Contribution menu Wikis are a great way to share information within a community, since everyone can make additions to the knowledge base. This is also it's greatest weakness. Wiki's often rely on a relatively large active community, instead of a small group of dedicated writers. This guide explains how you can add stuff to our wiki.
It is assumed that the user is logged in for this entire guide.
Creating a page
Before creating a new page, do a few wiki searches with relevant keywords. If there is an existing article that already ties closely to your subject, it may be better to add to the existing article instead of creating a new one. Likewise, if a subtopic in an article becomes really big, it may be worth splitting it off into it's own article.
Creating a page is very easy, as all pages exist in potentia. This means in order to create a page, all you need to do is go to that page and add content. Confused? Don't worry, we have pictures!
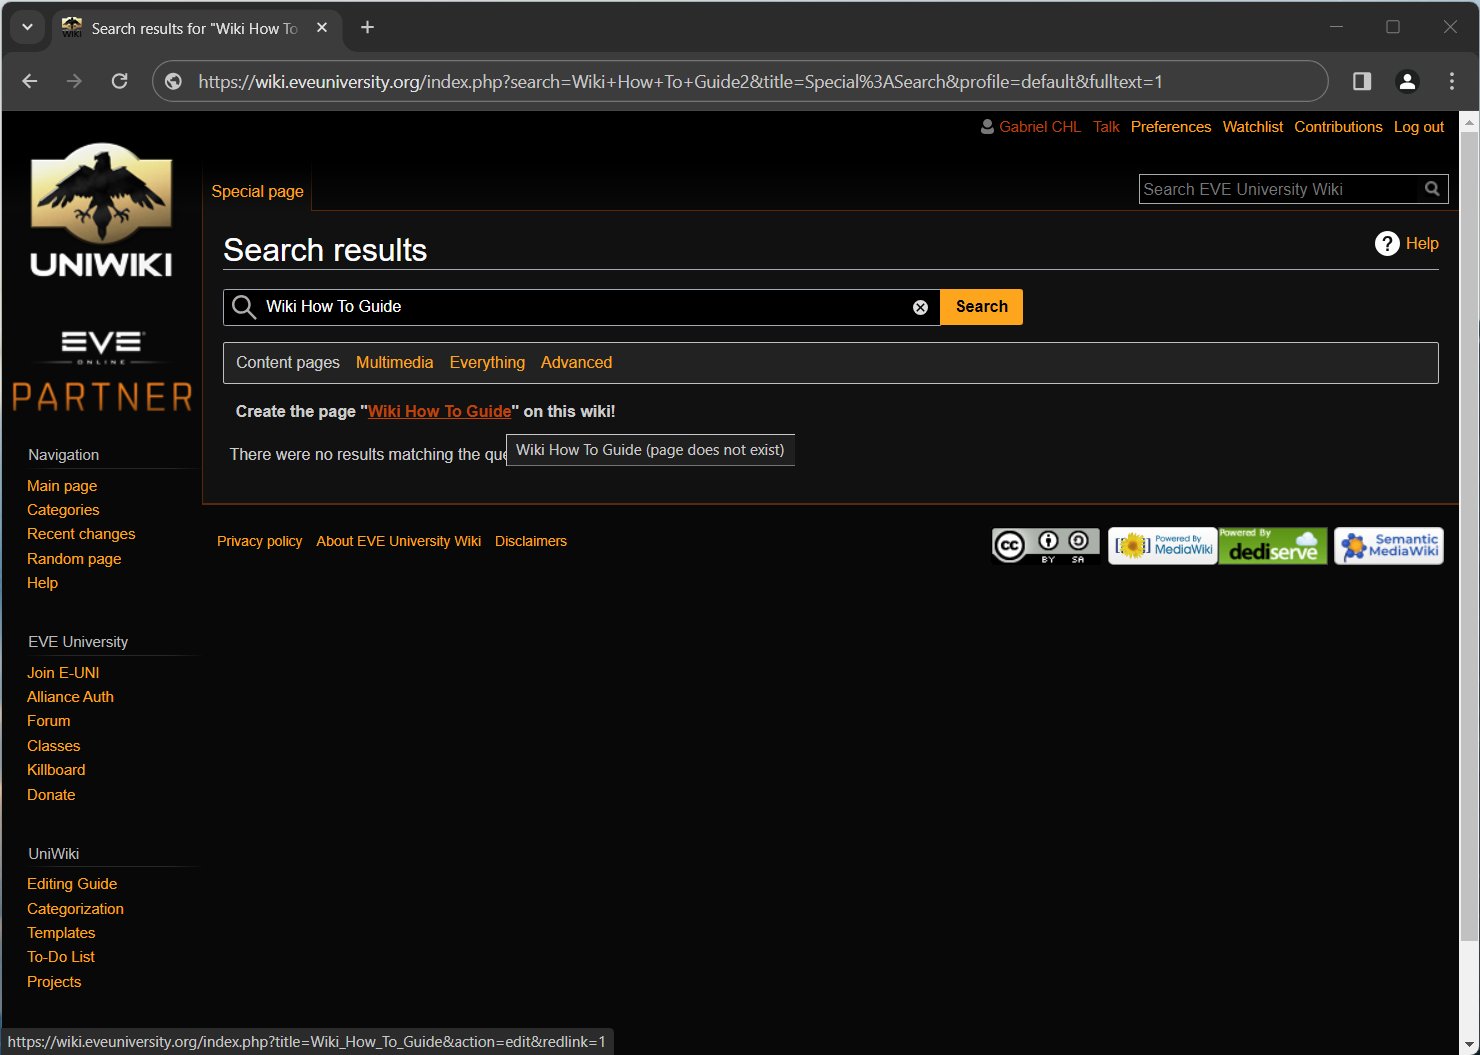
First, you'll need to go to the page you want to create. This example shows how this guide was made. You can navigate to the page you wish to make by manually adjusting your browser URL and click 'edit', or - as shown in this example - simply do a search on our wiki for the name of the page you wish to create, and then click 'Create this page'. You can use spaces if the page you wish to create contains multiple words.
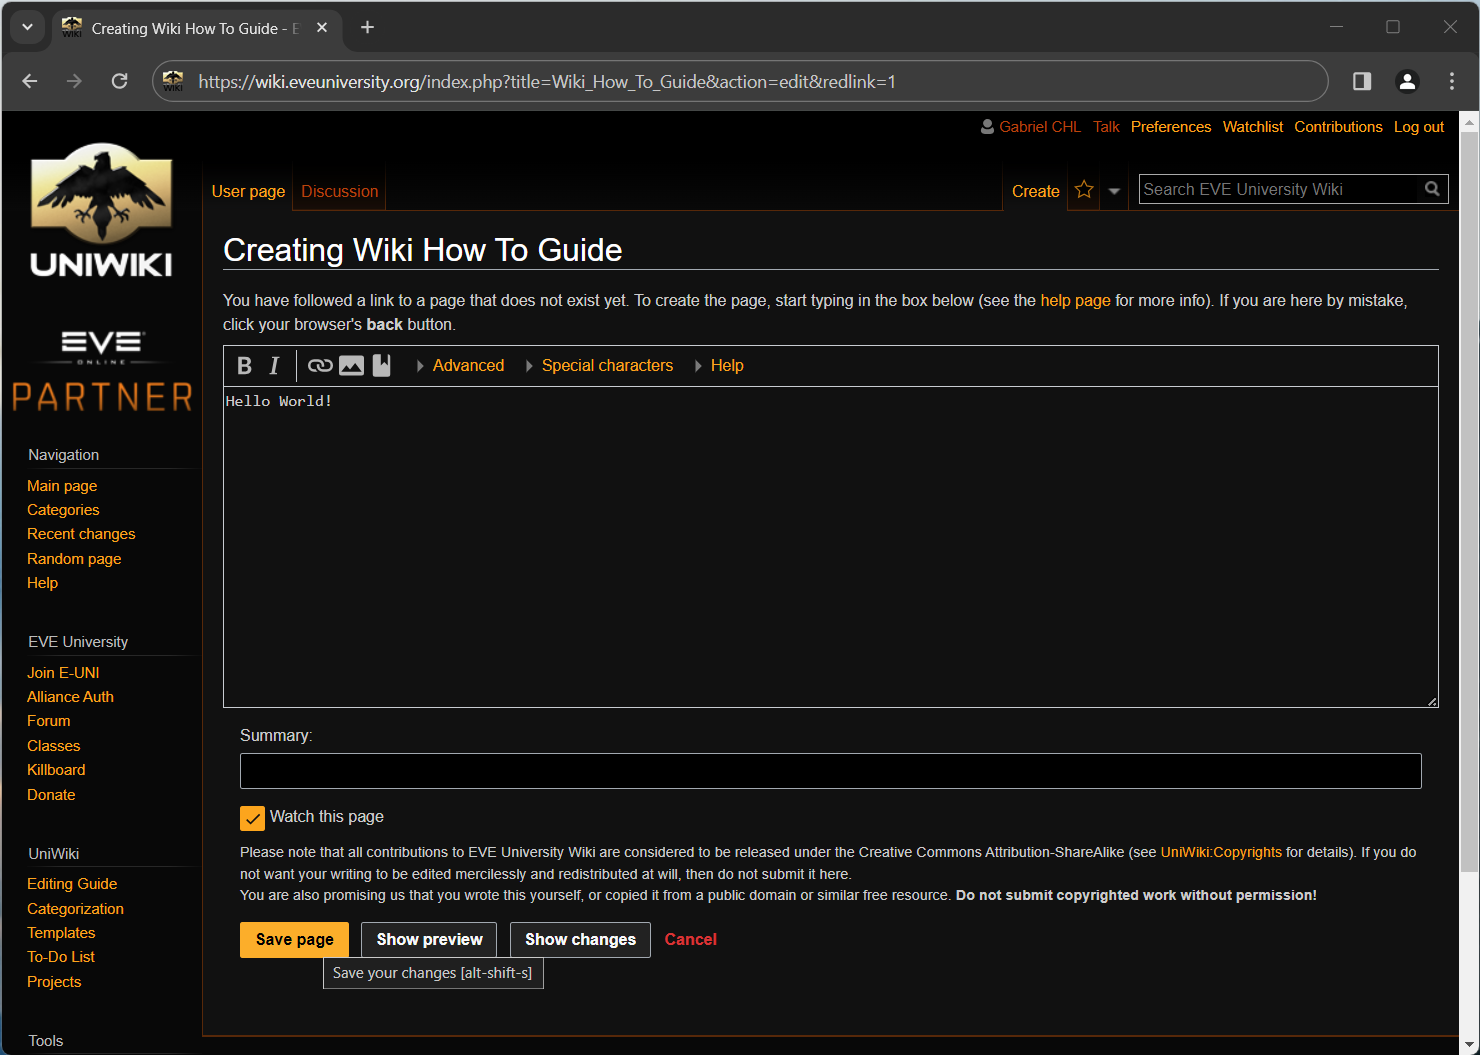
After clicking 'create this page' you should see the page editing form. All you need to do now is type the content in the text box, and hit save. It is good practice to include a short summary of the change you made to the page.
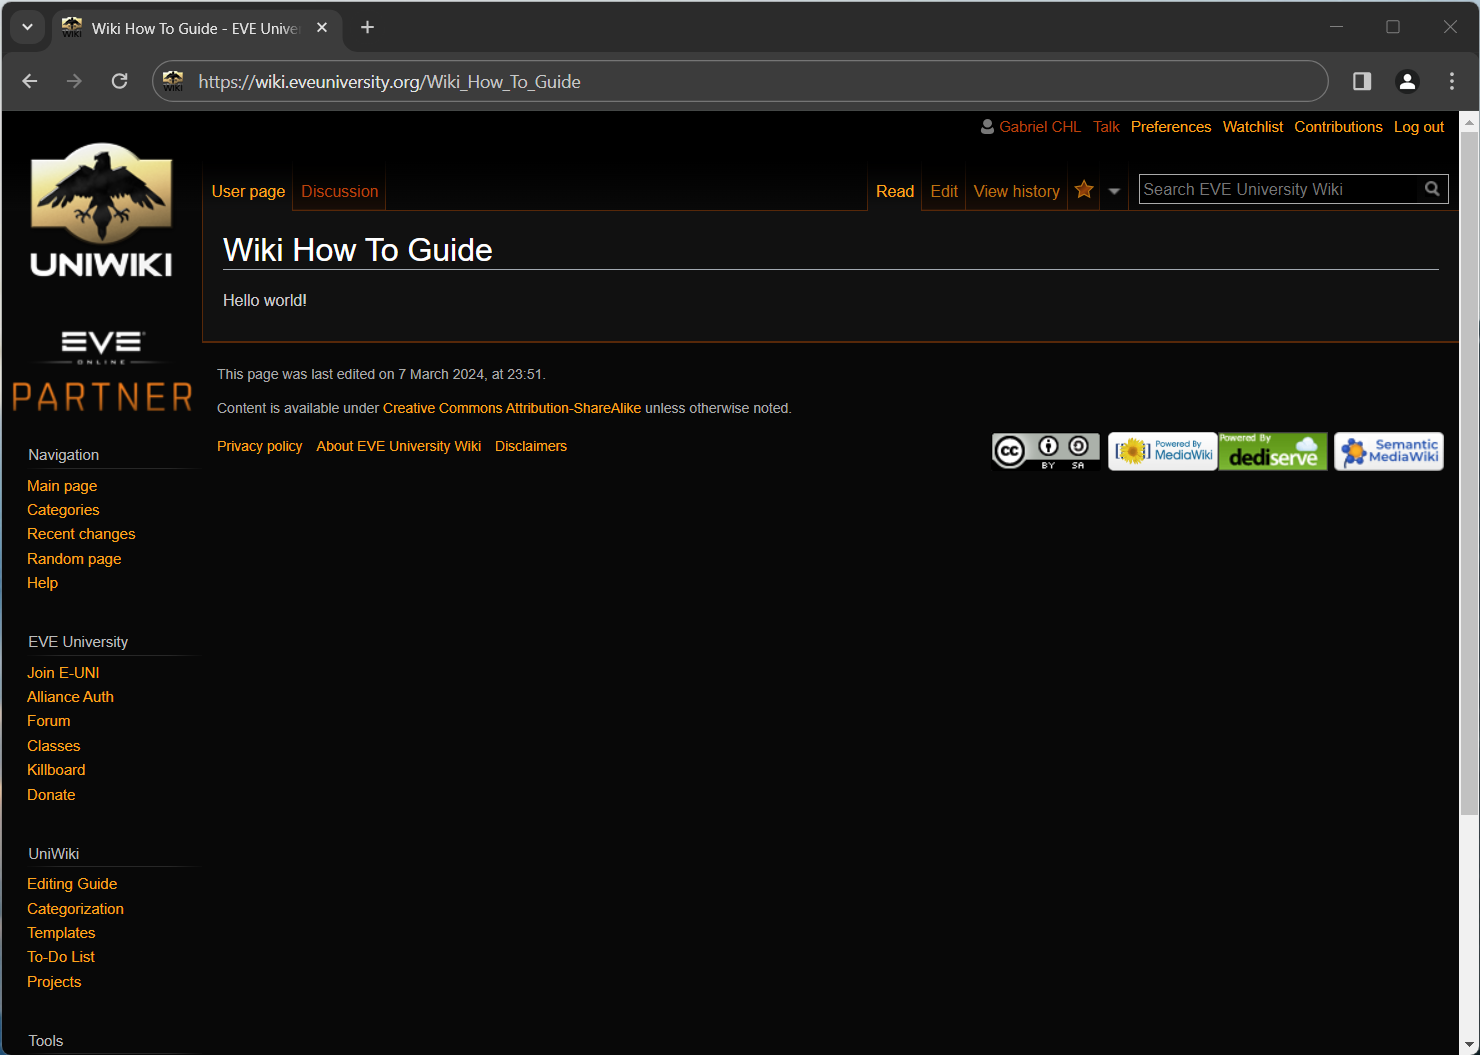
Now you have successfully created the page!
Of course, just plain text doesn't make for very useful and readable wiki pages. The next part of this guide describes the wiki markup language.
Editing a page
To edit any page, go to that page and click the 'edit' tab at the top of the page.
For a full description of the various tags, see the Help:Editing page. We'll discuss the most important ones here.
Wiki syntax
Headings
The use of headings not only makes for readable text but also automatically generates a table of contents. Headings are very easy to add, simply surround the title of the paragraph with equal signs ( '=' ).
= Heading level 1 (top) =
== Heading level 2 ==
=== Heading level 3 ===
==== Heading level 4 ====
etc...
Heading 1 is the same as the page heading, so it is recommended to start with heading level 2 on your page.
Links
Linking is one of the most powerful aspects of a wiki, so it is important that it is understood well. First you must realise there is a difference between intra-wiki links (links to other articles on this wiki) and external links (links to external websites/pages).
The basic intra-wiki link has the following syntax:
[[Link topic]]
where Link topic is a page on the wiki. For example, if we wish to link to Main Page we use
[[Main Page]]
. These topics can include spaces, as the wiki will automatically reformat the text to the correct link. You can also link to pages that do not exist yet such as this Intentionally Red Link, when you feel that subject deserves it's own article. The link will then appear red instead of blue, and people will hopefully feel encouraged to make the article. As you can see, the text inside the double square brackets is both the destination (the page it links to) and the description (the text that shows up as link). In order to change the description you can use the pipe ('|') in the following syntax:
[[Link topic|link text]]
. For example:
[[Main Page|Example]]
becomes Example. In order to make external links, you can use single square brackets like so:
[http://www.google.com]
. If you want to change the description text of your external link, separate the url from the description with a space like so:
[http://www.google.com like so]
.
Redirect
A topic could be known by different titles, therefore a Redirect on these titles to the available topic can be very useful to find it.
#REDIRECT [[Target]]
#REDIRECT [[Target#Section]]
Regular markup
Italics
''Italics''
Bold
'''Bold'''
- Unsorted
- Lists
- Are cool
* Unsorted
** Lists
** Are cool
Images
In order to include images (or other files) in your article, simply link them like
[[File:filename.ext]]
. For example, the first image in this guide is linked as
[[File:wiki1.png]]
.
After saving the edit, click the file link and follow the form to upload your file.
Of course, you can always look at the source of an article (click the edit link) and look up markup codes that aren't described here.
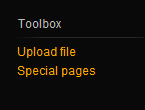
To upload your image:
<--Look-left---
Proper categorization
It is important we categorize our articles properly. This allows our category pages to automatically list all articles in their category, which makes it easy for people to see the collection of articles in the same category.
Categories should be used as collection mechanic instead of custom made pages where we have to manually add links to new articles.
You can add a category to an article by adding
[[Category:CategoryName]]
anywhere in the article (categories are usually listed either at the start or end of an article). CategoryName should obviously be replaced with the name of the category. For an example, see the source of this article and note that it includes:
[[Category:Guides]]
If you wish to link to a category page, use the following syntax:
[[:Category:CategoryName]]
Note the first colon. Example Guides:
[[:Category:Guides|Guides]]
Templates
Templates are a bit more advanced so this guide will not explain how to make them, but we do have some templates made that are ready to use.
Templates allow us to automatically format information a certain way. For example, the Clean Up template always looks like this:
In order to include a template, place the template name between two pairs of curly brackets:
{{Cleanup}}Some templates allow variable input.
You simply put a pipe character after the template name and then put the text. A new pipe for each variable:
{{Example|The example template for example!}}
We have several templates that we use at the moment, see the template category for the full collection. We'll discuss some of the more common maintenance templates here.
Cleanup
{{Cleanup}}
Indicates that this article needs to be cleaned up/improved. Mark articles with the Cleanup template if they contain a lot of spelling errors, unwieldy layout, etcetera.
Deprecated
{{Deprecated}}
Indicates that this article is no longer required and is no longer being maintained. Depreciated pages may be reused or edited into something useful.
Deletion
{{Deletion}}
Used for pages that were created by accident, empty categories, blank pages, or abusive articles that are better off removed entirely.
Merge
Indicates that the contents of an article is duplicated somewhere else. Duplication of information will almost certainly lead to inconsistencies when changes are applied to only a part of the duplicate information, and as such should be avoided at all cost. Instead, articles should link to one another to reference information. If you find articles that have significant duplicate information, mark them with the Merge template. The Merge template takes one argument, the name of the other article containing the duplicate information:
{{Merge|Second Wiki How To Guide}}
Discussion
If you feel a certain page requires discussion, each page comes with it's own discussion page. This is really just a regular wiki page, so adding comments to it works exactly the same way as adding to any other wiki artcile. If you want to sign the message with your name, then end your message with four tildes. ( ~~~~ )
Sandbox
Want to fool around in the wiki without worrying about screwing up existing articles? Go play in the sandbox!
Watch List
Often, you will want to know the state of a particular page. This can be especially true if:
- You are the original author
- You have proposed a change
- You are actively involved in the discussion of a page
- The page is a work in progress and you'd like to monitor it's development
Luckily the wiki provides us with a very helpful tool for monitoring the last time a particular page was edited and they do this with a "watch list".
Adding
You can add any page to your watch list by simply clicking on the "watch" button located on the same row as the "page" and "discussion" buttons but to the far right. When you click "watch" the button will change to "unwatch" and wiki will give you a notice letting you know that the page has been added to your watch list and a few details as to what it will do.
Viewing
To view if any changes have been made to those pages you have put in your watch list; you only need to click on the "my watchlist" link located in the top right hand corner of the wiki page. This page will list any and all changes applied to the pages you've defined in your watch list and highlight the ones that you have not recently visited (so that you can find them easier).
Removing
Should you, in the future, wish to remove a page from your watch list; simply navigate back to the page and click the "unwatch" button.


