More actions
No edit summary |
|||
| (3 intermediate revisions by the same user not shown) | |||
| Line 1: | Line 1: | ||
The use of signature bands is an advanced method to speed up scanning a newly entered system. A "signature band" is a group of [[Cosmic Signatures]] that have the same base signal strength. Signatures with a low-band are harder to scan down as they will start at low signal strength, and vice versa for high-band. Through the work of many explorers, most (if not all) of the [[Cosmic Signatures]] have been classified according to their base signal strengths. | |||
The idea is the use the bands to sort out signatures you want or do not want. E.g., if you are looking for a 4/10 DED Complex in Hi-sec, you will want to focus on the 1/40 band. | |||
Before Odyssey, the method involved dropping a single Combat probe or a single Deep Space Probe and setting it at maximum range. This way still works, but CCP gave us a new way. This page will discuss both. | |||
Throughout this page, refer to the signature band tables summarized on swiftandbitter: | |||
[http://swiftandbitter.com/eve/dsp/nullsec.html Nullsec Table] | [http://swiftandbitter.com/eve/dsp/highsec.html Highsec Table] <br> | ||
[http://swiftandbitter.com/eve/dsp/lowsec.html Lowsec Table] <br> | |||
[http://swiftandbitter.com/eve/dsp/nullsec.html Nullsec Table] <br> | |||
[http://swiftandbitter.com/eve/dsp/wormhole.html Wormhole Table] <br> | |||
==Base Signal Strengths== | |||
Here is a list of all the bands with conversions between Band, Signal Strength percentage, and Distance. | |||
{| class="wikitable" align="center" | |||
|- | |||
| Band | |||
| 1/10 | |||
| 1/20 | |||
| 1/15 | |||
| 1/20 | |||
| 1/25 | |||
| 1/40 | |||
| 1/65 | |||
| 1/80 | |||
|- | |||
| Percentage | |||
| 20.0% | |||
| 10.0% | |||
| 6.67% | |||
| 5.00% | |||
| 4.00% | |||
| 2.50% | |||
| 1.50% | |||
| 1.25% | |||
|- | |||
| Distance | |||
| 4.00AU | |||
| 6.22AU | |||
| 6.67AU | |||
| 7.33AU | |||
| 7.56AU | |||
| 7.89AU | |||
| 7.95AU | |||
| 8.00AU | |||
|} | |||
==Probe method== | ==Probe method== | ||
| Line 17: | Line 54: | ||
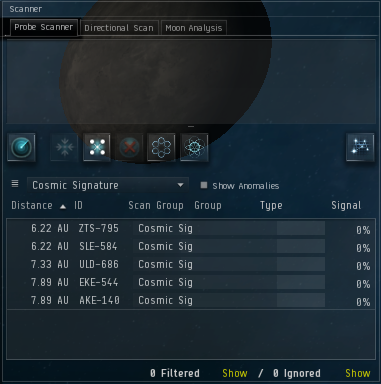
When you first enter a system, you will see all the signatures in the system in your probe window. To explain the process, I will go through an example. Below is a screenshot of the signature list upon entering the WHC home system, J211936. | When you first enter a system, you will see all the signatures in the system in your probe window. To explain the process, I will go through an example. Below is a screenshot of the signature list upon entering the WHC home system, J211936. | ||
'''Important Note:''' If you hit | '''Important Note:''' If you hit "Analyze" with probes, you will lose this information. As of yet, CCP has not given us an option to retrieve the original information without leaving and re-entering the system. | ||
[[File:Scan_First_Enter.png]] | [[File:Scan_First_Enter.png]] | ||
| Line 29: | Line 66: | ||
[[File:Scan_Final_Results.png]] | [[File:Scan_Final_Results.png]] | ||
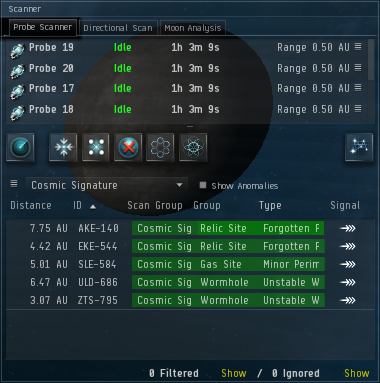
The above image is the signatures in the example scanned to 100%. Note that ULD-686 was the C3 static and ZTS-795 was the Hi-sec static. The 7.33AU signatures were both Relic sites. The other 6.22AU signature was not a K162, but a | The above image is the signatures in the example scanned to 100%. Note that ULD-686 was the C3 static and ZTS-795 was the Hi-sec static. The 7.33AU signatures were both Relic sites. The other 6.22AU signature was not a K162, but a middle-end Minor Gas site. | ||
Latest revision as of 18:30, 11 June 2013
The use of signature bands is an advanced method to speed up scanning a newly entered system. A "signature band" is a group of Cosmic Signatures that have the same base signal strength. Signatures with a low-band are harder to scan down as they will start at low signal strength, and vice versa for high-band. Through the work of many explorers, most (if not all) of the Cosmic Signatures have been classified according to their base signal strengths.
The idea is the use the bands to sort out signatures you want or do not want. E.g., if you are looking for a 4/10 DED Complex in Hi-sec, you will want to focus on the 1/40 band.
Before Odyssey, the method involved dropping a single Combat probe or a single Deep Space Probe and setting it at maximum range. This way still works, but CCP gave us a new way. This page will discuss both.
Throughout this page, refer to the signature band tables summarized on swiftandbitter:
Highsec Table
Lowsec Table
Nullsec Table
Wormhole Table
Base Signal Strengths
Here is a list of all the bands with conversions between Band, Signal Strength percentage, and Distance.
| Band | 1/10 | 1/20 | 1/15 | 1/20 | 1/25 | 1/40 | 1/65 | 1/80 |
| Percentage | 20.0% | 10.0% | 6.67% | 5.00% | 4.00% | 2.50% | 1.50% | 1.25% |
| Distance | 4.00AU | 6.22AU | 6.67AU | 7.33AU | 7.56AU | 7.89AU | 7.95AU | 8.00AU |
Probe method
Work-In-Progress
Distance method
When you first enter a system, you will see all the signatures in the system in your probe window. To explain the process, I will go through an example. Below is a screenshot of the signature list upon entering the WHC home system, J211936.
Important Note: If you hit "Analyze" with probes, you will lose this information. As of yet, CCP has not given us an option to retrieve the original information without leaving and re-entering the system.
This system is known to have a Hi-sec static and a C3 static hole; we want to find them quickly. The C3 static is an O477 wormhole. Looking at the Wormhole Table, we can see it must be in the 7.33AU band. Since there is only one such signature system in the system, we immediately know ULD-686 is that wormhole. The Hi-sec wormhole, however, is a B274 and has to be in the 6.22AU band. There are two such signatures in system: ZTS-795 and SLE-584. We will have to scan both down to find which is the wormhole.
Also, since this is in wormhole space, the EKE-544 and AKE-140 signatures are most likely a Relic or Data site, or a valuable Vital or Instrumental Gas site. There is a small chance they could be a roaming wormhole, but those are rare.
Especially important for wormhole dwellers is the 6.22AU band: the K162 exit holes are in this band. Since they are such high band, they are easy to scan. When you are mapping a chain, your first signature to scan should be the hole's static, and then everything in the 6.22AU as some may be K162s.
The above image is the signatures in the example scanned to 100%. Note that ULD-686 was the C3 static and ZTS-795 was the Hi-sec static. The 7.33AU signatures were both Relic sites. The other 6.22AU signature was not a K162, but a middle-end Minor Gas site.


