More actions
| Line 364: | Line 364: | ||
=== Cash Flow for Capsuleers (10 of 10) === | === Cash Flow for Capsuleers (10 of 10) === | ||
{{Missiondetails | |||
|Name= | |||
|Level= | |||
|Type= Encounter | |||
|Objective= Destroy the pirate leader's capsule. | |||
|Faction= | |||
|Faction1= | |||
|Faction2= | |||
|Faction3= | |||
|Faction4= | |||
|DamageToDeal= | |||
|DamageToDeal1= | |||
|DamageToDeal2= | |||
|DamageToDeal3= | |||
|DamageToDeal4= | |||
|DamageToResist= | |||
|DamageToResist1= | |||
|DamageToResist2= | |||
|DamageToResist3= | |||
|DamageToResist4= | |||
|WebPoint= | |||
|EWAR= | |||
|ShipSizeLimit= | |||
|ShipSuggestion= Attack of Combat Frigate from [[Military_Career_Agent#Cash_Flow_for_Capsuleers_.282_of_10.29|mission 2]] | |||
|Rewards= Combat Frigate ({{icon|isis amarr|22}}[[Punisher]] /{{icon|isis caldari|22}}[[Merlin]] /{{icon|isis gallente|22}}[[Tristan]] /{{icon|isis minmatar|22}}[[Rifter]]) | |||
|StandingLoss= | |||
|Extra= | |||
}} | |||
'''{{co|#9ef37c|Objective:}}''' | |||
* This is one of the hardest missions among Career Agent missions, so feel free to fit everything you have: good weapons and ammo, afterburners, shield hardeners, self-repair modules, and stasis webifiers. | |||
* | |||
* This mission consists of three deadspace pockets, connected via acceleration gates. You have to destroy all the rats and reinforcements in each pocket to be able to use the acceleration gate there to enter the next pocket. These "deadspace complexes" (a series of deadspace areas connected by acceleration gates) are fairly common in higher-end PvE [[missions]]. Note that if you have to warp out of a pocket (e.g. because your ship is taking too much damage and you need to repair), you will have to go through each pocket sequentially to reach your previous location; however, the rats in those pockets will not respawn if destroyed. | |||
* The third (and final) pocket contains a Stasis Tower and three rats - two frigates and the Destroyer-class Stolen Navy Ship. | |||
** The Stasis Tower uses a Stasis Webifier to slow your ship down. The pirate leader you're here to kill is manning the Stasis Tower; once you destroy it, he ejects in his [[pod|capsule]]. Destroying it completes the mission. | |||
** The Stolen Navy Ship does the most damage and should be the primary target to bring down as soon as possible. An afterburner and a stasis webifier will allow you to catch up to the ship while being webbed by the Stasis Tower. Once the navy ship goes down, the other frigates do not pose much of a threat. | |||
** Alternatively, you may also try bringing down the Stasis Tower while ignoring enemy fire. While dealing no damage on its own, the Stasis Tower is quite tanky, and you might need to warp out, repair, and come back to the pocket to successfully pull it off without losing your ship. | |||
** You can also experiment with different ammunition for your guns. All the [[turrets|turret weapons]] have a range of ammunition to choose from, ranging from short-range high-damage ammunition to long-range low-damage ammunition. You've probably been using the former, but you may want to buy some of the latter from the market (or use whatever you've looted from wrecks so far) and experiment with staying further away from the rats while hitting them with your longer-range ammunition. | |||
[[Category:Career Agents]] | [[Category:Career Agents]] | ||
Revision as of 06:16, 22 November 2020
The Military Career Agent is one of the five career agents in the game, which show new players different types of PvE activities in EVE. The military career agent missions teach you about PvE combat. In total these missions pay about 2M ISK in rewards.
Cash Flow for Capsuleers (1 of 10)
| Type | Encounter |
| Objective | Destroy NPC pirates ("rats"). |
| Rewards | Faction-specific weapon and ammunition - See table below. |
- You can use any ship, including your corvette, as long as it's armed with some weapons.


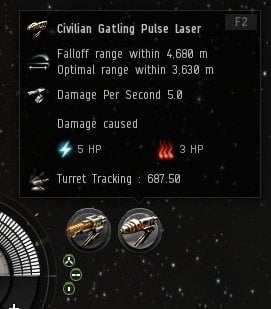
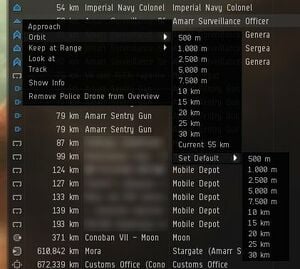
- You can check your weapon's optimal and falloff ranges by hovering a mouse over it - these are the maximum distances at which your weapon will be effective against enemies. It's probably a good idea to set your ship's default "orbit" and "keep at range" distances to around your weapon's optimal range. To do this, right-click on any entry in the Overview, go into the "Orbit" sub-menu, then into the "Set Default" sub-menu, and select the appropriate range. Repeat for "Keep at Range".


- Once you arrive at the deadspace pocket, you will encounter several rats. After you have destroyed them, two more rats will appear further away. If your ship has a propulsion module (e.g., an Afterburner or a Microwarpdrive) fitted, you can activate it to increase your ship's speed.
- If there is a yellow box around the rat's icon in the Overview, it is targeting your ship. If the box turns red, it is taking offensive actions, such as firing weapons at you.
- You can check a rat's description, bounty, and damage resistance profiles in its "Show Info" panel (available either from the Selected Item window or right-click menu).
- When the mission is turned in, the agent grants you a faction-specific weapon along with ammunition as bonus rewards. The table below lists the faction-specific rewards given along with links to the detailed description of each weapon system. Note that weapons outside the Civilian variant require ammunition to operate.
| Faction | Reward | Bonus Reward | Weapon Type |
|---|---|---|---|
| Dual Light Beam Laser I | 3 x Multifrequency S | Energy Turret | |
| 75mm Gatling Rail I | 2,000 x Antimatter S | Hybrid Turret | |
| 75mm Gatling Rail I | 2,000 x Antimatter S | Hybrid Turret | |
| 125mm Gatling AutoCannon I | 2,000 x EMP S | Projectile Turret |
Cash Flow for Capsuleers (2 of 10)
| Type | Encounter |
| Objective | Destroy rats and retrieve civilians. |
| Rewards | Attack or combat frigate ( |
- Feel free to try out the new weapon module from the previous mission, noting that it requires ammunition. You load ammunition into your weapon by dragging it onto the fitted weapon on the Fitting screen (ALT + F) or right-clicking on the weapon in space and selecting which ammunition to load (which takes a few seconds). It's also a good idea to carry some spare ammunition in your ship's cargohold so that you can reload your weapon with fresh ammunition once it's empty (with the exception of T1 frequency crystals which do not run out).
- While the mission text recommends you fit a Shield Booster or Armor Repairer module, it's not really necessary.
- When you destroy the last rat in the deadspace pocket, it will drop a cargo container that you can loot for civilians.

- Note that the enemies you destroyed leave behind wrecks (again, if you cannot see any wrecks on your overview, switch to a different overview preset). Some of these wrecks contain loot, and these are marked with a specific icon. If you want to retrieve the loot in the wrecks (it's not mandatory for completing the mission), use the same method as you used for the cargo container above. While most items you loot will have relatively little value, the amount does add up over time, and specific "elite" rats can drop very valuable items when destroyed.
- The frigate given out as reward is ideal for completing the remaining missions in the chain due to its increased combat capabilities and speed compared to a corvette.
Cash Flow for Capsuleers (3 of 10)
| Type | Encounter |
| Objective | Destroy rats and retrieve Secret Documents. |
| Ship suggestion | Frigate |
| Rewards | Two weapon modules ( |
- If you wish to fly the new frigate obtained from the last mission, don't forget to take useful modules from the ship you were flying previously to the new one. To unfit modules, either activate the previous ship and drag the weapon from the Ship Fitting screen to the Item Hangar, or right-click on the previous ship and select "Strip Fitting".
- A weapon occupies a turret/launcher hardpoint in addition to a high fitting slot. You can check out how many hardpoints a ship has in the fitting screen or in the "Show Info" panel. Depending on the ship you're flying, you may not be able to fit all three of the weapons you've gained from the missions so far.
- Although not strictly necessary for this mission, it is a good habit to insure your ship to recover most of the value of the ship's hull (but NOT any modules or cargo) should it be destroyed. Note, however, that repackaging the ship renders the insurance void, and therefore you will often have to manually fly it if you want to move the ship to another location without losing the insurance.
- While you can target and fire each weapon individually, it's almost always a good idea to fire them together at one target. You can make this easy by clicking "group all weapons" button in the fitting screen or dragging the modules onto each other in space to stack them, allowing you to fire all your weapons with a single click or button press. Note that for weapon modules to be grouped, they need to be of the same type and carry the same type and number of ammunition.

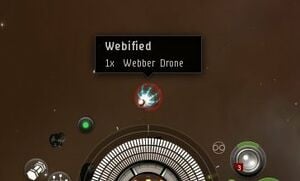
- In the mission deadspace, you will encounter some Drone rats for the first time in this mission chain (you can identify them by their icon on the Overview, compared with the frigates and corvettes you have been fighting so far). Some of these (the helpfully named Webber Drones) will use Stasis Webifier modules on you (this is referred to as "webbing"), slowing your ship down and making it easier to hit with weapons. An icon will appear above your capacitor indicating that an enemy is webbing you; you can move your mouse over it to show which enemy is doing the webbing. You may wish to destroy these first.
- A Destroyer rat (note the different Overview icon) will also appear and taunt you in the Local chat channel, but will warp off before you can engage it. They are named differently for each faction (
 The Devout /
 Tahamar /
 Wolf /
 Steon) and will serve as the primary antagonist throughout the rest of the mission chain.
 - The last rat that you destroy will drop a cargo container; loot it to obtain Secret Documents.
Cash Flow for Capsuleers (4 of 10)
| Type | Travel |
| Objective | Approach the Smuggler Stargate. |
| Rewards | 1MN Afterburner I |
- Fly to the mission's deadspace location and find the "Smuggler Stargate" on your Overview. You may need to switch to a different Overview preset (or modify the presets) in order to see it.
- Once you've approached the stargate, a warning sound will play and you will take some damage. Once this happens, the mission is complete.
Cash Flow for Capsuleers (5 of 10)
| Type | Encounter |
| Objective | Destroy one rat while (optionally) trying out a shield hardener module. |
| Rewards | Shield Hardener ( |
- Shield hardeners will reduce the damage your ship's shield takes from a specific damage type, one of Electromagnetic-EM, Thermal, Kinetic, and Explosive.
- To see the effects of the Shield Hardener in action, once in space, open the Fitting window. Then open the Attributes panel (on the right-hand side of the Fitting window) and make sure the "Defense" section is expanded. Note that your tank is made up of shields, armor, and structure, and each has a different resistance to the four damage types. Assuming you're being shot at by all four damage types equally, adding the three tank types together gives you your ship's "effective hitpoints" (EHP), which are a good overall indication of how tough your ship is.
- Note your shield's resistance to the four damage types, then activate your Shield Hardener module. Note how your shields' resistance to the module's damage type increases, and how this also increases your ship's effective hit points. NPCs (rats) in EVE are very predictable in what damage types they deal - your agent will have given you a Shield Hardener to counter the local rats' preferred damage type.
- Destroy the rat in the deadspace location and feel free to activate the shield hardener in combat.
Cash Flow for Capsuleers (6 of 10)
| Type | Encounter |
| Objective | Destroy a pirate outpost. |
| Rewards | Limited Ocular Filter |
- Once you activate the acceleration gate at the mission location, it flings you to another pocket with a few frigate rats. Additional rats will warp in as you destroy them.
- With all the rats gone, you can now activate the second acceleration gate that leads to the pirate outpost. The outpost itself goes down easily, but the moment it is fired upon two rats and two sentry guns (powerful immobile turrets) spawn. The frigates aren't a big threat, but the sentry guns will do significant damage to your ship if they hit you.
- Once the outpost goes down, the mission is complete and you can warp back to the station ignoring the enemy reinforcements. Your ship's computer warned you against taking any loot from the container that drops when the outpost is destroyed, but you're free to take any as long as the game doesn't produce a warning message about illicit materials.
- Should you wish to take on the sentry guns, make sure you orbit them in close range with your propulsion module on. These sentry guns have poor tracking, and by flying around them at high speed you're maximizing your ship's angular velocity and therefore making it difficult for the sentry guns to hit you.
- If your ship has taken some armor/structure damage in the last fight, either right-click on a ship in the Ship Hangar and press "Get a Repair Quote" or click the Repairshop icon in the Station Services panel to repair it for a small fee.
- The Limited Ocular Filter is an implant that you can "plug in" to your character's head (select the item, right-click, and choose 'plug-in') to increase their Perception attribute by 1 point, which slightly increases your training speed for skills which use the Perception attribute. Note that should your pod be destroyed, any implants you have plugged in will be destroyed as well. You can view your plugged-in implants in your Character Sheet (click on your portrait in the upper left-hand corner), on the Character - Augmentations tab.
Cash Flow for Capsuleers (7 of 10)
| Type | Encounter |
| Objective | Destroy rats while (optionally) trying out a self-repair module. |
| Rewards | Self-repair module ( |
- Armor repairer and shield booster will gradually repair your ship's armor or shield respectively when activated at the cost of your ship's capacitor energy. Using modules like these to repair your armor or shield during a fight is called "active armor/shield tanking".
- Destroy all rats and reinforcements at the mission's deadspace location and use your self-repair module as appropriate. Note that armor is repaired at the end of an armor repairer cycle while shield is boosted at the beginning of a shield booster cycle. Your capacitor probably doesn't recharge quickly enough for you to run your self repair module indefinitely , so turn it off when you don't need it.
Cash Flow for Capsuleers (8 of 10)
| Type | Encounter |
| Objective | (Attempt to) retrieve VIPs. |
| Rewards | 2 x Overdrive Injector System I |
- Warp to the mission's deadspace location and approach the "hotel" (as usual, check your Overview preset and settings if you can't see it - the inn is in the "Large Collidable Structure" category, and your overview must be set to display these). As you approach the structure, a bomb will go off, destroying the hotel and damaging your ship. When the hotel goes down, it leaves behind a cargo container with random "livestock" loot, presumably the hapless survivors of the terrorist attack (e.g., tourists, janitors, marines, etc.).
- The mission is now complete and you can return to your agent. Alternatively, you can engage the ambushing rats for bounties and loot. This group of rats is a step up from the rats in the last mission, so feel free to warp out, repair, and re-engage as necessary.
- Overdrive Injector System I increases your ship's speed at the expense of reduced cargohold capacity.
Cash Flow for Capsuleers (9 of 10)
| Type | Encounter |
| Objective | Destroy the Narcotics Warehouse. |
| Rewards | Stasis Webifier I |
- At the mission location, you will find an acceleration gate guarded by three rats later joined by three more reinforcements. Destroying them and activating the acceleration gate flings your ship into the next deadspace area, where you will find the Narcotics Warehouse you're supposed to destroy.
- You can also kill the three rats guarding the warehouse (as well as the three additional ones which warp in), but they are optional.
- Stasis Webifier I slows down enemy ships when used.
Cash Flow for Capsuleers (10 of 10)
| Type | Encounter |
| Objective | Destroy the pirate leader's capsule. |
| Ship suggestion | Attack of Combat Frigate from mission 2 |
| Rewards | Combat Frigate ( |
Objective:
- This is one of the hardest missions among Career Agent missions, so feel free to fit everything you have: good weapons and ammo, afterburners, shield hardeners, self-repair modules, and stasis webifiers.
- This mission consists of three deadspace pockets, connected via acceleration gates. You have to destroy all the rats and reinforcements in each pocket to be able to use the acceleration gate there to enter the next pocket. These "deadspace complexes" (a series of deadspace areas connected by acceleration gates) are fairly common in higher-end PvE missions. Note that if you have to warp out of a pocket (e.g. because your ship is taking too much damage and you need to repair), you will have to go through each pocket sequentially to reach your previous location; however, the rats in those pockets will not respawn if destroyed.
- The third (and final) pocket contains a Stasis Tower and three rats - two frigates and the Destroyer-class Stolen Navy Ship.
- The Stasis Tower uses a Stasis Webifier to slow your ship down. The pirate leader you're here to kill is manning the Stasis Tower; once you destroy it, he ejects in his capsule. Destroying it completes the mission.
- The Stolen Navy Ship does the most damage and should be the primary target to bring down as soon as possible. An afterburner and a stasis webifier will allow you to catch up to the ship while being webbed by the Stasis Tower. Once the navy ship goes down, the other frigates do not pose much of a threat.
- Alternatively, you may also try bringing down the Stasis Tower while ignoring enemy fire. While dealing no damage on its own, the Stasis Tower is quite tanky, and you might need to warp out, repair, and come back to the pocket to successfully pull it off without losing your ship.
- You can also experiment with different ammunition for your guns. All the turret weapons have a range of ammunition to choose from, ranging from short-range high-damage ammunition to long-range low-damage ammunition. You've probably been using the former, but you may want to buy some of the latter from the market (or use whatever you've looted from wrecks so far) and experiment with staying further away from the rats while hitting them with your longer-range ammunition.
