More actions
Ellis Ofsol (talk | contribs) |
Change (background-)color for light-mode readability. Fix typo. Apply link end trick. Changed 12,960,00 ISK to 12,960,000 ISK? |
||
| Line 1: | Line 1: | ||
{{Main|Homefront operation}}{{HomefrontOperationsLinks}} | {{Main|Homefront operation}}{{HomefrontOperationsLinks}} | ||
[[File: | [[File:Abyssal Artifact Recovery.jpg|thumb|left|alt=Abyssal Artifact Recovery Miner|Abyssal Artifact Recovery Miner]] | ||
This site will require proficiency in mining, drones, repair, and capacitor transfer. After an initial set-up | This site will require proficiency in mining, drones, repair, and capacitor transfer. After an initial set-up period of 90 seconds, asteroids from beyond the rift will appear and a timer will begin. The site will progress through a total of 9 waves divided into three tiers. The enemy fleet compositions will become more difficult and the wave timers become shorter with each tier. | ||
During each wave, a random Abyssal [[Abyssal Deadspace#Weather Effects|Weather]] effect will begin and 12 asteroids will spawn in fixed locations. Each asteroid contains 24 ore ([[Media:Admixti mutanite description.jpg|Admixti Mutanite]]), each with a mass of 4{{m3}}, for a total of 96{{m3}}. The presence of these asteroids causes an anti-warp [[Tackling#Warp disruption fields|bubble]] until all 12 are depleted. | During each wave, a random Abyssal [[Abyssal Deadspace#Weather Effects|Weather]] effect will begin and 12 asteroids will spawn in fixed locations. Each asteroid contains 24 ore ([[Media:Admixti mutanite description.jpg|Admixti Mutanite]]), each with a mass of 4{{m3}}, for a total of 96{{m3}}. The presence of these asteroids causes an anti-warp [[Tackling#Warp disruption fields|bubble]] until all 12 are depleted. | ||
| Line 13: | Line 13: | ||
File:Abyssal Artifact Recovery- Mining Locations.png|Abyssal Artifact Recovery: Mining Positions | File:Abyssal Artifact Recovery- Mining Locations.png|Abyssal Artifact Recovery: Mining Positions | ||
</gallery> | </gallery> | ||
== Fleet size & composition ==<!-- clearly stating 5 or 3 man optimal fleet size + roles & Ship classes applicable. Not Including any detailed ships or fits --> | |||
== Fleet size & composition == | |||
<!-- clearly stating 5 or 3 man optimal fleet size + roles & Ship classes applicable. Not Including any detailed ships or fits --> | |||
* Optimal fleet size: 5 ships | * Optimal fleet size: 5 ships | ||
* Fleet composition: T1 Cruisers (DPS), T1 Logistic Cruisers (Logi), Miners | * Fleet composition: T1 Cruisers (DPS), T1 Logistic Cruisers (Logi), Miners | ||
== Type of ships allowed ==<!-- Included to have a comprehensive page on the subject --> | == Type of ships allowed == | ||
<!-- Included to have a comprehensive page on the subject --> | |||
This homefront operation takes place in a [[Deadspace|deadspace pocket]] with an acceleration gate that has ship restrictions. | This homefront operation takes place in a [[Deadspace|deadspace pocket]] with an acceleration gate that has ship restrictions. | ||
| Line 25: | Line 27: | ||
* Tech 1 cruisers | * Tech 1 cruisers | ||
* Tech 1 haulers, including [[Squall]] | * Tech 1 haulers, including [[Squall]] | ||
* [[Venture | * [[Venture]]s | ||
{{Note|You can view in-game ship restrictions for each Homefront Operation by opening the Opportunities window (ALT+J) and double-clicking on a mission.}}<gallery> | {{Note|You can view in-game ship restrictions for each Homefront Operation by opening the Opportunities window (ALT+J) and double-clicking on a mission.}} | ||
<gallery> | |||
File:Homefronts_ship_restrictions.png|Homefront ship restrictions example | File:Homefronts_ship_restrictions.png|Homefront ship restrictions example | ||
</gallery> | </gallery> | ||
| Line 45: | Line 48: | ||
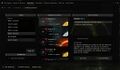
== Hostiles == | == Hostiles == | ||
Each wave spawns an enemy fleet belonging to one of three factions: [[Sleepers]], [[Rogue Drones]], or [[Triglavian Collective|Triglavians]]. Fleet compositions are randomized and may include logistics, capacitor neutralizers, and other forms of [[EWAR]]. Enemies persist until destroyed, so maintaining a minimum level of [[DPS]] is essential to avoid being overwhelmed. | Each wave spawns an enemy fleet belonging to one of three factions: [[Sleepers]], [[Rogue Drones]], or [[Triglavian Collective|Triglavians]]. Fleet compositions are randomized and may include logistics, capacitor neutralizers, and other forms of [[EWAR]]. Enemies persist until destroyed, so maintaining a minimum level of [[DPS]] is essential to avoid being overwhelmed. | ||
{| style="background:#350000; border:1px solid #333333; | {| style="background-color: #350000; border: 1px solid #333333; color: var(--color-inverted-fixed);" | ||
| [[File:Icon_warning.png|link=]] | |||
| style="padding:8px;" |'''WARNING:''' After the 9th and final wave, a 60-second evacuation timer begins. When it ends, a Drifter response fleet led by Tyrannos Basileus will arrive in overwhelming force. No vessel can survive the Basileus battleship’s superweapon. | | style="padding: 8px;" |'''WARNING:''' After the 9th and final wave, a 60-second evacuation timer begins. When it ends, a Drifter response fleet led by Tyrannos Basileus will arrive in overwhelming force. No vessel can survive the Basileus battleship’s superweapon. | ||
|} | |} | ||
[[File:Tyrannos Basileus.jpg|center|frameless| | |||
[[File:Tyrannos Basileus.jpg|center|frameless|500px|Tyrannos Basileus: Description]] | |||
{| class="wikitable" | {| class="wikitable" | ||
|- style="background-color: var(--background-color-warning-subtle);" | |||
! rowspan="9" style="background-color: | ! colspan="3" | [[Sleepers]] | ||
! colspan="3" | ! rowspan="9" style="background-color: var(--background-color-base);" | | ||
! rowspan="9" style="background-color: | ! colspan="3" |[[File:Logo_faction_rogue_drones.png|64px]][[Rogue Drones]] | ||
! colspan="3 | ! rowspan="9" style="background-color: var(--background-color-base);" | | ||
|- | ! colspan="3" |[[File:Logo_faction_triglavian_collective.png|64px]][[Triglavian Collective|Triglavian]] | ||
|- style="background-color: var(--background-color-warning-subtle);" | |||
! Prefix | |||
! Info | |||
! Weakness | |||
! Prefix | |||
! Info | |||
! Weakness | |||
! Prefix | |||
! Info | |||
! Weakness | |||
|- | |- | ||
|Soothing | |Soothing | ||
| Line 78: | Line 83: | ||
|- | |- | ||
|Enervating | |Enervating | ||
|[[File:Icon_energy_neutralizer_i.png| | |[[File:Icon_energy_neutralizer_i.png|16px]] Neuts | ||
|{{Damage to resist|Triglavians}} | |{{Damage to resist|Triglavians}} | ||
|Alienator | |Alienator | ||
|[[File:Icon_stasis_webifier_i.png| | |[[File:Icon_stasis_webifier_i.png|16px]] Webs | ||
|{{Damagetype|ex}} | |{{Damagetype|ex}} | ||
|Dominant | |Dominant | ||
| Line 107: | Line 112: | ||
|{{Damagetype|EM}} | |{{Damagetype|EM}} | ||
|- | |- | ||
| | | colspan="3" rowspan="3" | | ||
| | | colspan="3" rowspan="3" | | ||
|Stifler | |Stifler | ||
|[[File:Icon_stasis_webifier_i.png|16x16px]] Webs | |[[File:Icon_stasis_webifier_i.png|16x16px]] Webs | ||
| Line 138: | Line 143: | ||
{| class="wikitable" style="text-align: center;" | {| class="wikitable" style="text-align: center;" | ||
|+ISK payout (wave) | |+ISK payout (wave) | ||
|- style="background-color: var(--background-color-warning-subtle);" | |||
! | ! Tier | ||
! | ! Waves | ||
! | ! Threat Level | ||
! | ! Timer | ||
! Payout (ISK) | |||
|- | |- | ||
|1 | |1 | ||
| Line 161: | Line 167: | ||
|2:00 | |2:00 | ||
| style="text-align: right;" |9,165,440 | | style="text-align: right;" |9,165,440 | ||
|}Not counting any of the Triglavian Artifacts that are recovered from the caches: | |} | ||
Not counting any of the Triglavian Artifacts that are recovered from the caches: | |||
* Unaligned Dekaisogen: 500,000 ISK each, sold to NPC buy order | * Unaligned Dekaisogen: 500,000 ISK each, sold to NPC buy order | ||
* Fluctuating Entropic Regulator: 200,000 ISK each, sold to NPC buy order | * Fluctuating Entropic Regulator: 200,000 ISK each, sold to NPC buy order | ||
| Line 172: | Line 178: | ||
File:Fluctuating Entropic Regulator.jpg|Fluctuating Entropic Regulator: Description | File:Fluctuating Entropic Regulator.jpg|Fluctuating Entropic Regulator: Description | ||
File:AAR Loot- Spectral Emission Slices.png|AAR Loot: Spectral Emission Slices | File:AAR Loot- Spectral Emission Slices.png|AAR Loot: Spectral Emission Slices | ||
</gallery>Estimated Admixti Mutanite ore amount per site is 2592 units, with an ISK value of 12,960, | </gallery> | ||
Estimated Admixti Mutanite ore amount per site is 2592 units, with an ISK value of 12,960,000 ISK. The mutanite can only be sold to NPC buy orders. | |||
<gallery> | <gallery> | ||
File:Admixti mutanite description.jpg|Admixti Mutanite: Description | File:Admixti mutanite description.jpg|Admixti Mutanite: Description | ||
| Line 183: | Line 190: | ||
File:Abyssal Artifact Recovery- Scenic.png|Abyssal Artifact Recovery - Scenic | File:Abyssal Artifact Recovery- Scenic.png|Abyssal Artifact Recovery - Scenic | ||
</gallery> | </gallery> | ||
[[Category:Homefront Operations]] | [[Category:Homefront Operations]] | ||
Revision as of 10:44, 15 September 2025
- Main article: Homefront operation

|
| Homefront Operations |
|---|
|
|
| Universal Sites |

This site will require proficiency in mining, drones, repair, and capacitor transfer. After an initial set-up period of 90 seconds, asteroids from beyond the rift will appear and a timer will begin. The site will progress through a total of 9 waves divided into three tiers. The enemy fleet compositions will become more difficult and the wave timers become shorter with each tier.
During each wave, a random Abyssal Weather effect will begin and 12 asteroids will spawn in fixed locations. Each asteroid contains 24 ore (Admixti Mutanite), each with a mass of 4 m3, for a total of 96 m3. The presence of these asteroids causes an anti-warp bubble until all 12 are depleted.
Uncover the hidden Faulty Triglavian Caches by mining any of the asteroids, there are Triglavian Artifacts to be looted from them—destroy them quickly, as they have a limited lifespan.
The success of each wave is determined by the depletion of the asteroids. If any remain at the end of the wave timer, the site will fail. Note that the warp bubble will still remain until all asteroids have been mined out. Successfully completing a wave will result in a payout at the end of that wave's timer, based on the wave's difficulty tier.
-
 Abyssal Artifact Recovery: Site Overview
 -
 Abyssal Artifact Recovery: Faulty Triglavian Cache
 -
 Abyssal Artifact Recovery: Mining Positions


Fleet size & composition
- Optimal fleet size: 5 ships
- Fleet composition: T1 Cruisers (DPS), T1 Logistic Cruisers (Logi), Miners
Type of ships allowed
This homefront operation takes place in a deadspace pocket with an acceleration gate that has ship restrictions.
- Tech 1 frigates, navy and pirate frigates
- Tech 1 destroyers, navy and pirate destroyers
- Tech 1 cruisers
- Tech 1 haulers, including Squall
- Ventures
| You can view in-game ship restrictions for each Homefront Operation by opening the Opportunities window (ALT+J) and double-clicking on a mission. |
-
 Homefront ship restrictions example

Mission parameters
- Threat Level: Minimal / Moderate / Severe
- Current wave (9)
- Asteroids Depleted (12)
- Mining Timer
- Intermission Timer
-
 Abyssal Artifact Recovery: Mission Parameters

Abyssal Artifact Recovery in different empires
These sites have no regional differences.
Hostiles
Each wave spawns an enemy fleet belonging to one of three factions: Sleepers, Rogue Drones, or Triglavians. Fleet compositions are randomized and may include logistics, capacitor neutralizers, and other forms of EWAR. Enemies persist until destroyed, so maintaining a minimum level of DPS is essential to avoid being overwhelmed.
| WARNING: After the 9th and final wave, a 60-second evacuation timer begins. When it ends, a Drifter response fleet led by Tyrannos Basileus will arrive in overwhelming force. No vessel can survive the Basileus battleship’s superweapon. |

| Sleepers |  Rogue Drones Rogue Drones
|
 Triglavian Triglavian
| ||||||||
|---|---|---|---|---|---|---|---|---|---|---|
| Prefix | Info | Weakness | Prefix | Info | Weakness | Prefix | Info | Weakness | ||
| Soothing | Logi | Machinist | Logi | Fortifying | Logi | |||||
| Enervating | Alienator | Dominant | DPS | |||||||
| Risen | DPS | Proliferator | DPS | Fervent | DPS | |||||
| Stirring | DPS | Corrupted | DPS | Ravenous | ||||||
| Stifler | ||||||||||
| Stalker | ||||||||||
| Umbral | ||||||||||
Finding sites
Homefront operations are Cosmic Anomalies located in empire owned High Security systems, mostly focused around trade hubs or career agent systems.
- Opportunities window > Homefront Operations tab: will render a list of the available homefronts within a limited range.
- Agency window > Homefront Operations tab: will give you a more detailed filtering ability that allows you to search any region.
- Probe Scanner > Displays all available anomalies in the system, including their distance in AU, with options to warp or align to them.
-
 Opportunities > Homefront Operations
 -
 Agency > Homefront Operations
 -
 Probe Scanner > Homefront Anomalies


Rewards
Each of the 5 pilots in the fleet receive a total payout of 65,422,260 ISK for completing all 9 waves.
| Tier | Waves | Threat Level | Timer | Payout (ISK) |
|---|---|---|---|---|
| 1 | 3 | Minimal | 3:00 | 5,372,850 |
| 2 | 3 | Moderate | 2:30 | 7,269,130 |
| 3 | 3 | Severe | 2:00 | 9,165,440 |
Not counting any of the Triglavian Artifacts that are recovered from the caches:
- Unaligned Dekaisogen: 500,000 ISK each, sold to NPC buy order
- Fluctuating Entropic Regulator: 200,000 ISK each, sold to NPC buy order
- Spin resonance
- Spectral Emission Slices
-
 Unaligned Dekaisogen: Description
 -
 AAR Loot: Electron Spin Resonance
 -
 Fluctuating Entropic Regulator: Description
 -
 AAR Loot: Spectral Emission Slices


Estimated Admixti Mutanite ore amount per site is 2592 units, with an ISK value of 12,960,000 ISK. The mutanite can only be sold to NPC buy orders.
-
 Admixti Mutanite: Description

Gallery
-
Abyssal Articact Recovery - Site Overview
-
 Abyssal Artifact Recovery - Site Overview 2
 -
 Abyssal Artifact Recovery - Scenic

