More actions
No edit summary |
No edit summary |
||
| Line 37: | Line 37: | ||
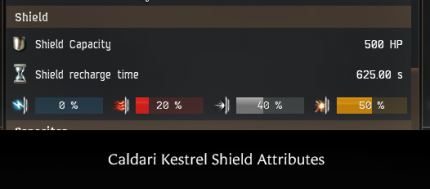
Notice that both ships have the same four shield resistance values. This is because the resistances are expressed in percentages. The Hurricane starts out with almost three times as many hitpoints, thus each percentage absorbs considerably more damage than will the Kestrel. In each case the shield recharge time is an average of what might happen in practice. The actual shield recharge rate varies quite a bit in combat – this is discussed in the [[#Shield Recharge Rate|Shield Recharge Rate]] section, below. | Notice that both ships have the same four shield resistance values. This is because the resistances are expressed in percentages. The Hurricane starts out with almost three times as many hitpoints, thus each percentage absorbs considerably more damage than will the Kestrel. In each case the shield recharge time is an average of what might happen in practice. The actual shield recharge rate varies quite a bit in combat – this is discussed in the [[#Shield Recharge Rate|Shield Recharge Rate]] section, below. | ||
====Resistance and Vulnerability==== | |||
There are four types of damage, and a shield will deal with each differently. As illustrated here, a ship begins with a base Damage Resistance value for each type: | |||
[[File:QSG_hurricane_shield.png|center|400px|alt=shield get info attributes for minmatar hurricane]] | |||
The four resistances shown for this ship show how much of each type of damage the shield will reject. Each of these resistance values also represents a corresponding "vulnerability" number that shows how much damage will ''get through the shield'' for each hit of that kind of weapon. [[File:QSG_shielddefense.gif|left|alt=animation showing damage rejection]]The Vulnerabilities are always 100% minus the resistances. So, for example, a ship with these resistances: | |||
Shield Resistance: EM:0% Thermal:20% Kinetic:40% Explosive:50% | |||
would have these vulnerabilities: | |||
Shield Vulnerability: EM:100% Thermal:80% Kinetic:60% Explosive:50% | |||
This is the damage that would get through if the ship flew with its base shields, with no benefits from skills, modules or rigs. ''Because of the way the shield enhancement modules and rigs work, it is more useful to focus on the shield's Vulnerabilities than its Resistances.'' | |||
====Bonuses and Penalties==== | |||
Modules usually express their effects in term of "bonuses". For example, a kinetic shield hardener might have a "-40% bonus" to kinetic damage. There are two things to keep in mind about these bonuses as they apply to shields: | |||
#Bonuses usually apply more directly to shield vulnerability values than to shield resistance values. That is, a "-40% damage" bonus is reducing the damage that gets through, the vulnerability of, the shield by 40%; this would increase its resistance by 60%. You can work with either resistances or vulnerabilities, but it's important to keep track of what the bonus numbers mean. | |||
#The second bonus that applies to the same attribute is multiplied by the first bonus to get the resulting effect. For example, if the first bonus results in a 40% vulnerability reduction, installing a second module would add 40% . | |||
Some kinds of modules are subject to [[Stacking_penalties|Stacking penalties]] which reduced progressively in effectiveness if they affect the same attribute. For shield attributes, this means: | |||
*Penalized: Shield resistances; Shield boost | |||
*Not Penalized: Shield recharge rate; Shield hit points | |||
The penalty will only apply to the module's impact on the affected attribute, and will progress as follows: | |||
1st mod: 100.0% effectiveness | |||
2nd mod: 86.9% effectiveness | |||
3rd mod: 57.1% effectiveness | |||
4th mod: 28.3% effectiveness | |||
... and so on. | |||
Consideration of penalties while the proper equipment for a ship comes under the heading of "[[fitting]]" which is not covered in detail in this article – but stacking more than three modules is generally considered to be a really bad idea. | |||
===Damage Type Resistance=== | |||
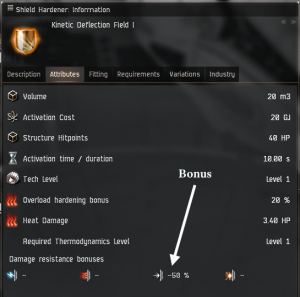
[https://wiki.eveonline.com/en/wiki/Item_Database:Ship_Equipment:Shield:Shield_Hardeners Shield Hardener] and [https://wiki.eveonline.com/en/wiki/Item_Database:Ship_Equipment:Shield:Shield_Resistance_Amplifiers Resistance Amplifier] modules reduce the Damage Type Vulnerabilities of the shield. | |||
{{Example | [https://wiki.eveonline.com/en/wiki/Kinetic_Deflection_Field_I Kinetic Deflection Field I] | |||
[[File:QSG_kineticdeflection.png|thumb|alt=kinetic deflection I attributes]] | |||
This module will reduce the Kinetic Damage Vulnerability of the shield by 50%.}} | |||
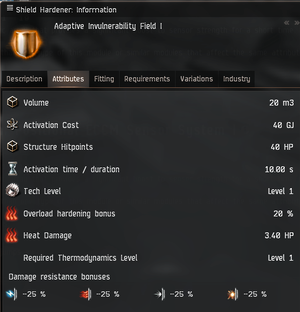
Since you need a different module for each type of damage, and since most ships do not have enough medium level power slots to handle more than a few modules, it is difficult to use these kinds of modules to protect against all types of damage. One solution is to load the kind of module you need for the expected encounter. Another is to use a "multi-type" module that protects against all damage types. | |||
{{Example | [https://wiki.eveonline.com/en/wiki/Item_Database:Ship_Equipment:Shield:Shield_Hardeners:Adaptive_Shield_Hardeners Adaptive Shield Hardener] | |||
[[File:QSG_adaptiveshield_module.png|thumb|alt=adaptive shield hardener attributes]] | |||
This module reduces the Damage Vulnerability of all types of damage, but by considerably less than the specific shield hardener does. Nonetheless, these kinds of modules are very widely used.}} | |||
===Shield Capacity=== | ===Shield Capacity=== | ||
| Line 85: | Line 142: | ||
This module increases the recharge rate of the shield by 20%, but at the same time it decreases the hitpoint capacity of the shield by 10%.}} | This module increases the recharge rate of the shield by 20%, but at the same time it decreases the hitpoint capacity of the shield by 10%.}} | ||
==Using Shields== | ==Using Shields== | ||
Revision as of 16:45, 27 June 2015
This article explains the functional process of spaceship shielding. It does not cover the various tactical applications of shields. These can be found in such as:
Nor does it cover the detailed fitting of shields to specific ships. This can be found in such as:
The descriptions of the various ships include shield fits as appropriate to the hull. (See Hurricane, for example.)
What Is a Shield?
You can think of a shield as a sphere,completely enclosing the ship at a location just inside its Signature Radius.
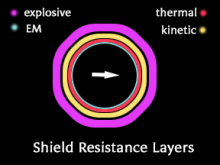
Since the Signature Radius is the effective size of the ship – the area that is targeted by weapons – the shield intercepts any damage that occurs before it can reach the ship. The shield consists of four separate, overlapping spheres, called resistance layers, each of which protects against a different kind of damage. This means that the ship has a different shield resistance value for each of: thermal, kinetic, EM, and explosive damage.
Resistance indicates how much of that kind of damage will be rejected by the shield when the ship is hit by that kind of weapon. Resistance values are always shown in percentages – for example, "30% Thermal Resistance" means that the shield will reject 30% of the damage from any weapons hit that does thermal damage.
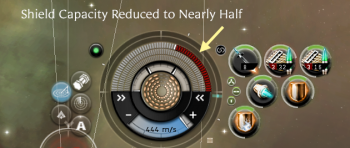
The shield also has a capacity which shows how many hitpoints of damage it would take to destroy, or "drop", the shield. In combat this shows as the outermost of three red rings on the pilot's dashboard display. A ship's shield also has a recharge rate which shows how fast the shield rebuilds itself while damaged.
The base values for all of these can be found in the Attributes panel of the ship's Get Info window. Each is described in detail below.
Notice that both ships have the same four shield resistance values. This is because the resistances are expressed in percentages. The Hurricane starts out with almost three times as many hitpoints, thus each percentage absorbs considerably more damage than will the Kestrel. In each case the shield recharge time is an average of what might happen in practice. The actual shield recharge rate varies quite a bit in combat – this is discussed in the Shield Recharge Rate section, below.
Resistance and Vulnerability
There are four types of damage, and a shield will deal with each differently. As illustrated here, a ship begins with a base Damage Resistance value for each type:
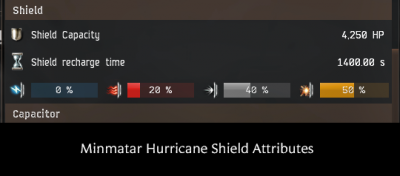
The four resistances shown for this ship show how much of each type of damage the shield will reject. Each of these resistance values also represents a corresponding "vulnerability" number that shows how much damage will get through the shield for each hit of that kind of weapon.
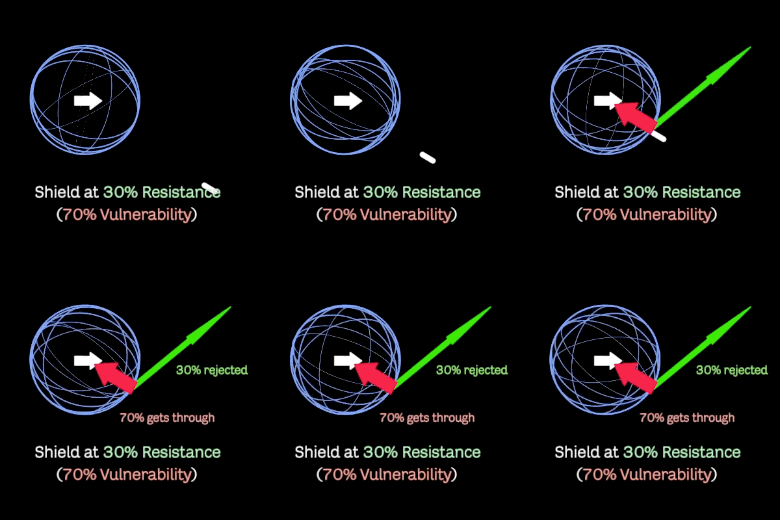
The Vulnerabilities are always 100% minus the resistances. So, for example, a ship with these resistances:
Shield Resistance: EM:0% Thermal:20% Kinetic:40% Explosive:50%
would have these vulnerabilities:
Shield Vulnerability: EM:100% Thermal:80% Kinetic:60% Explosive:50%
This is the damage that would get through if the ship flew with its base shields, with no benefits from skills, modules or rigs. Because of the way the shield enhancement modules and rigs work, it is more useful to focus on the shield's Vulnerabilities than its Resistances.
Bonuses and Penalties
Modules usually express their effects in term of "bonuses". For example, a kinetic shield hardener might have a "-40% bonus" to kinetic damage. There are two things to keep in mind about these bonuses as they apply to shields:
- Bonuses usually apply more directly to shield vulnerability values than to shield resistance values. That is, a "-40% damage" bonus is reducing the damage that gets through, the vulnerability of, the shield by 40%; this would increase its resistance by 60%. You can work with either resistances or vulnerabilities, but it's important to keep track of what the bonus numbers mean.
- The second bonus that applies to the same attribute is multiplied by the first bonus to get the resulting effect. For example, if the first bonus results in a 40% vulnerability reduction, installing a second module would add 40% .
Some kinds of modules are subject to Stacking penalties which reduced progressively in effectiveness if they affect the same attribute. For shield attributes, this means:
- Penalized: Shield resistances; Shield boost
- Not Penalized: Shield recharge rate; Shield hit points
The penalty will only apply to the module's impact on the affected attribute, and will progress as follows:
1st mod: 100.0% effectiveness 2nd mod: 86.9% effectiveness 3rd mod: 57.1% effectiveness 4th mod: 28.3% effectiveness ... and so on.
Consideration of penalties while the proper equipment for a ship comes under the heading of "fitting" which is not covered in detail in this article – but stacking more than three modules is generally considered to be a really bad idea.
Damage Type Resistance
Shield Hardener and Resistance Amplifier modules reduce the Damage Type Vulnerabilities of the shield.
Since you need a different module for each type of damage, and since most ships do not have enough medium level power slots to handle more than a few modules, it is difficult to use these kinds of modules to protect against all types of damage. One solution is to load the kind of module you need for the expected encounter. Another is to use a "multi-type" module that protects against all damage types.
Shield Capacity
Shield capacity indicates how many hitpoints of damage it will take to drop the shields. (The ship itself is also protected by Armor and Hull defenses, and so it will take considerably more than than that to destroy the entire ship.) In general, the larger the ship, the larger the base shield capacity.
You can think of a shield's capacity as its current size; whenever the shield takes damage of any kind, its capacity goes down, and it shrinks. So while hits that do thermal, kinetic, EM, and/or explosive damage may be mitigated by the shield's resistance layers, any damage that does get through will be subtracted from the Shield Capacity value. This reduction will appear on the pilot's dashboard as a red mark in the outer shield ring.

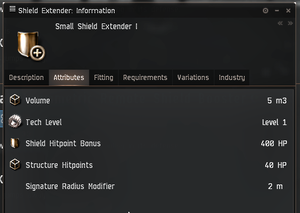
Shield Booster and Extender modules add hitpoints to the capacity of the shield and increases the total amount of damage that the shield can take before it is destroyed. This is an absolute increase in shield strength, and it applies to all damage types.
Shield Recharge Rate
It takes a certain amount of time to recharge a fully depleted shield. This figure is given as the Shield Recharge Time in the ship's Attribute window. Recharging, however, does not tick along like the numbers on a clock. The speed varies depending on the amount of damage the shield has already taken.
In the beginning, the shield charges at its average rate. As the shield takes damage, and it's capacity goes down, the rate at which it rebuilds itself goes up. If you want, you can think of this as the shield storing energy from the hits that it is taking and feeding the stored energy back into itself.
But then, when the shield capacity has dropped to about 25% (in other words, when the shield is three-quarters gone), the recharge rate peaks and begins to fall off. At its peak, the shield will be recharging about twice as fast as it was in the beginning.
At this point a buzzer will sound, to warn the pilot that the shield is at its recharging limit. If it continues to take more damage than it can hold, the recharge rate will drop off quickly, and the capacity of the shield will fall towards zero ... at that point the shield will fail.
The graph shown here is a simplified version of the Shield Recharge Rate Graph. A ship's shield begins at 100% full capacity ... the left side of the graph. As the shield takes damage, the rate at which it recharges slowly grows, until, when the shield is at about 25% of its capacity, the rate is more than twice what it was at the start. From that point on, if the shield capacity continues to fall, the recharge rate will being to decrease. If damage continues, the shield will soon fail.
Flux Coil, Power Relay and Shield Recharger modules all increase the Recharge Rate of the shield and so decrease the amount of time it takes to rebuild lost shield capacity. This affects the absolute strength of the shield; it applies to all damage types.
Using Shields
In some cases the technical construction of the ship dictates the use of Shields (or Armor) as its primary defense. Any ship receiving a bonus to shield capabilites would likely use shields. And because most shield modules use medium level power slots, a ship with more mid than low slots will tend to use shields.
For example, these ships will usually use shields:
- The ORE Procurer, a mining ship, receives a 5% bonus to shield hitpoints.
- The Caldari Moa, a cruiser, receives a 4% bonus to all shield resistances.
- The Caldari Kestrel, a frigate, has four mid slots and only two low slots.
On the other hand, these ships will usually use armor:
- The Amarr Prophecy, a battlecruiser, has seven low slots and four medium slots.
- The Gallente Incursus, a frigate, has a 7.5% bonus to Armor Repairer amount.
It is worth noting that many ships can use either shields or armor. In these cases the choice is a matter of fitting ... what is the goal of the fit, and what are the skills of the pilot.
The argument as to which approach is best never ends. Every type of defense has advantages and disadvantages, and it is always best to fit the ship to match its characteristics, the pilot's skills, and the goals of the encounter.
Advantages of Shields
- Does not reduce speed or maneuverability
- As a first line of defense, leaves you with Armor and Hull as a fallback if shields go down
- Recharge on their own – no need to dock for repairs
- Shield recharge modules work more quickly than armor repair modules
- Low slots are available for weapon enhancing modules
Disadvantages of Shields
- Increases signature radius – ship becomes easier to target
- Not possible to fully protect against all damage types
- Fewer kinds of enhancement modules – less choice than with armor
- Shield recharge modules use more capacitor power than armor repair modules
- Mid slots are not available for EWAR, propulsion and scanning modules
Shield Tanking
The term "shield tanking" refers to the use of shields as a ship's primary defensive mechanism. There are three general approaches to Shield Tanking:
- Active – use modules that draw on the ship's capacitor to improve shield performance
- Passive – use modules that do not draw on the ship's capacitor; mostly to improve shield recharge rate
- Buffer – use modules that do not draw on the ship's capacitor; mostly to increase the shield's capacity and resistance
This topic is covered in depth in the course on Shield Tanking, and in the document on Passive Shield Tanking.
Logistical Shielding
Logistical shielding is the use of one ship's modules to apply shield protection to a different ship. This is covered in the E-UNI courses Logistics 101: Introduction to Logistics and the document Guide to Logistics.
Ships that Use Shields
Every ship has a shield. Whether or not a pilot decides to expand and improve the shield is his or her choice. You can find lists of ships that are commonly tanked with shields, but unless you are in a drastic hurry, you are better off choosing a ship that fits your situation and THEN deciding whether to use shields or armor as your primary defense.
That said, here are the factors that you look for when you are thinking about shields:
- a ship bonus that favors shields over armor,
- a shortage of low or a surplus of mid power slots,
- more need to favor modules that improve weaponry (which tend to need low slots),
- less need for modules that support tackling and scanning (which tend to need mid slots),
- pilot skills that are biased towards shields.
Shield Skills
A variety of skills improve a pilot's use of shields. Some of these are important to all pilots, while others are most important to pilot's who "shield tank" their ships and depend on shields as the primary means of defense.
Basic Shield Skills
These will be useful to any pilot and should be trained as soon as possible at least to Level III.
Shield Management – 5% bonus to shield capacity per skill level
Shield Operation – 5% reduction in shield recharge time per skill level
Shield Upgrades – 5% reduction in shield upgrade powergrid needs
Tactical Shield Manipulation – Reduces the "bleed through" of damage when the shield falls below 25% by 5% per skill level
Shield Tanking Skills
These are of most use to pilots who depend on shields as their primary defense. Refer to the article on Shield Tanking for detailed information.
Shield Compensation – 2% less capacitor need for shield boosters per skill level
[[Skills: Thermic Shield Compensation ]], Kinetic Shield Compensation, Explosive Shield Compensation, EM Shield Compensation – 5% bonus to damage resistance per level for Shield Amplifiers of the type listed
Other Shield Skills
These require advanced training and are of little use to newer players.
Shield Emission Systems – providing shield capacity to other players ... used in Logistics.
Capital Shield Operation – 2% reduction in capacitor need for capital shield boosters per skill level
Capital Shield Emission Systems – 5% reduced capacitor need for capital shield emission system modules per skill level
Technical Section: Shield Recharge Rate
The Average Shield Recharge Rate can be computed by dividing the Shield Capacity by its Recharge Time.
ARR = SC / RT
Recharge Time never changes. This means that if two ships have the same RT and one has more shield capacity, then the one with the larger capacity will recharge faster.
The Peak Recharge Rate is approximately 2.4 * ARR. It occurs when the capacity of the shield reaches approximately 25% of its maximum value. While there is considerable discussion of this no one seems to have located a producing formula that the game uses to generate the rate. Nonetheless, it appears that damage occurs, and then the rate is adjusted based on the new shield capacity value.
The following graph is taken from the EVE University Course, Shield Tanking supporting course material.
It is not clear if the graph represents actual data collected from tests of shield recharging, or data derived from a mathematical model. There is, however, widespread agreement as to this pattern.
Note that there does not seem to be any way to apply this information effectively in combat. When the shield is under attack, the changing value of the shield capacity makes it difficult to do a computation, let alone to make use of the results.

