Difference between revisions of "Editing and uploading class recordings"
m |
m |
||
| Line 28: | Line 28: | ||
After you record the lecture, you might need to edit it: the class might have started late and you want to remove the first 2 mins or maybe you forgot to stop the recording and you recorded 30mins of silence. Whatever the reason, if you need to edit the file, you can use a freeware software such as [http://audacity.sourceforge.net/ Audacity], its a free, multi-platform and easy to use software and in the following sections we'll demonstrate its use. You can always use other software if you prefer to do so. | After you record the lecture, you might need to edit it: the class might have started late and you want to remove the first 2 mins or maybe you forgot to stop the recording and you recorded 30mins of silence. Whatever the reason, if you need to edit the file, you can use a freeware software such as [http://audacity.sourceforge.net/ Audacity], its a free, multi-platform and easy to use software and in the following sections we'll demonstrate its use. You can always use other software if you prefer to do so. | ||
| + | |||
| + | ===Installing Audiacity & Lame Encoder=== | ||
| + | We will download & install [http://audacity.sourceforge.net/ Audacity] and install the [http://audacity.sourceforge.net/help/faq?s=install&item=lame-mp3 lame encoder for audacity], we'll need it to export our class audio files into mp3 later on. You can download audacity from [http://audacity.sourceforge.net/download/ this link] and lame encoder for audaicty from [http://lame.buanzo.com.ar/ this link]. Please check [http://audacity.sourceforge.net/help/faq?s=install&item=lame-mp3 this page] for instructions on properly installing the encoder. We will not provide the details of installing the software or the encoder as the steps or methods may vary between different platforms. | ||
===Editing=== | ===Editing=== | ||
| − | |||
| − | |||
| + | [[file:Audacity_openfile.gif|link=]] | ||
| + | |||
| + | *Once you have audacity set, start the program, Go to '''File > Open...''' and select the .wav file you recorded with Teamspeak | ||
| + | |||
| + | |||
| + | |||
| + | [[file:Audacity_edit_file_1.gif|link=]] | ||
| + | |||
| + | * This is how it looks when you open the file. | ||
| + | |||
| + | |||
| + | |||
| + | [[file:Audacity_edit_file_2.gif|link=]] | ||
| + | |||
| + | * Now it's time to edit the audio file. We may need to cut out some parts from the beginning if you started recorded earlier than class start. (and that's more preferable than missing some parts of the class, so whenever possible, you should start recording a bit early and then take these parts out) see the image below for the next step. | ||
| + | * <font color="red">'''Select:'''</font> use this tool to select a part of the file. You can select '''a point''' to start playing from there, or you can select '''an area''' if you want to remove or move that selected area. If you want to remove a selection, just press '''Delete''' button on your keyboard or go to '''Edit > Delete''' from the menu panel. Please keep in mind that audacity can do more than simply deleting parts of the file, but these functions will not be covered in this guide. | ||
| + | * <font color="green">'''Zoom tool:'''</font> you can use zoom tool to zoom in (left mouse click) or out (right mouse click) to more easily pinpoint a location. | ||
| + | * <font color="teal">'''File format information'''</font> | ||
| + | |||
| + | [[file:Audacity_edit_file_3.gif|link=]] | ||
| + | |||
| + | * When you're done editing the file, simply go to '''File > Export Selection...''' from the menu panel to save the file in .mp3 format. | ||
| + | |||
| + | |||
| + | |||
| + | [[file:Audacity_edit_file_4.gif|link=]] | ||
| + | |||
| + | * Make sure you've selected filetype as MP3 and click options to specify encoding properties. | ||
| + | <pre> | ||
| + | Bitrate Mode: Constant | ||
| + | Quality: 32kbps | ||
| + | Channel Mode: Joint Stereo | ||
| + | </pre> | ||
| + | * We select '''joint Stereo''' because it keeps the file as Mono, like the original. Selecting Stereo might result with a stereo file (which is totally unnecessary) with bigger filesize. | ||
| + | * Click '''Save''' | ||
| + | |||
| + | |||
| + | [[file:Audacity_edit_file_5.gif|link=]] | ||
| − | + | * You will be asked to edit the Metadata for the mp3 file. Please use the following format and don't add anything else. See the screnshot above. | |
| + | <pre> | ||
| + | Artist Name: <Instructor's name> | ||
| + | Track Title: <Class name> | ||
| + | Album Title: Eve University Class Library | ||
| + | Year: <year> | ||
| + | Comments: Recorded: <class date in YYYY.MM.DD format> | ||
| + | </pre> | ||
Revision as of 12:33, 12 December 2010
As you know, the Eve University Class Library is an invaluable knowledge base for new capsuleers. This guide will illustrate, step-by-step, how to record, encode, edit and upload your class recordings. We encourage unistas to record classes they attend.
Contents
Recording
Disabling sound notifications
Important: Please make sure you have all sound notifications disabled in Teamspeak settings. Please see the following images.
File:Teamspeak settings disable all sounds.jpg
Recording a Class is simple enough; Once you join the Class.E-UNI channel on teamspeak, simply click the Recording menu on your teamspeak and select Start Recording.
File:Teamspeak start recording.jpg
You will be prompted to select the directory and enter the name of the file (if you often record classes, you might want to include some details like class date and name to prevent confusion)
File:Teamspeak save recording to.jpg
Congratulations, barring the ever-present possibility of connection problems, you should now be successfully recording a class.
Editing & Encoding
After you record the lecture, you might need to edit it: the class might have started late and you want to remove the first 2 mins or maybe you forgot to stop the recording and you recorded 30mins of silence. Whatever the reason, if you need to edit the file, you can use a freeware software such as Audacity, its a free, multi-platform and easy to use software and in the following sections we'll demonstrate its use. You can always use other software if you prefer to do so.
Installing Audiacity & Lame Encoder
We will download & install Audacity and install the lame encoder for audacity, we'll need it to export our class audio files into mp3 later on. You can download audacity from this link and lame encoder for audaicty from this link. Please check this page for instructions on properly installing the encoder. We will not provide the details of installing the software or the encoder as the steps or methods may vary between different platforms.
Editing
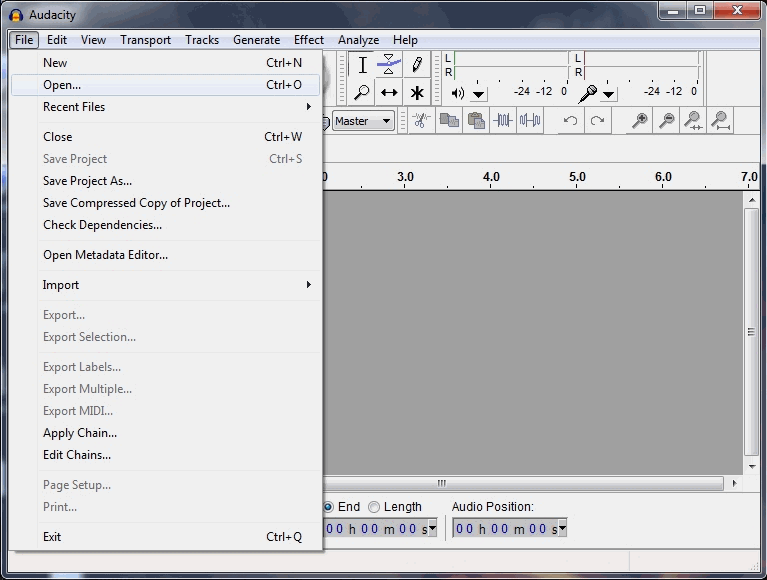
- Once you have audacity set, start the program, Go to File > Open... and select the .wav file you recorded with Teamspeak
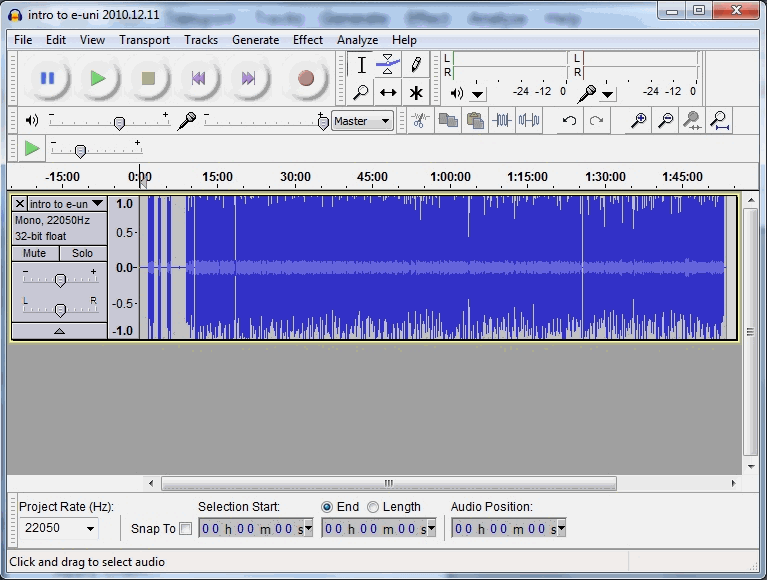
- This is how it looks when you open the file.
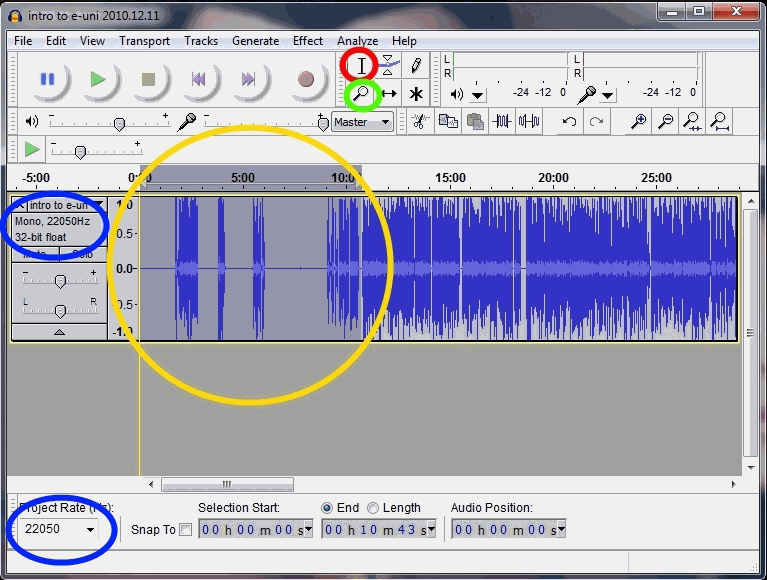
- Now it's time to edit the audio file. We may need to cut out some parts from the beginning if you started recorded earlier than class start. (and that's more preferable than missing some parts of the class, so whenever possible, you should start recording a bit early and then take these parts out) see the image below for the next step.
- Select: use this tool to select a part of the file. You can select a point to start playing from there, or you can select an area if you want to remove or move that selected area. If you want to remove a selection, just press Delete button on your keyboard or go to Edit > Delete from the menu panel. Please keep in mind that audacity can do more than simply deleting parts of the file, but these functions will not be covered in this guide.
- Zoom tool: you can use zoom tool to zoom in (left mouse click) or out (right mouse click) to more easily pinpoint a location.
- File format information
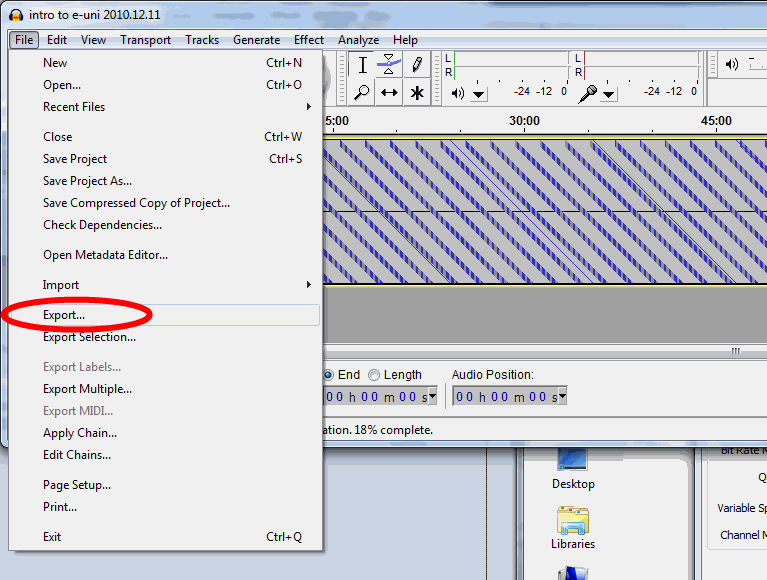
- When you're done editing the file, simply go to File > Export Selection... from the menu panel to save the file in .mp3 format.
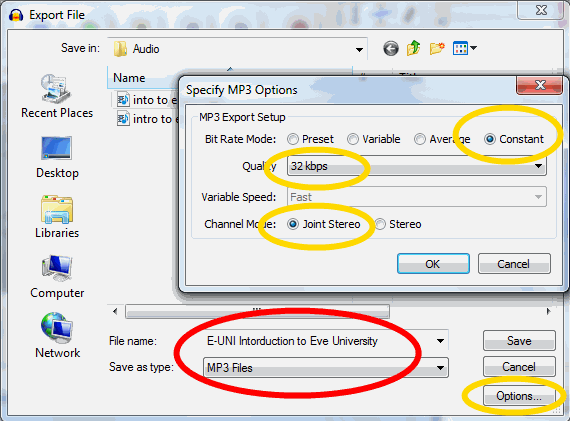
- Make sure you've selected filetype as MP3 and click options to specify encoding properties.
Bitrate Mode: Constant
Quality: 32kbps
Channel Mode: Joint Stereo
- We select joint Stereo because it keeps the file as Mono, like the original. Selecting Stereo might result with a stereo file (which is totally unnecessary) with bigger filesize.
- Click Save
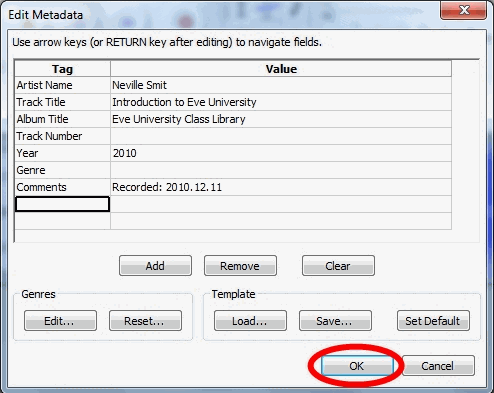
- You will be asked to edit the Metadata for the mp3 file. Please use the following format and don't add anything else. See the screnshot above.
Artist Name: <Instructor's name>
Track Title: <Class name>
Album Title: Eve University Class Library
Year: <year>
Comments: Recorded: <class date in YYYY.MM.DD format>