Importing market data into Excel
This article or section is in the process of an expansion or major restructuring. You are welcome to assist in its construction by editing it as well.
If this article or section has not been edited in several days, please remove this template.
There is various third party software which can be used to assist players to plan their activities in EVE Online. In particular, traders may find it useful to import market data from EVE-Central to Excel, to transfer the information to a spreadsheet format and allow them to process the data. This guide assumes the use of Excel 2007.
Contents
Getting started
To get started you will need the typeID, and either the stationID or systemID or regionID (depending on what data they want to show).
Obtaining the typeID
One way to get the typeID is to use Fuzzwork's API search. To use this, direct your browser to https://www.fuzzwork.co.uk/api/typeid.php?typename= and add the name of the item. Note that any spaces in the item name should be replaced with %20.
Obtaining the other IDs
This spreadsheet contains an alphabetical list of station, system and region IDs.
Importing data
In order to import the data into Excel you will first need to generate a URL to pull the data from EVE Central, and then import that into Excel.
Obtaining the URL
To obtain the correct URL for EVE Central you need to insert the IDs you have obtained above into this URL: http://api.eve-central.com/api/marketstat?typeid=XXX&usesystem=YYY, where XXX is the type ID and YYY is the system ID (for pulling information from a particular station or a whole region you would alter the URL accordingly).
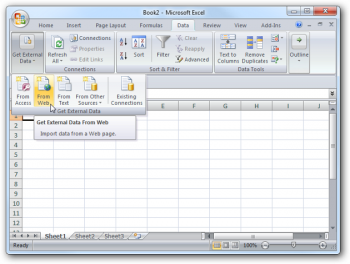
Importing this into Excel
Understanding imported data
We have at column A of the spreadsheet the "API Version" and at the column B we have the "Method", both columns can be ignored. At column C we have the "typeid", at D "buy volume", that represents the total volume of buy orders at the broker, at column E "buy average price", that means that if you want to supply all market demand for the typeid you will receive at the end of the transactions ISK equivalent to column D multiplied by column E, column F is the "maximum price offer of the buy orders", column G is the "minimun price offer of the buy orders", column H is the "standard deviation of buy orders", that is a measure of dispertion of the data around the buy average price, column I is the "median buy prices", that means if you want to supply 50% of the demand selling for the best buy orders you will receive payments between the median and maximun price offer of the buy orders per unit of item sold. At column J we have "percentile of buy orders", this percentile reffers to 95th percentile, that means that if you want to supply 5% of market demand you will receive payments between percentile of buy orders and maximum buy orders prices, in our example we can see at Image 2, that the 95th percentile is the same value of maximum buy orders prices. To understande percentile better I suggest to read Percentile
Columns K to Q are information about sell orders, respectively: Volume, average, maximum, minimum, standard deviation, median, percentile. In the case of sell orders we are talking about 5th percentile, so that means if you want to buy all 5% of the offers at the broker you will pay prices between percentile value and minimum value.
Columns R to X are information about the last 24 hours opperations in market, so it is historical data, they are important to preview future negociations. They are respectivelly: Volume, average, maximum, minimum, standard deviation, median, percentile.
Importing multiple data
To import multiple data you only need to add "&typeid='number'" to URL, so we will add to our data the typeid number 223, that is the number of Iron Charge M. In this way we will have the following URL http://api.eve-central.com/api/marketstat?typeid=215&typeid=223&usesystem=30000142 . We can see at Image 3 the final result of importing multiple data.
Final considerations
It is important to say that you can not trust only in imported data, you need to check the in game market to make sure you are doing the right choice. This happens because XML data of EVE Central is updated each hour, so it can be some deprecated data on it.
On the other hand, you can import multiple data at your Excel to monitor multiple markets, it can help traders to look for better business opportunities.
Another thing that you must know is that after imported, data will not update automatically, so you will need to update imported data everytime you want clicking at button showed at Image 4.


