Difference between revisions of "Rogue Hunt"
(fixed NPCTableRows, changed Spawn to Reinforcement to match other missions) |
|||
| Line 8: | Line 8: | ||
|Type= Encounter | |Type= Encounter | ||
|Objective= | |Objective= | ||
| − | |Faction= | + | |Faction=Rogue Drones |
| − | |DamageToDeal= | + | |DamageToDeal= |
| − | |DamageToResist= | + | |DamageToResist= |
| − | |WebPoint= | + | |WebPoint=Stasis Towers (Web) |
| − | |EWAR= 2 Energy Neutralizer Sentry IIIs | + | |EWAR=2 Energy Neutralizer Sentry IIIs |
|ShipSizeLimit= | |ShipSizeLimit= | ||
|ShipSuggestion= Completed in (1) Maelstrom w/ passive tank and (1) Maelstrom w/ Shield Transporter in 2 hours, but recommend more support. | |ShipSuggestion= Completed in (1) Maelstrom w/ passive tank and (1) Maelstrom w/ Shield Transporter in 2 hours, but recommend more support. | ||
| Line 22: | Line 22: | ||
Completed in (1) Passive Ishtar (Sentry rigged), and (1) Logistics [Important: Destroy stasis towers first, followed by missile towers] | Completed in (1) Passive Ishtar (Sentry rigged), and (1) Logistics [Important: Destroy stasis towers first, followed by missile towers] | ||
| − | Completed in (1) Passive Tengu, kill batteries then | + | Completed in (1) Passive Tengu, kill batteries then stasis towers then smaller->larger ships, orbit around something at 15km to reduce DPS |
|Rewards= | |Rewards= | ||
| − | |Extra= | + | |Extra= |
}} | }} | ||
{{NPCTableCSS}} | {{NPCTableCSS}} | ||
====Part 2 of 3==== | ====Part 2 of 3==== | ||
| − | (Part 1 covered here: https://wiki.eveuniversity.org/Rogue_Eradication) | + | (Part 1 covered here: https://wiki.eveuniversity.org/Rogue_Spy) |
| + | |||
| + | (Part 3 covered here: https://wiki.eveuniversity.org/Rogue_Eradication) | ||
| − | |||
===Single Pocket=== | ===Single Pocket=== | ||
| Line 40: | Line 41: | ||
{{NPCTableHead|Initial Group}} | {{NPCTableHead|Initial Group}} | ||
| − | {{NPCTableRow| Frigate |4|Strain Barracude Alvi/Devilfish Alvi|note=orbits at 2-10 km }} | + | {{NPCTableRow|Frigate|4|Strain Barracude Alvi/Devilfish Alvi|note=orbits at 2-10 km }} |
| − | {{NPCTableRow| Destroyer |3|Shatter Alvior/Ripper Alvior |note=orbits at 3 km}} | + | {{NPCTableRow|Destroyer|3|Shatter Alvior/Ripper Alvior |note=orbits at 3 km}} |
| − | {{NPCTableRow| Cruiser |4|Atomizer Alvum/Nuker Alvum*|trigger=2a |<note=orbits at 17-19 km}} | + | {{NPCTableRow|Cruiser|4|Atomizer Alvum/Nuker Alvum*|trigger=Reinforcement 2a |<note=orbits at 17-19 km}} |
| − | {{NPCTableRow| Battlecruiser |4|Siege/Enforcer/Striker Alvatis* |trigger=1|note=rbits at 28 km}} | + | {{NPCTableRow|Battlecruiser|4|Siege/Enforcer/Striker Alvatis* |trigger=Reinforcement 1|note=rbits at 28 km}} |
| − | {{NPCTableRow| | + | {{NPCTableRow|Battleship|7|Alvus Queen/Alvus Ruler/Supreme Alvus Parasite|note=orbits at 31-36 km }} |
| − | {{NPCTableRow| Drone Cruise Missile Batteries | + | {{NPCTableRow|Sentry|4|Drone Cruise Missile Batteries}} |
| − | {{NPCTableRow| Drone Heavy Missile Batteries | + | {{NPCTableRow|Sentry|4|Drone Heavy Missile Batteries}} |
| − | {{NPCTableRow| Drone Energy Neutralizer Sentry | + | {{NPCTableRow|Sentry|2|Drone Energy Neutralizer Sentry III|ewar=Neut}} |
| − | {{NPCTableRow| | + | {{NPCTableRow|Sentry||2Drone Stasis Towers|ewar=Web}} |
|} | |} | ||
| − | {{NPCTableHead| | + | |
| + | |||
| + | {{NPCTableHead|Reinforcement 1}} | ||
{{NPCTableRow| Battleship |4|Alvus Queen |note=orbits at 36 km}} | {{NPCTableRow| Battleship |4|Alvus Queen |note=orbits at 36 km}} | ||
|} | |} | ||
| − | {{NPCTableHead| | + | |
| − | {{NPCTableRow| Frigate |4|Strain Hunter Alvi |trigger=2b|note=orbits at 11 km}} | + | |
| − | {{NPCTableRow| Cruiser | + | {{NPCTableHead|Reinforcement 2a}} |
| + | {{NPCTableRow|Frigate|4|Strain Hunter Alvi |trigger=Reinforcement 2b|note=orbits at 11 km}} | ||
| + | {{NPCTableRow|Cruiser|3|Strain Nuker Alvum|trigger=Reinforcement 2b|note=orbits at 17 km}} | ||
|} | |} | ||
| − | {{NPCTableHead| | + | |
| − | {{NPCTableRow| Battleship |3-4|Matriarch Alvus/Alvus Queen |trigger=2c|note=orbits at 36 km}} | + | |
| + | {{NPCTableHead|Reinforcement 2b}} | ||
| + | {{NPCTableRow|Battleship|3-4|Matriarch Alvus/Alvus Queen|trigger=Reinforcement 2c|note=orbits at 36 km}} | ||
|} | |} | ||
| − | {{NPCTableHead| | + | |
| − | {{NPCTableRow| Battleship |1|Inettria Volur | + | |
| + | {{NPCTableHead|Reinforcement 2c}} | ||
| + | {{NPCTableRow|Battleship|1|Inettria Volur|note=orbits at 40km }} | ||
| + | |} | ||
| + | |||
| + | |||
| + | {{NPCTableHead|Structures, Drops no loot}} | ||
| + | {{NPCTableRow|Structure|2|Drone Bunker}} | ||
| + | {{NPCTableRow|Structure|1|Infested Station Ruins}} | ||
|} | |} | ||
| − | + | ||
| − | |||
| − | |||
===Notes=== | ===Notes=== | ||
Revision as of 09:39, 12 April 2019
Rogue Hunt, Level 5
| Level | 5 |
| Type | Encounter |
| Faction | Rogue Drones |
| Warp disruption | Stasis Towers (Web) |
| EWAR | 2 Energy Neutralizer Sentry IIIs |
| Ship suggestion | Completed in (1) Maelstrom w/ passive tank and (1) Maelstrom w/ Shield Transporter in 2 hours, but recommend more support.
Completed in (2) passive fit Drakes with shield recharge rigs, had to warp out once each till the frigates were destroyed. Total time including salvaging 1 hour. Completed in (1) Nighthawk with Passive Tank, (1) Dominix with Large Remote Shield Reppers, and (1) Maelstrom with 8x 1200mm 'Scouts' for DPS. Completed in (1) Passive Ishtar (Sentry rigged), and (1) Logistics [Important: Destroy stasis towers first, followed by missile towers] Completed in (1) Passive Tengu, kill batteries then stasis towers then smaller->larger ships, orbit around something at 15km to reduce DPS |
Part 2 of 3
(Part 1 covered here: https://wiki.eveuniversity.org/Rogue_Spy)
(Part 3 covered here: https://wiki.eveuniversity.org/Rogue_Eradication)
Single Pocket
At gate's destination, NPCs surround your warp-in point at distances between 15 – 25km with Missile Batteries at 55km. Full Room aggro upon warp-in.
Position and Orientation of your ship at warp-in: image
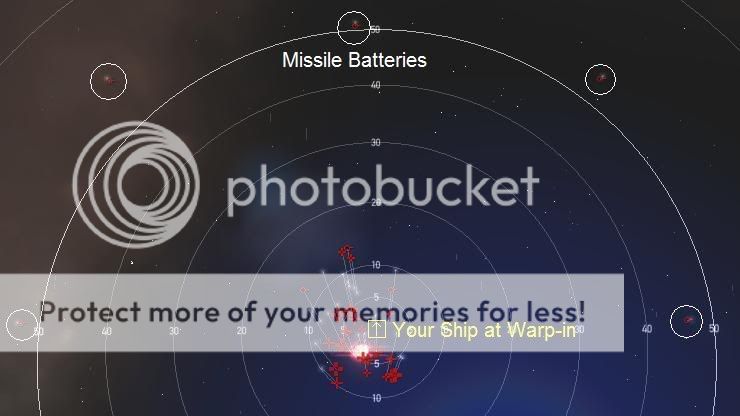
| WD | EWAR | L
| ||
|---|---|---|---|---|
| 4 x Frigate Strain Barracude Alvi/Devilfish Alvi |
||||
| 3 x Destroyer Shatter Alvior/Ripper Alvior |
||||
| 4 x Cruiser Atomizer Alvum/Nuker Alvum* |
||||
| 4 x Battlecruiser Siege/Enforcer/Striker Alvatis* |
||||
| 7 x Battleship Alvus Queen/Alvus Ruler/Supreme Alvus Parasite |
||||
| 4 x Sentry Drone Cruise Missile Batteries | ||||
| 4 x Sentry Drone Heavy Missile Batteries | ||||
| 2 x Sentry Drone Energy Neutralizer Sentry III | ||||
| Sentry 2Drone Stasis Towers | ||||
| WD | EWAR | L
| ||
|---|---|---|---|---|
| 4 x Battleship Alvus Queen |
||||
| WD | EWAR | L
| ||
|---|---|---|---|---|
| 4 x Frigate Strain Hunter Alvi |
||||
| 3 x Cruiser Strain Nuker Alvum |
||||
| WD | EWAR | L
| ||
|---|---|---|---|---|
| 3-4 x Battleship Matriarch Alvus/Alvus Queen |
||||
| WD | EWAR | L
| ||
|---|---|---|---|---|
| 1 x Battleship Inettria Volur |
||||
| WD | EWAR | L
| ||
|---|---|---|---|---|
| 2 x Drone Bunker | ||||
| 1 x Infested Station Ruins | ||||
Notes
- Plan your tank's resistances and repair for 1718 hp/s of damage from initial agro. Dealt as: (Exp: 33%, Therm: 26%, Kin: 25%, EM: 16%)
- Use a passive tank. Or plan a capacitor that recharges or receives 80 Units/s.
- Lowering Incoming Damage: Missile Batteries, Frigates and Destroyers won’t spawn more ships so consider taking them out first to reduce incoming damage.
- Mission is flagged complete when Inettria Volur's Battleship is destroyed.