Difference between revisions of "Setting up a planetary colony"
(Move total quantity conversion data to Planetary Commodities) |
|||
| Line 157: | Line 157: | ||
*Silos | *Silos | ||
*System Scanning Arrays | *System Scanning Arrays | ||
| − | |||
| − | |||
| − | |||
| − | |||
| − | |||
| − | |||
| − | |||
| − | |||
| − | |||
| − | |||
| − | |||
| − | |||
| − | |||
| − | |||
| − | |||
| − | |||
| − | |||
| − | |||
| − | |||
| − | |||
| − | |||
| − | |||
| − | |||
| − | |||
| − | |||
| − | |||
| − | |||
| − | |||
| − | |||
| − | |||
| − | |||
| − | |||
| − | |||
| − | |||
| − | |||
| − | |||
| − | |||
| − | |||
| − | |||
| − | |||
| − | |||
| − | |||
| − | |||
| − | |||
| − | |||
| − | |||
| − | |||
| − | |||
| − | |||
| − | |||
| − | |||
| − | |||
| − | |||
| − | |||
| − | |||
| − | |||
| − | |||
| − | |||
| − | |||
| − | |||
| − | |||
| − | |||
| − | |||
| − | |||
| − | |||
| − | |||
| − | |||
| − | |||
| − | |||
| − | |||
| − | |||
| − | |||
| − | |||
| − | |||
| − | |||
| − | |||
| − | |||
| − | |||
| − | |||
| − | |||
| − | |||
| − | |||
| − | |||
| − | |||
| − | |||
| − | |||
| − | |||
| − | |||
| − | |||
| − | |||
| − | |||
| − | |||
| − | |||
| − | |||
| − | |||
Revision as of 04:31, 15 May 2010
The Planetary Interaction feature of the Tyrannis expansion allows players to utilize planetary industries. Below is a general overview of what can be exploited with this new feature.
Note: Planetary Commodities page has been introduced to hold the main tables with Resources and Products, the tables below that overlap with that page will be used to fill the Commodities page. This page should focus on how to connect Extractor A to Processor B via Storage C to produce product D, the best way to organize links, routes, exploit deposits, and so on
Contents
Connecting It Together
Insert text about hooking up buildings together.
To setup an outgoing route for products from a storage facility (Command Center, Launch Pad, or Storage Facility), you can wait for product to build up in the facility and route up to the amount of product current in storage, or you can click on one of the incoming routes and send that amount to the destination (eg Processor).
If you hook the extractor directly to the processor, you might end up throwing away resources if there is an uneven lot when it fills up (Processors accumulate resources until they have an even lot of input product (eg P1 would be 6000), and then start processing. If the buffer has 5950 in it, and the extractor delivers 210, then 160 units are lost. If there is inputs in the buffer when you change the schematic, they are lost. You can buffer with a storage facility or just live with the loss. If you are living with the loss, you can reduce it somewhat by staggering your extractors' cycles to minimize the chance that two extractors deliver at the same time.
Your First Colony
By way of introducing you you the user interface, let us install a colony.
Buy a "XXX Command Center" on the market. (We are going to a Temperate Planet, so I bought a Limited Command Center). Fly to the system with the command center in your cargo, and sit in space cloaked (I am doing this in 0.0, stealing resources from The Syndicate who might object, but since they an NPC corp, their sovereignty is not blocking my deployment).
(There are pictures coming.)
- Select Planet in Overview File:PI YFC-SelectPlanet.png
- Enter Planet Mode
- Survey for Resources (Scan, adjust resource level sliders, pick favourite spot).
- Place Command Center 200px
- Submit 200px
- Place Extractor 350px 350px
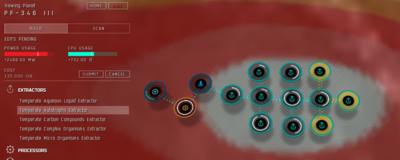
- Under the Build Tab, choose Extractors, select the type of extractor that matches the desired resource, then click in the location you wish to place it on the map. Below the edit tab, you will see the edits pending, the change in PG and CPU that will result and the cost of these upgrades. You can make a number of changes and then submit or cancel the changes.
- Place More Extractors 350px
- Create Links 350px 350px 350px
- Right Click on the node at one end of link, and choose "Create Link". Click on the node on the other end of the link. Notice that as you stretch the link to the destination, it will tell you the length and how much CPU and Powergrid it will cost. Keep an eye on the progress of using up your CPU and powergrid.
- You can create a route using up to 8 intermediate nodes, so you can save link costs by connecting far away nodes to the next closest node, and linking that node to the next closest, etc. until you have it connected to where you are trying to get to.
- Place Processor 350px
- Place Launch Pad 350px
- Create Links 350px
- Choose Schematic
- PI YFC-10-SelectProcessor.png
- PI YFC-11-SelectSchematic.png
- PI YFC-12-SubmitSchematic.png
- PI YFC-13-RouteProcessor.png
- PI YFC-16-RoutingProcessorProduct.png
- PI YFC-17-CreatingProcessorRoute.png
- PI YFC-18-SelectCmdCtrRoute.png
- Click on your processor, and click on the Schematic (File:Icon PI ProcessorSchematic.png) Icon. Use the dropdown to select your desired output product. Submit the result, at which point you will be prompted to route the result. Click on the product to be routed, and click "Create Route", then click on the destination storage facility. Finally, click on "Create Route".
- Submit. Click on the "Submit" button in the "Edits Pending" area. You will not be able to survey until your extractors are placed permanently, ie you must commit your changes.
- Survey Extractors and Create Routes to Launchpad
- PI YFC-20-SelectExtractor.png
- PI YFC-21-SurveyDeposit.png
- PI YFC-22-DepositSelected.png
- PI YFC-23-RouteProduct.png
- Note that you can choose extractions that produce alot in the short term, but ultimately produce less in total, or trickle in, but generate more total product in the long term, depending on how much you want to babysit the extractors, and how consistently your Processors are running. Consensus seems to lean toward the 24 hour extraction. We could choose the long and copious extraction easily on this planet due to its great abundance, but to demonstrate overloaded links, I am choosing the 5 hour extraction since it creates a larger point load on the links.
- Upgrade links (and Submit) Partway through surveying and routing, we got the message "The route can not be created as adding traffic to one of the links over which it travels would create dangerous levels of congestion." If we hover the mouse over a link it will tell us the level of usage of the link. If we click on the destination it will tell us the link usage of all the routes arriving at that destination. It would appear that we have to upgrade two links, the one just before the Storage, and the Extractor-Extractor link just upstream of that. Click on the link to be upgraded, and click on the Link-Plus icon. You will be given a quote of how much more CPU/PG this will cost. If it is acceptable, click on the Upgrade button.
- PI YFC-24-OverloadedLink.png
- PI YFC-24a-HoverOverloadedLink.png
- PI YFC-26-HoverLinkLoads.png
- PI YFC-24b-ChooseLink.png
- PI YFC-25-UpgradeLink.png
- PI YFC-25b-UpgradeLink-L2.png
- PI-YFC-27-UpgradeLink-L2.png
- Create Route Launchpad to Processor. Select the Processor, Click on the Routes icon, choose one of the incoming routes, and click on the Create Route button at the bottom.
- PI-YFC-26-CreateStorageToProcessorRoute.png
- PI YFC-26a-CreateProductRoute.png
- PI-YFC-26b-CreateProductRoute.png
- Submit
- Wait 15 minutes for the Extractors to dump into storage.
- Had a little bit of power/CPU left, so add 3 more extractors, Submit. While we are waiting, I notice we have a little bit of power and CPU left, so let us add some more extractors. First upgrade the link between the last extractor and the Launchpad storage, since it was at 96%, to make sure we are not going to run out of PG halfway through this operation. Notice the additional ISK cost, and the CPU and PG differencial usage lines above the submit button.
- Check out the Competition: While we are waiting, we could also check out who else is on the planet. The other colonies are small and subtle. Sometimes you just see an extractor here or there, sometimes you see the Command Centre. If you click on the Command Centre you can see all the nodes in their network. Right click on the background to hide or show other players colonies. Mostly you can just ignore them, except when they are sitting on top of the juicy resource node that is rightfully yours. Until Dust 541, there is little to be done about this, except that if you both drink from the same resource node, each gets less. This is also a danger if you place your own extractors too close to each other. For more details, see Planetary Interaction PvP.


- Check on Processor Buffer. Ok, enough time has elapsed for the extractors to have run a cycle by now, let's check out how we are doing at building up in the Processor's buffer. 350px.
- Oh dear, I have waited too long, and it has built up enough input to get started on the processor cycle, and is building up for the next cycle already. Now we must wait 30 minutes for the Output to come out. In the mean time, the buffer filled up waiting for the processing cycle to complete and backlog is building in the storage. You can use this to adjust your extraction renewal schedules by letting stuff build in storage and then coming back anytime while the Processor(s) are working on that buffer of inputs to renew your Extractors. 350px 350px
- Horray! Product. Now you can move to Planetary_Interaction#Interplanetary_Logistics to get your stuff off planet. 350px
- Observe that this is in a really good deposit, and will be building up a backlog for the first 24 hours, and then work on that backlog over the next little while waiting for you to come back to and re-survey the extractors.
- Teardown colony. You can tear down your whole colony by deleting the Command Center. You might need to do this if you decide to upgrade your Command Center to make your operation larger. You will lose the investment you made in the old command centre, and all the buildings you built.
Hint: select the right size of Command Center first, because to deploy a new one, you must destroy the entire colony, losing all the investment you made in extractors, all unprocessed inputs stuck in the Processors,etc. It does not destroy the items that had been exported to the Customs Office, and you can deploy a new Command Centre immediately rather than waiting for downtime.
Manufactured Goods
Most of these goods are manufactured normally in space, away from Planets, but rely heavily on Planetary Commodities
POS Fuels
Not actually manufactured, but an intermediate planetary product. Usable immediately as POS fuel
- Coolant
- Enriched Uranium
- Mechanical Parts
- Oxygen
- Robotics
T2 parts
Most T2 manufacturing uses a PI good. Mainly P2 and P3.
- Construction Blocks
- Consumer Electronics
- Transmitter
- Guidance Systems
- Robotics
- Miniature Electronics
- Super Conductor
Miscellaneous
Created with Blueprint and PI products
- Nanite Repair Paste
Sovereignty Structures
Created with Blueprints and P4 products.
- Infrastructure Hub
- Sovereignty Blockade Unit
- Territorial Claim Unit
Starbase Structures
Created with Blueprints and P4 products.
- Assembly Array
- Control Towers
- Corporate Hangar Array
- Cynosural Generator Array
- Cynosural System Jammer
- Electronic Warfare Batteries
- Energy Neutralizing Array
- Hybrid Turret Batteries
- Jump Bridges
- Laser Turret Batteries
- Missile Batteries
- Mobile Laboratory
- Moon Harvesting Array
- Projectile Turret Batteries
- Reactors
- Refining Arrays
- Shield Hardening Arrays
- Ship Maintenance Arrays
- Silos
- System Scanning Arrays