EVE UNI Mapper

From EVE University Wiki
(Redirected from Pathfinder)
Jump to: navigation, search
This article should be cleaned up or improved.
The reason is: Needs to be updated to current Main and Wormhole Community information as well as general cleanup
Christmas Eagle Logo.png This page is specific to EVE University. Other corporations or groups in the game may operate differently.
For a summary of EVE University's rules and code of conduct, see EVE University Rules.


Pathfinder is a free and open-source wormhole mapping tool. This tool allows groups of players to share mapped wormhole connections, intel, and cosmic signature information.

Mapping is essential to coordinate EVE University communities' scanning and exploration and is vital for Wormhole Community to ensure they have full knowledge of nearby wormholes. EVE University hosts a private Pathfinder for its members and was introduced in November 2019 as a replacement for our old EVE-Wspace tool.

Accessing the mapper

  1. Go to https://pathfinder.eveuniversity.org/
  2. Use SSO login and login EVE Online account.
  3. Select required map. Usually a community map, but personal or shared maps can be created.

Reading the map

The map is made of systems of any security level, and the connections between them. The map will show some of their information in compact form. To see the complete set of information about the system, select it on the map and look at the adjacent panels.
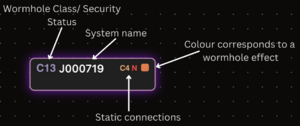
On the system bubble you can quickly see the basic information of that system

Connections

Connections between systems will change shape and color depending on their properties. These are user-defined and rely upon capsuleers to specify this information by right-clicking on the connection on the map.

  • Wormhole size limit is indicated by a letter on the wormhole
    • Small and medium wormholes have dashed lines
  • Gate Connections are straight with blue cores
  • Reduced and critical mass wormholes have yellow and red cores
  • End-of-life (EOL) wormhole connections have purple outlines
  • If Signature Overlay is enabled the wormhole will show its type at its ends
  • Bubbled holes have large clear circles over the end of the connection

Managing information

Adding Systems

There are two ways to add systems.

  1. Automatically by Pathfinder as they are jumped into
  2. Manually create systems by right-clicking on the map

To move a system on the map, left-click and hold while the mouse is over where the class of the wormhole (or security status of the system) is specified, and subsequently re-position the system to where you wish. Clicking and dragging on any other part of the box will attempt to create a connection to another system, and that will be visible by the underlying animation.

Adding Connections

After a system has had another system added to it with a wormhole connection this can be linked to a signature in that system. Simply click the "leads to " attribute on the WH signature and select the corresponding system once the new system is present. Setting this will automatically add mass and size limit info on the connection if the wormhole was not K162.

Wormhole connection health should be subsequently verified and set by right-clicking the wormhole connection. This way you can set the mass criticality and end of the lifetime of the connection. EOL connections are automatically deleted 4h 15m after the status is set. The "preserve mass" option is for informing other map users to not waste the mass of this wormhole.

Adding Signatures

First, make sure the correct system selected in Pathfinder. Signatures can be added imported in bulk or individually. It is recommended to import them in bulk as it is much faster and easier to keep the system up-to-date. Pasting signatures directly into the signatures window will update signatures immediately. Use the signature reader to check updates before applying them.

To quickly bulk import signatures:

  • Make sure the correct system is selected in Pathfinder
  • Copy all signatures (CTRL + A then CTRL + C) from the in-game scan window
  • Paste the signatures (CTRL + V) into the signature pane

Using the signature reader:

  • Make sure the correct system is selected in Pathfinder
  • Open the signature reader from the top right of the signatures pane
  • Copy all signatures (CTRL + A then CTRL + C) from the in-game scan window
  • Paste the signatures (CTRL + V) into the signature reader
  • New signatures are highlighted in green, updated signatures in yellow, and expired signatures are not highlighted
  • Selecting "Lazy Delete" from the top left of the reader will highlight expired signatures to be deleted in red
  • Press "Update Signatures" to process all signature updates

To add a single signature manually:

  • Make sure you have the correct system selected
  • Click the "+" button in the top right corner of the signatures panel
  • Add the full Signature ID (ex. ABC-123 with hyphen) shown in the signatures list
  • Add signature group, type, and description
  • Press the "+" button on this row of information

If a signature already existed in the system, the "Last Updated" timer will reset when the signature is updated. A signature that was not copied (i.e. it has expired) will not have its timer updated.

The "Undo" icon above the list of signatures allows for rolling back to a previous record of signatures. Useful if a signature is accidentally deleted or the wrong system's signatures are imported.

Preexisting signatures can also be edited or deleted in the signatures panel. Simply click the attribute you want to change.

Adding Structures

Structures can be added to Pathfinder in two ways: manually one at a time or bulk imported from D-Scan. Importing via D-Scan allows for existing structure intel to be updated. Only Upwell Structures should be added. If a POS is notable (i.e. has a warp-in trap) it should be noted in the system panel notes.

To add a structure manually:

  • Make sure the correct system is selected in Pathfinder
  • Click the "+" button in the top right of the structures panel
  • Add the Name and Owner exactly as they appear in-game
  • Select the structure type
  • Add Owner to the notes section if not able to select in Owner search
  • Save the structure

To bulk import structures:

  • Make sure the correct system is selected in Pathfinder
  • Click the "D-Scan Reader" icon in the top right of the structures panel
  • Copy everything (CTRL + A then CTRL + C) from the in-game D-Scan window
  • Paste (CTRL + V) into the D-Scan reader
  • Press "Update Intel" to update structure intel

Due to the browser based nature of Pathfinder, multiple bulk imports can occasionally be needed to add all structures on D-Scan. Repeat bulk imports of the same D-Scan will add missing structures from previous imports.

Keeping content updated

Even after systems in an area of interest have been mapped and their information added into Pathfinder, it is important to keep it continuously updated.

Signature updates

System signatures should be updated every time a system is entered and frequently when undocked.

Signatures should be updated even if they have not been scanned down. Bulk imports from the in-game scan window allow for quick updates to all of a systems signatures. Existing signatures will keep all signature information with only the 'last updated' column refreshed. Expired signatures can be removed automatically if Lazy Delete is selected. New unscanned signatures will appear as unknown in Pathfinder when bulk imported allowing for quick identification of what needs to be scanned down.

Connection health

Pay attention to the lifetime of wormhole connections each time you travel through them. When you notice that the connection is approaching the end of the line due to its visual differences / descriptive text of the wormhole, go into Pathfinder and mark the connection between the respective systems as "EOL". When doing this, the connection will turn purple on the map, and the connection will be automatically removed from Pathfinder once a 4-hour timer expires.

When considering jumping through a wormhole that is already marked EOL, look at the last update time of the particular connection. You can do this by hovering your mouse over the "ship" icon in the top right corner of the map grid. When you do this, tooltips will appear over every wormhole connection, which will tell you when the connection was first created (the first line) and when the connection was last updated (the second line). If the last update time is 2 to 4 hours of a connection already marked EOL, give additional consideration to whether you jump through and how long you decide to stay. This information can also be seen by hovering over the hourglass next to the ship icon.

When verifying the EOL status of a wormhole while on grid, you should check to see if the mass criticality has changed since it was first observed and entered into Pathfinder. This may be the case due to the number of players entering and exiting the wormhole, but also due to players specifically trying to roll the wormhole.

Available tools and intelligence

One of the core features of Pathfinder is that it provides a variety of intelligence about the local environment in a readily available manner. More specifically, when inspecting any given system, you are provided with basic information such as the number of Jumps, Ship & Pod kills, and NPC kills. There are also links to DOTLAN and EVE Eye located below the map directly to the specific system. Likewise, a truncated version of the killboard showcasing the five ship skills for that system is displayed alongside the other panels.

The current status of Thera connections is pulled in as a separate panel and used as an important input for the systems of interest in the route panel. As players update the systems on the map, and as Thera connections come and go, the route panel will be continuously updated showing the most effective ways to those destinations. You can manually refresh the routes with the refresh button in the top right corner.

Lastly, the current structures and stations that exist in the system are displayed as panels as well, providing a quick way to understand who might be living in the system or at least has a stake in others' presence.

Shortcuts

  • Space + mouse allows dragging the map.
  • Holding CTRL allows you to select multiple systems or connections on the map.

Personalizing

You can change certain aspects of how information is presented or handled on the mapper. These settings will only apply to you.

The map setting can be changed by clicking the "map" button on the top right corner of Pathfinder. This opens sidebar with the following options:

  • Settings - Only available for the map maintainer.
  • Grid snapping - Snaps systems into the grid when you move them.
  • Magnetizing - Causes systems to push at each other to prevent them from overlapping.
  • Signatures - Shows signature info of the wormhole connections on the map.
  • Compact - Hide/show pilot names on the map.

The panels below the map can be rearranged by dragging them from their corners.

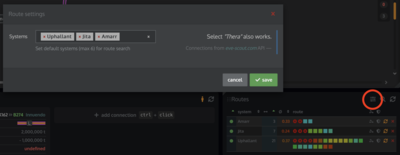
In addition, the mapper can look up the shortest routes to your favourite locations from a selected system. Use Routes/settings to add and save these connections (see screenshot).

Mapper screenshot

Creating maps

Pilots can host private maps in addition to the preexisting corporation maps. To create a map click the "add +" button on the row above the map. Private maps can be shared with a limited number of other players.

Map Options

Scope

The types of systems automatically added to the map can be limited by the map maintainer.

  • All - Every connection jumped will be automatically added
  • Wormholes - Only wormhole connections are added
  • Stargates - Only stargate connections are added
  • None - No connections are automatically added, but systems and connections can be added manually

Pilot tracking has its flaws; Jump cloning, getting podded, or just opening a different map may add non-existing connections to the map.

Practical example

Here is a practical example of how to add scan data to Pathfinder:

  • You arrive at the system of Octanneve. After making sure you are safe you start to scan the system. The first mapper-related thing you should do is to check if the mapper contains up-to-date information on cosmic signatures. If you are lucky, all the signatures are already mapped and you don't need to scan. To do this, select the system in which you are and look at the "Signatures" panel below the map.
Pathfinder signature quick import.png
Old scan data of the system. You can see the age of the scan information on the right side of the table. In this example, it has been 2 days and 4 hours since someone scanned the system. You will need to completely re-scan the system.
  • Start by enabling the "lazy 'delete' signatures" option at the top right corner. With this option enabled you can paste new full signature data of the system and all the signatures that are not present anymore will be deleted from Pathfinder. Note that this option will automatically disable itself after every scan so you will need to re-enable it every time you need it.
  • Open the probe scan window in-game.
Probe scan window
Select the probe scanner window, select all signatures with CTRL + A and copy them with CTRL + C.
  • Pay attention to the filters you use. Depending on the community you are in, information on anomalies in known space is rarely useful and just adds unnecessary noise. On the other hand, in wormhole space, the information on anomalies can be very important.
  • Go back to the Pathfinder window and CTRL + V to add the info on signatures. Now you will easily see if any of the old signatures are still present in the system. There is no need to scan those again, so you can scan faster by taking advantage of the old scanning information in Pathfinder.
  • Once you have scanned all signatures you can add the scanned data in Pathfinder the same way. Select signatures with CTRL + A, copy them with CTRL + C and paste them in Pathfinder with CTRL + V.

In this example, you find a wormhole in the system. You, being a good explorer, will of course map it:

  • Warp to the wormhole at a distance so you are not immediately uncloaked.
  • Once you are on grid with the wormhole you will be able to see the type of the wormhole on your overview. All wormholes have not very useful "K162" on their "out" end and a more useful name on the "in" end. As such, the "K162" can be present for any class of wormhole. Other types are usually associated with specific classes and wormhole sizes.
  • In this example the "in" end is in this system. Add this information to the Pathfinder for the specific signature that you warped to.
  • In the signatures panel click the red "unknown" text in the "type" column of the wormhole. Write in the name of the wormhole.
  • With the exception of the "K162" wormhole types, knowing the type of the wormhole will reveal the ship size limit, mass limit, and what kind of system is on the "out" end of the wormhole.
  • To map the connection to the specific system, you jump through the wormhole. If you have tracking enabled in Pathfinder the destination system is added and connected in the map automatically. If the tracking is not enabled you can right-click the system you were in and select "add system" to add a system.
  • Add a bookmark for the wormhole connection in the respective community bookmark location. Some communities may require a specific scheme for naming bookmarks.
  • Now connect the previous signature to the wormhole. Make sure your now previous system is still selected, then click the "leads to" attribute of the wormhole in the signatures panel. The drop-down menu will already contain the newly connected system for you to select. This information is useful later when the signature has gone away. When the next person comes and removes the signature that is no longer mapped the wormhole connection is also deleted without extra input.

Some mapping schemes may also require you to add a name for the connected wormhole system. This is based on the bookmarking procedure that is used by the respective community to make it easier to follow bookmark trails without the need to look at the mapper in every system on the path. Double click a system in the mapper to open the dialog where you can add or update the name to include the name from the bookmark (e.g. "2 B1 Aldrat").