| AAR asteroids currently have 108m3 of ore |
Unknown if this is intentional or not, it is not mentioned in any patch notes. After March, it was 120m3, and that is what this section is based on. The fits and info will still work, just be a bit overkill.
The 40 m3 breakpoint mentioned below is for 120 m3 rocks. Rocks actually being 108 m3 means the breakpoint is actually 36 m3.
Pioneer Duet
Basic Strategy
- DD rep the solo logi
- Assign drone bunny. Priority targets: Tyrannos Kyrios, Ravenous ___, Enervating ___
- Two Pioneers mine 6 rocks each per wave (see images for split examples)
- Warp out after wave 9 or die
-
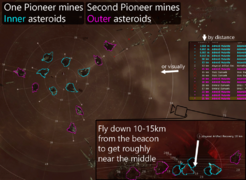 Inner/Outer split
 -
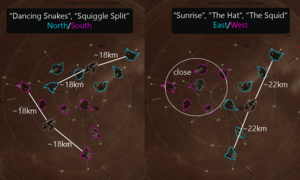 Dancing Snakes and Squid Split


Simplest Strategy
Composition
- 1x Logi Osprey
- 2x DD Vexors
- 2x "HFC AAR Duet - Pioneer Gold Pure MLU2" fit from below (or any Pioneer with 40m3 yield per cycle and 25km range, or higher)
Strategy
- Miners position themselves in the middle of the site. One mines the furthest 6 rocks and the other the closest 6 rocks (see Inner/Outer Split graphic above).
- Osprey gives Remote Sensor Booster with Range script to whichever Pioneer is responsible for the the Outer rocks.
- Someone deploys a Mobile Tractor Unit
- Vexors stay near the Osprey and rep the Osprey.
- One Vexor is drone bunny, everyone assists drones to them.
- Either Vexor shoots Faulty Triglavian Caches that spawn from mined-out rocks.
- Always kill *Tyrannos Kyrios*, Ravenous, and Enervating enemies first.
Logi Fits
| HFC AAR Duet - Logi T2 Osprey |
|---|
[Osprey, HFC AAR Duet - Logi Osprey] Power Diagnostic System II Capacitor Power Relay II Capacitor Power Relay II Multispectrum Shield Hardener II Large Compact Pb-Acid Cap Battery EM Shield Hardener II F-23 Compact Remote Sensor Booster Multispectrum Shield Hardener II Medium Asymmetric Enduring Remote Shield Booster Medium Asymmetric Enduring Remote Shield Booster Medium Asymmetric Enduring Remote Shield Booster Medium Asymmetric Enduring Remote Shield Booster Medium Inductive Compact Remote Capacitor Transmitter Medium Thermal Shield Reinforcer II Medium Capacitor Control Circuit II Medium Capacitor Control Circuit II Hornet II x4 Targeting Range Script x1 Scan Resolution Script x1 Mobile Tractor Unit x1 |
| HFC AAR Duet - Logi T1 Osprey |
|---|
[Osprey, HFC AAR Duet - Logi T1 Osprey] Mark I Compact Power Diagnostic System Mark I Compact Capacitor Power Relay Mark I Compact Capacitor Power Relay Enduring Multispectrum Shield Hardener Large Compact Pb-Acid Cap Battery Enduring EM Shield Hardener Linked Enduring Remote Sensor Booster Enduring Multispectrum Shield Hardener Medium Asymmetric Enduring Remote Shield Booster Medium Asymmetric Enduring Remote Shield Booster Medium Asymmetric Enduring Remote Shield Booster Medium Asymmetric Enduring Remote Shield Booster Medium Inductive Compact Remote Capacitor Transmitter Medium Thermal Shield Reinforcer II Medium Capacitor Control Circuit II Medium Capacitor Control Circuit II Caldari Navy Hornet x4 Scan Resolution Script x1 Targeting Range Script x1 Mobile Tractor Unit x1 |
DD Fits
| HFC AAR Duet - DD T1 Vexor |
|---|
[Vexor, HFC AAR Duet - DD T1 Vexor] AE-K Compact Drone Damage Amplifier AE-K Compact Drone Damage Amplifier AE-K Compact Drone Damage Amplifier Mark I Compact Capacitor Power Relay Mark I Compact Capacitor Power Relay Large Compact Pb-Acid Cap Battery Denny Enduring Omnidirectional Tracking Link Large F-S9 Regolith Compact Shield Extender Enduring Multispectrum Shield Hardener Medium Asymmetric Enduring Remote Shield Booster Festival Launcher Focused Modulated Medium Energy Beam I Drone Link Augmentor I Medium EM Shield Reinforcer II Medium Thermal Shield Reinforcer II Medium Hyperspatial Velocity Optimizer II Caldari Navy Vespa x5 Vespa II x5 Tracking Speed Script x1 Imperial Navy Infrared M x1 Mobile Tractor Unit x1 |
Capchain DD Fits
These fits require capchaining to each other to be stable. The above fit (or an upgraded/T2 version) is recommended for its simplicity if nothing else. These capchain fits don't have many advantages, but do recover from neuts faster and are safer when entering the site early without the logi.
| HFC AAR Duet - DD T1 Vexor |
|---|
[Vexor, HFC AAR Duet - DD T1 Vexor] Damage Control II Photonic Upgraded Co-Processor AE-K Compact Drone Damage Amplifier AE-K Compact Drone Damage Amplifier AE-K Compact Drone Damage Amplifier Enduring Multispectrum Shield Hardener Large Compact Pb-Acid Cap Battery Large F-S9 Regolith Compact Shield Extender Denny Enduring Omnidirectional Tracking Link Drone Link Augmentor I Medium Asymmetric Enduring Remote Shield Booster Medium Inductive Compact Remote Capacitor Transmitter Medium Inductive Compact Remote Capacitor Transmitter Medium Processor Overclocking Unit I Medium EM Shield Reinforcer II Medium Thermal Shield Reinforcer II Caldari Navy Vespa x5 Vespa II x5 Imperial Navy Infrared M x1 Tracking Speed Script x1 Focused Modulated Medium Energy Beam I x1 Civilian Gatling Railgun x1 Mobile Tractor Unit x1 |
| HFC AAR Duet - DD T2 Vexor |
|---|
[Vexor, HFC AAR Duet - DD T2 Vexor] Damage Control II Photonic Upgraded Co-Processor Drone Damage Amplifier II Drone Damage Amplifier II Drone Damage Amplifier II Multispectrum Shield Hardener II AML Compact Omnidirectional Tracking Link Large F-S9 Regolith Compact Shield Extender Large Compact Pb-Acid Cap Battery Medium Asymmetric Enduring Remote Shield Booster Medium Inductive Compact Remote Capacitor Transmitter Medium Inductive Compact Remote Capacitor Transmitter Drone Link Augmentor I Medium Processor Overclocking Unit I Medium EM Shield Reinforcer II Medium Thermal Shield Reinforcer II Caldari Navy Vespa x5 Vespa II x5 Imperial Navy Infrared M x1 Tracking Speed Script x1 Focused Modulated Medium Energy Beam I x1 Civilian Gatling Railgun x1 Mobile Tractor Unit x1 |
Miner Fits
There are a lot of fits and information below here. The short version is you want 40m3 yield per cycle or more, and 25km range or more.
There are a number of ways to get there and a number of ways to accommodate lower skill levels.
| HFC AAR Duet - Pioneer Silver Alpha (Mining Destroyer 2, Mining 4, Mining Upgrades 1) |
|---|
[Pioneer, HFC AAR Duet - Pioneer Silver Alpha] Mining Laser Upgrade I Mining Laser Upgrade I Compact Thermal Shield Amplifier Medium F-S9 Regolith Compact Shield Extender Enduring Multispectrum Shield Hardener Miner II [1] Miner II [2] Miner II [3] Festival Launcher Small EM Shield Reinforcer II Small Processor Overclocking Unit I Small Processor Overclocking Unit I Caldari Navy Hornet x4 Hornet II x4 [1] Miner II Gravid Mining Laser Mutaplasmid capacitorNeed 18.0, cpu 80.0, duration 15000.0, maxRange 13000.0, miningAmount 16.8, miningCritBonusYield 2.0, miningCritChance 0.01, miningWasteProbability 34.0, miningWastedVolumeMultiplier 1.0, power 4.0 [2] Miner II Gravid Mining Laser Mutaplasmid capacitorNeed 18.0, cpu 80.0, duration 15000.0, maxRange 13000.0, miningAmount 16.8, miningCritBonusYield 2.0, miningCritChance 0.01, miningWasteProbability 34.0, miningWastedVolumeMultiplier 1.0, power 4.0 [3] Miner II Gravid Mining Laser Mutaplasmid capacitorNeed 18.0, cpu 80.0, duration 15000.0, maxRange 13000.0, miningAmount 16.8, miningCritBonusYield 2.0, miningCritChance 0.01, miningWasteProbability 34.0, miningWastedVolumeMultiplier 1.0, power 4.0 |
| HFC AAR Duet - Pioneer Silver Residue MLU1 (Mining Destroyer 4, Mining 4, Astrogeology 0, Mining Upgrades 1) |
|---|
[Pioneer, HFC AAR Duet - Pioneer Silver Residue MLU1] Mining Laser Upgrade I Mining Laser Upgrade I Medium F-S9 Regolith Compact Shield Extender Enduring Multispectrum Shield Hardener Compact Thermal Shield Amplifier Miner II Miner II Miner II Festival Launcher Small Processor Overclocking Unit I Small Processor Overclocking Unit I Small EM Shield Reinforcer II Caldari Navy Hornet x4 Hornet II x4 |
| HFC AAR Duet - Pioneer Gold Pure MLU1 (Mining Destroyer 4, Mining 4, Astrogeology 4, Mining Upgrades 1) |
|---|
[Pioneer, HFC AAR Duet - Pioneer Gold Pure MLU1] Mining Laser Upgrade I Mining Laser Upgrade I Medium F-S9 Regolith Compact Shield Extender Enduring Multispectrum Shield Hardener Compact Thermal Shield Amplifier EP-S Gaussian Scoped Mining Laser EP-S Gaussian Scoped Mining Laser EP-S Gaussian Scoped Mining Laser Festival Launcher Small Processor Overclocking Unit I Small EM Shield Reinforcer II Small EM Shield Reinforcer II Caldari Navy Hornet x4 Hornet II x4 |
| HFC AAR Duet - Pioneer Gold Pure MLU2 (Mining Destroyer 4, Mining 4, Astrogeology 1, Mining Upgrades 4) |
|---|
[Pioneer, HFC AAR Duet - Pioneer Gold Pure MLU2] Mining Laser Upgrade II Mining Laser Upgrade II Medium F-S9 Regolith Compact Shield Extender Enduring Multispectrum Shield Hardener Compact Thermal Shield Amplifier EP-S Gaussian Scoped Mining Laser EP-S Gaussian Scoped Mining Laser EP-S Gaussian Scoped Mining Laser Festival Launcher Small Processor Overclocking Unit I Small EM Shield Reinforcer II Small EM Shield Reinforcer II Caldari Navy Hornet x4 Hornet II x4 |
| HFC AAR Duet - Pioneer Platinum (Mining Destroyer 5, Mining 5, Astrogeology 4, Mining Upgrades 4) |
|---|
[Pioneer, HFC AAR Duet - Pioneer Platinum] Mining Laser Upgrade II Mining Laser Upgrade II Medium F-S9 Regolith Compact Shield Extender Enduring Multispectrum Shield Hardener Compact Thermal Shield Amplifier Miner II Miner II Miner II Festival Launcher Small Processor Overclocking Unit I Small Processor Overclocking Unit I Small EM Shield Reinforcer II Caldari Navy Hornet x4 Hornet II x4 |
"Silver/Gold/Platinum" see tiers below
"Pure" means the fit uses scoped T1 lasers
"Residue" means the fit uses T2 lasers, this sacrifices range in exchange for lower overall skill requirement to reach yield breakpoints
Miner Tiers
- Bronze: Minimum requirements, can do inner rocks and the close rocks of the Sunset Split[1]
- 40 m3 12 km
- Silver: Can also do Dancing Snakes
- 40 m3 18 km
- Gold: Can do outer rocks and the horizon of the Sunset Split
- 40 m3 25 km
- Platinum: Range downgrade but major yield upgrade. Outer rocks now require a little finesse, but gives a ton of time margin
- 60 m3 24 km
Miner Skills
- Silver Residue Alpha
- Mining Destroyer 2, Mining 4, Mining Upgrades 1
- Silver Residue MLU1
- Mining Destroyer 4, Mining 4, Astrogeology 0, Mining Upgrades 1
- Gold Pure MLU1
- Mining Destroyer 4, Mining 4, Astrogeology 4, Mining Upgrades 1
- Gold Pure MLU2
- Mining Destroyer 4, Mining 4, Astrogeology 1, Mining Upgrades 4
- Platinum Residue
- Mining Destroyer 5, Mining 5, Astrogeology 4, Mining Upgrades 4
Miner Breakpoints and Splits
This section contains excessive information and detail, maybe useful to FCs and the curiously minded. I wrote it as an aid in my quest to determine fits and skills needed for our loaners.
Yield breakpoints:
- 40 m3 per cycle: finishes each rock in 3 cycles. 90 seconds for all 6 rocks. 30 second margin.
- 60 m3 per cycle: finishes each rock in 2 cycles. 60 seconds for all 6 rocks. 60 seconds margin.
- 90 m3 per cycle: finishes each rock in 1.5 cycles. 46 seconds for all 6 rocks. 74 second margin.
- 120 m3 per cycle: finishes each rock in 1 cycle. 30 seconds for all 6 rocks. 90 second margin.
Practically, 40 m3 is the minimum requirement. Slightly less is possible but requires a great deal of attention with little room for error.
Having a yield low enough that short-cycling your lasers is critical to completing the site is not recommended. This makes these breakpoints fairly rigid. On the other hand, short cycling with a higher than minimum yield (such as the 90 m3 breakpoint) allows a skilled miner to back up their partner, cover for mistakes, and generally help prevent site failures. This is especially effective with lasers that have residue and is best accompanied by enough range to cover the other Pioneer's rocks, which can be done with any split.
Range breakpoints (refer to the images above):
- 12km: can handle the head of the Squid split
- 13km: can handle the near rocks of the Inner/Outer split
- 18km: can handle the Dancing Snakes split
- 23km: can handle the arms of the Squid split
- 26km: can handle the far rocks of the Inner/Outer split [2]
- 32km: can reach all rocks from the beacon
- 40km: can reach all rocks from any position in any split
Unlike yield breakpoints, range breakpoints are looser. These ranges are not the absolute minimums as absolute minimum range requires extremely precise positioning and range displays in-game are not precise enough. These ranges are either rounded up to the nearest km, or add 1-2 km of margin. Higher range makes positioning considerably easier, drifting more forgiving, and is generally very impactful in consistently completing sites.
The game loves rounding values in tooltips and distances in space above 10km. If your range is 25km and the rock is 25km away you may not be able to mine it as your true mining range and true distance to the rock may be quite different. Also, if your cycle yield in-game shows as 40 m3 it is possible your yield is actually something like 39.7 m3 and you will occasionally not 3-cycle your rock.
Execution difficulty:
- Inner/Outer: Easiest to execute, requiring very little manual piloting. The far miner of this split has the highest SP requirement of any position in any split
- Squid: Somewhat more difficult to execute, requiring some manual piloting by both Pioneers. However, both Pioneers have objects in space as reference points that make this relatively simple: The Squid head Pioneer approaches and sits at 0 on the middle rock in their cluster. The Squid arm Pioneer sits next to the untargetable wreck doodad near one of the middle rocks. The wreck doodad is visible in the reference image above, next to the right toe of the Pioneer.
- Dancing Snakes: This split is arguably the most difficult of the three to execute, requiring the use of range to specific rocks find the right spot to sit. With good positioning, each Pioneer can target their closest 6 rocks by range from the overview. Otherwise, targeting rocks visually in space may be necessary to avoid mining each others rocks.
Why Care
It might seem silly to concern ourselves with all this -- and it kind of is -- but it's been fun and effective distraction for me. Also:
My group has spent a lot of time running AARs with very new players. The original, pre-Catalyst strategies meant teaching these players how to position themselves at specific points in space under time pressure and without any clickable/approachable/tangible objects. They had to use manual piloting and visual references. Manual piloting, it turns out, is not a common skill among new players and visual references are difficult when graphics differ from player to player. There were visual aids made, lots of Discord screen sharing, we even used alts in frigates to help direct people to the right spots.
It was not uncommon for newbies to fail multiple AARs without completing a single wave before they got the hang of it. This became an increasing problem as AARs became more popular; competition put more pressure on fleet members and slowed down the learning process. Therefore, our primary goal became to find strategies that made sites supremely consistent, with loaners to match.
The Near/Far Pioneer Duet is really the culmination of all that. It's a bit of a golden bullet in terms of strategies, and for individual pilots I recommend training and fitting your ships accordingly. It's not a long train and the ships are not expensive.
However, our job as an organization of FCs, teachers, and keepers of loaners means we want to accommodate players of all levels of SP and experience. All this extra theorycrafting and other work means people can show up to fleets with no ship, no clue, practically no SP, and still get to fly. That's important to us. Nerdy theory and prep also makes FC life easier, and EVE always needs more FCs.
Vexoneer Waltz
Using one Pioneer with at least 60 m3 and minimum 22km range to cover 9 asteroids, and one Vexor with at least 20 m3 can do the last 3 asteroids.
| HFC AAR Waltz - Miner Vexor (with max mining skils, the MLU1 is unnecessary) |
|---|
[Vexor, HFC AAR Waltz - Miner Vexor (3x20m3)] Photonic Upgraded Co-Processor Photonic Upgraded Co-Processor Mining Laser Upgrade I Drone Damage Amplifier II Drone Damage Amplifier II Medium F-S9 Regolith Compact Shield Extender Multispectrum Shield Hardener II AML Compact Omnidirectional Tracking Link Medium Compact Pb-Acid Cap Battery Particle Bore Compact Mining Laser Particle Bore Compact Mining Laser Particle Bore Compact Mining Laser Drone Link Augmentor I Medium Thermal Shield Reinforcer II Medium EM Shield Reinforcer II Medium EM Shield Reinforcer II Hornet II x1 Vespa II x4 Warden II x2 Light Shield Maintenance Bot II x5 Nanite Repair Paste x99 Optimal Range Script x1 Tracking Speed Script x1 'Wetu' Mobile Depot x1 |

