Difference between revisions of "EVE Fitting Tool"
m (→Seeing and linking your EFT fits in the IGB: Just added a screenshot of how to get the exact url with minimum effort.) |
Salartarium (talk | contribs) m (Remove old related class) |
||
| (22 intermediate revisions by 14 users not shown) | |||
| Line 1: | Line 1: | ||
| − | EVE Fitting Tool, or EFT, is one of the most widely used 3rd party applications by players. It allows you to create and experiment with different ship fittings without the need to be in the game. By adding your character information, it can let you know if you meet the requirements for the fitting or what skills you lack for the proper fit. The step-by-step visual guide below is aimed at providing you with a good understanding of how to use the program and interpret the information it displays. | + | {{Deprecated|[[PYFA]], an alternative fitting tool,}} |
| − | + | {{Color box | color=darkred|The EFT project has been abandoned by Gripen, its author, since March 2016. Fitting stats on a variety of modules and ships have been changed since that time, and so EFT can now generate inaccurate fits. Use of EFT is no longer recommended.}} | |
| + | |||
| + | EVE Fitting Tool, or EFT, is one of the most widely used 3rd party applications by players. It allows you to create and experiment with different ship fittings without the need to be in the game. By adding your character information, it can let you know if you meet the requirements for the fitting or what skills you lack for the proper fit. The step-by-step visual guide below is aimed at providing you with a good understanding of how to use the program and interpret the information it displays. | ||
| + | |||
| + | To download EFT you should follow the link in the opening post of [https://forums.eveonline.com/default.aspx?g=posts&t=24359 this thread] on the official EVE online forums. Do not download EFT from anywhere else. | ||
| + | |||
==Step One: Importing Your Character== | ==Step One: Importing Your Character== | ||
The first thing you will want to do after starting EFT is import your character information. This can be done by opening the 'Character Editor' under the 'View' menu option or pressing Ctrl + C. | The first thing you will want to do after starting EFT is import your character information. This can be done by opening the 'Character Editor' under the 'View' menu option or pressing Ctrl + C. | ||
| − | |||
[[File:Eftstep1a.JPG]] | [[File:Eftstep1a.JPG]] | ||
| − | By default, EFT provides you with a 'All level V' character | + | By default, EFT provides you with a 'All level V' character. To use your own skill set, first click the 'Create new character' icon just to the right of the drop down menu. |
| − | |||
| − | |||
| + | [[File:Eftstep1b.JPG]] | ||
| − | |||
| + | This will open a new window to type in your character's name. After hitting 'Ok', the drop down menu will select and display your newly created character. | ||
| − | + | [[File:EFT_001_CHAR_CREATE.gif]] | |
| − | + | '''To import the current skills from your character''', click the 3rd small icon, named "API skill import". | |
| + | [[File:EFT_002_CHAR_IMPORT.gif]] | ||
| − | |||
| + | On this screen, you will need to input your character's API key which can be obtained here: [https://community.eveonline.com/support/api-key/ if you have existing API for this purpose] or [https://community.eveonline.com/support/api-key/CreatePredefined?accessMask=8 if you want to create a new one]. When you have input the information, click 'Next' which will pop up another window allowing you to select the character information you want to import. You can also click the option to save that character selection which will allow you to use the 'Quick import' button to update your character in the future. | ||
| − | [[File: | + | [[File:EFT_003_CHAR_API_INPUT.gif]] |
Keep in mind, this only imports your character's current skill information and does not anticipate any future training. It will not import any implants your character has either. However, you can add implants by clicking the 'Implant' button and browsing the trees available. When you have found the right implant, double-click it to add it to your character's stats. Active implants are displayed by a green check mark. | Keep in mind, this only imports your character's current skill information and does not anticipate any future training. It will not import any implants your character has either. However, you can add implants by clicking the 'Implant' button and browsing the trees available. When you have found the right implant, double-click it to add it to your character's stats. Active implants are displayed by a green check mark. | ||
| − | |||
[[File:Eftstep1e.JPG]] | [[File:Eftstep1e.JPG]] | ||
| Line 36: | Line 39: | ||
One other useful thing to know is that you can modify your character's skill levels manually. This is very helpful if you want to compare ship stats with your current skill level versus any anticipated training. | One other useful thing to know is that you can modify your character's skill levels manually. This is very helpful if you want to compare ship stats with your current skill level versus any anticipated training. | ||
| − | |||
[[File:Eftstep1f.JPG]] | [[File:Eftstep1f.JPG]] | ||
| Line 48: | Line 50: | ||
To open a ship window, click the 'File' menu tab and select 'Open ship browser...' | To open a ship window, click the 'File' menu tab and select 'Open ship browser...' | ||
| − | |||
[[File:Eftstep2a.JPG]] | [[File:Eftstep2a.JPG]] | ||
| − | |||
This will open the selection window where you can browse all the different ships available. Clicking a ship will show its stats and bonuses to the right. | This will open the selection window where you can browse all the different ships available. Clicking a ship will show its stats and bonuses to the right. | ||
| − | |||
[[File:Eftstep2b.jpg]] | [[File:Eftstep2b.jpg]] | ||
| − | |||
Once you start adding and saving fits, you will notice that each selection will indicate the number of setups that you have for that ship type. When you have found the ship you want to fit hit 'Ok'. The ship window will open up and if you do not already have any fits for that ship it will ask you to create a new one. Click 'Yes', type in the name you want to save the fit under, and hit 'Ok'. | Once you start adding and saving fits, you will notice that each selection will indicate the number of setups that you have for that ship type. When you have found the ship you want to fit hit 'Ok'. The ship window will open up and if you do not already have any fits for that ship it will ask you to create a new one. Click 'Yes', type in the name you want to save the fit under, and hit 'Ok'. | ||
| − | |||
[[File:Eftstep2c.jpg]] | [[File:Eftstep2c.jpg]] | ||
| − | |||
From here, you will want to familiarize yourself with the display. You can select the character you want to work with in the drop down box at the top. Mousing over the various icons in each section will display specific information. For example, mousing over the question mark in the top left will display the ships information and bonuses. | From here, you will want to familiarize yourself with the display. You can select the character you want to work with in the drop down box at the top. Mousing over the various icons in each section will display specific information. For example, mousing over the question mark in the top left will display the ships information and bonuses. | ||
| − | |||
[[File:Eftstep2d.JPG]] | [[File:Eftstep2d.JPG]] | ||
| − | |||
The icons under 'Defence' and 'Targeting' will also indicate the ability to right-click and alter the displayed information or variables. | The icons under 'Defence' and 'Targeting' will also indicate the ability to right-click and alter the displayed information or variables. | ||
| − | |||
[[File:Eftstep2e.JPG]] | [[File:Eftstep2e.JPG]] | ||
| − | |||
Once you are comfortable with the display, you can start fitting your ship. | Once you are comfortable with the display, you can start fitting your ship. | ||
| Line 82: | Line 74: | ||
On the left side of the EFT screen, it will have various categories which can be expanded to find different modules. | On the left side of the EFT screen, it will have various categories which can be expanded to find different modules. | ||
| − | |||
[[File:Eftstep3a.JPG]] | [[File:Eftstep3a.JPG]] | ||
| − | |||
You may also search for specific types by typing the name in the search window at the top. In certain categories you can show faction or other specific modules by clicking the buttons at the bottom of the window. | You may also search for specific types by typing the name in the search window at the top. In certain categories you can show faction or other specific modules by clicking the buttons at the bottom of the window. | ||
| − | |||
[[File:Eftstep3b.JPG]] | [[File:Eftstep3b.JPG]] | ||
| − | |||
To load a module, click and drag the module into the appropriate slot on the ship window. When a module is loaded you will notice that it will change various stats on the right side of the ship window. You can overload or place a module offline by clicking the icon to the left of the module itself. | To load a module, click and drag the module into the appropriate slot on the ship window. When a module is loaded you will notice that it will change various stats on the right side of the ship window. You can overload or place a module offline by clicking the icon to the left of the module itself. | ||
| Line 131: | Line 119: | ||
| − | + | To get some suggestions on what skills or other modules can make up for the difference, right click the attribute and select "Show Attribute Info", then "Affected by". | |
| + | |||
| + | [[File:EftAttributes.png]] | ||
| + | [[File:EftAffectedBy.png]] | ||
Once you have finished creating a fitting, you have a couple of options. If you wish to work with the same ship, you can click the arrow down icon next to the 'Current Setup' drop down menu to manage the setups. | Once you have finished creating a fitting, you have a couple of options. If you wish to work with the same ship, you can click the arrow down icon next to the 'Current Setup' drop down menu to manage the setups. | ||
| Line 145: | Line 136: | ||
Fly safe! o/ | Fly safe! o/ | ||
| − | |||
| − | |||
== Other Useful Tips == | == Other Useful Tips == | ||
| Line 157: | Line 146: | ||
=== Export/Import fits between EVE and EFT === | === Export/Import fits between EVE and EFT === | ||
| − | EFT | + | |
| + | ==== From EFT to the Game ==== | ||
| + | EFT offers the option to export files in XML-format that you can import in game. | ||
[[Image:Eftstep3i.JPG]] | [[Image:Eftstep3i.JPG]] | ||
| − | When you have a fit open, click the drop-down menu to the right of the name of your fit, and select Export to XML. The default EVE file path for fittings under Windows is "...\My Documents\EVE\fittings", so save it there. In game | + | When you have a fit open in EFT, click the drop-down menu to the right of the name of your fit, and select Export to XML. The default EVE file path for fittings under Windows is "...\My Documents\EVE\fittings", so save it there. In game, go to the Fitting Management window (by opening up the fitting window (ALT+F) and clicking the Browse button near the bottom right). The Fitting Management window has an Import button, and the rest should be obvious. |
| − | There's | + | ==== From the Game to EFT ==== |
| + | There's an Export button in the game's Fitting Management window, which (guess what) exports all your fits in a single XML file. Export fittings in game first, then in EFT, go to File -> Import/Export to Eve -> Open XML File Manager to look at the exported XML files. | ||
| + | |||
| + | === Importing fits via clipboard === | ||
| + | Fits can be imported from text format via the clipboard. Copy the fit (for example from the wiki or a forum post) to the clipboard by marking and pressing CTRL-C. Click on the EFT window to give the focus to EFT. A dialog will appear, asking if the fit should be imported to EFT. | ||
| + | |||
| + | [[Image:EftClipboard.png]] | ||
=== DPS charts === | === DPS charts === | ||
| Line 213: | Line 210: | ||
DamageProfile=[ammo] Tremor,0,0,3,5<br> | DamageProfile=[ammo] Tremor,0,0,3,5<br> | ||
DamageProfile=EM,1,0,0,0<br> | DamageProfile=EM,1,0,0,0<br> | ||
| − | DamageProfile= | + | DamageProfile=Thermal,0,1,0,0<br> |
DamageProfile=Kinetic,0,0,1,0<br> | DamageProfile=Kinetic,0,0,1,0<br> | ||
DamageProfile=Explosive,0,0,0,1<br> | DamageProfile=Explosive,0,0,0,1<br> | ||
| − | With these damage profiles you'll be able to see how effective your tank is against specific enemies/weapons. Both your DPS tank and your effective HP ratings will be recalculated based on the damage type you use, by default EFT is using a balanced damage profile (which is the reason why the numbers might differ from the numbers shown by the ingame fitting screen, as the ingame fitting screen is using your lowest resists to calculate the effectiveness of your tank).<br> | + | With these damage profiles you'll be able to see how effective your tank is against specific enemies/weapons. Both your DPS tank and your effective HP ratings will be recalculated based on the damage type you use, by default EFT is using a balanced damage profile (which is the reason why the numbers might differ from the numbers shown by the ingame fitting screen, as the ingame fitting screen is using your lowest resists to calculate the effectiveness of your tank).<br> |
| − | |||
| − | |||
| − | |||
| − | |||
| − | |||
| − | |||
| − | |||
| − | |||
| − | + | === Creating an All Level X Character === | |
| − | + | Occasionally you may prefer to test all level X values without having to change everything using the drop-down menus. Within the Character Editor, select the [All level V] character and click the second button from the left for "Rename\Duplicate character." Enter the name All level X (or something similar) and click OK. | |
| + | Go to your EFT directory, then into the Characters directory. Open up the character file for your new All level X with Notepad (or some other basic text editor program), then use the replace all function to change the 5s to your target level. Save the changes and you'll have an 'all level X' character for your theorizing pleasure. This will accept otherwise impossible sets of skills (eg you could have weapon upgrades to 3 and advanced weapon upgrades to 3 even though advanced weapon upgrades has a prerequisite of weapon upgrades 5). | ||
| − | [[Category: | + | [[Category:Applications]] |
Latest revision as of 08:10, 7 March 2022
Please visit PYFA, an alternative fitting tool, for current info.
EVE Fitting Tool, or EFT, is one of the most widely used 3rd party applications by players. It allows you to create and experiment with different ship fittings without the need to be in the game. By adding your character information, it can let you know if you meet the requirements for the fitting or what skills you lack for the proper fit. The step-by-step visual guide below is aimed at providing you with a good understanding of how to use the program and interpret the information it displays.
To download EFT you should follow the link in the opening post of this thread on the official EVE online forums. Do not download EFT from anywhere else.
Step One: Importing Your Character
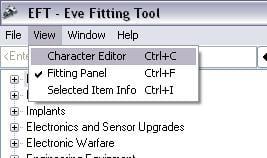
The first thing you will want to do after starting EFT is import your character information. This can be done by opening the 'Character Editor' under the 'View' menu option or pressing Ctrl + C.
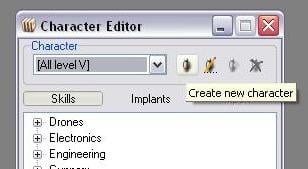
By default, EFT provides you with a 'All level V' character. To use your own skill set, first click the 'Create new character' icon just to the right of the drop down menu.
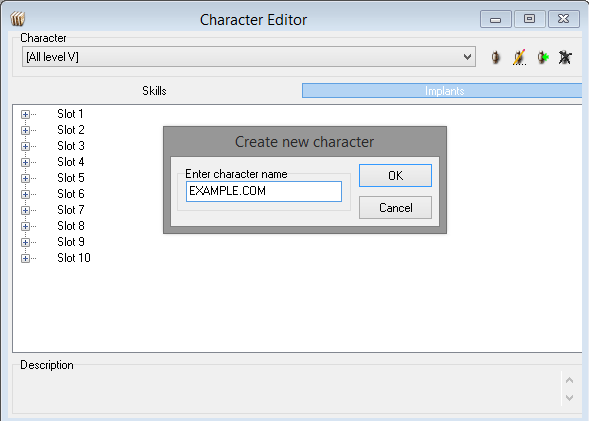
This will open a new window to type in your character's name. After hitting 'Ok', the drop down menu will select and display your newly created character.
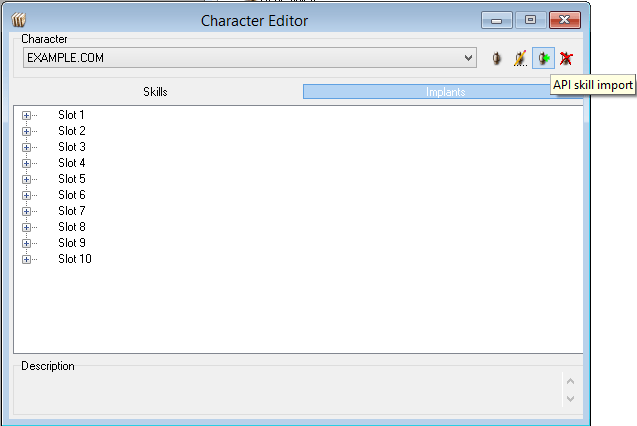
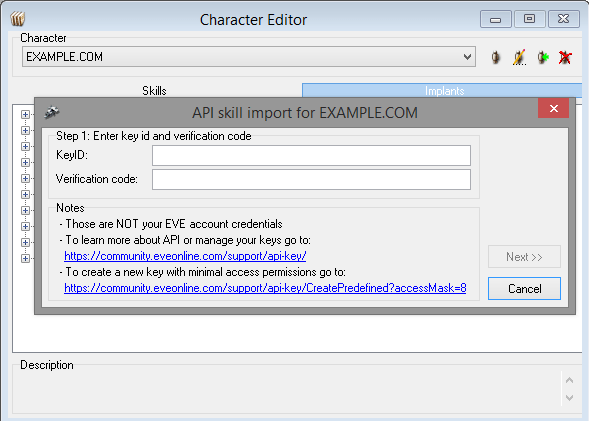
To import the current skills from your character, click the 3rd small icon, named "API skill import".
On this screen, you will need to input your character's API key which can be obtained here: if you have existing API for this purpose or if you want to create a new one. When you have input the information, click 'Next' which will pop up another window allowing you to select the character information you want to import. You can also click the option to save that character selection which will allow you to use the 'Quick import' button to update your character in the future.
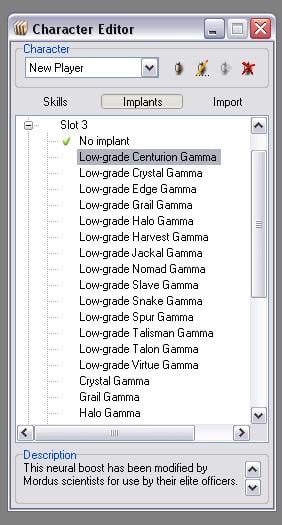
Keep in mind, this only imports your character's current skill information and does not anticipate any future training. It will not import any implants your character has either. However, you can add implants by clicking the 'Implant' button and browsing the trees available. When you have found the right implant, double-click it to add it to your character's stats. Active implants are displayed by a green check mark.
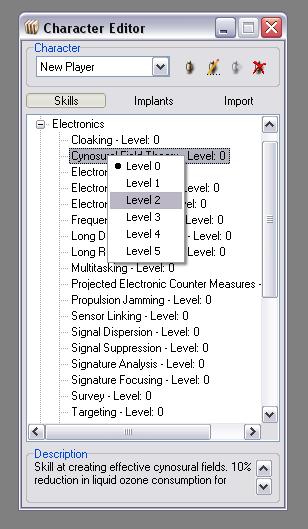
One other useful thing to know is that you can modify your character's skill levels manually. This is very helpful if you want to compare ship stats with your current skill level versus any anticipated training.
Just remember that you can use the 'Quick import' button to 'reset' your skills back to their original state should you forget which skills you modified.
Now that you have added your character, it is time to work with your ships.
Step Two: Using the Ship Window
To open a ship window, click the 'File' menu tab and select 'Open ship browser...'
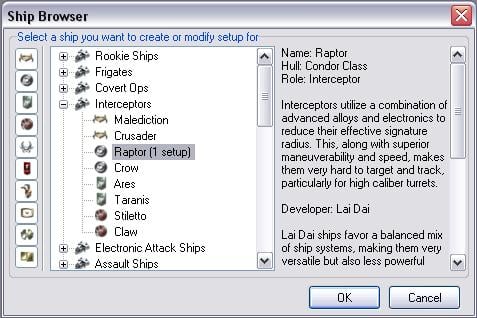
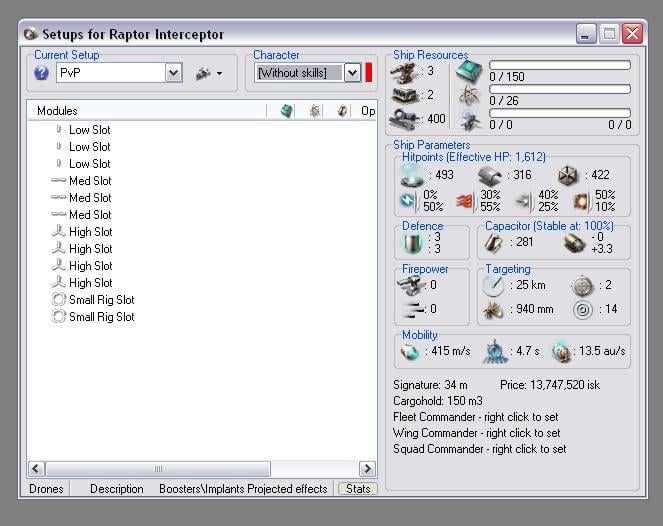
This will open the selection window where you can browse all the different ships available. Clicking a ship will show its stats and bonuses to the right.
Once you start adding and saving fits, you will notice that each selection will indicate the number of setups that you have for that ship type. When you have found the ship you want to fit hit 'Ok'. The ship window will open up and if you do not already have any fits for that ship it will ask you to create a new one. Click 'Yes', type in the name you want to save the fit under, and hit 'Ok'.
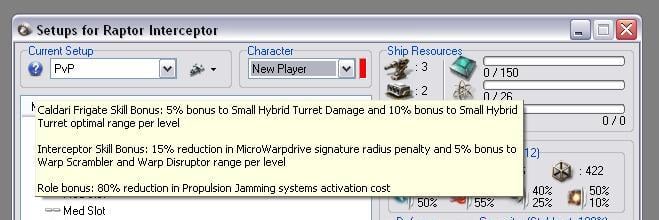
From here, you will want to familiarize yourself with the display. You can select the character you want to work with in the drop down box at the top. Mousing over the various icons in each section will display specific information. For example, mousing over the question mark in the top left will display the ships information and bonuses.
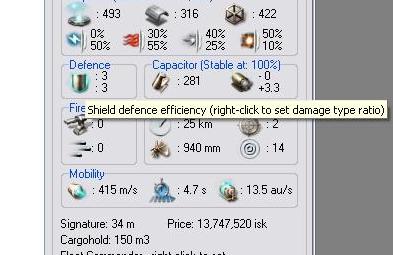
The icons under 'Defence' and 'Targeting' will also indicate the ability to right-click and alter the displayed information or variables.
Once you are comfortable with the display, you can start fitting your ship.
Step Three: Fitting Your Ship
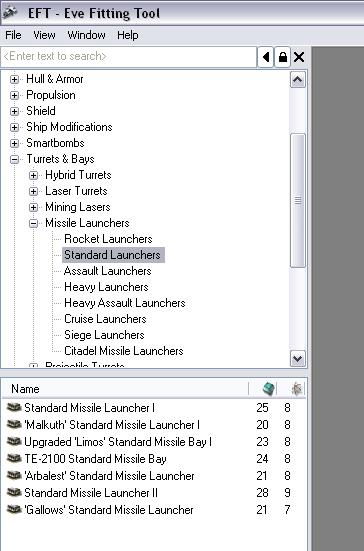
On the left side of the EFT screen, it will have various categories which can be expanded to find different modules.
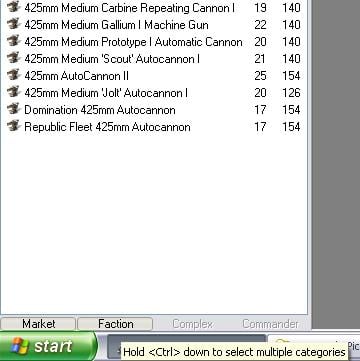
You may also search for specific types by typing the name in the search window at the top. In certain categories you can show faction or other specific modules by clicking the buttons at the bottom of the window.
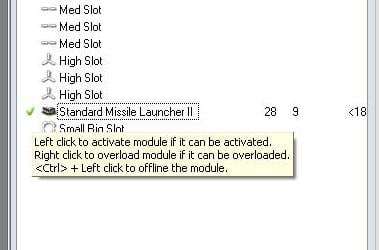
To load a module, click and drag the module into the appropriate slot on the ship window. When a module is loaded you will notice that it will change various stats on the right side of the ship window. You can overload or place a module offline by clicking the icon to the left of the module itself.
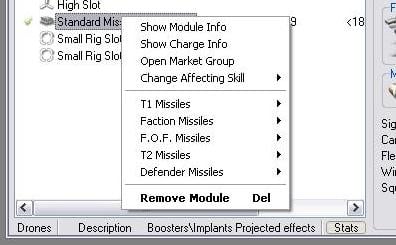
Right clicking the module will allow you to change ammunition types and view other info.
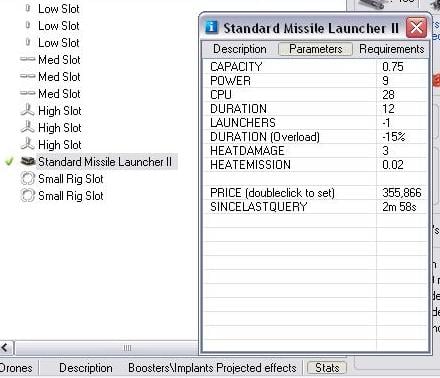
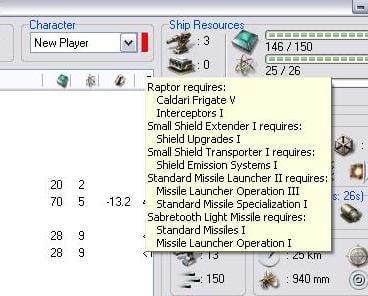
Clicking 'Show Module Info' will pop up a window displaying the various stats and requirements to fit the module.
You will notice that it gives the price for the module itself. As you load a module onto the ship, it will automatically pull the average price information from the EVE-Central database if you are on an active internet connection. As you fit more and more modules, the ship window will calculate the estimated total cost for that fitting in the bottom right. Keep in mind that not all modules have price data loaded on the EVE-Central site and it may not be completely accurate depending on the region you are in.
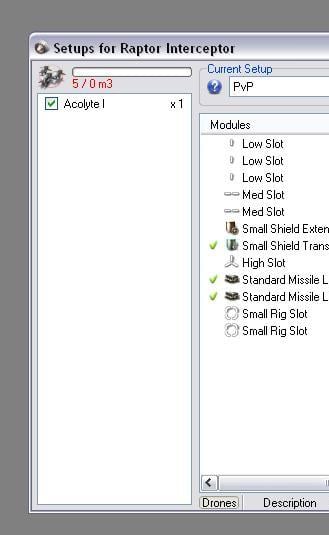
Some ships have the ability to carry drones. If you wish to add those to the fitting, click the 'Drones' button at the bottom right of the ship window. From here you simply click and drag the drones you wish to fit. To put them online, click the check box.
When you have finished loading all the modules you wish to fit to a ship, the display window will indicate if you have the proper skills. The color icon next to your characters name will either be red or green. If it is red, you can mouse over to show which skills you still need to be able to fit the modules.
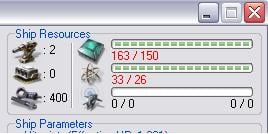
Keep in mind that even though you may have the required skills, they may not always be enough to fit the modules effectively. Other things such as the Powergrid or CPU requirements may still hinder you from flying with that fitting. If this is the case, it will show the overage in the top right.
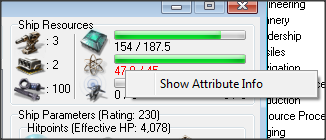
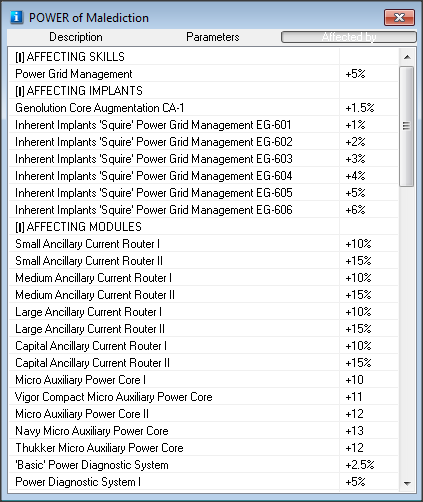
To get some suggestions on what skills or other modules can make up for the difference, right click the attribute and select "Show Attribute Info", then "Affected by".
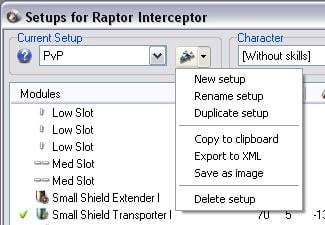
Once you have finished creating a fitting, you have a couple of options. If you wish to work with the same ship, you can click the arrow down icon next to the 'Current Setup' drop down menu to manage the setups.
It also features options to export the setup to various formats. If you are finished working with that ship type, click the X in the top right of the ship window to close it and save your setup.
That's all there is to it! EFT when used properly is a very useful tool to create your own ship setups and help you further develop your character in game. As EFT is updated, this page will be updated to reflect those changes. Feel free to add your own useful tips and tricks as needed below.
Fly safe! o/
Other Useful Tips
Importing fits from EVEMon
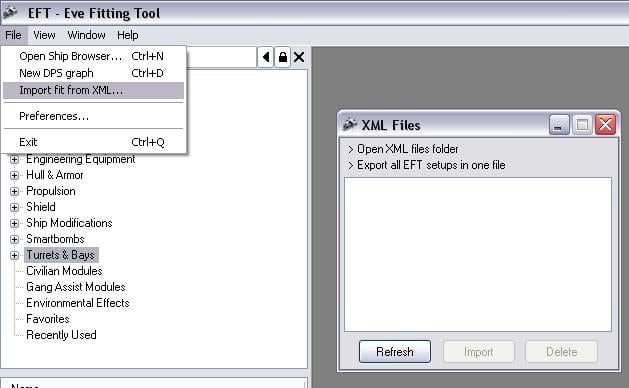
EFT offers the option to import saved ship setups that you may find online or pull from EVEMon. To do so, open the 'File' menu and click 'Import fit from XML...'.
In this window, you can specify where your saved XML files are, import them, and also export your current setups into one large file.
Export/Import fits between EVE and EFT
From EFT to the Game
EFT offers the option to export files in XML-format that you can import in game.
When you have a fit open in EFT, click the drop-down menu to the right of the name of your fit, and select Export to XML. The default EVE file path for fittings under Windows is "...\My Documents\EVE\fittings", so save it there. In game, go to the Fitting Management window (by opening up the fitting window (ALT+F) and clicking the Browse button near the bottom right). The Fitting Management window has an Import button, and the rest should be obvious.
From the Game to EFT
There's an Export button in the game's Fitting Management window, which (guess what) exports all your fits in a single XML file. Export fittings in game first, then in EFT, go to File -> Import/Export to Eve -> Open XML File Manager to look at the exported XML files.
Importing fits via clipboard
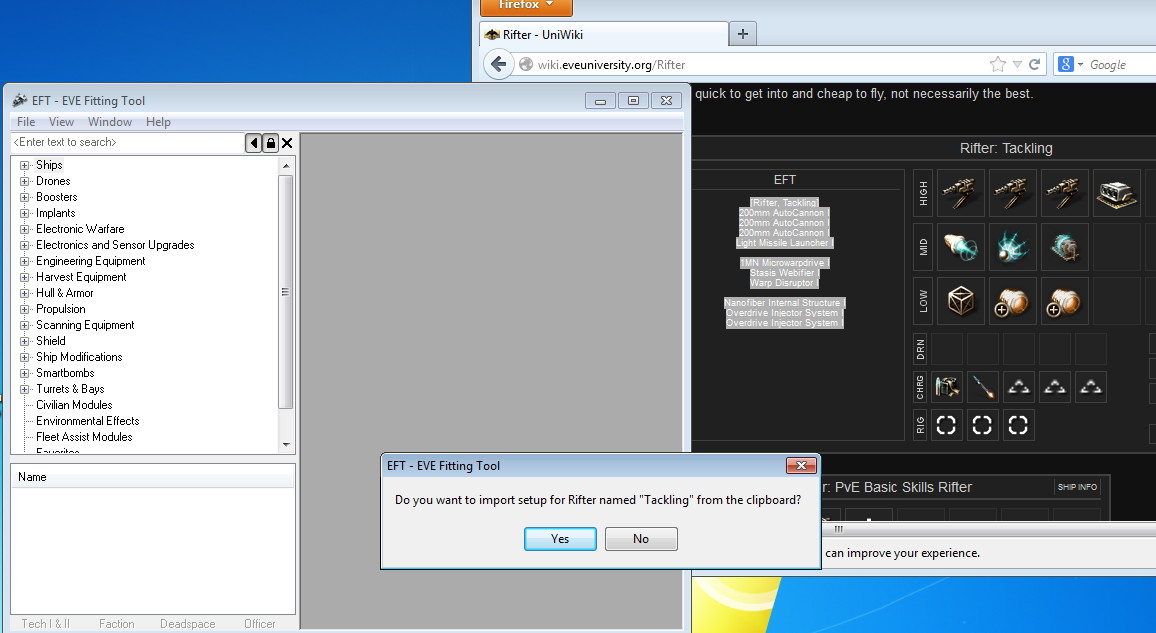
Fits can be imported from text format via the clipboard. Copy the fit (for example from the wiki or a forum post) to the clipboard by marking and pressing CTRL-C. Click on the EFT window to give the focus to EFT. A dialog will appear, asking if the fit should be imported to EFT.
DPS charts
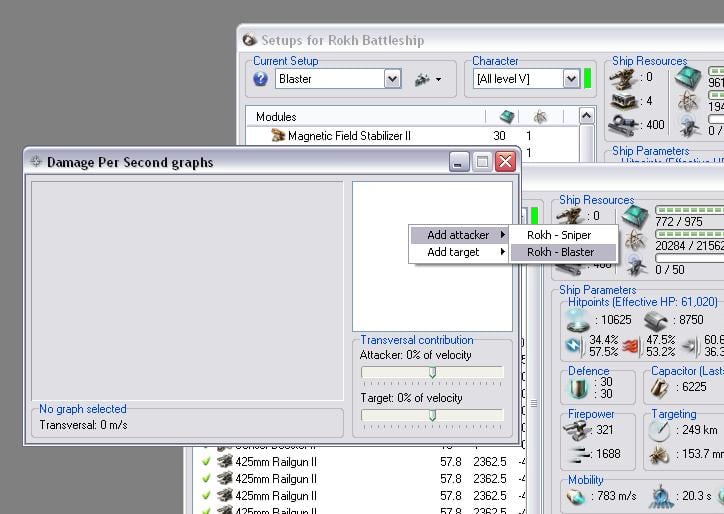
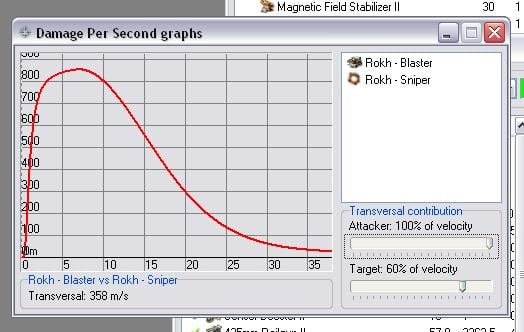
If you wish, EFT also offers the ability to compile DPS charts based on ship setups that you have saved. To use this function, you would need to have multiple ship windows open each with a different setup selected. From here, open the 'File' menu and click 'New DPS Graph'. This will pop up a new window.
Right click to select the attacking and defending ships. The graph will display your DPS versus the range of the targeted ship.
You can also adjust the velocity at which the ships are traveling and clicking on the line will show the transversal velocity of the two combating ships.
Adding damage profiles
It's possible to add damage profiles to your defence icon, in order to see how your tank/ehp will act against specific damage type proportions.
The syntax is as follow:
DamageProfile=Name,EM,THERM,KIN,EXPL
Below you will find a list of damage profiles for various NPC factions and several popular ammunition types. To use them in EFT just copy/paste the following at the very end of your config.ini file in your EFT directory.
- NOTE: EFT must be closed when modifying the .ini file.
DamageProfile=[NPC] Angel Cartel,480,0,719,3058
DamageProfile=[NPC] Blood Raiders,613,570,60,0
DamageProfile=[NPC] EoM,0,618,1718,0
DamageProfile=[NPC] Guristas Pirates,0,570,3504,0
DamageProfile=[NPC] Mercenaries,90,634,424,108
DamageProfile=[NPC] Mordu's Legion,0,30,70,0
DamageProfile=[NPC] Rogue Drones,86,91,281,964
DamageProfile=[NPC] Sansha's Nation,1945,1598,0,0
DamageProfile=[NPC] Serpentis,0,1627,1320,0
DamageProfile=[Faction] Amarr,1204,1349,0,0
DamageProfile=[Faction] Caldari,0,795,944,0
DamageProfile=[Faction] Gallente,25,781,1127,0
DamageProfile=[Faction] Minmatar,615,310,815,1633
DamageProfile=[ammo] Antimatter,0,5,7,0
DamageProfile=[ammo] Null,0,6,5,0
DamageProfile=[ammo] Spike,0,4,4,0
DamageProfile=[ammo] Multifrequency,7,5,0,0
DamageProfile=[ammo] Scorch,9,2,0,0
DamageProfile=[ammo] Aurora,5,3,0,0
DamageProfile=[ammo] EMP,9,0,1,2
DamageProfile=[ammo] Phased Plasma,0,10,2,0
DamageProfile=[ammo] Fusion,0,0,2,10
DamageProfile=[ammo] Barrage,0,0,5,6
DamageProfile=[ammo] Tremor,0,0,3,5
DamageProfile=EM,1,0,0,0
DamageProfile=Thermal,0,1,0,0
DamageProfile=Kinetic,0,0,1,0
DamageProfile=Explosive,0,0,0,1
With these damage profiles you'll be able to see how effective your tank is against specific enemies/weapons. Both your DPS tank and your effective HP ratings will be recalculated based on the damage type you use, by default EFT is using a balanced damage profile (which is the reason why the numbers might differ from the numbers shown by the ingame fitting screen, as the ingame fitting screen is using your lowest resists to calculate the effectiveness of your tank).
Creating an All Level X Character
Occasionally you may prefer to test all level X values without having to change everything using the drop-down menus. Within the Character Editor, select the [All level V] character and click the second button from the left for "Rename\Duplicate character." Enter the name All level X (or something similar) and click OK. Go to your EFT directory, then into the Characters directory. Open up the character file for your new All level X with Notepad (or some other basic text editor program), then use the replace all function to change the 5s to your target level. Save the changes and you'll have an 'all level X' character for your theorizing pleasure. This will accept otherwise impossible sets of skills (eg you could have weapon upgrades to 3 and advanced weapon upgrades to 3 even though advanced weapon upgrades has a prerequisite of weapon upgrades 5).
