Esi Otomeya (talk | contribs) No edit summary |
Esi Otomeya (talk | contribs) No edit summary |
||
| Line 40: | Line 40: | ||
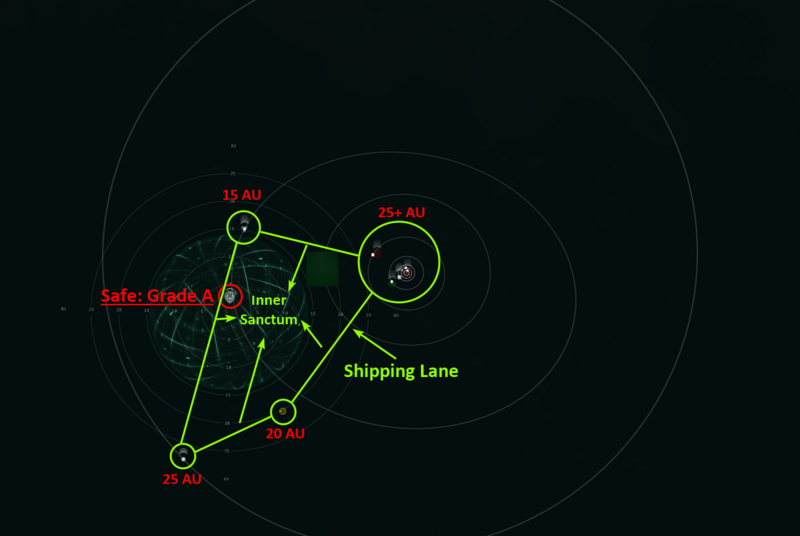
See the following diagram: | See the following diagram: | ||
[[File:Safe-spots-diagram.png| | [[File:Safe-spots-diagram.png|800px|thumb|center]] | ||
Latest revision as of 01:58, 17 February 2024
Introduction
Ignore everything I say as it's probably just a bad joke or sarcasm. Noob player. Ignore advice from me.
Safe Spots
We have a site for Safe Spots, but I think my system is better.
Keywords
- "Shipping Lane": the "warp to" lanes between celestial objects, POS, etc.
- "Inner Sanctum": the space between shipping lanes when you draw straight lines between them all
Ranks
I rank my safe spots as follows:
- "Grade A" (!A) is a safe spot that is inside an Inner Sanctum and greater than 14.3 AU from any other celestial, gate, POS, station... everything fixed (not sites/signatures - they move)
- "Grade B" (!B) is in the middle of an Inner Sanctum but is within 14.3 AU of celestial objects, and more
- "Grade C" (!C) is on a Shipping Lane, and is only a temp safe spot whilst you aim to create a Grade B or ideally a Grade A safe spot
Process
Note: I use `!` in my bookmark names because it takes the entry to the top of the list. I (you) want my (your) safe spots to always be at the top of the list so they're just right there and accessible.
- You've arrived in a system and you want a safe spot
- Mentally draw out an Inner Sanctum (or take a screenshot and draw on it with Paint... whatever)
- You warp to a celestial and on the way there you create a bookmark tagged `!C` (Grade C)
- Now you warp to `!C`
- You then find a second warp point that places you inside of the Inner Sanctum, and warp to it from `!C`
- Between `!C` and the second celestial you create a second safe spot: `!B` - you can delete `!C` now
- If you can, try to create an `!A` grade safe instead of a `!B` grade one
Why?
You'll have a better idea of what a safe gets you when you return to it a week later whilst passing through the system. If it's !B then you know you're in the d-scan range of other players! If it's !A, then you're not in the d-scan range, which double as a warning you: you also cannot see other players.
Example
See the following diagram:

