More actions
Proton One (talk | contribs) -> to ➙; dashes |
|||
| (16 intermediate revisions by 9 users not shown) | |||
| Line 1: | Line 1: | ||
PYFA (Python Fitting Assistant) is a cross-platform fitting application that can be used natively on any platform where python and wxwidgets are available, including Windows, Mac and Linux. | {{update|PYFA version updates/UI changes and possible game damage profile updates.}} | ||
PYFA (Python Fitting Assistant) is a cross-platform [[Fitting ships|fitting]] application that can be used natively on any platform where python and wxwidgets are available, including Windows, Mac and Linux. | |||
It provides many advanced features such as graphs and full calculations of any possible combination of modules, fits, etc. | It provides many advanced features such as graphs and full calculations of any possible combination of modules, fits, etc. | ||
PYFA can be downloaded from [https://github.com/pyfa-org/Pyfa/releases GitHub], installed directly on Windows by running <code>winget install pyfa</code>, or installed on Linux from [https://flathub.org/en/apps/io.github.pyfa_org.Pyfa Flathub]. | |||
==Initial Setup== | ==Initial Setup== | ||
=== | === Linking Your Characters === | ||
To connect your EVE character to PYFA you will need to use CCP's ESI SSO. | To connect your EVE character to PYFA you will need to use CCP's ESI SSO. | ||
| Line 14: | Line 16: | ||
To do this: | To do this: | ||
# Open the ''SSO Character Management'' screen ('''Character''' | # Open the ''SSO Character Management'' screen ('''Character''' ➙ '''Manage ESI Characters'''). | ||
# Create a new character by clicking '''Add Character'''. | # Create a new character by clicking '''Add Character'''. | ||
# A page will open in your default | # A page will open in your default browser—sign in using your EVE Online account credentials. | ||
# Select the correct character from the list. | # Select the correct character from the list. | ||
# Click '''Authorise'''. | # Click '''Authorise'''. | ||
If you are using a Mac, Mac OS security prevents the redirect back to the local server. In order to authenticate your characters, you'll need to manually copy your token. | |||
To do this: | |||
# Open the ''Pyfa Preferences'' window ('''Pyfa''' ➙ '''Preferences'''). | |||
# Click on the ''EVE SSO'' tab. | |||
# In the ''Local Authentication'' section, choose '''Manual''' rather than '''Local Server''' | |||
# Dismiss the Preferences window | |||
# Open the ''SSO Character Management'' screen ('''Character''' ➙ '''Manage ESI Characters'''). | |||
# Create a new character by clicking '''Add Character'''. | |||
# A page will open in your default browser—sign in using your EVE Online account credentials. | |||
# Select the correct character from the list. | |||
# Click '''Authorize'''. | |||
# The web browser will redirect to a page that says "Please copy and paste the token below into pyfa." | |||
# Copy the ESI token from the web page | |||
# Switch back to Pyfa, paste the token into the ''SSO Login'' box and click ''OK''. You might not see this box because it launches underneath the ''SSO Character Management'' window. Simply drag the SSO Character management window out of the way and you should now see the SSO login box. | |||
===Settings=== | ===Settings=== | ||
You should change your settings to match the images below. General settings are mostly personal preference, however the network settings are required for PYFA to query EVE-Central for prices. | You should change your settings to match the images below. General settings are mostly personal preference, however the network settings are required for PYFA to query EVE-Central for prices. | ||
To change settings go to | To change settings go to '''Global''' ➙ '''Preferences''' or press {{button|Ctrl}}+{{button|P}}. | ||
{| | {| | ||
| valign="top" | [[File:PYFA general.PNG| | | valign="top" | [[File:PYFA general.PNG|450px]] | ||
| valign="top" | [[File:PYFA network.PNG| | | valign="top" | [[File:PYFA network.PNG|450px]] | ||
|} | |} | ||
===Damage Profiles=== | ===Damage Profiles=== | ||
Copy the following into the damage pattern editor by selecting all the damage patterns, and copy them into your clipboard. Then inside of PYFA under the | Copy the following into the damage pattern editor by selecting all the damage patterns, and copy them into your clipboard. Then inside of PYFA under the editors tab select the damage pattern editor. You will be prompted to name your new profile, hit OK. At the bottom right hand side there will be 2 buttons. Select the one that says import from clipboard. From now on you will be able to select the type of incoming damage and you can change your fit accordingly. (The Law damage profile is [[CONCORD]] Response.) | ||
| Line 129: | Line 148: | ||
==Fitting== | ==Fitting== | ||
[[File: | [[File:PyfaUiMainAnnotated.png|thumb|none|upright=2.5|Pyfa user interface (main window)]] | ||
The highlighted areas on the UI image: | The highlighted areas on the UI image: | ||
# | # Menu bar | ||
# Fitting | # Market/Fittings pane - Used for managing fits and adding modules | ||
# Additions - Used for adding and selecting drones/implants as well as assigning fleet boosts | # Fitting pane - Used to view fit and add charges to weapons and modules | ||
# Character Selection - Drop down box for selecting | # Additions pane - Used for adding and selecting drones/implants as well as assigning fleet boosts | ||
# Stats - Resist profile and EHP, DPS and volley, | # Character Selection - Drop down box for selecting characters, all (level) 0 and all (level) 5 are "build in" | ||
# Stats - Resist profile and EHP, DPS and volley, targeting and speed info, ship and module cost | |||
To browse, edit, and add fittings use the | To browse, edit, and add fittings use the Fittings tab in the left pane (2): | ||
* Root list [[File:Root.PNG]] | * Root list [[File:Root.PNG]] | ||
* Back one level [[File:Back.PNG]] | * Back one level [[File:Back.PNG]] | ||
| Line 148: | Line 168: | ||
To create a new fit browse to a ship class and click the [[File:New.PNG]] | To create a new fit browse to a ship class and click the [[File:New.PNG]] | ||
[[File: | [[File:PyfaUiFittingsNew.png|thumb|none|upright=1.2]] | ||
===Adding Modules=== | ===Adding Modules=== | ||
To add a module to your fit open the market tab in the left | To add a module to your fit open the market tab in the left pane (2), browse to the module you want to add and double click it. Providing there is a free slot available, the module will be added to the fit. You can switch between T1/T2 - Faction - Deadspace - Officer modules using the buttons at the bottom of the pane. | ||
[[File: | [[File:PyfaUiMarket.png|thumb|none|upright=1.2]] | ||
===Adding Charges=== | ===Adding Charges=== | ||
To add a charge right click a module, hover over charge and click the desired charge. (You can add charges to multiple modules by Shift-clicking modules) | To add a charge right click a module, hover over charge and click the desired charge. (You can add charges to multiple modules by {{button|Shift}}-clicking modules) | ||
[[File: | [[File:PyfaUiFittingAddCharge.png|thumb|none|upright=2.5]] | ||
===Adding Drones=== | ===Adding Drones=== | ||
To add drones browse to the drones section of the market tab and double click, only drones that are ticked will be added to the DPS stats. The drone bandwidth and capacity is shown in the top left of the stats pane ( | To add drones browse to the drones section of the market tab and double click, only drones that are ticked will be added to the DPS stats. The drone bandwidth and capacity is shown in the top left of the stats pane (6) You can manipulate the drone stack by right clicking. | ||
[[File:Drones.png]] | [[File:Drones.png]] | ||
| Line 175: | Line 195: | ||
When you have a boost ship set you then open up the Fleet tab under the Additions ( | When you have a boost ship set you then open up the Fleet tab under the Additions (4) pane. you can select boost ships from the drop down box and any character can be used. | ||
[[File:Boost select.PNG]] | [[File:Boost select.PNG]] | ||
| Line 181: | Line 201: | ||
===Using Graphs=== | ===Using Graphs=== | ||
Graphs can be used to view DPS - Range charts. You can add multiple ships to the same graph to compare damage projection. The targets Signature, Velocity, Angle and Distance can be added for the desired effects. To add ships to the graph open the | Graphs can be used to view DPS - Range charts. You can add multiple ships to the same graph to compare damage projection. The targets Signature, Velocity, Angle and Distance can be added for the desired effects. To add ships to the graph open the graphs window (Window ➙ Graphs or press {{button|Ctrl}}+{{button|G}}) and drag fits into the graph. | ||
[[File: | [[File:PyfaUiGraphs.png|thumb|none|upright=1.7]] | ||
==Importing/Exporting Fits== | ==Importing/Exporting Fits== | ||
===Importing fits=== | ===Importing fits=== | ||
PYFA can import fittings directly from clipboard, to import a fit either go Edit | PYFA can import fittings directly from clipboard, to import a fit either go Edit ➙ From Clipboard or {{button|Ctrl}}+{{button|V}}. To import a fit from EVE to PYFA simply click 'Copy to Clipboard' in game. Once you have a fit copied to clipboard you can paste it into PYFA. | ||
[[File: | [[File:EveUiFittingManagementCopyToClipboard.png|thumb|none|upright=2]] | ||
===Exporting fits=== | ===Exporting fits=== | ||
To export a fit either go Edit | To export a fit either go Edit ➙ To clipboard or press {{button|Ctrl}}+{{button|C}}, and select your preferred format. The EFT format is the most widely used and can be imported into EVE by opening the fitting window in game, clicking browse and clicking 'Import from Clipboard'. The EFT format is commonly used on forums and to import fits for a variety of 3rd party programs. | ||
[[File: | [[File:EveUiFittingImportFromClipboard.png|thumb|none|upright=3]] | ||
[[Category:Applications]] | [[Category:Applications]] | ||
Latest revision as of 10:59, 16 November 2025
Reason: PYFA version updates/UI changes and possible game damage profile updates.
PYFA (Python Fitting Assistant) is a cross-platform fitting application that can be used natively on any platform where python and wxwidgets are available, including Windows, Mac and Linux.
It provides many advanced features such as graphs and full calculations of any possible combination of modules, fits, etc.
PYFA can be downloaded from GitHub, installed directly on Windows by running winget install pyfa, or installed on Linux from Flathub.
Initial Setup
Linking Your Characters
To connect your EVE character to PYFA you will need to use CCP's ESI SSO.
To do this:
- Open the SSO Character Management screen (Character ➙ Manage ESI Characters).
- Create a new character by clicking Add Character.
- A page will open in your default browser—sign in using your EVE Online account credentials.
- Select the correct character from the list.
- Click Authorise.
If you are using a Mac, Mac OS security prevents the redirect back to the local server. In order to authenticate your characters, you'll need to manually copy your token.
To do this:
- Open the Pyfa Preferences window (Pyfa ➙ Preferences).
- Click on the EVE SSO tab.
- In the Local Authentication section, choose Manual rather than Local Server
- Dismiss the Preferences window
- Open the SSO Character Management screen (Character ➙ Manage ESI Characters).
- Create a new character by clicking Add Character.
- A page will open in your default browser—sign in using your EVE Online account credentials.
- Select the correct character from the list.
- Click Authorize.
- The web browser will redirect to a page that says "Please copy and paste the token below into pyfa."
- Copy the ESI token from the web page
- Switch back to Pyfa, paste the token into the SSO Login box and click OK. You might not see this box because it launches underneath the SSO Character Management window. Simply drag the SSO Character management window out of the way and you should now see the SSO login box.
Settings
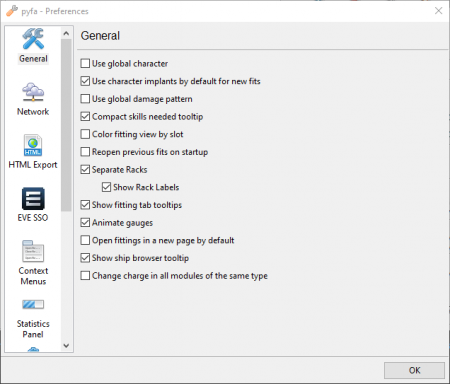
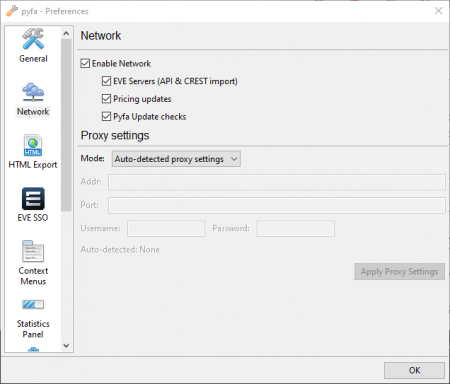
You should change your settings to match the images below. General settings are mostly personal preference, however the network settings are required for PYFA to query EVE-Central for prices.
To change settings go to Global ➙ Preferences or press Ctrl+P.
|
|
Damage Profiles
Copy the following into the damage pattern editor by selecting all the damage patterns, and copy them into your clipboard. Then inside of PYFA under the editors tab select the damage pattern editor. You will be prompted to name your new profile, hit OK. At the bottom right hand side there will be 2 buttons. Select the one that says import from clipboard. From now on you will be able to select the type of incoming damage and you can change your fit accordingly. (The Law damage profile is CONCORD Response.)
Values are in following format:
DamageProfile = [Folder] [name],[EM amount],[Thermal amount],[Kinetic amount],[Explosive amount]
DamageProfile = [Asteroid] Angel Cartel,23,7,26,44
DamageProfile = [Asteroid] Blood Raiders,55,45,0,0
DamageProfile = [Asteroid] Guristas,0,17,83,0
DamageProfile = [Asteroid] Rogue Drone,10,18,28,44
DamageProfile = [Asteroid] Sansha's Nation,58,42,0,0
DamageProfile = [Asteroid] Serpentis,0,53,47,0
DamageProfile = [Deadspace] Angel Cartel,6,9,26,59
DamageProfile = [Deadspace] Blood Raiders,53,47,0,0
DamageProfile = [Deadspace] Guristas,0,19,81,0
DamageProfile = [Deadspace] Rogue Drone,8,34,32,26
DamageProfile = [Deadspace] Sansha's Nation,57,43,0,0
DamageProfile = [Deadspace] Serpentis,0,62,38,0
DamageProfile = [Hybrid] Antimatter,0,20,28,0
DamageProfile = [Hybrid] Javelin,0,32,24,0
DamageProfile = [Hybrid] Null,0,24,20,0
DamageProfile = [Hybrid] Spike,0,1,1,0
DamageProfile = [Hybrid] Void,0,1,1,0
DamageProfile = [Laser] Aurora,20,12,0,0
DamageProfile = [Laser] Conflagration,1,1,0,0
DamageProfile = [Laser] Gleam,1,1,0,0
DamageProfile = [Laser] Multifreq,28,20,0,0
DamageProfile = [Laser] Radio,1,0,0,0
DamageProfile = [Laser] Scorch,36,8,0,0
DamageProfile = [Missile] EM,1,0,0,0
DamageProfile = [Missile] Explosive,0,0,0,1
DamageProfile = [Missile] Kinetic,0,0,1,0
DamageProfile = [Missile] Thermal,0,1,0,0
DamageProfile = [Mission] Amarr Empire,56,43,1,0
DamageProfile = [Mission] CONCORD,26,12,20,42
DamageProfile = [Mission] Caldari State,0,31,69,0
DamageProfile = [Mission] Gallente Federation,0,58,42,0
DamageProfile = [Mission] Khanid,56,40,4,0
DamageProfile = [Mission] Minmatar Republic,14,5,23,58
DamageProfile = [Mission] Mordu,2,32,66,0
DamageProfile = [Mission] Thukker,0,37,7,56
DamageProfile = [Other] Incursion Sansha's Nation,16,13,36,35
DamageProfile = [Other] Sleepers,29,29,21,21
DamageProfile = [Other] The Law,36,29,24,11
DamageProfile = [Projectile] Barrage,0,0,20,24
DamageProfile = [Projectile] EMP,36,0,4,8
DamageProfile = [Projectile] Fusion,0,0,8,40
DamageProfile = [Projectile] Hail,0,0,13,48
DamageProfile = [Projectile] Quake,0,0,20,36
DamageProfile = [Projectile] Tremor,0,0,12,20
DamageProfile = [Projectile] Phased Plasma,0,40,8,0
Fitting
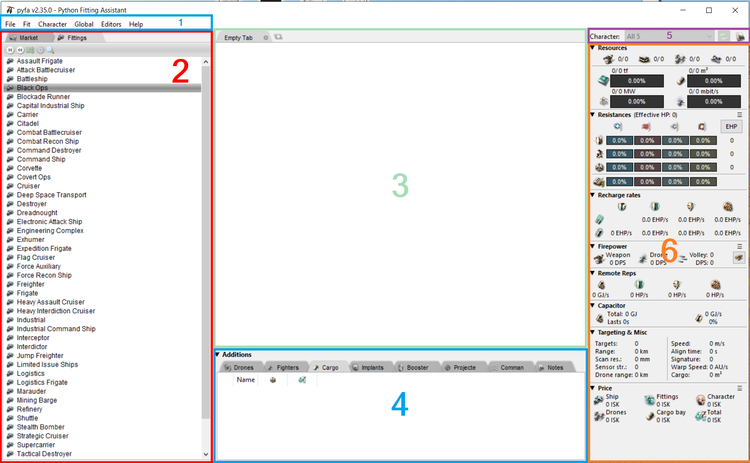
The highlighted areas on the UI image:
- Menu bar
- Market/Fittings pane - Used for managing fits and adding modules
- Fitting pane - Used to view fit and add charges to weapons and modules
- Additions pane - Used for adding and selecting drones/implants as well as assigning fleet boosts
- Character Selection - Drop down box for selecting characters, all (level) 0 and all (level) 5 are "build in"
- Stats - Resist profile and EHP, DPS and volley, targeting and speed info, ship and module cost
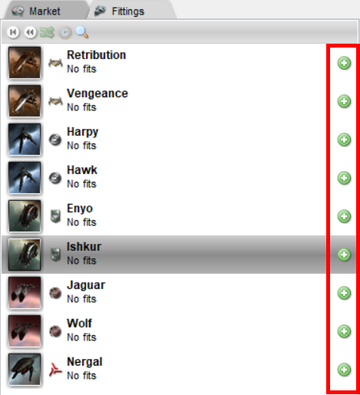
To browse, edit, and add fittings use the Fittings tab in the left pane (2):
To create a new fit browse to a ship class and click the
Adding Modules
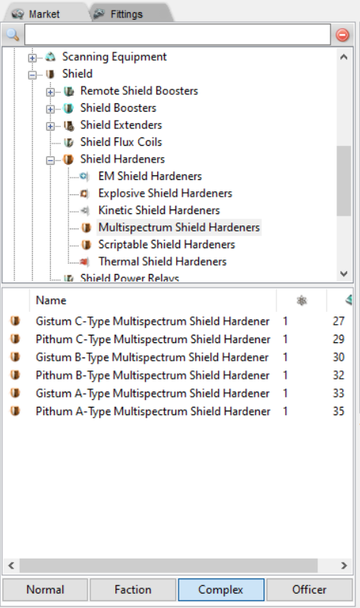
To add a module to your fit open the market tab in the left pane (2), browse to the module you want to add and double click it. Providing there is a free slot available, the module will be added to the fit. You can switch between T1/T2 - Faction - Deadspace - Officer modules using the buttons at the bottom of the pane.
Adding Charges
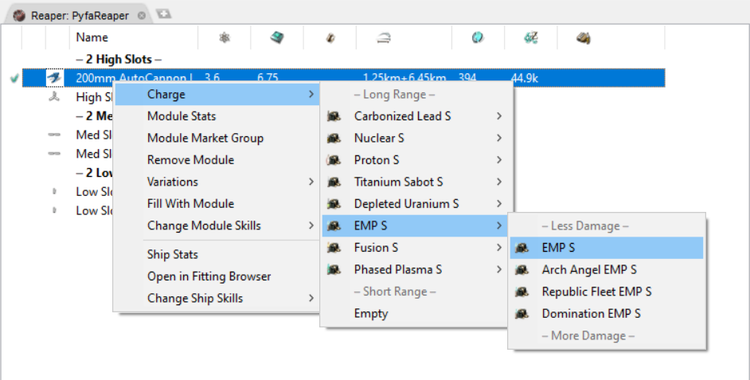
To add a charge right click a module, hover over charge and click the desired charge. (You can add charges to multiple modules by Shift-clicking modules)
Adding Drones
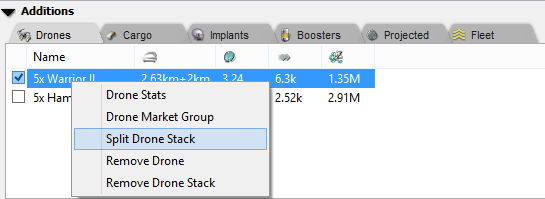
To add drones browse to the drones section of the market tab and double click, only drones that are ticked will be added to the DPS stats. The drone bandwidth and capacity is shown in the top left of the stats pane (6) You can manipulate the drone stack by right clicking.
Adding Fleet Boosts
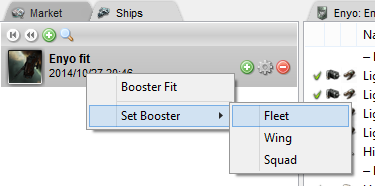
You can set a Squad/Wing/Fleet booster in PYFA, each role can have a different character and ship assigned to it. To set boosts you first need to create a boost ship, this could either be an empty ship (to apply character skills only) or a boosting ship (to apply module boosts). Once you have created a boost ship right click the fit and tick booster fit. Ships assigned as boosters are marked with . You can also drag fits in to the boost window and use the right click menu to set a Squad/Wing/Fleet booster.
When you have a boost ship set you then open up the Fleet tab under the Additions (4) pane. you can select boost ships from the drop down box and any character can be used.
Using Graphs
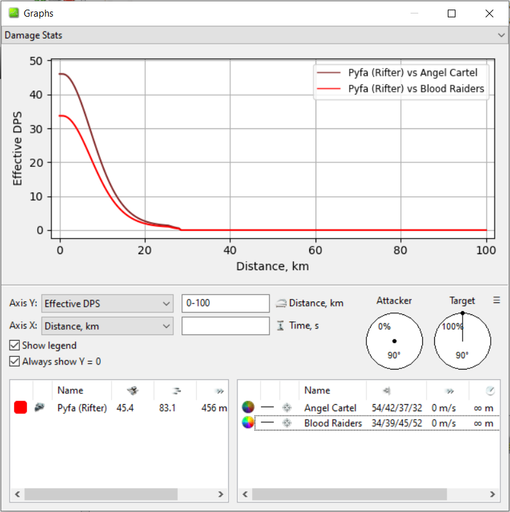
Graphs can be used to view DPS - Range charts. You can add multiple ships to the same graph to compare damage projection. The targets Signature, Velocity, Angle and Distance can be added for the desired effects. To add ships to the graph open the graphs window (Window ➙ Graphs or press Ctrl+G) and drag fits into the graph.
Importing/Exporting Fits
Importing fits
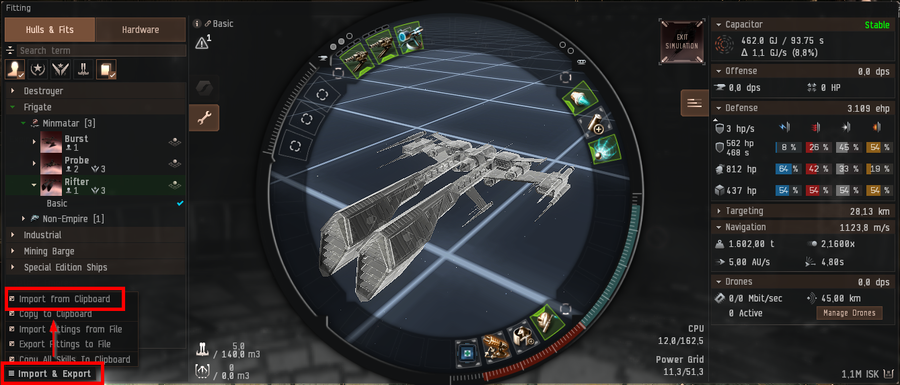
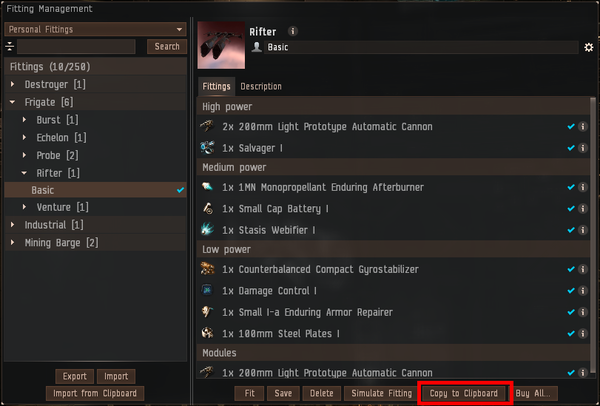
PYFA can import fittings directly from clipboard, to import a fit either go Edit ➙ From Clipboard or Ctrl+V. To import a fit from EVE to PYFA simply click 'Copy to Clipboard' in game. Once you have a fit copied to clipboard you can paste it into PYFA.
Exporting fits
To export a fit either go Edit ➙ To clipboard or press Ctrl+C, and select your preferred format. The EFT format is the most widely used and can be imported into EVE by opening the fitting window in game, clicking browse and clicking 'Import from Clipboard'. The EFT format is commonly used on forums and to import fits for a variety of 3rd party programs.
