More actions
m Removed property "Has update description" |
Salartarium (talk | contribs) m proofreading |
||
| Line 8: | Line 8: | ||
[[File:Qs_neocom.jpg|thumb|left|50px|alt= neocom|Click for full size]] | [[File:Qs_neocom.jpg|thumb|left|50px|alt= neocom|Click for full size]] | ||
To use Map Beta you first have to tell the game that you want to access it. You do this in the game settings window, which you open by pressing the {{button|ESC}} key. | To use Map Beta you first have to tell the game that you want to access it. You do this in the game settings window, which you open by pressing the {{button|ESC}} key. | ||
Next click on the "General Settings" tab, and then go down to the "Experimental Features" section. Check the box for "Try the New Map", and it will appear in your Neocom under the name "Map Beta". (''Its icon looks like the old map, but with a red ß added to the symbol. If you want, you can drag this to your side bar.'') | Next, click on the "General Settings" tab, and then go down to the "Experimental Features" section. Check the box for "Try the New Map", and it will appear in your Neocom under the name "Map Beta". (''Its icon looks like the old map, but with a red ß added to the symbol. If you want, you can drag this to your side bar.'') | ||
Now, go to the "Shortcuts" tab and then to the "Windows" tab in the shortcuts. There you will be able to set a | Now, go to the "Shortcuts" tab and then to the "Windows" tab in the shortcuts. There you will be able to set a hotkey for "Map Beta". | ||
The new and old maps are entirely separate. They do not interfere with one another, and you can have both of them open at once if you want to. (''Note that Map and Map Beta are both full blown maps and so are different from the "Map Browser", which is a kind of mini-map.'') | The new and old maps are entirely separate. They do not interfere with one another, and you can have both of them open at once if you want to. (''Note that Map and Map Beta are both full blown maps and so are different from the "Map Browser", which is a kind of mini-map.'') | ||
| Line 27: | Line 27: | ||
* Clicking on the X will {{Co|#C46960|Close}} the Map Beta window. | * Clicking on the X will {{Co|#C46960|Close}} the Map Beta window. | ||
* Clicking on the magnifying glass icon will open the {{Co|#C46960|Search}} box. As you begin to type in the box, the search will give you a list of matching star systems and objects within those systems. Click on a star name to focus the map on that system - and draw a dotted line | * Clicking on the magnifying glass icon will open the {{Co|#C46960|Search}} box. As you begin to type in the box, the search will give you a list of matching star systems and objects within those systems. Click on a star name to focus the map on that system - and draw a dotted line there from your current position. If you click on the name of a station or other object in the list, that object will be focused in the center of the map, and the map will zoom in to show the star system in detail. Right-click on any item in the list to open the usual menu: destination, waypoint, save location, and so on. | ||
* Clicking on the little square with the dot in the middle will open the {{Co|#C46960|Resize}} option box. Here you set the map window to full screen mode, dock it to either side of your screen, or tell it to float in the middle of your screen. The docked windows can be resized left or right ... the floating window can be resized in any direction ... by clicking and dragging on the edges of the window. | * Clicking on the little square with the dot in the middle will open the {{Co|#C46960|Resize}} option box. Here you set the map window to full screen mode, dock it to either side of your screen, or tell it to float in the middle of your screen. The docked windows can be resized left or right ... the floating window can be resized in any direction ... by clicking and dragging on the edges of the window. | ||
| Line 87: | Line 87: | ||
=== Example: Making a Safe Spot === | === Example: Making a Safe Spot === | ||
{{Example | {{Example | ||
|You can use a close up view of a system when you are making safe spots for exploring or scouting. In the first image I have zoomed the map in to look at the system I am in. To make it easier to see things in this example, I have also turned off all of the marker icons except for stargates and personal locations. The circle with the '''X''' in it marks the current position of my ship. | |You can use a close up view of a system when you are making safe spots for exploring or scouting. In the first image, I have zoomed the map in to look at the system I am in. To make it easier to see things in this example, I have also turned off all of the marker icons except for stargates and personal locations. The circle with the '''X''' in it marks the current position of my ship. | ||
[[File:Qs savefspot1.png|center|525px|alt=initial position for safe spot jump]] | [[File:Qs savefspot1.png|center|525px|alt=initial position for safe spot jump]] | ||
| Line 118: | Line 118: | ||
Below the search box you will see two check boxes. | Below the search box you will see two check boxes. | ||
* The first one activates/deactivates your autopilot. This has the same function as the Autopilot button on your ship control panel. | * The first one activates/deactivates your autopilot. This has the same function as the Autopilot button on your ship control panel. | ||
* The second one shows/hides your route path in space. Turning this on lights up a set of thin, green lines that let you see your trip path from your ship. (''It's not clear that these | * The second one shows/hides your route path in space. Turning this on lights up a set of thin, green lines that let you see your trip path from your ship. (''It's not clear that these do anything, but they are kind of pretty.'') | ||
* The next three radio buttons are mutually exclusive; they control what happens when you select "Set Destination" or "Set Waypoint" anywhere in the game. They tell the Route Planner to include or ignore certain systems based on their security status. | * The next three radio buttons are mutually exclusive; they control what happens when you select "Set Destination" or "Set Waypoint" anywhere in the game. They tell the Route Planner to include or ignore certain systems based on their security status. | ||
** Prefer Shorter - Ignore Security Status | ** Prefer Shorter - Ignore Security Status | ||
| Line 135: | Line 135: | ||
Your avoidance list contains all of the systems that you have marked "avoid" at one time or another. The [[Autopilot avoidance|avoidance system]] is quite sophisticated. You can avoid systems, constellations and/or regions. {{Co|#768d31|Note: the Avoidance article references the old map. To avoid a region on the Map Beta, use the same procedure except begin by using the Search box in the [[#The Route Planner|Route Planner window]].}} | Your avoidance list contains all of the systems that you have marked "avoid" at one time or another. The [[Autopilot avoidance|avoidance system]] is quite sophisticated. You can avoid systems, constellations and/or regions. {{Co|#768d31|Note: the Avoidance article references the old map. To avoid a region on the Map Beta, use the same procedure except begin by using the Search box in the [[#The Route Planner|Route Planner window]].}} | ||
And finally the window has three action buttons: | And finally, the window has three action buttons: | ||
* Clear All Waypoints - clears your route entirely | * Clear All Waypoints - clears your route entirely | ||
* Optimize Route - reorganizes your waypoints to take the shortest path consistent with your security selections | * Optimize Route - reorganizes your waypoints to take the shortest path consistent with your security selections | ||
| Line 147: | Line 147: | ||
For example, here is a trip that passes through Ansalle and Jufvitte on the way to Amygnon, and then back through Jufvitte to Anasalle. Perhaps this is exactly the path you want to take, in which case there is | For example, here is a trip that passes through Ansalle and Jufvitte on the way to Amygnon, and then back through Jufvitte to Anasalle. Perhaps this is exactly the path you want to take, in which case there is no problem. But suppose that you are on the way to home base in Amygnon and just want to drop something off at Ansalle. In that case, you are backtracking in a way that makes you take extra jumps. Pressing the "Optimize" button tells the Planner to reorganize the route so that it makes the minimum number of jumps. | ||
You can also optimize the route by clicking the "Optimize Route" button on the main Route Planner menu window. (''This button will only be visible if the route has waypoints.'') | You can also optimize the route by clicking the "Optimize Route" button on the main Route Planner menu window. (''This button will only be visible if the route has waypoints.'') | ||
Latest revision as of 00:19, 29 July 2024
|
| Navigation |
|---|
| Maps |
| Piloting |
| Autopilot |
| External links |
While the original Star Map is still available to help you find your way through the universe, EVE's new "Map Beta" is now front and center.[1] This page describes the features of the new map and shows how to access them.
Getting to the New Map Beta

To use Map Beta you first have to tell the game that you want to access it. You do this in the game settings window, which you open by pressing the ESC key. Next, click on the "General Settings" tab, and then go down to the "Experimental Features" section. Check the box for "Try the New Map", and it will appear in your Neocom under the name "Map Beta". (Its icon looks like the old map, but with a red ß added to the symbol. If you want, you can drag this to your side bar.)
Now, go to the "Shortcuts" tab and then to the "Windows" tab in the shortcuts. There you will be able to set a hotkey for "Map Beta".
The new and old maps are entirely separate. They do not interfere with one another, and you can have both of them open at once if you want to. (Note that Map and Map Beta are both full blown maps and so are different from the "Map Browser", which is a kind of mini-map.)

Map Beta Overview

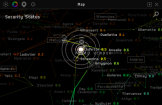
Map Beta is three-dimensional. Stars are shown as colored dots - the shades of which can be changed to represent different sorts of data: security status, services, sovereignty, number of pilots in space, and many others. Lines show the jump gate connections between stars, with the path from your current location to the selected system shown as a dotted line.
Roll your mouse's scrollbar to zoom the map in and out. Drag on the map to rotate its orientation. Right click to drag the map sideways or up and down. Click on a star to center it in the window.
When you open the map, it will be centered on a Selected Solar System. This is at first the system where you are currently located, but you can change the selection by clicking on any star. You can use your mouse wheel to zoom in until you see the system in great detail ... planets, moons, stations, asteroid belts, etc. ... or, you can zoom out until you see the entire universe.
Three buttons at the top right of the map control window activities.
- Clicking on the X will Close the Map Beta window.
- Clicking on the magnifying glass icon will open the Search box. As you begin to type in the box, the search will give you a list of matching star systems and objects within those systems. Click on a star name to focus the map on that system - and draw a dotted line there from your current position. If you click on the name of a station or other object in the list, that object will be focused in the center of the map, and the map will zoom in to show the star system in detail. Right-click on any item in the list to open the usual menu: destination, waypoint, save location, and so on.
- Clicking on the little square with the dot in the middle will open the Resize option box. Here you set the map window to full screen mode, dock it to either side of your screen, or tell it to float in the middle of your screen. The docked windows can be resized left or right ... the floating window can be resized in any direction ... by clicking and dragging on the edges of the window.
Four buttons at the top left of the map control formatting.
- The leftmost Layout button opens a menu that lets you change the display of star groups and jump lines. You can group systems by region or constellation, or you can have no grouping. Similarly, you can show all jump gate lines, all the ones in the region you are looking at, or just the ones connected to the star you have selected. At the bottom of this menu is a box labeled "Abstract Layout." Checking this box collapses the map into a flat, more two-dimensional view.
- The second, Color button opens an extensive menu of data items. Clicking on an item tells the map to color the stars according to that kind of data. "Security Status", for example, shows the typical green, yellow and red colors of the various levels. Some data types produce fuzzy balls around some systems - "Ships Destroyed in the Last 24 Hours" for example, puts a sphere around each star ... bigger spheres for greater totals of killed ships.
- The third, greyish button opens a menu that lets you show or hide Solar System Markers. These show icons for such as planets, stations, locations, and asteroid belts. Markers are only visible when you are zoomed in for a closeup view of a system.
- The rightmost "Focus" button will always center the map on your current position.
Using the Map Beta Controls

The solar system menu lets you fine tune the icons that you see when you zoom in on a system. If you are mining, for example, you can show asteroid belts and omit moons and planets. If you are scouting, you can show corporate and personal locations. If you are exploring, you can see scanner probes.
Clicking on one of these icons will bring up the usual menu with "show info", "set destination", "set waypoint", and so on.

The layout menu lets you set the way that star systems will be grouped on the map. It also lets you decide which jump lines will be shown.
The "no grouping" option shows the largest number of individual stars. Grouping stars by region or constellation clumps them together and organizes the map to keep the clumps distinct. This is most useful when you are looking at longer distances, and least useful when you are trying to plot a course from one star to another.
The three path options determine which lines will light up when you move the mouse over a star system. The path from your current location to the selected systems will be shown as a dotted line.
Checking the Abstract Layout box will flatten the map to a nearly two-dimensional state. This makes it somewhat easier to see multiple systems at the same time when you are trying to lay out a route.

The color menu is arguably the most useful. It allows you to color the star systems based on the usual categories such as region, race, and security, as well as on various kinds of data that the game has collected.
For example, here are a few of the options:
- Services
- Repair Facility
- Clone Bay
- Industry
- Manufacturing Systems Cost Index
- Personal
- My Assets
- My Cargo Illegality
The menu keeps your most recent selections at the top of the list for easy reference.
Example: Checking for Systems Where Fighting is Going On

Example: Making a Safe Spot


The Route Planner
While the Route Planner is not physically attached to the map, it operates on your map. You use it to edit your waypoints and "avoided" systems, and it will always control any trips that you make using the Autopilot. And, since autopilot routes can be executed manually, one at a time, you can use the Route Planner to think through and plot out a trip ahead of time.
Opening the Route Planner
To see the Route Planner, first be sure that you are displaying your route information. This is located in the upper left hand corner of your screen. If you do not see the word "Route" there, in big, white letters, then click on the "spaceship" (or letter A) icon at the top left of your screen. This toggles the Route display on and off. (Note: this set of icons is nearly transparent, and kind of hard to see.)
If the route display is visible, you can click on the route icon (to the left of the word "Route") to bring up the planner menu.
The Route Planner Menu Window

At the top of the planner you will find a standard search box. Type in some text, press the "Search" button, and the results of your search will appear in a separate window. Clicking on a search result will open its "Show Info" window. Below the search box you will see two check boxes.
- The first one activates/deactivates your autopilot. This has the same function as the Autopilot button on your ship control panel.
- The second one shows/hides your route path in space. Turning this on lights up a set of thin, green lines that let you see your trip path from your ship. (It's not clear that these do anything, but they are kind of pretty.)
- The next three radio buttons are mutually exclusive; they control what happens when you select "Set Destination" or "Set Waypoint" anywhere in the game. They tell the Route Planner to include or ignore certain systems based on their security status.
- Prefer Shorter - Ignore Security Status
- Prefer Safer - Stay in 0.5 to 1.0 Where Possible
- Prefer Less Secure - Stay in 0.0 to 0.4 Where Possible
Below the radio buttons is a "Security Penalty" slider. It has a range of 1 to 100, and it modifies the "Prefer" route selection. If you have "Prefer Safer" selected, then at 1, the slider will produce the same route as "Prefer Shorter" - in other words, it will generate the shortest route, even if it takes you through nullsec systems. As you move the slider up towards 100, the planner will eliminate the less secure systems - generally making your route longer, but safer. If you have "Prefer Less Secure" selected, 1 will again give you the shortest route, even if it goes through 1.0 systems, and 100 will give you a longer, but less secure, route.
Next are three option checkboxes:
- Avoid Systems Where Pod Killing Has Recently Occurred
- Avoid Systems on Your Avoidance List
- Disable Autopilot at Each Waypoint
It's not clear exactly how "recent" a pod kill has to be to invoke the avoidance, but you can see pod kills on the Map Beta by choosing that as a color option, so you can check systems manually if you need to.
Your avoidance list contains all of the systems that you have marked "avoid" at one time or another. The avoidance system is quite sophisticated. You can avoid systems, constellations and/or regions. Note: the Avoidance article references the old map. To avoid a region on the Map Beta, use the same procedure except begin by using the Search box in the Route Planner window.
And finally, the window has three action buttons:
- Clear All Waypoints - clears your route entirely
- Optimize Route - reorganizes your waypoints to take the shortest path consistent with your security selections
- Manage Route - opens the Manage Route window.
Waypoint Management
The Manage Route window contains two tabs. One lets you look at your avoidance list and delete any systems that you no longer want to avoid. The other lists the systems you will pass through in your current route and lets you drag the waypoints around to reorganize the trip.


For example, here is a trip that passes through Ansalle and Jufvitte on the way to Amygnon, and then back through Jufvitte to Anasalle. Perhaps this is exactly the path you want to take, in which case there is no problem. But suppose that you are on the way to home base in Amygnon and just want to drop something off at Ansalle. In that case, you are backtracking in a way that makes you take extra jumps. Pressing the "Optimize" button tells the Planner to reorganize the route so that it makes the minimum number of jumps.
You can also optimize the route by clicking the "Optimize Route" button on the main Route Planner menu window. (This button will only be visible if the route has waypoints.)
Using DOTLAN with the Map Beta

The largest fault of Map Beta is generally considered to be its cluttered appearance.[2] Even in two-dimensional "abstract mode", it is difficult to quickly see paths from one system to another. One approach to solving this problem can be found at the DOTLAN mapping site.
DOTLAN contains more or less the same information found in Map Beta, but in a two-dimensional, rather stark layout that makes it easy to see how the systems connect to one another. The EVE universe is presented as a collection of region maps (along with some specialized combination maps). You cannot see everything at once ... however, you can quickly figure out a path from one system to another within the same region.
DOTLAN offers the same data displays as the EVE Map Beta color menu. But the DOTLAN layout makes it easy to quickly spot groupings of, for example, systems with large numbers of asteroid belts.
Because it can be unclear, DOTLAN maps show system jump links with color coding: Black links are between systems within a constellation, red links are between constellations in the same region, and purple links are off map to another region.