* [[Industrialist (Producer)|Industrialist - Producer]], which teach you about [[mining]], [[reprocessing]], [[manufacturing]], and [[hauling]].
* [[Industrialist (Producer)|Industrialist - Producer]], which teach you about [[mining]], [[reprocessing]], [[manufacturing]], and [[hauling]].
The agents are not exclusive (i.e. doing one set of missions doesn't "lock" you into a pre-set "career path", as there are no such things in EVE); you can do as many of the agents' missions as you want. There are 12 [[#Career Agents Locations|locations]] in total, 3 for each of the four [[Faction]]s in New Eden.
The agents are not exclusive (i.e. doing one set of missions doesn't "lock" you into a pre-set "career path", as there are no such things in EVE); you can do as many of the agents' missions as you want. There are 12 [[#Career Agents Locations|locations]] in total, 3 for each of the four [[Factions#Empires|empires]] in New Eden.
It is highly recommended that you complete all the mission chains (or arcs if you will) given by the five career agents, even if you already know what you'd like to do in EVE. The missions give a good overview of some of the mechanics of the game, and good financial rewards for a new player. It is also good to have a basic idea of how each career works - for example, even if you don't plan to do any exploration, it is good to have an idea of how other players are able to scan and find you while you are in space doing any number of activities. Also, it's likely that over the course of your time in EVE you will want to try doing many different things.
It is highly recommended that you complete all the mission chains (or arcs if you will) given by the five career agents, even if you already know what you'd like to do in EVE. The missions give a good overview of some of the mechanics of the game, and good financial rewards for a new player. It is also good to have a basic idea of how each career works - for example, even if you don't plan to do any exploration, it is good to have an idea of how other players are able to scan and find you while you are in space doing any number of activities. Also, it's likely that over the course of your time in EVE you will want to try doing many different things.
If you plan on [[Applying to EVE University|applying to join EVE University]], it is recommended that you have at least started, if not completed, all the career agent missions.
== Introduction ==
== Introduction ==
Line 46:
Line 47:
You can do the agents in any order you like - even accept all 5 and do them in parallel. In fact, the latter has the advantage that some of the rewards of one mission line are requested by another so you need to buy/build/get fewer items to finish the missions.
You can do the agents in any order you like - even accept all 5 and do them in parallel. In fact, the latter has the advantage that some of the rewards of one mission line are requested by another so you need to buy/build/get fewer items to finish the missions.
There are three sets of five career agents for each Empire faction in the game; however, they all offer identical missions, and unless you are looking to recover from low [[NPC standings|faction standings]] there is no reason to do the missions for more than one set of career agents.
There are three sets of five career agents for each Empire faction in the game. They all offer identical missions and equivalent rewards, however, they can be used as a quick way to gain [[NPC standings|faction standings]], as each character can complete all sets of career agents, for all empire factions.
== Tutorial Systems in EVE ==
Setting off on your journey to the career agent, you will likely come from one of these systems and stations, from which new players are spawned to start the tutorial. The system at which you start in is dependent on the corporation you pick when you create the character, for instance, creating a new Minmatar character with a corporation of "Republic Military School" will place you in Ammold.
=== Amarr ===
*[https://evemaps.dotlan.net/station/Sehmy_VIII_-_Moon_2_-_Hedion_University Sehmy VIII - Moon 2 - Hedion University]
*[https://evemaps.dotlan.net/station/Emrayur_III_-_Moon_1_-_Royal_Amarr_Institute_School Emrayur III - Moon 1 - Royal Amarr Institute]
*[https://evemaps.dotlan.net/station/Chaven_VIII_-_Moon_1_-_Imperial_Academy Chaven VIII - Moon 1 - Imperial Academy]
=== Caldari ===
*[https://evemaps.dotlan.net/station/Todaki_VI_-_Moon_1_-_School_of_Applied_Knowledge Todaki VI - Moon 1 - School of Applied Knowledge]
*[https://evemaps.dotlan.net/station/Kisogo_VII_-_State_War_Academy Kisogo VII - State War Academy]
*[https://evemaps.dotlan.net/station/Amsen_VI_-_Moon_1_-_Science_and_Trade_Institute_School Amsen VI - Moon 1 - Science and Trade Institute]
=== Gallente ===
*[https://evemaps.dotlan.net/station/Cistuvaert_V_-_Moon_12_-_Center_for_Advanced_Studies_School Cistuvaert V - Moon 12 - Center for Advanced Studies]
*[https://evemaps.dotlan.net/station/Duripant_VII_-_Moon_6_-_Federal_Navy_Academy Duripant VII - Moon 6 - Federal Navy Academy]
*[https://evemaps.dotlan.net/station/Bourynes_VII_-_Moon_2_-_University_of_Caille Bourynes VII - Moon 2 - University of Caille]
=== Minmatar ===
*[https://evemaps.dotlan.net/station/Hulm_VIII_-_Moon_2_-_Republic_University Hulm VIII - Moon 2 - Republic University]
*[https://evemaps.dotlan.net/station/Ammold_V_-_Republic_Military_School Ammold V - Republic Military School]
*[https://evemaps.dotlan.net/station/Ryddinjorn_VI_-_Moon_2_-_Pator_Tech_School Ryddinjorn VI - Moon 2 - Pator Tech School]
Your designated [[Home Station]] will initially be your starting station, although you can move it to any other station should you wish to.
== Career Agents Locations ==
== Career Agents Locations ==
Line 107:
Line 82:
* This mission chain does not involve combat or require any mission item to be outsourced, and thus it is an ideal candidate as an earlier choice.
* This mission chain does not involve combat or require any mission item to be outsourced, and thus it is an ideal candidate as an earlier choice.
* The second mission reward is the ship you might want to turn in later for [[Industrialist (Producer)#Making Mountains of Molehills (10 of 10)|Making Mountains of Molehills (10/10)]]
* The second mission grants an exploration frigate, which is convenient for most other career missions (large cargo hold, good multi-weapons damages for a new pilot).
* The last mission reward is the ship you might want to turn in later for [[Industrialist (Producer)#Making Mountains of Molehills (10 of 10)|Making Mountains of Molehills (10/10)]]
=== [[Enforcer (Career Agent)|Enforcer]] ===
=== [[Enforcer (Career Agent)|Enforcer]] ===
Line 117:
Line 93:
=== [[Soldier of Fortune]] ===
=== [[Soldier of Fortune]] ===
* Since this mission chain deals with more advanced PvE combat topics, for the new players it is suggested that you complete [[Enforcer (Career Agent)|Enforcer]] first.
* Since this mission chain deals with more advanced PvE combat topics, for the new players it is suggested that you complete [[Enforcer (Career Agent)|Enforcer]] first. However, the final mission of this chain rewards a T1 [[Destroyers|destroyer]], which could be used to complete the Enforcer missions more quickly, thanks to their significantly increased firepower vs frigates.
* In addition, [[Soldier of Fortune#The Exam (10 of 10)|The Exam (10/10)]] might pose a challenge for those who do not yet have a combat-appropriate frigate from [[Enforcer (Career Agent)#Cash Flow for Capsuleers (2 of 10)|Cash Flow for Capsuleers (2/10)]] or the necessary skill injected and trained to use the destroyer granted to you when the mission is accepted.
* In addition, [[Soldier of Fortune#The Exam (10 of 10)|The Exam (10/10)]] might pose a challenge for those who do not yet have a combat-appropriate frigate from [[Enforcer (Career Agent)#Cash Flow for Capsuleers (2 of 10)|Cash Flow for Capsuleers (2/10)]] or the necessary skill injected and trained to use the destroyer granted to you when the mission is accepted.
* Tip #1: [[Soldier of Fortune#Angel of Mercy (2 of 10)|Angel of Mercy (2/10)]] and [[Soldier of Fortune#The Stand (5 of 10)|The Stand (5/10)]] require you to fly a frigate to its destruction. Do not fit any modules on it other than what you need to complete the mission, and get it Platinum-level insured before you undock for a quick and easy pay-out on mission completion. While you need to use the frigate provided in [[Soldier of Fortune#Angel of Mercy (2 of 10)|Angel of Mercy (2/10)]], you can choose to use a free corvette (with a second civilian gun instead of the mining laser) for [[Soldier of Fortune#The Stand (5 of 10)|The Stand (5/10)]].
* Tip #1: [[Soldier of Fortune#Angel of Mercy (2 of 10)|Angel of Mercy (2/10)]] and [[Soldier of Fortune#The Stand (5 of 10)|The Stand (5/10)]] require you to fly a frigate to its destruction. Do not fit any modules on it other than what you need to complete the mission, and get it Platinum-level insured before you undock for a quick and easy pay-out on mission completion.
* Tip #2: [[Soldier of Fortune#The Stand (5 of 10)|The Stand (5/10)]] requires you to purchase ammunition and modules for the mission at your own expense. Other players may be selling what you are likely to want to use at the agent's station. Though likely at high prices. You may want to bring your own ammunition and modules before you start the mission chain.
* Tip #2: [[Soldier of Fortune#The Stand (5 of 10)|The Stand (5/10)]] requires you to do some damage, so you'll need weapons, that you can buy at your own expense (with their ammunition) to other players at the agent's station, or bring your own ammunition and modules before you start the mission chain from a place with lower prices. Alternatively you can use the ship provided, insure it, and fit it with 3 to 4 free turrets and 1 free afterburner taken from a free corvette, it will provide enough damage for the mission. It will require you to repackage/assemble your corvette several times and then take the free modules from item hangar.
* Tip #3 (for experienced players only): While you need to use the frigate provided in [[Soldier of Fortune#Angel of Mercy (2 of 10)|Angel of Mercy (2/10)]], you can choose to use a free corvette (with a second civilian gun instead of the mining laser) for [[Soldier of Fortune#The Stand (5 of 10)|The Stand (5/10)]], but it requires to pilot the ship the right way (orbit at 1000m with afterburner on) and warp to the site using missions details sheet since mission tracking UI on the left won't let you warp on the site without the granted frigate.
* [[Industrialist (Producer)#Making Mountains of Molehills (4 of 10)|Making Mountains of Molehills (4/10)]] and [[Industrialist (Producer)#Making Mountains of Molehills (8 of 10)|(8/10)]] require 7,000 and 2,640 units of Tritanium respectively, which you can reprocess from the ores you mine or buy from the market. Should you wish to mine and reprocess yourself, a {{sh|Venture}} mining frigate given by [[Industrialist (Entrepreneur)#Balancing the Books (2 of 10)|Industrialist - Entrepreneur mission: Balancing the Books (2/10)]] may come in handy due to its mining speed and spacious orehold capacity. Alternatively, [[Frigates#Exploration|exploration frigates]] given out by [[Explorer#An Introduction to Cosmic Signatures (2 of 5)|Explorer mission: An Introduction to Cosmic Signatures (2/5)]] is also a good candidate for mining for this mission (although not for mining in general) as they usually have the largest cargohold capacity within the non-mining frigate class to minimize the number of mining trips you have to make.
* [[Industrialist (Producer)#Making Mountains of Molehills (4 of 10)|Making Mountains of Molehills (4/10)]] and [[Industrialist (Producer)#Making Mountains of Molehills (8 of 10)|(8/10)]] require 7,000 and 2,640 units of Tritanium respectively, which you can reprocess from the ores you mine or buy from the market. Should you wish to mine and reprocess yourself, a {{sh|Venture}} mining frigate given by [[Industrialist (Entrepreneur)#Balancing the Books (2 of 10)|Industrialist - Entrepreneur mission: Balancing the Books (2/10)]] may come in handy due to its mining speed and spacious orehold capacity. Alternatively, [[Frigates#Exploration|exploration frigates]] given out by [[Explorer#An Introduction to Cosmic Signatures (2 of 5)|Explorer mission: An Introduction to Cosmic Signatures (2/5)]] is also a good candidate for mining for this mission (although not for mining in general) as they usually have the largest cargohold capacity within the non-mining frigate class to minimize the number of mining trips you have to make.
* [[Industrialist (Producer)#Making Mountains of Molehills (9 of 10)|Making Mountains of Molehills (9 of 10)]] Mining 4,000 units of Kernite before completing this mission and then reprocessing it will complete both the mining and reprocessing Kernite [[AIR Career Program]] industrialist tasks. This is the only hisec source of Kernite otherwise a trip to lowsec will be required to mine Kernite.
* [[Industrialist (Producer)#Making Mountains of Molehills (9 of 10)|Making Mountains of Molehills (9 of 10)]] Mining 4,000 units of Kernite before completing this mission and then reprocessing it will complete both the mining and reprocessing Kernite [[AIR Career Program]] industrialist tasks.
* [[Industrialist (Producer)#Making Mountains of Molehills (10 of 10)|Making Mountains of Molehills (10/10)]] requires a faction-specific frigate which you can either manufacture or purchase from the market. Alternatively, if you have already completed [[Explorer#Gas Site Scanning (5 of 5)|Explorer mission: Gas Site Scanning (5/5)]] and have the rewarded frigate intact, you can turn it in to immediately complete the mission.
* [[Industrialist (Producer)#Making Mountains of Molehills (10 of 10)|Making Mountains of Molehills (10/10)]] requires a faction-specific frigate which you can either manufacture or purchase from the market. Alternatively, if you have already completed [[Explorer#Gas Site Scanning (5 of 5)|Explorer mission: Gas Site Scanning (5/5)]] and have the rewarded frigate intact, you can turn it in to immediately complete the mission.
== Rewards ==
== Rewards ==
The career agent missions reward a moderate amount of ISK (about 5-6M ISK in total), as well as a number of useful ships and modules. Additionally, completing the last mission for each of the five career agents increases your [[NPC standings|standings]] with the agent's faction. While this is only slightly useful for new characters (who start off with neutral standings to all the empire factions), it's a way for older characters to recover from low faction standings. Lastly, the completion of your first Career agents provides you with a free [[Expert_Systems#AIR_Expert_Systems|AIR Expert system]], which temporarily gives you a significant boost to your skills of the respective career path. The expert systems are rewarded through the [[AIR_Career_Program|Air Career Programme.]]
The career agent missions reward a moderate amount of ISK (about 5-6M ISK in total), as well as a number of useful ships and modules. Additionally, completing the last mission for each of the five career agents increases your [[NPC standings|standings]] with the agent's faction (with no [[NPC_standings#Derived_standings|derived standing]]). While this is only slightly useful for new characters (who start off with neutral standings to all the empire factions), it's a way for older characters to recover from low faction standings. Lastly, the completion of your first Career agents provides you with a free [[Expert_Systems#AIR_Expert_Systems|AIR Expert system]], which temporarily gives you a significant boost to your skills of the respective career path. The expert systems are rewarded through the [[AIR_Career_Program|Air Career Programme.]]
{| class="wikitable"
{| class="wikitable"
Line 162:
Line 140:
|}
|}
<small><references /></small>
== Blitzing for faction standings ==
{{Co|coral|New players are strongly advised to disregard this section. Career Agents act as an extension to the EVE tutorial, and new players should take their time to work through a single set of career agent missions as they were intended, at their own pace, for the learning experience they offer.}}
For experienced players looking to [[Gaining faction standings fast|gain faction standings fast]], career agent missions offer significant faction standing gains (7.5% per set, with 12 sets available = 22.5% per faction) for relatively low effort and there are a number of tips and tricks that can greatly improve the speed at which you burn through the missions:
Every character can complete all three sets of career agent missions for each faction. Note: unlike [[Epic arcs|Epic Arcs]], career agent missions are never repeatable. You can accept a mission from each of the 5 agents in a location at once, and attempt to complete all 5 before returning to station, thus reducing your overall warps.
T1 [[Destroyers]] are within ship restrictions for most missions, and can be used to complete objectives, particularly combat related tasks, significantly faster than frigates, due to their increased firepower and abundance of high slots.
* Look to fit long range weapons as none of the NPCs will attempt to escape.
* Prioritise velocity, warp speed and [[Travel fits|align time]] over tank, as most NPCs have low damage output.
* A destroyer with 3 mid slots is ideal, to retain a prop mod, where combinations of 5 missions require you undock with the other two taken by mission specific modules.
* {{Co|coral|Two career agent missions will destroy your ship, ensure you do these in ships you're happy to lose}}.
** The two which destroy your ship, will notify you inside the mission dialogue.
Not all rats / rooms need to be cleared. Many missions such as 'The Exam (10 of 10)' simply require you to kill a single target or destroy a single structure. Throughout the career missions, ensure you focus simply on the mission objective, complete this, then move onto the next mission and objective.
'Aquire' missions, such as 'Making Mountains of Molehills (3 of 10)', which requires you hand in a 1MN Civilian Afterburner, can usually be completed instantly by purchasing the required item from the market, negating the need to use the supplied [[Blueprint Copy|BPC]].
* The exception here are the missions requiring Tritanium, which require you to at least engage with the mission site before handing in.
[[File:Fit to ship notice.png|alt=An in-game notice of the module required to be fitted to your ship, to complete the mission. |border|thumb|344x344px]]
Missions that require you fit a specific module, such as a Warp Scrambler for 'Your Undivided Attention (3 of 10)' will indicate this in your mission tracker, on the left hand side of your UI. Check your current fit meets the mission requirements for the set of 5 you have in progress, by clicking the white star icon for each mission you have accepted, prior to undocking (the icon in the top left corner, of the image to the right).
Missions that suggest you board a [[Venture]], can be completed in ships other than Ventures. This is simply a (good) suggestion to new players. If you wish to complete this mission in a different ship, you can still warp to the mission location after undocking.
Scan down a few data, relic and gas training sites in one sitting. You can then unfit the probe launcher from your ship in favour of another weapon, and (provided the sites don't de-spawn) you can complete all the exploration missions without needing to scan again.
The fastest configuration found in testing (thus far) was fitting a Destroyer with 5 x Weapons, 1 x Probe Launcher and 2 x [[Mining|Mining Lasers]] (yes, really), allowing for sets of 5 missions to be completed together, cutting out a significant number of warps, docks and refits between individual missions.
* Unfit the probe launcher once you've scanned at least one data, one relic and one gas training site inside the career agent system.
* Unfit the Mining Lasers when the industrial missions are complete (or for any set of 5 missions where no mining is required, in favour of more guns)
<small></small><references />
<!--
<!--
Possible standing gain from finishing three set of agent for '''one''' faction
Possible standing gain from finishing three set of agent for '''one''' faction
Line 181:
Line 191:
Thus by finishing 2 set of career mission can help unlock level 2 mission for that faction.
Thus by finishing 2 set of career mission can help unlock level 2 mission for that faction.
-->
-->{{expansion past
If you plan on [[Applying to EVE University|applying to join EVE University]], it is highly recommended that you have at least started, if not completed, all the career agent missions.
|'''[https://www.eveonline.com/news/view/patch-notes-version-23-02#h2-1 February 2026: Version 23.02 2026-02-25.1]'''
The final mission for each career agent, i.e. Making Mountains of Molehills (10 of 10) has had the faction standing bonus changed when completing the mission to no longer trigger derived standings, just like epic arcs. This will mean players will no longer lose standings to empire factions when completing the career agent missions.
It should be noted that players who have already started or previously talked to a specific career agent will still get the derived standing standings from their final mission.
The career agents (like nearly all other agents) can be accessed through the Station Services window at their station. Right-click on an agent to start a conversation with them.
The Career Agents are a part of EVE Online's new player training. Following on from the tutorial, the career agents offer missions that showcase and explain some of the main PvE activities in EVE Online, as well as expand on the topics covered in the tutorial. There are five career agents, each offering between 5 and 10 sequential missions covering a certain area of the game:
The agents are not exclusive (i.e. doing one set of missions doesn't "lock" you into a pre-set "career path", as there are no such things in EVE); you can do as many of the agents' missions as you want. There are 12 locations in total, 3 for each of the four empires in New Eden.
It is highly recommended that you complete all the mission chains (or arcs if you will) given by the five career agents, even if you already know what you'd like to do in EVE. The missions give a good overview of some of the mechanics of the game, and good financial rewards for a new player. It is also good to have a basic idea of how each career works - for example, even if you don't plan to do any exploration, it is good to have an idea of how other players are able to scan and find you while you are in space doing any number of activities. Also, it's likely that over the course of your time in EVE you will want to try doing many different things.
If you plan on applying to join EVE University, it is recommended that you have at least started, if not completed, all the career agent missions.
Introduction
If you're doing the Career Agent missions right after the tutorial, you may notice that some of the mission mechanics have changed.
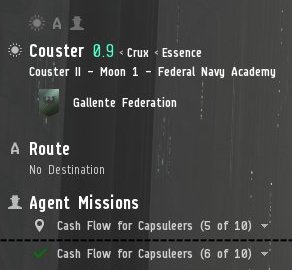
An uncompleted and a completed mission in the Info Panel. The currently active mission now shows up in the Info Panel (left side of the screen) under "Agent Missions". Each mission entry has a drop-down menu through which you can read a summary of the objectives. Additionally, once you've completed the objectives for a mission (including, if applicable, returning any items to the correct station), a green tick mark will appear in the Info Panel.
The missions will also be entered into your mission journal
With the Viridian expansion the mission journal was removed from the Neocom and the short-cut settings. Its keyboard short-cut was assigned to the newly introduced opportunities window.
Till the 2nd December 2025, the mission journal could still be called using the slash command/open journal in any of the chat windows.
In the Version 23.02 release 2025-12-02.1 CCP announced: Slash commands via chat have been disabled.
In order to start a mission, you must first talk to the agent (right-click on the agent (in the "Agents" panel in the Station Services window), and select "Start Conversation") and accept a mission. Once you've completed the objectives, you must return to the agent's station, and talk to him/her again to complete it. You will then be offered the next mission in the mission chain.
The career agent missions often give bonus rewards for completing them particularly quickly, although the time-frame given is usually more than generous.
Any agents you accept missions from will be automatically added to your address book (accessible through the Contacts window in the NeoCom). You can use this to find your agent again should you be unsure where to go.
In many ways, the career agents work similarly to "normal" mission agents in EVE, with two important differences:
The career agents only have a limited set of missions available. Normal mission agents will continue to offer you new missions indefinitely as long as you have the required standings
The career agents will sometimes give you ships, modules, or skillbooks as mission rewards. Normal mission agents almost always pay only ISK and loyalty points.
It's possible to decline a mission from a Career Agent, but this will prevent you from completing the rest of the missions in that agent's mission arc. Therefore, if you want to take a temporary break from a mission chain, click the "Delay" button (instead of the "Reject" button) when a mission is offered. Should you nonetheless run into problems where you are mid-chain, such as declining the agent (which will prevent you from progressing further with that agent) or any other technical glitches, you can open a support ticket, and usually, a game master (GM) will reset the mission or even the agent for you.
While many of the rewards from the Career Agents are useful in the rest of the game, some missions reward you with a "Civilian" module. These modules are much worse than even the basic Tech 1 modules and should be ditched at the earliest possible opportunity.
Many of the Career Agent missions have you interacting with objects in space (asteroids, containers, acceleration gates, etc); depending on your Overview settings these may not appear in your Overview. Therefore, the Career Agent missions are a good opportunity to get to know the Overview settings, and (if necessary) modify them so that you can see all the relevant objects in your Overview. If you're unsure whether your Overview settings are wrong (or if you're just in the wrong place), it may be a good idea to look at the "All" Overview preset from time to time.
The Career Agents assume that you've done the tutorial (or are at least familiar with the concepts taught in the tutorial) before starting their missions.
Caveat emptor – techniques are not mechanics
However, keep in mind that they offer very little training in PvP (which make up a very substantial part of the game). Additionally, EVE is a sandbox game, and much of the attraction of the game is forging your own path as opposed to following a pre-set path - so the career agent "careers" should only be seen as one of many things you can do in EVE.
Finding the Career Agents
If you've followed the tutorial, you will have flown to the station housing the career agents; all five agents are always located in the same station. If you skipped the tutorial, you can locate the closest set of career agents (there are three sets of agents per faction, but they all offer the same missions):
Select the card "Career Agents". This will open another window that will present you with the closest Career agents to your current location.
Next to each agent there will be a button labeled "Set Destination", "Dock", and "Start Conversation" depending on where you currently are. If you need to travel there click it to plot a route to the system and station where the agents are.
You can do the agents in any order you like - even accept all 5 and do them in parallel. In fact, the latter has the advantage that some of the rewards of one mission line are requested by another so you need to buy/build/get fewer items to finish the missions.
There are three sets of five career agents for each Empire faction in the game. They all offer identical missions and equivalent rewards, however, they can be used as a quick way to gain faction standings, as each character can complete all sets of career agents, for all empire factions.
Career Agents Locations
The career agents are located in the following systems (although you can easily find them through the help menu):
There is no built-in mission order for the career agents - you can complete them in whichever order you please. There are, however, some benefits to completing one mission chain before another, be it for logical or material reasons.
This mission chain does not involve combat or require any mission item to be outsourced, and thus it is an ideal candidate as an earlier choice.
The second mission grants an exploration frigate, which is convenient for most other career missions (large cargo hold, good multi-weapons damages for a new pilot).
Everything you need for the missions is internally supplied, and thus it is an ideal candidate as an earlier choice.
While your corvette is more than sufficient for the first two missions before a more combat-appropriate frigate is granted to you as a reward for Cash Flow for Capsuleers (2/10), you can try out the two frigates rewarded from the Explorer should you wish, as they will likely be an upgrade compared to the corvette.
Since this mission chain deals with more advanced PvE combat topics, for the new players it is suggested that you complete Enforcer first. However, the final mission of this chain rewards a T1 destroyer, which could be used to complete the Enforcer missions more quickly, thanks to their significantly increased firepower vs frigates.
In addition, The Exam (10/10) might pose a challenge for those who do not yet have a combat-appropriate frigate from Cash Flow for Capsuleers (2/10) or the necessary skill injected and trained to use the destroyer granted to you when the mission is accepted.
Tip #1: Angel of Mercy (2/10) and The Stand (5/10) require you to fly a frigate to its destruction. Do not fit any modules on it other than what you need to complete the mission, and get it Platinum-level insured before you undock for a quick and easy pay-out on mission completion.
Tip #2: The Stand (5/10) requires you to do some damage, so you'll need weapons, that you can buy at your own expense (with their ammunition) to other players at the agent's station, or bring your own ammunition and modules before you start the mission chain from a place with lower prices. Alternatively you can use the ship provided, insure it, and fit it with 3 to 4 free turrets and 1 free afterburner taken from a free corvette, it will provide enough damage for the mission. It will require you to repackage/assemble your corvette several times and then take the free modules from item hangar.
Tip #3 (for experienced players only): While you need to use the frigate provided in Angel of Mercy (2/10), you can choose to use a free corvette (with a second civilian gun instead of the mining laser) for The Stand (5/10), but it requires to pilot the ship the right way (orbit at 1000m with afterburner on) and warp to the site using missions details sheet since mission tracking UI on the left won't let you warp on the site without the granted frigate.
Balancing the Books (10/10) requires some faction-specific ammunition, which you can manufacture or purchase from the market. If you are doing this mission for a Gallente or Minmatar agent, you can use leftover ammunition which comes as a bonus reward by Enforcer: Cash Flow for Capsuleers (1/10) for at least a partial supply of required items.
Making Mountains of Molehills (10/10) requires a faction-specific frigate which you can either manufacture or purchase from the market. Alternatively, if you have already completed Explorer mission: Gas Site Scanning (5/5) and have the rewarded frigate intact, you can turn it in to immediately complete the mission.
Rewards
The career agent missions reward a moderate amount of ISK (about 5-6M ISK in total), as well as a number of useful ships and modules. Additionally, completing the last mission for each of the five career agents increases your standings with the agent's faction (with no derived standing). While this is only slightly useful for new characters (who start off with neutral standings to all the empire factions), it's a way for older characters to recover from low faction standings. Lastly, the completion of your first Career agents provides you with a free AIR Expert system, which temporarily gives you a significant boost to your skills of the respective career path. The expert systems are rewarded through the Air Career Programme.
New players are strongly advised to disregard this section. Career Agents act as an extension to the EVE tutorial, and new players should take their time to work through a single set of career agent missions as they were intended, at their own pace, for the learning experience they offer.
For experienced players looking to gain faction standings fast, career agent missions offer significant faction standing gains (7.5% per set, with 12 sets available = 22.5% per faction) for relatively low effort and there are a number of tips and tricks that can greatly improve the speed at which you burn through the missions:
Every character can complete all three sets of career agent missions for each faction. Note: unlike Epic Arcs, career agent missions are never repeatable. You can accept a mission from each of the 5 agents in a location at once, and attempt to complete all 5 before returning to station, thus reducing your overall warps.
T1 Destroyers are within ship restrictions for most missions, and can be used to complete objectives, particularly combat related tasks, significantly faster than frigates, due to their increased firepower and abundance of high slots.
Look to fit long range weapons as none of the NPCs will attempt to escape.
Prioritise velocity, warp speed and align time over tank, as most NPCs have low damage output.
A destroyer with 3 mid slots is ideal, to retain a prop mod, where combinations of 5 missions require you undock with the other two taken by mission specific modules.
Two career agent missions will destroy your ship, ensure you do these in ships you're happy to lose.
The two which destroy your ship, will notify you inside the mission dialogue.
Not all rats / rooms need to be cleared. Many missions such as 'The Exam (10 of 10)' simply require you to kill a single target or destroy a single structure. Throughout the career missions, ensure you focus simply on the mission objective, complete this, then move onto the next mission and objective.
'Aquire' missions, such as 'Making Mountains of Molehills (3 of 10)', which requires you hand in a 1MN Civilian Afterburner, can usually be completed instantly by purchasing the required item from the market, negating the need to use the supplied BPC.
The exception here are the missions requiring Tritanium, which require you to at least engage with the mission site before handing in.
Missions that require you fit a specific module, such as a Warp Scrambler for 'Your Undivided Attention (3 of 10)' will indicate this in your mission tracker, on the left hand side of your UI. Check your current fit meets the mission requirements for the set of 5 you have in progress, by clicking the white star icon for each mission you have accepted, prior to undocking (the icon in the top left corner, of the image to the right).
Missions that suggest you board a Venture, can be completed in ships other than Ventures. This is simply a (good) suggestion to new players. If you wish to complete this mission in a different ship, you can still warp to the mission location after undocking.
Scan down a few data, relic and gas training sites in one sitting. You can then unfit the probe launcher from your ship in favour of another weapon, and (provided the sites don't de-spawn) you can complete all the exploration missions without needing to scan again.
The fastest configuration found in testing (thus far) was fitting a Destroyer with 5 x Weapons, 1 x Probe Launcher and 2 x Mining Lasers (yes, really), allowing for sets of 5 missions to be completed together, cutting out a significant number of warps, docks and refits between individual missions.
Unfit the probe launcher once you've scanned at least one data, one relic and one gas training site inside the career agent system.
Unfit the Mining Lasers when the industrial missions are complete (or for any set of 5 missions where no mining is required, in favour of more guns)
^In the past, Amarr, Caldari and Minmatar agents used to award 1.2% while only Gallente agents gave out 1.5%. This seems to have been fixed.
The final mission for each career agent, i.e. Making Mountains of Molehills (10 of 10) has had the faction standing bonus changed when completing the mission to no longer trigger derived standings, just like epic arcs. This will mean players will no longer lose standings to empire factions when completing the career agent missions.
It should be noted that players who have already started or previously talked to a specific career agent will still get the derived standing standings from their final mission.


 Venture mining frigate given by Industrialist - Entrepreneur mission: Balancing the Books (2/10) may come in handy due to its mining speed and spacious orehold capacity. Alternatively, exploration frigates given out by Explorer mission: An Introduction to Cosmic Signatures (2/5) is also a good candidate for mining for this mission (although not for mining in general) as they usually have the largest cargohold capacity within the non-mining frigate class to minimize the number of mining trips you have to make.