No edit summary |
m typos |
||
| (9 intermediate revisions by the same user not shown) | |||
| Line 3: | Line 3: | ||
This is a guide to set up colonies for [[Planetary Industry]]. | This is a guide to set up colonies for [[Planetary Industry]]. | ||
There are eight types of planets in EVE: Barren, Gas, Ice, Lava, Oceanic, Plasma, Storm and Temperate. To start doing industry on a planet, you need to have a Planetary Command Center matching that planet's type. These are sold by NPCs all across New-Eden | There are eight types of planets in EVE: Barren, Gas, Ice, Lava, Oceanic, Plasma, Storm and Temperate. To start doing industry on a planet, you need to have a Planetary Command Center matching that planet's type. These are sold by NPCs all across New-Eden. | ||
{{Box|tldr: | {{Box|tldr: Boxes like this will give sweet click-by-click instructions to build a simple starter-colony. No vegetables included.}} | ||
This instruction will not cover the process of finding and scanning a planet for resources. This is already covered in [[Planetary Industry#Planet Scanning|Planet Scanning]] and [[Identifying valuable planets]]. | |||
== Step 1: Deploying the [[Planetary buildings#Command Centers|Command Center]] == | == Step 1: Deploying the [[Planetary buildings#Command Centers|Command Center]] == | ||
==== Enter planet view ==== | ==== Enter planet view ==== | ||
[[File:System_information_window.png | [[File:System_information_window.png|thumb|Solar system: Information|left]] | ||
[[File:Planet_information.png|left|thumb]] | [[File:Planet_information.png|left|thumb]] | ||
To deploy the [[Planetary buildings#Command Centers|Command Center]] you need to have the command center-item in your cargo hold and have to be undocked in space in the same system as the planet you want to colonize. You can be tethered or cloaked for this step. | To deploy the [[Planetary buildings#Command Centers|Command Center]] you need to have the command center-item in your cargo hold and have to be undocked in space in the same system as the planet you want to colonize. You can be tethered or cloaked for this step. | ||
You can access the planet view by right-clicking a planet in the overview or any other list | You can access the planet view by right-clicking a planet in the overview or any other list and select "View planetary industry". You can get a list of avaible planets from opening the "Solar System: Information" by clicking on the systems name in the top left corner and select the "Orbital Bodies" tab. Each planet has their own information page accessed by the familiar[[File:Info_button.png|frameless]]-icon. The only game mechanic-relevant attribute in this window is the radius and the extractable resources. It also has a button "View Planetary Industry" at the bottom.{{clear}} | ||
==== Place the Command Center ==== | ==== Place the Command Center ==== | ||
Once you are in the planet view, you can drag and zoom to see the planet from different angles. In the top-left corner are two tabs | Once you are in the planet view, you can drag and zoom to see the planet from different angles. In the top-left corner are two tabs: "Build" and "Scan". To set up your colony you can use [[Colony management#Colony Layouts|templates]] or build it structure-by-structure. | ||
The location of the [[Planetary buildings#Command Centers|Command Center]] is not overly relevant. In most cases it will not be connected to the rest of the colony and | The location of the [[Planetary buildings#Command Centers|Command Center]] on the planet is not overly relevant. In most cases it will not be connected to the rest of the colony and not used to export products from the planet if it can be avoided. Your [[Planetary buildings#Command Centers|Command Center]] provides Powergrid and CPU to your entire colony. This is similar to ship fitting and limits how many buildings you can build on a planet. Everything built takes a certain amount of CPU and Powergrid, including the transport-links between the buildings. The [[Planetary buildings#Command Centers|Command Center]] itself does not need to be connected by a link to provide the fitting resources. It just needs to exist somewhere on the planet. However, if you double-click any empty spot on the planets surface it will center the view on the [[Planetary buildings#Command Centers|Command Center]], so having it close to the rest of the colony might make navigating back there easier. | ||
==== Hit submit ==== | ==== Hit submit ==== | ||
| Line 29: | Line 31: | ||
==== Upgrading the command center ==== | ==== Upgrading the command center ==== | ||
[[File:Level_1_Command_Center.png|left|thumb]] | [[File:Level_1_Command_Center.png|left|thumb]] | ||
A [[Planetary buildings#Command Centers|Command Center]] is always deployed at its lowest level. The CPU and Power it provides for the colony in this stage is very limited and hardly useful. To upgrade the [[Planetary buildings#Command Centers|Command Center]] you have to click it and select the first tab with the green plus-icon. | A [[Planetary buildings#Command Centers|Command Center]] is always deployed at its lowest level. The CPU and Power it provides for the colony in this stage is very limited and hardly useful. To upgrade the [[Planetary buildings#Command Centers|Command Center]] you have to click it and select the first tab with the green plus-icon. It will show you the level it can be upgraded to, depending on your level in the [[Command Center Upgrades]] skill. To upgrade you will have to hit the "upgrade" button at the bottom. | ||
{{clear}}{{Box|tldr: | {{clear}}{{Box|tldr: Select the Command Center from the build menu and place it on the planet. Hit submit. Upgrade the Command Center by selecting it, click on the first tab and select the desired level. Hit upgrade.}} | ||
== Step 2: Getting resources == | == Step 2: Getting resources == | ||
There are two methods to get resources to the planets surface | There are two methods to get resources to the planets surface: Extracting and Importing. | ||
* Extracting: If you are building a extraction-planet, you mine the resources from the planet with extractors, usually refine the extracted materials to some degree and export them up from the planetary surface into space. Follow [[Setting up a planetary colony#Step 2.1: Extract resources|Step 2.1]] for building a extraction planet | * Extracting: If you are building a extraction-planet, you mine the resources from the planet with extractors, usually refine the extracted materials to some degree and export them up from the planetary surface into space. Follow [[Setting up a planetary colony#Step 2.1: Extract resources|Step 2.1]] for building a extraction planet. | ||
* Importing: If you are building a factory-planet, you import | * Importing: If you are building a factory-planet, you import some of these resources from space back onto the surface, refine it with processors to one or more higher grade materials and export them up again into space. Follow [[Setting up a planetary colony#Step 2.2: Import resources|Step 2.2]] for building a factory planet. | ||
There are hybrid | There are hybrid configurations, that use both methods, but in most cases it is more efficient to do one or the other. | ||
=== Step 2.1: Extract resources === | === Step 2.1: Extract resources === | ||
| Line 59: | Line 61: | ||
The lower right corner of the programmer window shows the amount of resources that can be expected to be extracted. The numbers change in realtime with the movement of the [[Planetary buildings#Extractor Heads|heads]]. Once you are happy with the placement of the [[Planetary buildings#Extractor Heads|heads]] hit "Start extraction" and submit to start the process. | The lower right corner of the programmer window shows the amount of resources that can be expected to be extracted. The numbers change in realtime with the movement of the [[Planetary buildings#Extractor Heads|heads]]. Once you are happy with the placement of the [[Planetary buildings#Extractor Heads|heads]] hit "Start extraction" and submit to start the process. | ||
{{Box|tldr: Hit Scan | {{Box|tldr: Hit Scan. Select a resource and find for a rich spot on the surface. Go back to Build menu. Select the Extractor Control unit. Place it on the planet, the range circle around it over the spot you want to extract. Dont place any extractor heads just now. We come to that later.}} | ||
=== Step 2.2: Import resources === | === Step 2.2: Import resources === | ||
| Line 79: | Line 81: | ||
==== Bulding a Launchpad for export ==== | ==== Bulding a Launchpad for export ==== | ||
At | At some point you will want to export whatever you produced on the planet to space to use it or ship it somewhere else to process it further or to the market. A [[Planetary buildings#Command Centers|Command Center]] can be used to launch goods to a can into space, but this is more expensive and can only hold 500m³ at a time. At a [[Planetary buildings#Launchpad|Launchpad]] you can export your products to the customs office in space around the planet. A single [[Planetary buildings#Launchpad|Launchpad]] will overload a [[Planetary buildings#Command Centers|Command center's]] CPU if its not upgraded. | ||
{{Box|tldr: Build a launchpad. For extraction planets with Command Center level 3+ build a storage facility. Put buildings as close together as possible.}}{{clear}} | {{Box|tldr: Build a launchpad. For extraction planets with Command Center level 3+ build a storage facility. Put buildings as close together as possible.}}{{clear}} | ||
| Line 87: | Line 89: | ||
==== Create links ==== | ==== Create links ==== | ||
{{button|CTRL}}+{{button|LMB}} one building, then release {{button|CTRL}} and click the building you want to build a link to. A link can always used in both directions, so it doesnt matter in what direction you build it. Materials can only be routed through up to six transiting buildings. Generally it is enough to connect each new building to | {{button|CTRL}}+{{button|LMB}} one building, then release {{button|CTRL}} and click the building you want to build a link to. A link can always used in both directions, so it doesnt matter in what direction you build it. Materials can only be routed through up to six transiting buildings. Generally it is enough to connect each new building to exactly one already existing building for all buidings to be connected. | ||
If you have a red circle around a building, this indicates a possible problem with the building. Usually this means that resources are either not delivered to or from the building. | If you have a red circle around a building, this indicates a possible problem with the building. Usually this means that resources are either not delivered to or from the building. | ||
| Line 105: | Line 107: | ||
* The easier way it by opening the [[File:PI storage icon.png|frameless]] Storage tab and double-click the commodity you want to route somewhere. While the mouse curser is changed we can double-click another building to route the material there. | * The easier way it by opening the [[File:PI storage icon.png|frameless]] Storage tab and double-click the commodity you want to route somewhere. While the mouse curser is changed we can double-click another building to route the material there. | ||
* The other option is for the situation, that you dont have any material in the storage yet, but have already routed something to it. You can open the [[File:PI routes.png|frameless]]routes tab. This lists all routes that come in, go out or transit through this building. If you click on any incoming route from that list, you get a button to create a matching outgoung route. Note that double-click on the commodity does not work here. Once you hit "create route" the curser is changed and awaits a destination again.{{Box|tldr: Create links by Ctrl-clicking a building. Click an ajacent building. Repeat until all buildings are linked to the rest. Click the extractor, select the routing tab. Double-click the resource listed. Double-click the storage.}} | * The other option is for the situation, that you dont have any material in the storage yet, but have already routed something to it. You can open the [[File:PI routes.png|frameless]]routes tab. This lists all routes that come in, go out or transit through this building. If you click on any incoming route from that list, you get a button to create a matching outgoung route. Note that double-click on the commodity does not work here. Once you hit "create route" the curser is changed and awaits a destination again.{{Box|tldr: Create links by Ctrl-clicking a building. Click an ajacent building. Repeat until all buildings are linked to the rest.</br>Click the extractor, select the routing tab. Double-click the resource listed. Double-click the storage.}} | ||
{{clear}} | {{clear}} | ||
| Line 114: | Line 116: | ||
Raw materials (R0) produced by the extractor have no immediate use outside of PI. They can only be refined into the first level of PI-products (P1). This first processing-step reduces volume by 75%. With this the Launchpad takes longer to fill and the colony can run longer without exporting. Refining of raw R0 resources is done in Basic Industry Facilities. | Raw materials (R0) produced by the extractor have no immediate use outside of PI. They can only be refined into the first level of PI-products (P1). This first processing-step reduces volume by 75%. With this the Launchpad takes longer to fill and the colony can run longer without exporting. Refining of raw R0 resources is done in Basic Industry Facilities. | ||
The number of Basic Factories should be balanced against the amount of raw materials the extractor can produce. Too many Factories will not get enough resources to run all of the time and the fitting they take up would be better spend | The number of Basic Factories should be balanced against the amount of raw materials the extractor can produce. Too many Factories will not get enough resources to run all of the time and the fitting they take up would be better spend on additional extractor heads. Too few will let the buffer storage fill up eventually and any excess raw materials would then be lost. Each Basic Industry Facility consumes 3000 raw materials per cycle. Each cycle takes 30 minutes. So each Basic Industry Facility will consume 6000 raw materials per hour. | ||
To balance extraction and processing might take a few tries and the setup might have to be adjusted over time. To try out how many extractor heads and factories are needed to hit a balance without paying for every change you can hit submit in the edits pending before each try. Everything built after is not paid for and can always be reverted by clicking cancel until you hit submit again. | To balance extraction and processing might take a few tries and the setup might have to be adjusted over time. To try out how many extractor heads and factories are needed to hit a balance without paying for every change you can hit submit in the edits pending before each try. Everything built after is not paid for and can always be reverted by clicking cancel until you hit submit again. | ||
| Line 122: | Line 124: | ||
If you have already started extracting before, you can just try to build as many Basic Industry Facilities as you can and need. If you do not have the fitting left to build enough Basic Factories, build as much as you can. In this case the buffer storage will start to fill up with unprocessed resources. You can then reduce the amount of heads for the next runtime to free up some fitting for additional Basic Facilities. | If you have already started extracting before, you can just try to build as many Basic Industry Facilities as you can and need. If you do not have the fitting left to build enough Basic Factories, build as much as you can. In this case the buffer storage will start to fill up with unprocessed resources. You can then reduce the amount of heads for the next runtime to free up some fitting for additional Basic Facilities. | ||
{{Box|tldr: Hit submit. Doubleclick the extractor. Select a resource and a duration. 1) Ctrl-click on the surface to place a head and drag&drop head(s) to hotspots without overlapping. 2) After each head check Avg. per hour. For each full 6000 build a Basic Industry Facility. 3) | {{Box|tldr: Hit submit. Doubleclick the extractor. Select a resource and a duration.</br>1) Ctrl-click on the surface to place a head and drag&drop head(s) to hotspots without overlapping.</br>2) After each head check Avg. per hour. For each full 6000 build a Basic Industry Facility.</br>3) Repeat until full 10 heads are set or fitting is exhausted.}} | ||
If you are not happy with the results, hit cancel in the edits pending and try again. Nothing is lost but time. Costs are only paid when pending edits are submitted. | If you are not happy with the results, hit cancel in the edits pending and try again. Nothing is lost but time. Costs are only paid when pending edits are submitted. | ||
| Line 130: | Line 132: | ||
==== Install Schematics ==== | ==== Install Schematics ==== | ||
[[File:PI P1 Schematics.png|left|thumb]] | [[File:PI P1 Schematics.png|left|thumb]] | ||
For each | For each industry facilities you have to select what it should produce. Double-click on each of them and select the schematic to be installed. The tooltip of each schematic shows what inputs are needed. Once you double-click a schematic or hit install, the system takes you directly to the routing dialog. Notice the changed cursor, that expects you to doubleclick or select a destination for the produced material. | ||
If you miss to route the materials at this stage, you can always follow the "Routing the resources from a extractor or factory" anytime later. A red circle around the building will remind you of it. | If you miss to route the materials at this stage, you can always follow the "Routing the resources from a extractor or factory" anytime later. A red circle around the building will remind you of it. | ||
{{Box|tldr: 1) | {{Box|tldr:</br>1) Double-click a factory.</br>2) Double-click the right P1 commodity for your R0.</br>3) Double-click the launchpad.</br>4) Repeat for each factory}}{{Clear}} | ||
==== Route inputs to the factory ==== | ==== Route inputs to the factory ==== | ||
Dont forget to route material from a source like a storage or a launchpad to the factory to provide resources. | Dont forget to route material from a source like a storage or a launchpad to the factory to provide resources. | ||
{{Box|tldr: Select the Storage facility. 1) Select the | {{Box|tldr: Select the Storage facility.</br>1) Select the routes tab.</br>2) Click the incoming route.</br>3) Select "create route".</br>4) Double-click a previously not selected factory.</br>5) Repeat for each factory}} | ||
== Step 6: Profit! == | == Step 6: Profit! == | ||
Export and sell or transport to a factory palanet, reprocess further and sell then. | |||
To export commodities to space you have to be undocked in the same system. You can be tethered or cloaked for this. Right-click the Customs Office from the overview and select "Access Customs Office". Select the right launchpad in the upper right corner if you have multiple. Drag&drop resources to and from the office to the launchpad. Hit "transfer" when you are done. | |||
To pick up the items, you have to be uncloaked near them. Access the Customs Office and Drag&drop items from it to the Cargo hold. | |||
Latest revision as of 23:13, 7 October 2025
This is a guide to set up colonies for Planetary Industry.
There are eight types of planets in EVE: Barren, Gas, Ice, Lava, Oceanic, Plasma, Storm and Temperate. To start doing industry on a planet, you need to have a Planetary Command Center matching that planet's type. These are sold by NPCs all across New-Eden.
This instruction will not cover the process of finding and scanning a planet for resources. This is already covered in Planet Scanning and Identifying valuable planets.
Step 1: Deploying the Command Center
Enter planet view
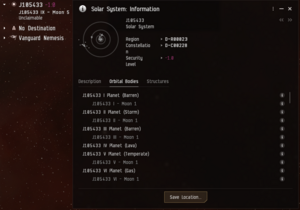
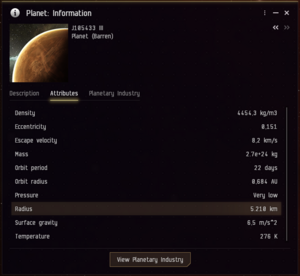
To deploy the Command Center you need to have the command center-item in your cargo hold and have to be undocked in space in the same system as the planet you want to colonize. You can be tethered or cloaked for this step.
You can access the planet view by right-clicking a planet in the overview or any other list and select "View planetary industry". You can get a list of avaible planets from opening the "Solar System: Information" by clicking on the systems name in the top left corner and select the "Orbital Bodies" tab. Each planet has their own information page accessed by the familiar![]() -icon. The only game mechanic-relevant attribute in this window is the radius and the extractable resources. It also has a button "View Planetary Industry" at the bottom.
-icon. The only game mechanic-relevant attribute in this window is the radius and the extractable resources. It also has a button "View Planetary Industry" at the bottom.
Place the Command Center
Once you are in the planet view, you can drag and zoom to see the planet from different angles. In the top-left corner are two tabs: "Build" and "Scan". To set up your colony you can use templates or build it structure-by-structure.
The location of the Command Center on the planet is not overly relevant. In most cases it will not be connected to the rest of the colony and not used to export products from the planet if it can be avoided. Your Command Center provides Powergrid and CPU to your entire colony. This is similar to ship fitting and limits how many buildings you can build on a planet. Everything built takes a certain amount of CPU and Powergrid, including the transport-links between the buildings. The Command Center itself does not need to be connected by a link to provide the fitting resources. It just needs to exist somewhere on the planet. However, if you double-click any empty spot on the planets surface it will center the view on the Command Center, so having it close to the rest of the colony might make navigating back there easier.
Hit submit
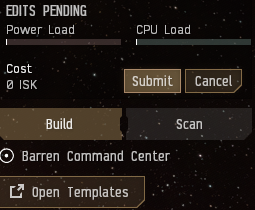
Once you have chosen a location, select your Command Center in the Build-tab and place it on the planet. The "edits pending" will show you the cost in ISK (zero in this case) and an option to submit or cancel. Nothing is paid and can always be changed or reverted back to the original state until the submit button is pressed. A few actions can not be done while there are edits pending.
To continue building the colony you will have to accept the placement of the Command Center and hit submit.
Upgrading the command center
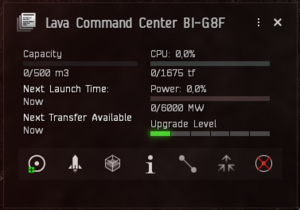
A Command Center is always deployed at its lowest level. The CPU and Power it provides for the colony in this stage is very limited and hardly useful. To upgrade the Command Center you have to click it and select the first tab with the green plus-icon. It will show you the level it can be upgraded to, depending on your level in the Command Center Upgrades skill. To upgrade you will have to hit the "upgrade" button at the bottom.
Step 2: Getting resources
There are two methods to get resources to the planets surface: Extracting and Importing.
- Extracting: If you are building a extraction-planet, you mine the resources from the planet with extractors, usually refine the extracted materials to some degree and export them up from the planetary surface into space. Follow Step 2.1 for building a extraction planet.
- Importing: If you are building a factory-planet, you import some of these resources from space back onto the surface, refine it with processors to one or more higher grade materials and export them up again into space. Follow Step 2.2 for building a factory planet.
There are hybrid configurations, that use both methods, but in most cases it is more efficient to do one or the other.
Step 2.1: Extract resources
To extract resources from the planet you need to build a Extractor Control Unit (ECU). Each built Control Unit can have up to ten Extractor Heads connected within a certain radius around it. Extractor Control Units, like all buildings, can not be moved after they are built. If you want to extract in a different spot you will have to decommission the old one and build and pay for a new one. Extractor Heads do not cost any ISK and can be moved while they are not extracting.
Placing the Extractor Control Unit
Scan the planet for resources you want to extract as explained in the Planet Scanning and the Identifying valuable planets articles. Select the ECU from the build menu and place the Unit with the darkened circle over the spot, where you want to extract. After hitting submit you could start setting down Extractor Heads
At this point, it might be better to build the rest of the colony first and see how much "fitting"-space is left after for placing extractor heads. You also will want to balance the amount of extracted resources with what the factories can actually process.
Start extracting
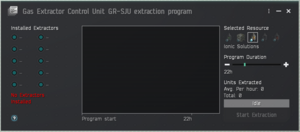
To open the extraction program window either double-click the ECU, or select it and click the first icon ![]() . In the upper right corner of the extraction program window we can select which of the avaible resources will be extracted. One Extractor Unit can only extract one type of resource at a time. While a resource is selected the scanner automatically shows the planets heatmap for that resouce.
. In the upper right corner of the extraction program window we can select which of the avaible resources will be extracted. One Extractor Unit can only extract one type of resource at a time. While a resource is selected the scanner automatically shows the planets heatmap for that resouce.
Below the resource selection is the duration slider. This determines how long the the extractor runs before it stops and has to be started again. The longer the runtime the less resources are extracted per hour. The duration also changes the radius of the heads and the individual cycle time that define how often resources are delivered.
Extractor Heads can be created and deleted by clicking on the dots on the left side of the program window. They can also be created and deleted by CTRL+LMB on the planet inside the Extractors radius while the Program Window is open. Drag and drop the heads in a position where the heatmap promises good results. Overlapping heads result in a penalty for both heads and should be avoided.
The lower right corner of the programmer window shows the amount of resources that can be expected to be extracted. The numbers change in realtime with the movement of the heads. Once you are happy with the placement of the heads hit "Start extraction" and submit to start the process.
Step 2.2: Import resources
For a factory planet you only need to build one or more Launchpads to import resources from the customs office in space. This will act like the buffer storage for the extraction planet explained in the next section. The difference is, that it needs to be periodically filled by you instead of getting resources from an extractor unit. The upsideis, that you can feed the factories with higher grade material and refine it even further.
Step 3: Storage
Building a buffer storage
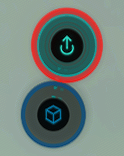
Input of materials has a lot of variance in the amount of resources gained in a given time. Materials are usually imported in batches at a time and extractors produce very different amounts of resouces per cycle. Factories on the other hand always process a static amount of resources per time. Even though the factories have one cycle of resource storage build in, this is usually not enough to compensate for the variance of the resources injected into the system. To buffer those spikes, extracted resources should always be routed to some form of storage. Factories can then pull it from there at the rate they need them.
If at any time a storage is full no new products can be delivered to it and the goods would just be lost at delivery. If fitting permits it is good practice for extraction-planets to separate the buffer storage from the one for the final product.
- A Storage Facility is the best option for extraction-planets (see below) in most cases.
- A Launchpad provides decent storage for buffer and final product if it has to be shared. It is also the go to for factory-planets (also below).
- The Command Center would be the worst option.
Bulding a Launchpad for export
At some point you will want to export whatever you produced on the planet to space to use it or ship it somewhere else to process it further or to the market. A Command Center can be used to launch goods to a can into space, but this is more expensive and can only hold 500m³ at a time. At a Launchpad you can export your products to the customs office in space around the planet. A single Launchpad will overload a Command center's CPU if its not upgraded.
Step 4: Links
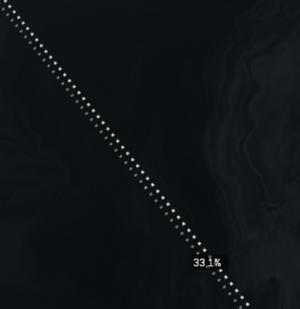
To transport resources we need to build links between buildings and route materials to their destination. Links cost more Power and CPU the longer they are. The radius of the planet and the distance between the buildings are the factors here. To save on fitting for links you always want to place buildings as close together as you can. Technically links have a limited throughput that can be upgraded, but this is hardly ever neded.
Create links
CTRL+LMB one building, then release CTRL and click the building you want to build a link to. A link can always used in both directions, so it doesnt matter in what direction you build it. Materials can only be routed through up to six transiting buildings. Generally it is enough to connect each new building to exactly one already existing building for all buidings to be connected.
If you have a red circle around a building, this indicates a possible problem with the building. Usually this means that resources are either not delivered to or from the building.
Routing the resources from a extractor or factory
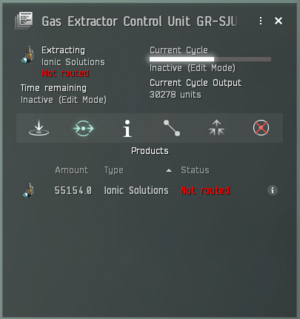
The extracted or refined resources need to be delivered somewhere, preferably to a buffer storage. For this we need to select the building and use the ![]() routing tab. Here the produced resource can be selected with a double-click that takes us directly to routing without having to select and hit "create routing". While the cursor is changed it expects us to select a destination. This can also be done by a double-click on the destination or by clicking the destination facility once and hitting "create route".
routing tab. Here the produced resource can be selected with a double-click that takes us directly to routing without having to select and hit "create routing". While the cursor is changed it expects us to select a destination. This can also be done by a double-click on the destination or by clicking the destination facility once and hitting "create route".
Industry Facilities will automatically start the routing dialog when a new schematic is installed.
Routing the resources from a storage
There are two ways to initiate a routing from a storage:
- The easier way it by opening the
 Storage tab and double-click the commodity you want to route somewhere. While the mouse curser is changed we can double-click another building to route the material there.
 - The other option is for the situation, that you dont have any material in the storage yet, but have already routed something to it. You can open the
 routes tab. This lists all routes that come in, go out or transit through this building. If you click on any incoming route from that list, you get a button to create a matching outgoung route. Note that double-click on the commodity does not work here. Once you hit "create route" the curser is changed and awaits a destination again.tldr: Create links by Ctrl-clicking a building. Click an ajacent building. Repeat until all buildings are linked to the rest.
Click the extractor, select the routing tab. Double-click the resource listed. Double-click the storage.
Step 5: Processing
Balance extraction versus refining
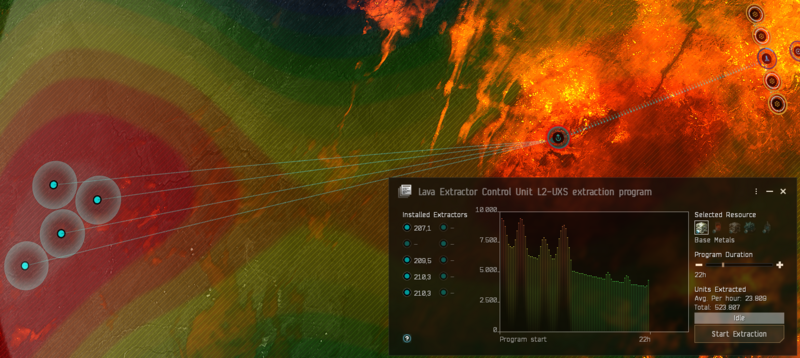
Raw materials (R0) produced by the extractor have no immediate use outside of PI. They can only be refined into the first level of PI-products (P1). This first processing-step reduces volume by 75%. With this the Launchpad takes longer to fill and the colony can run longer without exporting. Refining of raw R0 resources is done in Basic Industry Facilities.
The number of Basic Factories should be balanced against the amount of raw materials the extractor can produce. Too many Factories will not get enough resources to run all of the time and the fitting they take up would be better spend on additional extractor heads. Too few will let the buffer storage fill up eventually and any excess raw materials would then be lost. Each Basic Industry Facility consumes 3000 raw materials per cycle. Each cycle takes 30 minutes. So each Basic Industry Facility will consume 6000 raw materials per hour.
To balance extraction and processing might take a few tries and the setup might have to be adjusted over time. To try out how many extractor heads and factories are needed to hit a balance without paying for every change you can hit submit in the edits pending before each try. Everything built after is not paid for and can always be reverted by clicking cancel until you hit submit again.
I recommend first setting the runtime of the extractor and putting down heads one by one as described in Start extracting. Everytime you hit 6000 units per hour or a multiple of it place another Basic Industy Facility next to an existing one or the storage. When you can not place any Factories anymore, maximise the amount of heads. You should have a Factory for each full 6000 materials you extract per hour.
If you have already started extracting before, you can just try to build as many Basic Industry Facilities as you can and need. If you do not have the fitting left to build enough Basic Factories, build as much as you can. In this case the buffer storage will start to fill up with unprocessed resources. You can then reduce the amount of heads for the next runtime to free up some fitting for additional Basic Facilities.
1) Ctrl-click on the surface to place a head and drag&drop head(s) to hotspots without overlapping.
2) After each head check Avg. per hour. For each full 6000 build a Basic Industry Facility.
3) Repeat until full 10 heads are set or fitting is exhausted.
If you are not happy with the results, hit cancel in the edits pending and try again. Nothing is lost but time. Costs are only paid when pending edits are submitted.
Install Schematics
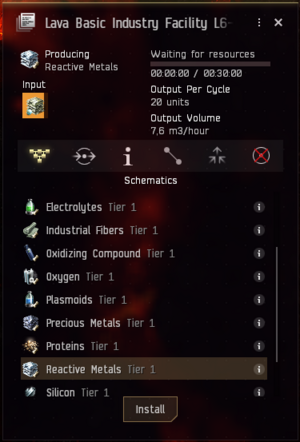
For each industry facilities you have to select what it should produce. Double-click on each of them and select the schematic to be installed. The tooltip of each schematic shows what inputs are needed. Once you double-click a schematic or hit install, the system takes you directly to the routing dialog. Notice the changed cursor, that expects you to doubleclick or select a destination for the produced material.
If you miss to route the materials at this stage, you can always follow the "Routing the resources from a extractor or factory" anytime later. A red circle around the building will remind you of it.
1) Double-click a factory.
2) Double-click the right P1 commodity for your R0.
3) Double-click the launchpad.
4) Repeat for each factory
Route inputs to the factory
Dont forget to route material from a source like a storage or a launchpad to the factory to provide resources.
1) Select the routes tab.
2) Click the incoming route.
3) Select "create route".
4) Double-click a previously not selected factory.
5) Repeat for each factory
Step 6: Profit!
Export and sell or transport to a factory palanet, reprocess further and sell then.
To export commodities to space you have to be undocked in the same system. You can be tethered or cloaked for this. Right-click the Customs Office from the overview and select "Access Customs Office". Select the right launchpad in the upper right corner if you have multiple. Drag&drop resources to and from the office to the launchpad. Hit "transfer" when you are done.
To pick up the items, you have to be uncloaked near them. Access the Customs Office and Drag&drop items from it to the Cargo hold.
