More actions
→Salvage Research: Quick and dirty fleet comp summary |
|||
| (9 intermediate revisions by the same user not shown) | |||
| Line 3: | Line 3: | ||
Fit names theoretically follow this format, but we haven't been super consistent with it and it will likely change to match other PvE SIG fit names. | Fit names theoretically follow this format, but we haven't been super consistent with it and it will likely change to match other PvE SIG fit names. | ||
<pre>HFC <site name/abbreviation> [region color code] [fleet comp -] <ship role(s)> [skill level] <hull name></pre> | <pre>HFC <site name/abbreviation> [region color code] [fleet comp -] <ship role(s)> [skill level] <hull name></pre> | ||
Fit color codes: | |||
* Blue = Caldari | |||
* Gold = Amarr | |||
* Green = Gallente | |||
* Red = Minmatar | |||
* No color code = any region | |||
| Line 163: | Line 170: | ||
Caldari Navy Vespa x10 | Caldari Navy Vespa x10 | ||
Infrared M x1 | |||
Tracking Speed Script x1 | Tracking Speed Script x1 | ||
Focused Modal Medium Laser I x1 | Focused Modal Medium Laser I x1 | ||
Civilian Gatling Railgun x1 | Civilian Gatling Railgun x1 | ||
| Line 174: | Line 179: | ||
<pre> | <pre> | ||
[Vexor, HFC AAR Duet - DD T2 Vexor] | [Vexor, HFC AAR Duet - DD T2 Vexor] | ||
Damage Control II | Damage Control II | ||
Photonic Upgraded Co-Processor | Photonic Upgraded Co-Processor | ||
| Line 190: | Line 196: | ||
Drone Link Augmentor I | Drone Link Augmentor I | ||
Medium Processor Overclocking Unit I | |||
Medium EM Shield Reinforcer II | Medium EM Shield Reinforcer II | ||
Medium Thermal Shield Reinforcer II | Medium Thermal Shield Reinforcer II | ||
| Line 199: | Line 204: | ||
Caldari Navy Vespa x10 | Caldari Navy Vespa x10 | ||
Infrared M x1 | |||
Tracking Speed Script x1 | Tracking Speed Script x1 | ||
Civilian Gatling Railgun x1 | |||
Focused Modal Medium Laser I x1 | Focused Modal Medium Laser I x1 | ||
</pre>|width=100%}} | </pre>|width=100%}} | ||
| Line 239: | Line 243: | ||
</pre>|width=100%}} | </pre>|width=100%}} | ||
=== | ===Spider Vexors/Arbitrators=== | ||
Only been tested a little bit, but seems to work well. Uses the same miners as Pioneer Duet, replaces the rest of the fleet with spider tanked drone boats. Module swaps are for drone bunny (civilian gun, or beam laser to also shoot caches with ideally 60 volley damage), cache popper (beam laser), medium cap transmitter (the remaining spiders). Cap chain with just the large cap transmitter. Any medium cap transmitters are to counter any neuts. | |||
* 2 Pioneers | |||
* 3 Vexors/Arbitrators | |||
{{CollapseBox|HFC AAR Spider - DD Vexor| | |||
<pre> | |||
[Vexor, HFC AAR Spider - DD Vexor] | |||
Photonic Upgraded Co-Processor | |||
Mark I Compact Reactor Control Unit | |||
Drone Damage Amplifier II | |||
Drone Damage Amplifier II | |||
Drone Damage Amplifier II | |||
Multispectrum Shield Hardener II | |||
Large Compact Pb-Acid Cap Battery | |||
Large F-S9 Regolith Compact Shield Extender | |||
Compact EM Shield Amplifier | |||
Medium Asymmetric Enduring Remote Shield Booster | |||
Medium Asymmetric Enduring Remote Shield Booster | |||
Medium Inductive Compact Remote Capacitor Transmitter | |||
Large Inductive Compact Remote Capacitor Transmitter | |||
Medium Thermal Shield Reinforcer II | |||
Medium Egress Port Maximizer II | |||
Medium Egress Port Maximizer II | |||
Hornet II x1 | |||
Vespa II x4 | |||
Infrared M x1 | |||
Nanite Repair Paste x100 | |||
Civilian Gatling Railgun x1 | |||
Focused Modulated Medium Energy Beam I x1 | |||
</pre>|width=100%}} | |||
{{CollapseBox|HFC AAR Spider - DD Arbitrator| | |||
<pre> | |||
[Arbitrator, HFC AAR Spider - DD Arbitrator] | |||
Mark I Compact Reactor Control Unit | |||
Drone Damage Amplifier II | |||
Drone Damage Amplifier II | |||
Drone Damage Amplifier II | |||
Drone Damage Amplifier II | |||
Multispectrum Shield Hardener II | |||
Large Compact Pb-Acid Cap Battery | |||
Large F-S9 Regolith Compact Shield Extender | |||
Compact EM Shield Amplifier | |||
Medium Asymmetric Enduring Remote Shield Booster | |||
Medium Asymmetric Enduring Remote Shield Booster | |||
Medium Inductive Compact Remote Capacitor Transmitter | |||
Large Inductive Compact Remote Capacitor Transmitter | |||
Medium Thermal Shield Reinforcer II | |||
Medium Egress Port Maximizer II | |||
Medium Egress Port Maximizer II | |||
Hornet II x1 | |||
Vespa II x4 | |||
Infrared M x1 | |||
Nanite Repair Paste x100 | |||
Civilian Gatling Railgun x1 | |||
Focused Modulated Medium Energy Beam I x1 | |||
</pre>|width=100%}} | |||
===Old Vexor Miner Strategy=== | |||
<gallery mode=packed> | |||
File:AAR Old ABC Field Split.png|alt=An infographic showing the ABC asteroid field split split in Abyssal Artifact Recovery sites: 3 clusters of 4 rocks|ABC split | |||
</gallery> | |||
This strategy is mostly made obsolete by the introduction of Pioneers and how simple and forgiving Pioneer strategies can be in comparison. This strategy still works fine if executed correctly. (A Vexor miner can also replace one of the Pioneers in the Pioneer Duet; the Vexoneer Waltz.) | This strategy is mostly made obsolete by the introduction of Pioneers and how simple and forgiving Pioneer strategies can be in comparison. This strategy still works fine if executed correctly. (A Vexor miner can also replace one of the Pioneers in the Pioneer Duet; the Vexoneer Waltz.) | ||
Two module swaps (in cargo) differentiate the Osprey fits, the fleet requires one of each Osprey. | Two module swaps (in cargo) differentiate the Osprey fits, the fleet requires one of each Osprey. | ||
* 3 Vexor Miners | |||
* 0-1 Support Vexor | |||
* 0-2 Logi Osprey | |||
{{CollapseBox|HFC AAR Vexed - Logi Bunny Osprey| | {{CollapseBox|HFC AAR Vexed - Logi Bunny Osprey| | ||
<pre> | <pre> | ||
| Line 443: | Line 530: | ||
==[[Emergency Aid]]== | ==[[Emergency Aid]]== | ||
* 4 Logi | * 4 Logi | ||
* 1 DD | * 1 DD | ||
===Shield=== | |||
Drop Warden near structure. Orbit Warden. Warden tanks drone aggro letting the fleet launch their Acolytes. Bellicose is drone bunny and kills Devastating (structure aggro) and maybe Corruptors (drone aggro). Ospreys rep structure, Warden, and the fleet. | |||
Mambas, Vexors, Kikis, and other ships all work as DD, as do many other ships. Importantly, they need to be able to apply damage to frigates and destroyers. Depending on the DD ships used and skill levels of the pilots, adjusting to 2 DD and 3 Logi may work better. | |||
{{CollapseBox|HFC EA Red Shield - DD Belli| | |||
<pre> | |||
[Bellicose, HFC EA Red Shield - DD Belli] | |||
Damage Control II | |||
Ballistic Control System II | |||
Ballistic Control System II | |||
Ballistic Control System II | |||
Large F-S9 Regolith Compact Shield Extender | |||
Kinetic Shield Hardener II | |||
Explosive Shield Hardener II | |||
Missile Guidance Computer II, Missile Precision Script | |||
Target Painter II | |||
Rapid Light Missile Launcher II, Caldari Navy Mjolnir Light Missile | |||
Rapid Light Missile Launcher II, Caldari Navy Mjolnir Light Missile | |||
Rapid Light Missile Launcher II, Caldari Navy Mjolnir Light Missile | |||
Rapid Light Missile Launcher II, Caldari Navy Mjolnir Light Missile | |||
Medium Warhead Calefaction Catalyst I | |||
Medium Warhead Rigor Catalyst I | |||
Medium Warhead Flare Catalyst I | |||
Acolyte II x4 | |||
Acolyte II x1 | |||
Caldari Navy Warden x1 | |||
Caldari Navy Mjolnir Light Missile x6400 | |||
Missile Precision Script x1 | |||
Missile Range Script x1 | |||
Phased Scoped Target Painter x1 | |||
</pre>|width=100%}} | |||
{{CollapseBox|HFC EA Red Shield - Logi Ospi| | |||
<pre> | |||
[Osprey, HFC EA Red Shield - Logi Ospi] | |||
Damage Control II | |||
Photonic Upgraded Co-Processor | |||
Mark I Compact Reactor Control Unit | |||
Compact Kinetic Shield Hardener | |||
Compact Explosive Shield Hardener | |||
Large F-S9 Regolith Compact Shield Extender | |||
Compact Kinetic Shield Hardener | |||
Compact Explosive Shield Hardener | |||
Large Murky Compact Remote Shield Booster | |||
Large Murky Compact Remote Shield Booster | |||
Medium Murky Compact Remote Shield Booster | |||
Medium Murky Compact Remote Shield Booster | |||
Large Inductive Compact Remote Capacitor Transmitter | |||
Medium Ancillary Current Router I | |||
Medium Ancillary Current Router I | |||
Medium Ancillary Current Router I | |||
Acolyte II x4 | |||
Nanite Repair Paste x100 | |||
Medium Murky Compact Remote Shield Booster x1 | |||
</pre>|width=100%}} | |||
===Armor=== | |||
{{CollapseBox|HFC EA Red Logi Augoror| | {{CollapseBox|HFC EA Red Logi Augoror| | ||
<pre> | <pre> | ||
| Line 1,031: | Line 1,190: | ||
==[[Stabilize Rift]]== | ==[[Stabilize Rift]]== | ||
* 3 Neut DD | |||
{{CollapseBox|HFC StaR Bunny Dragoon| | {{CollapseBox|HFC StaR Bunny Dragoon| | ||
| Line 1,096: | Line 1,257: | ||
</pre>|width=100%}} | </pre>|width=100%}} | ||
==[[Traffic Stop]]== | |||
You need at least one cargo scanner, multiple people scanning doesn't hurt. Webs give more time to kill the haulers, but aren't necessary. Don't let the escorts pile up, kill them off. It's better to let some haulers through unscathed rather than get overwhelmed. | |||
{{CollapseBox|HFC TS DD/Web Coercer| | {{CollapseBox|HFC TS DD/Web Coercer| | ||
| Line 1,218: | Line 1,379: | ||
Nanite Repair Paste x406 | Nanite Repair Paste x406 | ||
</pre>|width=100%}} | </pre>|width=100%}} | ||
==Footnotes== | ==Footnotes== | ||
| Line 1,225: | Line 1,385: | ||
[[Category:Homefronts]] | [[Category:Homefronts]] | ||
[[Category:Guides]] | |||
Latest revision as of 20:22, 26 January 2026
This is a work in progress collection of some fits from the HFC Rens loaner fleet as of January, 2026. Some fits are due for adjustment, but all fits are functional.
Fit names theoretically follow this format, but we haven't been super consistent with it and it will likely change to match other PvE SIG fit names.
HFC <site name/abbreviation> [region color code] [fleet comp -] <ship role(s)> [skill level] <hull name>
Fit color codes:
- Blue = Caldari
- Gold = Amarr
- Green = Gallente
- Red = Minmatar
- No color code = any region
| Thank You 💗 |
|---|
|
These fits and strategies were put together with the help of many people, starting with the people who first tackled Homefronts on release and continuing to the people improving our understanding and mastery to this day. You are all champions. Thank you! I cannot mention everyone by name, and I will feel bad about that. I will work on this list over time, but some is better than none so I will thank a few of you specifically:
|
Abyssal Artifact Recovery
The Pioneer Duet
-
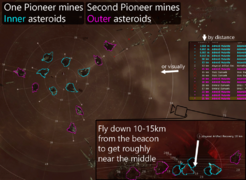 Inner/Outer split
 -
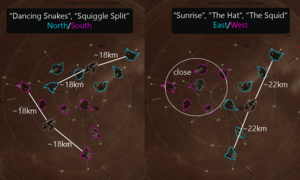 Alternative splits


Alpha
Alpha clones can mine using the "HFC AAR Duet - Far Alpha Pioneer" if trained to the max alpha skill levels of Mining Destroyer 2, Mining 4, Astrogeology 0, Mining Upgrades 1 (33,997 SP). This fit is more expensive in order to make it work for early alphas and is not recommended for omegas.
Training Mining Upgrades 4 (+148,020 SP) and CPU Management 5 (173,490 SP) allows using "HFC AAR Duet - Far T2 Pioneer." This fit is significantly cheaper and has marginally better tank, but has the same mining stats[1].
With this, alphas will have the same 32m3 cycle yield as the baseline for omegas described below. Alphas will not be able to do the Outer rocks with the Inner/Outer field split, but can do Inner rocks as well as other field splits.
Omega
Getting at least 32m3 yield per 15 second cycle on your miners allows you to finish each rock in 3 cycles. If you are responsible for 6 rocks, this means you can finish in 90 seconds. The shortest waves are 120 seconds, giving you a 30 second margin for targeting, cycling, mistakes, and other lost ticks. This works well.
You can start mining using the "Far T1 Pioneer" fit below with Mining Destroyer 2, Mining 4, Astrogeology 1, Mining Upgrades 1 (34,747 SP). At this point, you can mine the inner rocks or split the site with your Pioneer partner some other way. Your next milestone is Mining Destroyer 4 (another 72,182 SP)[2], this gives you enough range to reach all the outer rocks. This is a fine place to stop and work on drone skills, support skills, and fitting skills.
If you want to push further and become the Pioneer veteran that carries newer miners, saves sites from failures, and munches rocks just so very fast then train to Mining Destroyer 5, Mining 5, Astrogeology 3, Mining Upgrades 4 (another 687,498 SP; total 794,427 SP). This gives you 48m3 per cycle theoretically finishing 6 rocks in 60 seconds. Your range was already good enough, but now it will be 32km! The biggest danger at this point is being sensor dampened to below your mining range: ask your bunny to kill Ravenous Vedmaks, politely ask if anyone has a Remote Sensor Booster, or use a Mobile Depot to fit a Signal Amplifier or local Sensor Booster.
We favor meta scoped miners for our loaner Pioneers for two reasons: they have significantly more range than Miner IIs and leave more ore for slightly higher income. For your own fits, Miner IIs can be excellent as they have both higher yield and also residue which can hugely speed up your mining and give you much larger safety margin. If you use Miner IIs, be aware that your mining range may limit what field splits you can do.
All these specific milestones, numbers, and fits are for our loaner fleet. They assume no implants or medical boosters. If you fit your own ship, there are many opportunities along the journey to use implants and boosters to save training time, tweak fits, and push limits.
Fits
| HFC AAR Duet - Far T1 Pioneer |
|---|
[Pioneer, HFC AAR Duet - Far T1 Pio] Mining Laser Upgrade I Mining Laser Upgrade I Medium Azeotropic Restrained Shield Extender Enduring Multispectrum Shield Hardener Compact Thermal Shield Amplifier EP-S Gaussian Scoped Mining Laser EP-S Gaussian Scoped Mining Laser EP-S Gaussian Scoped Mining Laser Festival Launcher Small Processor Overclocking Unit I Small EM Shield Reinforcer II Small EM Shield Reinforcer II Caldari Navy Hornet x4 Hornet II x1 Salvager I x1 Mobile Depot x1 |
| HFC AAR Duet - Far T2 Pioneer |
|---|
[Pioneer, HFC AAR Duet - Far T2 Pio] Mining Laser Upgrade II Mining Laser Upgrade II Medium Shield Extender II Multispectrum Shield Hardener II Thermal Shield Amplifier II EP-S Gaussian Scoped Mining Laser EP-S Gaussian Scoped Mining Laser EP-S Gaussian Scoped Mining Laser Festival Launcher Small Processor Overclocking Unit I Small EM Shield Reinforcer II Small EM Shield Reinforcer II Hornet II x8 Salvager I x1 Mobile Depot x1 |
| HFC AAR Duet - Far Alpha Pioneer |
|---|
[Pioneer, HFC AAR Duet - Far Alpha Pio] Elara Restrained Mining Laser Upgrade Elara Restrained Mining Laser Upgrade Medium Azeotropic Restrained Shield Extender Enduring Multispectrum Shield Hardener Compact Thermal Shield Amplifier EP-S Gaussian Scoped Mining Laser EP-S Gaussian Scoped Mining Laser EP-S Gaussian Scoped Mining Laser Festival Launcher Small Processor Overclocking Unit I Small EM Shield Reinforcer II Small EM Shield Reinforcer II Caldari Navy Hornet x4 Hornet II x4 Salvager I x1 Mobile Depot x1 |
| HFC AAR Duet - DD T1 Vexor |
|---|
[Vexor, HFC AAR Duet - DD T1 Vexor] Damage Control II Photonic Upgraded Co-Processor AE-K Compact Drone Damage Amplifier AE-K Compact Drone Damage Amplifier AE-K Compact Drone Damage Amplifier Enduring Multispectrum Shield Hardener Large Compact Pb-Acid Cap Battery Large F-S9 Regolith Compact Shield Extender Denny Enduring Omnidirectional Tracking Link Drone Link Augmentor I Medium Asymmetric Enduring Remote Shield Booster Medium Inductive Compact Remote Capacitor Transmitter Medium Inductive Compact Remote Capacitor Transmitter Medium Processor Overclocking Unit I Medium EM Shield Reinforcer II Medium Thermal Shield Reinforcer II Caldari Navy Hornet x5 Caldari Navy Vespa x10 Infrared M x1 Tracking Speed Script x1 Focused Modal Medium Laser I x1 Civilian Gatling Railgun x1 |
| HFC AAR Duet - DD T2 Vexor |
|---|
[Vexor, HFC AAR Duet - DD T2 Vexor] Damage Control II Photonic Upgraded Co-Processor Drone Damage Amplifier II Drone Damage Amplifier II Drone Damage Amplifier II Multispectrum Shield Hardener II AML Compact Omnidirectional Tracking Link Large F-S9 Regolith Compact Shield Extender Large Compact Pb-Acid Cap Battery Medium Asymmetric Enduring Remote Shield Booster Medium Inductive Compact Remote Capacitor Transmitter Medium Inductive Compact Remote Capacitor Transmitter Drone Link Augmentor I Medium Processor Overclocking Unit I Medium EM Shield Reinforcer II Medium Thermal Shield Reinforcer II Hornet II x5 Caldari Navy Vespa x10 Infrared M x1 Tracking Speed Script x1 Civilian Gatling Railgun x1 Focused Modal Medium Laser I x1 |
| HFC AAR Duet - Logi Osprey |
|---|
[Osprey, HFC AAR Duet - Logi Osprey] Power Diagnostic System II Capacitor Power Relay II Capacitor Power Relay II Multispectrum Shield Hardener II Large Compact Pb-Acid Cap Battery EM Shield Hardener II F-23 Compact Remote Sensor Booster Multispectrum Shield Hardener II Medium Asymmetric Enduring Remote Shield Booster Medium Asymmetric Enduring Remote Shield Booster Medium Asymmetric Enduring Remote Shield Booster Medium Asymmetric Enduring Remote Shield Booster Medium Inductive Compact Remote Capacitor Transmitter Medium Thermal Shield Reinforcer II Medium Capacitor Control Circuit II Medium Capacitor Control Circuit II Hornet II x4 Targeting Range Script x1 Scan Resolution Script x1 Mobile Tractor Unit x1 |
Spider Vexors/Arbitrators
Only been tested a little bit, but seems to work well. Uses the same miners as Pioneer Duet, replaces the rest of the fleet with spider tanked drone boats. Module swaps are for drone bunny (civilian gun, or beam laser to also shoot caches with ideally 60 volley damage), cache popper (beam laser), medium cap transmitter (the remaining spiders). Cap chain with just the large cap transmitter. Any medium cap transmitters are to counter any neuts.
- 2 Pioneers
- 3 Vexors/Arbitrators
| HFC AAR Spider - DD Vexor |
|---|
[Vexor, HFC AAR Spider - DD Vexor] Photonic Upgraded Co-Processor Mark I Compact Reactor Control Unit Drone Damage Amplifier II Drone Damage Amplifier II Drone Damage Amplifier II Multispectrum Shield Hardener II Large Compact Pb-Acid Cap Battery Large F-S9 Regolith Compact Shield Extender Compact EM Shield Amplifier Medium Asymmetric Enduring Remote Shield Booster Medium Asymmetric Enduring Remote Shield Booster Medium Inductive Compact Remote Capacitor Transmitter Large Inductive Compact Remote Capacitor Transmitter Medium Thermal Shield Reinforcer II Medium Egress Port Maximizer II Medium Egress Port Maximizer II Hornet II x1 Vespa II x4 Infrared M x1 Nanite Repair Paste x100 Civilian Gatling Railgun x1 Focused Modulated Medium Energy Beam I x1 |
| HFC AAR Spider - DD Arbitrator |
|---|
[Arbitrator, HFC AAR Spider - DD Arbitrator] Mark I Compact Reactor Control Unit Drone Damage Amplifier II Drone Damage Amplifier II Drone Damage Amplifier II Drone Damage Amplifier II Multispectrum Shield Hardener II Large Compact Pb-Acid Cap Battery Large F-S9 Regolith Compact Shield Extender Compact EM Shield Amplifier Medium Asymmetric Enduring Remote Shield Booster Medium Asymmetric Enduring Remote Shield Booster Medium Inductive Compact Remote Capacitor Transmitter Large Inductive Compact Remote Capacitor Transmitter Medium Thermal Shield Reinforcer II Medium Egress Port Maximizer II Medium Egress Port Maximizer II Hornet II x1 Vespa II x4 Infrared M x1 Nanite Repair Paste x100 Civilian Gatling Railgun x1 Focused Modulated Medium Energy Beam I x1 |
Old Vexor Miner Strategy
-
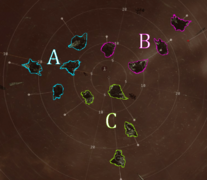 ABC split

This strategy is mostly made obsolete by the introduction of Pioneers and how simple and forgiving Pioneer strategies can be in comparison. This strategy still works fine if executed correctly. (A Vexor miner can also replace one of the Pioneers in the Pioneer Duet; the Vexoneer Waltz.)
Two module swaps (in cargo) differentiate the Osprey fits, the fleet requires one of each Osprey.
- 3 Vexor Miners
- 0-1 Support Vexor
- 0-2 Logi Osprey
| HFC AAR Vexed - Logi Bunny Osprey |
|---|
[Osprey, HFC AAR Vexed - Logi Bunny Osprey] Capacitor Power Relay II Capacitor Power Relay II Capacitor Power Relay II Parallel Enduring Target Painter Multispectrum Shield Hardener II Multispectrum Shield Hardener II EM Shield Hardener II Thermal Shield Hardener II Medium Asymmetric Enduring Remote Shield Booster Medium Asymmetric Enduring Remote Shield Booster Medium Asymmetric Enduring Remote Shield Booster Medium Asymmetric Enduring Remote Shield Booster Medium Inductive Compact Remote Capacitor Transmitter Medium Capacitor Control Circuit II Medium Capacitor Control Circuit II Medium Capacitor Control Circuit I Hornet II x4 Nanite Repair Paste x100 Power Diagnostic System II x1 Large Compact Pb-Acid Cap Battery x1 'Packrat' Mobile Tractor Unit x1 |
| HFC AAR Vexed - Logi Support Osprey |
|---|
[Osprey, HFC AAR Vexed - Logi Support Osprey] Power Diagnostic System II Capacitor Power Relay II Capacitor Power Relay II Large Compact Pb-Acid Cap Battery Multispectrum Shield Hardener II Multispectrum Shield Hardener II EM Shield Hardener II Thermal Shield Hardener II Medium Asymmetric Enduring Remote Shield Booster Medium Asymmetric Enduring Remote Shield Booster Medium Asymmetric Enduring Remote Shield Booster Medium Asymmetric Enduring Remote Shield Booster Medium Inductive Compact Remote Capacitor Transmitter Medium Capacitor Control Circuit II Medium Capacitor Control Circuit II Medium Capacitor Control Circuit I Hornet II x4 Nanite Repair Paste x100 Capacitor Power Relay II x1 Parallel Enduring Target Painter x1 'Packrat' Mobile Tractor Unit x1 |
| HFC AAR Vexed - Miner Vexor |
|---|
[Vexor, HFC AAR Vexed - Miner Vexor] Damage Control II Photonic Upgraded Co-Processor Photonic Upgraded Co-Processor Photonic Upgraded Co-Processor AE-K Compact Drone Damage Amplifier Compact Multispectrum Shield Hardener Large Compact Pb-Acid Cap Battery AML Compact Omnidirectional Tracking Link AML Compact Omnidirectional Tracking Link Miner II Miner II Miner II Miner II Medium Thermal Shield Reinforcer II Medium Processor Overclocking Unit I Medium EM Shield Reinforcer II Caldari Navy Hornet x1 Caldari Navy Vespa x4 Tracking Speed Script x2 Optimal Range Script x2 EP-S Gaussian Scoped Mining Laser x4 'Wetu' Mobile Depot x1 |
Dread Assault
- 3-4 Logi
- 1-2 DD
| HFC DA Red Logi Augoror |
|---|
[Augoror, HFC DA Red Logi Augoror] Mark I Compact Reactor Control Unit Mark I Compact Reactor Control Unit Experimental Enduring Explosive Armor Hardener I Experimental Enduring Kinetic Armor Hardener I Multispectrum Coating II Alumel-Wired Enduring Sensor Booster Alumel-Wired Enduring Sensor Booster Medium Compact Pb-Acid Cap Battery Large Inductive Compact Remote Capacitor Transmitter Large Inductive Compact Remote Capacitor Transmitter Large Inductive Compact Remote Capacitor Transmitter Large Inductive Compact Remote Capacitor Transmitter Medium I-ax Enduring Remote Armor Repairer Medium Ancillary Current Router I Medium Ancillary Current Router II Medium Ancillary Current Router II Caldari Navy Hornet x4 ECCM Script x2 Nanite Repair Paste x49 |
| HFC DA Red DD Vexor |
|---|
[Vexor, HFC DA Red DD Vexor] Kinetic Armor Hardener II Drone Damage Amplifier II Drone Damage Amplifier II Drone Damage Amplifier II Explosive Armor Hardener II Sensor Booster II Sensor Booster II Phased Scoped Target Painter Drone Navigation Computer I 250mm Prototype Gauss Gun 250mm Prototype Gauss Gun 250mm Prototype Gauss Gun Drone Link Augmentor I Medium Hybrid Metastasis Adjuster I Medium Hybrid Metastasis Adjuster I Medium Explosive Armor Reinforcer I Imperial Navy Acolyte x5 Imperial Navy Infiltrator x5 Imperial Navy Praetor x2 Targeting Range Script x2 Lead Charge M x1200 ECCM Script x2 Iron Charge M x1200 Iridium Charge M x1200 Experimental Enduring Explosive Armor Hardener I x1 Experimental Enduring Kinetic Armor Hardener I x1 |
| HFC DA Red DD Kikimora |
|---|
[Kikimora, HFC DA Red DD Kikimora] Damage Control II Compact Multispectrum Energized Membrane Entropic Radiation Sink II Entropic Radiation Sink II 5MN Quad LiF Restrained Microwarpdrive Small Compact Pb-Acid Cap Battery Optical Compact Tracking Computer Light Entropic Disintegrator II Small Explosive Armor Reinforcer I Small Trimark Armor Pump I Small Kinetic Armor Reinforcer I Tracking Speed Script x1 Mystic S x5000 Occult S x5000 Optimal Range Script x1 |
Emergency Aid
- 4 Logi
- 1 DD
Shield
Drop Warden near structure. Orbit Warden. Warden tanks drone aggro letting the fleet launch their Acolytes. Bellicose is drone bunny and kills Devastating (structure aggro) and maybe Corruptors (drone aggro). Ospreys rep structure, Warden, and the fleet.
Mambas, Vexors, Kikis, and other ships all work as DD, as do many other ships. Importantly, they need to be able to apply damage to frigates and destroyers. Depending on the DD ships used and skill levels of the pilots, adjusting to 2 DD and 3 Logi may work better.
| HFC EA Red Shield - DD Belli |
|---|
[Bellicose, HFC EA Red Shield - DD Belli] Damage Control II Ballistic Control System II Ballistic Control System II Ballistic Control System II Large F-S9 Regolith Compact Shield Extender Kinetic Shield Hardener II Explosive Shield Hardener II Missile Guidance Computer II, Missile Precision Script Target Painter II Rapid Light Missile Launcher II, Caldari Navy Mjolnir Light Missile Rapid Light Missile Launcher II, Caldari Navy Mjolnir Light Missile Rapid Light Missile Launcher II, Caldari Navy Mjolnir Light Missile Rapid Light Missile Launcher II, Caldari Navy Mjolnir Light Missile Medium Warhead Calefaction Catalyst I Medium Warhead Rigor Catalyst I Medium Warhead Flare Catalyst I Acolyte II x4 Acolyte II x1 Caldari Navy Warden x1 Caldari Navy Mjolnir Light Missile x6400 Missile Precision Script x1 Missile Range Script x1 Phased Scoped Target Painter x1 |
| HFC EA Red Shield - Logi Ospi |
|---|
[Osprey, HFC EA Red Shield - Logi Ospi] Damage Control II Photonic Upgraded Co-Processor Mark I Compact Reactor Control Unit Compact Kinetic Shield Hardener Compact Explosive Shield Hardener Large F-S9 Regolith Compact Shield Extender Compact Kinetic Shield Hardener Compact Explosive Shield Hardener Large Murky Compact Remote Shield Booster Large Murky Compact Remote Shield Booster Medium Murky Compact Remote Shield Booster Medium Murky Compact Remote Shield Booster Large Inductive Compact Remote Capacitor Transmitter Medium Ancillary Current Router I Medium Ancillary Current Router I Medium Ancillary Current Router I Acolyte II x4 Nanite Repair Paste x100 Medium Murky Compact Remote Shield Booster x1 |
Armor
| HFC EA Red Logi Augoror |
|---|
[Augoror, HFC EA Red Logi Augoror] Mark I Compact Reactor Control Unit Mark I Compact Reactor Control Unit Experimental Enduring Explosive Armor Hardener I Experimental Enduring Kinetic Armor Hardener I Multispectrum Coating II Cap Recharger II Cap Recharger II Medium Compact Pb-Acid Cap Battery Large Inductive Compact Remote Capacitor Transmitter Large I-ax Enduring Remote Armor Repairer Medium I-ax Enduring Remote Armor Repairer Medium I-ax Enduring Remote Armor Repairer Medium I-ax Enduring Remote Armor Repairer Medium Ancillary Current Router I Medium Ancillary Current Router II Medium Ancillary Current Router II Caldari Navy Hornet x4 Nanite Repair Paste x49 |
| HFC EA Red DD Vexor |
|---|
[Vexor, HFC EA Red DD Vexor] Kinetic Armor Hardener II Drone Damage Amplifier II Drone Damage Amplifier II Drone Damage Amplifier II Explosive Armor Hardener II Sensor Booster II Sensor Booster II Phased Scoped Target Painter Drone Navigation Computer I 250mm Prototype Gauss Gun 250mm Prototype Gauss Gun 250mm Prototype Gauss Gun Drone Link Augmentor I Medium Hybrid Metastasis Adjuster I Medium Hybrid Metastasis Adjuster I Medium Explosive Armor Reinforcer I Imperial Navy Acolyte x5 Imperial Navy Infiltrator x5 Imperial Navy Praetor x2 Iridium Charge M x1200 Targeting Range Script x2 Lead Charge M x1200 ECCM Script x2 Iron Charge M x1200 Experimental Enduring Explosive Armor Hardener I x1 Experimental Enduring Kinetic Armor Hardener I x1 |
Metaliminal Meteoroid
- 4-5 Miners
- 0-1 Logi
| HFC MM Red Miner Pioneer |
|---|
[Pioneer, HFC MM Red Miner Pioneer] Mining Laser Upgrade I Damage Control II Medium Azeotropic Restrained Shield Extender Compact Thermal Shield Hardener Compact EM Shield Hardener Particle Bore Compact Mining Laser Particle Bore Compact Mining Laser Particle Bore Compact Mining Laser Festival Launcher Small Processor Overclocking Unit I Small EM Shield Reinforcer I Small Thermal Shield Reinforcer I Mining Drone I x4 Miner II x3 |
| HFC MM Red Miner Venture |
|---|
[Venture, HFC MM Red Miner Venture] Mining Laser Upgrade I Medium Shield Extender II EM Shield Hardener II Thermal Shield Hardener II Miner II Miner II Small Core Defense Field Extender I Small Processor Overclocking Unit I Small Processor Overclocking Unit I Mining Drone I x2 Compact Thermal Shield Hardener x1 Medium Shield Extender I x1 Compact EM Shield Hardener x1 EP-S Gaussian Scoped Mining Laser x2 |
| HFC MM Red Pentioneer - Miner PCI |
|---|
[Pioneer Consortium Issue, HFC MM Red Pentioneer - Miner PCI] Mining Laser Upgrade II Damage Control II Small Compact Pb-Acid Cap Battery Eutectic Compact Cap Recharger F-23 Compact Remote Sensor Booster EM Shield Amplifier II Miner II Miner II Miner II Small Asymmetric Enduring Remote Shield Booster Small Capacitor Control Circuit II Small Thermal Shield Reinforcer II Small Thermal Shield Reinforcer II Mining Drone II x5 Acolyte II x5 ECCM Script x1 |
Raid
- 1 Logi
- 1 Hauler
- 3 DD
OR
- 1 Logi
- 3 Squall
- 1 DD
| HFC Raid Red Logi Osprey ɑ |
|---|
[Osprey, HFC Raid Red Logi Osprey ɑ] Capacitor Flux Coil II Capacitor Flux Coil II Power Diagnostic System II Domination Thermal Shield Hardener Domination EM Shield Hardener Large Compact Pb-Acid Cap Battery Dread Guristas Large Shield Booster Copasetic Compact Shield Boost Amplifier Medium Asymmetric Enduring Remote Shield Booster Medium Asymmetric Enduring Remote Shield Booster Centii A-Type Small Remote Capacitor Transmitter Small Asymmetric Enduring Remote Shield Booster Small Asymmetric Enduring Remote Shield Booster Medium EM Shield Reinforcer II Medium Thermal Shield Reinforcer II Medium Hyperspatial Velocity Optimizer I Nanite Repair Paste x50 |
| HFC Raid Red Logi Osprey Ω |
|---|
[Osprey, HFC Raid Red Logi Osprey Ω] Capacitor Flux Coil II Capacitor Flux Coil II Capacitor Flux Coil II Large Compact Pb-Acid Cap Battery Copasetic Compact Shield Boost Amplifier Dread Guristas Large Shield Booster EM Shield Hardener II Thermal Shield Hardener II Centii A-Type Small Remote Capacitor Transmitter Medium Asymmetric Enduring Remote Shield Booster Medium Asymmetric Enduring Remote Shield Booster Small Asymmetric Enduring Remote Shield Booster Small Asymmetric Enduring Remote Shield Booster Medium EM Shield Reinforcer II Medium Thermal Shield Reinforcer II Medium Hyperspatial Velocity Optimizer I Caldari Navy Vespa x1 Light Shield Maintenance Bot I x2 Nanite Repair Paste x50 |
| HFC Raid Red Badger (a) |
|---|
[Badger, HFC Raid Red Badger (a)] Damage Control II Type-D Restrained Expanded Cargo Nanofiber Internal Structure II Limited Expanded 'Archiver' Cargo 50MN Y-T8 Compact Microwarpdrive Medium F-S9 Regolith Compact Shield Extender Multispectrum Shield Hardener II Gistum B-Type Thermal Shield Amplifier Medium Compact Pb-Acid Cap Battery EM Shield Hardener II Medium Cargohold Optimization I Medium Cargohold Optimization II Medium Cargohold Optimization II |
| HFC Raid Red Badger L3 |
|---|
[Badger, HFC Raid Red Badger L3] Damage Control II Type-D Restrained Expanded Cargo Type-D Restrained Expanded Cargo Nanofiber Internal Structure II Multispectrum Shield Hardener II EM Shield Hardener I 50MN Cold-Gas Enduring Microwarpdrive Medium Compact Pb-Acid Cap Battery Small Shield Extender II Thermal Shield Hardener II Medium Cargohold Optimization II Medium Cargohold Optimization II Medium Cargohold Optimization I |
| HFC Raid Red Hauler Badger Ω |
|---|
[Badger, HFC Raid Red Hauler Badger Ω] Nanofiber Internal Structure II Nanofiber Internal Structure II Type-D Restrained Expanded Cargo Type-D Restrained Expanded Cargo EM Shield Amplifier II Multispectrum Shield Hardener II 50MN Y-T8 Compact Microwarpdrive Pithum C-Type Thermal Shield Amplifier Medium Shield Extender II Medium Compact Pb-Acid Cap Battery Medium Cargohold Optimization II Medium Cargohold Optimization II Medium Cargohold Optimization I |
| HFC Raid Red DD/H Squall |
|---|
[Squall, HFC Raid Red DD/H Squall] Ballistic Control System I Ballistic Control System I Ballistic Control System I Compact EM Shield Hardener J5 Enduring Warp Disruptor 50MN Cold-Gas Enduring Microwarpdrive Alumel-Wired Enduring Sensor Booster Enduring Thermal Shield Hardener Prototype 'Arbalest' Heavy Assault Missile Launcher I Prototype 'Arbalest' Heavy Assault Missile Launcher I Festival Launcher Prototype 'Arbalest' Heavy Assault Missile Launcher I Medium EM Shield Reinforcer II Medium Thermal Shield Reinforcer II Medium Cargohold Optimization II Caldari Navy Nova Heavy Assault Missile x3600 ECCM Script x1 |
| HFC Raid Red DD Omen |
|---|
[Omen, HFC Raid Red DD Omen] Damage Control II Heat Sink II Heat Sink II Heat Sink II Heat Sink II F-89 Compact Signal Amplifier Large F-S9 Regolith Compact Shield Extender Enduring Thermal Shield Hardener Faint Scoped Warp Disruptor Focused Modulated Medium Energy Beam I Focused Modulated Medium Energy Beam I Focused Modulated Medium Energy Beam I Focused Modulated Medium Energy Beam I Focused Modulated Medium Energy Beam I Medium EM Shield Reinforcer II Medium EM Shield Reinforcer II Medium Thermal Shield Reinforcer II Caldari Navy Vespa x4 Imperial Navy Multifrequency M x5 Gleam M x5 Nanite Repair Paste x100 Multifrequency M x5 Focused Medium Beam Laser II x5 Signal Amplifier II x1 Thermal Shield Hardener II x1 |
| HFC Raid Red Arbitrator |
|---|
[Arbitrator, HFC Raid Red Arbitrator] Damage Control II F-89 Compact Signal Amplifier AE-K Compact Drone Damage Amplifier AE-K Compact Drone Damage Amplifier AE-K Compact Drone Damage Amplifier Large F-S9 Regolith Compact Shield Extender Enduring Thermal Shield Hardener Initiated Compact Warp Disruptor 50MN Cold-Gas Enduring Microwarpdrive Heavy Modulated Energy Beam I Prototype 'Arbalest' Heavy Assault Missile Launcher I Prototype 'Arbalest' Heavy Assault Missile Launcher I Prototype 'Arbalest' Heavy Assault Missile Launcher I Medium Thermal Shield Reinforcer I Medium EM Shield Reinforcer I Medium EM Shield Reinforcer I Caldari Navy Vespa x15 Caldari Navy Nova Heavy Assault Missile x180 Imperial Navy Multifrequency M x1 |
| HFC Raid Red DD Caracal Mk.I |
|---|
[Caracal, HFC Raid Red DD Caracal Mk.I] Crosslink Compact Ballistic Control System Crosslink Compact Ballistic Control System IFFA Compact Damage Control F-89 Compact Signal Amplifier Large Azeotropic Restrained Shield Extender 50MN Y-T8 Compact Microwarpdrive Enduring Multispectrum Shield Hardener Compact EM Shield Amplifier Faint Scoped Warp Disruptor Prototype 'Arbalest' Heavy Assault Missile Launcher I Prototype 'Arbalest' Heavy Assault Missile Launcher I Prototype 'Arbalest' Heavy Assault Missile Launcher I Prototype 'Arbalest' Heavy Assault Missile Launcher I Prototype 'Arbalest' Heavy Assault Missile Launcher I Medium EM Shield Reinforcer II Medium Thermal Shield Reinforcer II Medium Thermal Shield Reinforcer II Nova Heavy Assault Missile x2918 |
| HFC Raid Red DD Caracal Mk.II |
|---|
[Caracal, HFC Raid Red DD Caracal Mk.II] Damage Control II Signal Amplifier II Ballistic Control System II Ballistic Control System II Large Shield Extender II 50MN Y-T8 Compact Microwarpdrive Warp Disruptor II Multispectrum Shield Hardener II EM Shield Amplifier II Heavy Assault Missile Launcher II Heavy Assault Missile Launcher II Heavy Assault Missile Launcher II Heavy Assault Missile Launcher II Heavy Assault Missile Launcher II Medium EM Shield Reinforcer II Medium Thermal Shield Reinforcer II Medium Thermal Shield Reinforcer I Nova Rage Heavy Assault Missile x2000 |
| HFC Raid Red DD Rupture |
|---|
[Rupture, HFC Raid Red DD Rupture] Gyrostabilizer II Gyrostabilizer II Gyrostabilizer II Drone Damage Amplifier II Drone Damage Amplifier II Multispectrum Shield Hardener II F-12 Enduring Tracking Computer Large Shield Extender II 50MN Cold-Gas Enduring Microwarpdrive 425mm AutoCannon II 425mm AutoCannon II 425mm AutoCannon II 425mm AutoCannon II Heavy Assault Missile Launcher II Medium EM Shield Reinforcer II Medium EM Shield Reinforcer II Medium Thermal Shield Reinforcer II Caldari Navy Hornet x2 Caldari Navy Vespa x3 Nova Rage Heavy Assault Missile x1888 Hail M x15292 Nova Heavy Assault Missile x5000 Tracking Speed Script x1 Fusion M x5000 Damage Control II x1 Signal Amplifier II x1 Initiated Compact Warp Scrambler x1 Prototype 'Arbalest' Heavy Assault Missile Launcher I x1 50MN Microwarpdrive II x1 425mm Medium 'Scout' Autocannon I x4 |
| HFC Raid Red DD Thorax |
|---|
[Thorax, HFC Raid Red DD Thorax] Damage Control II Vortex Compact Magnetic Field Stabilizer Vortex Compact Magnetic Field Stabilizer Vortex Compact Magnetic Field Stabilizer F-89 Compact Signal Amplifier Compact Thermal Shield Hardener 50MN Y-T8 Compact Microwarpdrive Initiated Compact Warp Disruptor Medium Azeotropic Restrained Shield Extender Modal Neutron Particle Accelerator I Modal Neutron Particle Accelerator I Modal Neutron Particle Accelerator I Modal Neutron Particle Accelerator I Modal Neutron Particle Accelerator I Medium EM Shield Reinforcer II Medium EM Shield Reinforcer II Medium Thermal Shield Reinforcer II Caldari Navy Vespa x5 Caldari Navy Antimatter Charge M x4400 |
| HFC Raid Red DD Vexor |
|---|
[Vexor, HFC Raid Red DD Vexor] Damage Control II AE-K Compact Drone Damage Amplifier AE-K Compact Drone Damage Amplifier Vortex Compact Magnetic Field Stabilizer Vortex Compact Magnetic Field Stabilizer Compact Thermal Shield Hardener 50MN Y-T8 Compact Microwarpdrive Initiated Compact Warp Disruptor Medium Azeotropic Restrained Shield Extender Modal Neutron Particle Accelerator I Modal Neutron Particle Accelerator I Modal Neutron Particle Accelerator I Modal Neutron Particle Accelerator I Medium Thermal Shield Reinforcer II Medium EM Shield Reinforcer II Medium EM Shield Reinforcer II Caldari Navy Hornet x3 Caldari Navy Vespa x6 Caldari Navy Wasp x2 Caldari Navy Antimatter Charge M x3200 Void M x3200 Heavy Neutron Blaster II x4 |
Salvage Research
- 3 Salvagers
| HFC SaR Punisher |
|---|
[Punisher, HFC SaR Punisher] Capacitor Power Relay II Small I-a Enduring Armor Repairer 400mm Rolled Tungsten Compact Plates Type-D Restrained Nanofiber Structure Multispectrum Coating II 5MN Y-T8 Compact Microwarpdrive Small Cap Battery II Salvager I Salvager I Salvager I Salvager I Small Capacitor Control Circuit I Small Salvage Tackle I Small Salvage Tackle I Small I-a Enduring Armor Repairer x1 400mm Crystalline Carbonide Restrained Plates x1 Upgraded Multispectrum Coating I x1 Mark I Compact Capacitor Power Relay x1 |
Stabilize Rift
- 3 Neut DD
| HFC StaR Bunny Dragoon |
|---|
[Dragoon, HFC StaR Bunny Dragoon] Drone Damage Amplifier II Drone Damage Amplifier II Compact Multispectrum Energized Membrane Small I-a Enduring Armor Repairer Cap Recharger II Small Cap Battery II Small Compact Pb-Acid Cap Battery Light Missile Launcher II Small Energy Neutralizer II Small Energy Neutralizer II Small Energy Neutralizer II Small Energy Neutralizer II Small Capacitor Control Circuit I Small Capacitor Control Circuit II Small Capacitor Control Circuit II Caldari Navy Hornet x14 Inferno Fury Light Missile x365 Nanite Repair Paste x100 Caldari Navy Inferno Light Missile x392 |
| HFC StaR Nos Dragoon |
|---|
[Dragoon, HFC StaR Nos Dragoon] Drone Damage Amplifier II Drone Damage Amplifier II Compact Multispectrum Energized Membrane Small I-a Enduring Armor Repairer Cap Recharger II Small Cap Battery II Small Compact Pb-Acid Cap Battery Small Ghoul Compact Energy Nosferatu Small Energy Neutralizer II Small Energy Neutralizer II Small Energy Neutralizer II Small Energy Neutralizer II Small Capacitor Control Circuit I Small Capacitor Control Circuit II Small Capacitor Control Circuit II Caldari Navy Hornet x15 Caldari Navy Inferno Light Missile x400 Nanite Repair Paste x100 Inferno Fury Light Missile x365 |
Traffic Stop
You need at least one cargo scanner, multiple people scanning doesn't hurt. Webs give more time to kill the haulers, but aren't necessary. Don't let the escorts pile up, kill them off. It's better to let some haulers through unscathed rather than get overwhelmed.
| HFC TS DD/Web Coercer |
|---|
[Coercer, HFC TS DD Coercer] Mark I Compact Reactor Control Unit EM Energized Membrane II Small Armor Repairer II Stasis Webifier II Cap Recharger II Small Focused Beam Laser II Small Focused Beam Laser II Small Focused Beam Laser II Small Focused Beam Laser II Small Focused Beam Laser II Small Focused Beam Laser II Small Focused Beam Laser II Small Focused Beam Laser II Small Capacitor Control Circuit II Small Capacitor Control Circuit I Small Capacitor Control Circuit I Imperial Navy Standard S x8 Imperial Navy Xray S x16 Aurora S x8 Small Cap Battery II x1 |
| HFC TS DD/Scan Thrasher |
|---|
[Thrasher, HFC TS DD Thrasher] Gyrostabilizer II Gyrostabilizer II Small Shield Booster II Dread Guristas EM Shield Hardener Type-E Enduring Cargo Scanner 280mm Howitzer Artillery II 280mm Howitzer Artillery II 280mm Howitzer Artillery II 280mm Howitzer Artillery II 280mm Howitzer Artillery II 280mm Howitzer Artillery II 280mm Howitzer Artillery II Small EM Shield Reinforcer II Small Capacitor Control Circuit I Small Capacitor Control Circuit II Republic Fleet EMP S x5000 Republic Fleet Fusion S x5000 |
| HFC TS DD/Scan Dragoon |
|---|
[Dragoon, HFC TS DD/Scan Dragoon] Small I-a Enduring Armor Repairer Drone Damage Amplifier II Drone Damage Amplifier II Corpum C-Type EM Energized Membrane PL-0 Scoped Cargo Scanner AML Compact Omnidirectional Tracking Link F-90 Compact Sensor Booster Arbalest Compact Light Missile Launcher Arbalest Compact Light Missile Launcher Arbalest Compact Light Missile Launcher Auto Targeting System I Small Capacitor Control Circuit I Small Capacitor Control Circuit II Small Capacitor Control Circuit II Imperial Navy Acolyte x5 Tracking Speed Script x1 Scan Resolution Script x1 Caldari Navy Mjolnir Light Missile x2069 |
| HFC TS Scan/Web Vigil FI |
|---|
[Vigil Fleet Issue, HFC TS Scan/Web Vigil FI] Damage Control II Small Ancillary Armor Repairer Multispectrum Energized Membrane II Stasis Webifier II Stasis Webifier II 5MN Y-T8 Compact Microwarpdrive Cargo Scanner II Rocket Launcher II Rocket Launcher II Small Energy Nosferatu II Small Explosive Armor Reinforcer I Small Trimark Armor Pump I Small Trimark Armor Pump I Caldari Navy Hornet x3 Nova Rage Rocket x374 Nanite Repair Paste x406 |
Footnotes
- ^ It technically has more mining yield, 33.4m3 instead of 32.8m3, but being over 32m3 means this has no practical effect on how you fly the ship or what you are capable of. In the very nitty gritty, 33.4m3 allows you to cancel your 3rd cycle at 14 seconds to finish the rock. This saves you theoretically 2 seconds during a wave. I have seen a couple waves be down to just a couple seconds so if something has gone terribly wrong, maybe those 2 seconds save the site. Just don't fuck up the timing.
- ^ For this breakpoint, you actually don't need Astrogeology 1. If you jump straight here, you can technically save those 750 SP and leave Astrogeology untrained. Astrogeology will be needed if you decide to continue training.