More actions
Review edits for Planets section |
Add info on surveying |
||
| Line 57: | Line 57: | ||
== Scanning and Surveying == | == Scanning and Surveying == | ||
These two are distinct - "Scanning" in the PI context refers to scanning a planet for a specific raw material, bringing up a heat map showing geographic | These two are distinct - "Scanning" in the PI context refers to scanning a planet for a specific raw material, bringing up a heat map showing geographic abundance. Surveying is done from a placed Extractor and will show you what deposits are available to extract at that spot. | ||
=== Planet Scanning === | === Planet Scanning === | ||
[[File:PI- | [[File:PI-AlteredHeatMap.jpg|right|Contrast Bar]]After you've familiarized yourself a bit with planets and resources, you'll probably want to extract one from the other. Finding a planet that is simply abundant in a resource you want is only the first step. Now you need to find out where on the planet you'll want to place your stuff. To get started, get yourself into Planet Mode and make sure you're on the "Scan" tab. You should see the five available resources, a "NO FILTER" bar, and a colorful "heat" bar. Click any one resource and you'll get a heat map showing where on the planet that resource is abundant. | ||
The colored bar will allow you to modify the contrast of the heat map - as very rich or very poor resources may completely white out or appear invisible if your contrast is off. There are two triangles on the contrast bar. The left one will set the minimum resource abundance you want on the map (if you move it right poorer areas will disappear), and the right one will determine how rich a resource have to be to show as white (if you move it left poorer resources will show more distinctly). Ideally you'll want a balance where you can clearly see where the richer parts of the planet are. | |||
You can leave a resource highlighted as you shift to the "Build" tab so you can more easily place an extractor on a rich spot. To remove the heat overlay click the "NO FILTER" bar.<br style="clear: both" /> | |||
=== Deposit Surveying === | === Deposit Surveying === | ||
'' | [[File:Surveying.png|left|Surveying window]]Surveying is done ''after'' you've placed an Extractor, but is kept here with Scanning since they're similar concepts. Surveying relates to the availability of a single resource in a single spot, right under an existing Extractor. To perform a survey simply select an Extractor and click the left-most button, highlighted in this screenshot. | ||
If any extractable material is present (it is possible to place extractors where there is nothing to extract) you should be presented with four "Deposits" - each of a varying total amount, cycle time, per-cycle yield, and total lifespan. If you have ample time to check on your Extractors often you can get a higher yield over shorter periods. If you do not want to check very often you can instead select long-term deposits so you won't need to babysit your extractors. | |||
After you select a deposit of your choice be sure to hit the "Install" button (and you may want to route the output right away too, more on that later) | |||
== Planetary Buildings == | == Planetary Buildings == | ||
Revision as of 18:47, 22 May 2010
Overview
Planetary Interaction (PI) is a new feature introduced in the Tyrannis expansion. It allows pod pilots from far and wide to create industrial colonies on just about any planet in the EVE universe. Additionally it is the first step toward the future integration of EVE and DUST 514, allowing pod pilots to hire mercenaries to fight over said planetary installations.
The first phase of PI introduces a set of new commodities, extracted from and processed on planets, that will allow players to replace a number of previously NPC-seeded-only goods on the market. Some commodities can be used immediately, such as Oxygen for POS fuel, while others can be used in new blueprints to create POS and T2 components.
This will provide a new source of income to all interested players, new and old, and even trial players as you need very little to try it out at a low level. Generally you can keep a colony running with a little attention once a day, more often if you want to optimize, or less often if you'd just like to coast along and check on your assets once in a while.
Currently you cannot harm the facilities of other players directly, although you may be able to compete with them over specific deposits. However, when it comes time to pick up items from your colonies, you have to go there in person - at which point the normal rules of engagement apply fully.
Planetary Interaction is a brave new frontier for all to see if you so choose - All These Worlds Are Yours
Skills

None of the skills related to PI are required to try it out. However, you'll be limited to a single command center (and thus single planet) of the lowest quality until you do some initial training. Thus you're most likely to get the best use out of training Interplanetary Consolidation and Command Center Upgrades first.
Click each skill link for more details
- (Planet Management) Interplanetary Consolidation - Increases the number of planets you can install command
- (Planet Management) Command Center Upgrades - Allows you to use better quality command centers
- (Science) Remote Sensing - Increases the range across which you can scan planets. Level 1 lets you scan at all. Train to level 1 first.
- (Science) Planetology - Improves accuracy and refines the planet's resource scan thermal map.
- (Science) Advanced Planetology - ? Effect ?
Planets

For more details, see Planets
Planets come in all sorts of shapes and sizes, and accordingly provides differing materials. Each planet provides five resources, but a few unique resources only exist on a single planet each. The unique resources include Autotrophs (![]() Temperate planets), Felsic Magma (
Temperate planets), Felsic Magma (![]() Lava planets), and Reactive Gas (
Lava planets), and Reactive Gas (![]() Gas planets)
Gas planets)
At first you are limited to a single planet, so ideally you need to first figure out what you're interested in harvesting and/or producing, pick the planet most appropriate for that activity, and then look for an example with the right resources in abundance. Note that planets in lower security levels are richer overall - see Good Planets for some analysis. While you can colonize planets in unclaimed or NPC nullsec (even wormhole space!) you cannot colonize planets in territory claimed by an alliance other than your own.

To actually look for a planet you can use several different ways. You can fly to them and actually click the planet, or be lazy and just select the planets from your overview. The Atlas can help you pick other systems, but it takes a few clicks to really get anywhere. Either way you'll want to use the "View in planet mode" option and get yourself a nice up-close view
You can also select planets from several other different views, such as via your MapBrowser. You can see the planet's overall resource abundance from anywhere (and gaze at its visual appeal), but the planet must be within your Remote Sensing skill range for you to actually perform a Scan operation on a specific resource (i.e. show its "heat" map). You can manage a planet you've already colonized from anywhere.
Resources and Products
For more details, see Planetary Commodities
The items involved in Planetary Interaction are known as Resources (extracted from Planets) and Products (produced from Resources on planets)
Resources are considered Tier Zero (R0), at least in the context of this guide, and each level of processing increases the tier by one. You thus get Tier 1 products (P1) produced by Resources (R0), Tier 2 Products (P2) produced by combining two different P1s, and so on. Processing items from one tier to the next happens in a Processor on the surface of a planet, and each tier requires a different amount of different items. Processing can then be summarized as such, one level of processing needed per column:
| Resources (R0) | Tier 1 Products (P1) | Tier 2 Products (P2) | Tier 3 Products (P3) | Tier 4 Products (P4) |
The actual Product combinations are performed as per "schematics" that are instructions for a Processor. Each schematic takes one to three items of varying tiers and quantities. You do not need to extract all the Resources you need on the same planet, nor process them to Tier 4. At any point you can supplement your "Colonies" from the market or sell your goods there.
Aside from leading to higher tiers of planetary Products, some PI goods can be used for T2 blueprints, Starbase / Sov structures, nanite paste, or POS fuel. For more information on the involved items, see Planetary Commodities. To find out how to get started looking for your initial Resources, read on!
Scanning and Surveying
These two are distinct - "Scanning" in the PI context refers to scanning a planet for a specific raw material, bringing up a heat map showing geographic abundance. Surveying is done from a placed Extractor and will show you what deposits are available to extract at that spot.
Planet Scanning

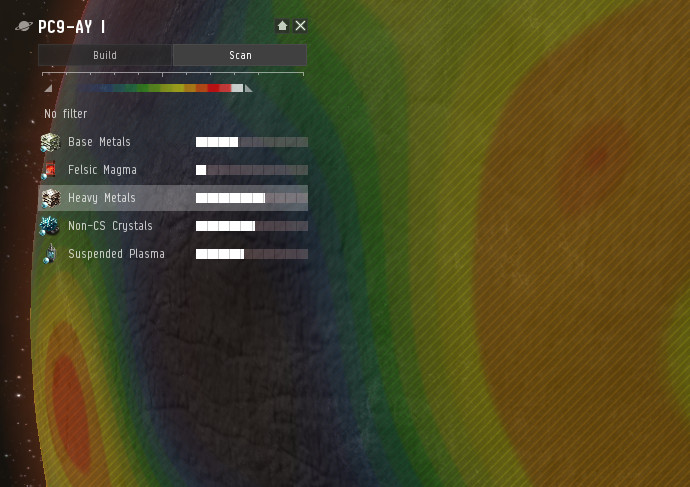
After you've familiarized yourself a bit with planets and resources, you'll probably want to extract one from the other. Finding a planet that is simply abundant in a resource you want is only the first step. Now you need to find out where on the planet you'll want to place your stuff. To get started, get yourself into Planet Mode and make sure you're on the "Scan" tab. You should see the five available resources, a "NO FILTER" bar, and a colorful "heat" bar. Click any one resource and you'll get a heat map showing where on the planet that resource is abundant.
The colored bar will allow you to modify the contrast of the heat map - as very rich or very poor resources may completely white out or appear invisible if your contrast is off. There are two triangles on the contrast bar. The left one will set the minimum resource abundance you want on the map (if you move it right poorer areas will disappear), and the right one will determine how rich a resource have to be to show as white (if you move it left poorer resources will show more distinctly). Ideally you'll want a balance where you can clearly see where the richer parts of the planet are.
You can leave a resource highlighted as you shift to the "Build" tab so you can more easily place an extractor on a rich spot. To remove the heat overlay click the "NO FILTER" bar.
Deposit Surveying
Surveying is done after you've placed an Extractor, but is kept here with Scanning since they're similar concepts. Surveying relates to the availability of a single resource in a single spot, right under an existing Extractor. To perform a survey simply select an Extractor and click the left-most button, highlighted in this screenshot.
If any extractable material is present (it is possible to place extractors where there is nothing to extract) you should be presented with four "Deposits" - each of a varying total amount, cycle time, per-cycle yield, and total lifespan. If you have ample time to check on your Extractors often you can get a higher yield over shorter periods. If you do not want to check very often you can instead select long-term deposits so you won't need to babysit your extractors.
After you select a deposit of your choice be sure to hit the "Install" button (and you may want to route the output right away too, more on that later)
Planetary Buildings
For more details, see Planetary Buildings
To extract and produce resources and products you need buildings! Buildings match the planet they are constructed on, but players only need to worry about selecting the right type of command center, the rest are built in-place on the planet and thus always of the right type. At a glance, the following structures exist:
- Command Centers - The first building you must construct, deployed from orbit. Ranges in quality from basic to elite, providing more CPU and Powergrid per level. Can store a small amount of material and offers a simple rocket launch mechanism by which you can ship said materials to orbit.
- Extractors - Just as the name implies this structure extracts a resource from the planet it is on. You have to pick the resource type for the extractor as you build it, and must provide a route for the raw material to travel once extracted, lest it be lost. Additionally, you must manually initiate the extraction of a particular "seam" of the resource and submit your action before extraction begins.
- Processors- These come in three different types, Basic, Advanced, and High Tech. Each takes a set of raw materials and/or processed goods to produce a product of a specific tier.
- Storage Facilities - About as simple as a planetary building goes, these hulks simply store materials or goods, potentially as part of a larger logistics system.
- Launchpad - A building dedicated to moving materials and goods to and from the planet. Similar in function to the rocket launch function of the Command Center, but superior as it is connected to a Cargo Link in orbit above the planet, from where the owner can import and export goods. Very costly, however.
- Planetary Links - These can essentially be thought of as railroads, connecting different structures. In addition to being built (which has a base cost plus a distance cost) actual routes have to be defined using the links to route specific products across your planetary network. They have a finite capacity in m3 per hour and can be upgraded.
Industry
For more details, see Planetary Industry
Industry should focus on describing how buildings are united in the quest to produce stuff. In other words, how to simply make one planet do stuff
Due to the complexity of the combination process a basic command center will be of very limited use. An improved command center is recommended as a minimum starting point.
- Setting up your industrial facilities
- Efficiently placing your building to maximize CPU/powergrid use and profit
- Ratios of Extractors/Production Buildings/Links/Storage that a Command Center can handle at any one time
- Keeping tabs on Extractors and relocating them or surveying for new resources when your current vein is depleted
- Storage (Surface, orbital cargo links, classic station hangars, ect)
- What ways are there to produce stuff?
- Strip mining/Extractors only
- Low Level Production
- High Level Production (including importing items from elsewhere, but not in high detail here - that's more of a colony management topic)
Colony Management
See Colony Management for details - may still want to segregate very heavy-screenshot examples of colonies on its own page?
While Industry should explain the "how" to use individual planets to create stuff, this section should describe which common colony types new players may be interested in and how to use multiple planets, other players, or the market to organize your planetary assets
- What aspects of the economy are effected by PI
- NPC Seeded Goods/Production materials
- POS fuel, ect
- Managing multiple colonies
- Up to 6 colonies
- Resource gathering colonies/production colonies
- Hauling between colonies
- Running multiple colonies that feed eachother/Buying goods off the market to feed production
Now that you have multiple colonies, you have to find them among the 67k planets in EVE. Your current colony worlds can be found in the Science and Industry Tab, from which you can enter planet mode for each.
To move items to and from your planets, see Colony Management#Interplanetary Logistics. In short...
- To get things to the planet, put them in the orbiting Customs Office, and then import to a launch pad on the planet. 5 isk/item tax.
- To get things off the planet:
- Put them in a launch pad on the planet, export them, and pick them up from the Customs Office. Maximum 10k m3, orbital storage is same building for all, but private hangar, 10 isk/item tax.
- Or put them in Command Center, launch them, and warp to the resulting can in orbit (find in your journal as a bookmark). Maximum 500 m3. 15 isk/item. Others can pick up if they can get to the can. Launching the can into orbit can be done docked in station anywhere in the universe.
Profit!
This section may be redundant, overlapping colony management too much, or if we get too much content this section could focus purely on market interaction. Optimizing extractors should be an Industry topic.
- Cultivating your colony
- Launching your goods for sale on the market
- Restructuring a colony to meet current market needs
- Not forgetting it's there
To Help rember where you havesters are located place a can inside a station and label it with the planet and resource your working on. It will be easily visible from your assests page you can use the search function to list all cans to sort if from your other stuff if you have especially crowded hangers.
- General guide to goods prices (post launch)
FAQ
- Q: Can I colonize planets in wormholes?
- A: Yes you can.
- Q: Can I attack another player's colony?
- A: No you cannot.
- Q: Can you deploy, manage or collect resources while cloaked?
- A: No. You can open the the cargo link while cloaked, but can not transfer. You can open the Customs Office from anywhere in the system, and setup the whole transfer while cloaked, but can not complete the transaction while cloaked. When considering this note also the danger that if your opponent found your colony on a particular planet, then sees you enter the system, they know which cargo link to sit on. (Just a note on the tricky operation of staying between 2050m and 2450m of the cargo link. In two tries, I was successful once, and the second time something decloaked me as I was creeping up to it, and it was not another player. It might be the sticky-out things problem that cloakies have with stations. Your opponent can guarantee it by orbiting at 2000m.)
- Q: Can you deploy, manage or collect resources from a freighter?
- A:
- Q: Is Planetary Interaction limited to system security status?
- A:
Term list
The following terms are defined here in an attempt to make them widely used and not ambiguous with similar terms within the context of Planetary Interaction. Note that some terms defined here may have alternative meetings outside of PI - such as Scan, which outside PI can refer to your ship's scanning abilities, unrelated to planets. Terms particularly likely to be ambiguous have been bolded.
- Planet Mode - the view you enter to interact with a planet
- Scan - the act of scanning a planet for a particular resource (brings up a heat map)
- Survey - the act of surveying for deposits available to an extractor
- Deposit - a "seam" of minerals or other resources that is exploitable by an extractor
- Resources - the various raw materials you can extract from planets. Nickname: Planet Goo
- Products - actual items manufactured from Resources or other Products (tier 1 and beyond)
- Commodities - any PI material (Resources + Products)
- Tiers / numbered products (P0, P1, etc) - raw materials (resources) are 0, then each level beyond that is a new set of products taking one manufacturing process per level
- Add your own!
Unsorted
- Tips
Planets may be managed from anywhere in range, though resource scanning will be limited in range depending on your Remote Sensing skill. Even works while in warp. Planets can be managed from inside a station using the science and industry tool and clicking on the Planets tab.
  To open the planet over view from anywhere Press f11 and in the side pannel you can use the bottem window to select planet view by right clicking the menue box in the left corner.
  By switching solarsytems or regions in the above boxes you can scan planets in regions as far as your abilities allow.
  In the solar system box you can use show info under each solar system and look at orbital bodies to get a list of planet type rather than look at them one at a time. You can also view planet directly from the list.
  You cannot deploy command centers while docked how ever you do not need to be at the planet however you must be in system.
http://www.eve-icsc.com/jumptools/jumpplanner.php use this link you calculate LY range to see what systems will be in range of your abilities it will help with planning.
- Struggles they may come up against, ect.
Related Links
- Eveonline forum thread on PI http://www.eveonline.com/ingameboard.asp?a=topic&threadID=1308696&page=4#102
- Planetary Interaction Taskforce - Central team organizing page
- Planets - Details on planets
- Planetary Industry - Details on PI production
- Colony - Details on colonies

