More actions
| Line 62: | Line 62: | ||
[[image:Heavyneut.jpg]] | [[image:Heavyneut.jpg]] | ||
Generally all neutralizers will have a similar set of attributes. The different sizes of neutralizer differ significantly, but they all fairly consistent across meta levels. Besides fitting considerations, the only attributes that change from meta 0 all the way to | Generally all neutralizers will have a similar set of attributes. The different sizes of neutralizer differ significantly, but they all fairly consistent across meta levels. Besides fitting considerations, the only attributes that change from meta 0 all the way to commander modules is the range and the amount of energy neutralized. The cycle time is consistent (6 seconds for small neuts, 12 seconds for medium, and 24 seconds for heavy) as well as the energy 'cost' to neutralize (45 for small, 150 for medium, and 500 for heavy). Accordingly, at each size higher meta modules are more efficient with meta 0 modules destabilizing as much as their activation cost (100% efficiency) up to meta 5 (tech II) and higher modules at 120% efficiency. The range for modules from meta 0 to the highest are: small from 5,250m - 7,350m; medium from 10,500m - 14,000m; and heavy from 21,000m - 39,200m. | ||
So if you are within range of a target and activate an energy neutralizer the activation cost will immediately be deducted from your capacitor and the neutralization amount will be deducted from the targets capacitor (test and verify). Each cycle time if still within range this will be repeated for as long as you have | So if you are within range of a target and activate an energy neutralizer the activation cost will immediately be deducted from your capacitor and the neutralization amount will be deducted from the targets capacitor (test and verify). Each cycle time if still within range this will be repeated for as long as you have capacitor to run it. Pretty simple, right? | ||
The important thing to remember is that your goal is to 'cap out' your opponent and that their capacitor will [[Capacitor Recharge Rate|continuously be recharging]]. So if you are not using a large enough neutralizer to overcome the peak recharge rate of their capacitor you are more or less wasting your time. Yes, you will make it harder for them to run cap stable, but likely you would be more | The important thing to remember is that your goal is to 'cap out' your opponent and that their capacitor will [[Capacitor Recharge Rate|continuously be recharging]]. So if you are not using a large enough neutralizer to overcome the peak recharge rate of their capacitor you are more or less wasting your time. Yes, you will make it harder for them to run cap stable, but likely you would be more efficient using that high slot for something else if that is all you are accomplishing. | ||
So you want: Neutralization Rate which is ((Energy Neutralized in GJ)/(Activation Time in seconds)) > | So you want: Neutralization Rate which is ((Energy Neutralized in GJ)/(Activation Time in seconds)) > opponent recharge rate in GJ/S | ||
The delta is the rate at which you will cap out your target. Remember however, that the recharge rate varies with the percentage of remaining cap so that in fact your neutralizing effectiveness will be highest when the | The delta is the rate at which you will cap out your target. Remember however, that the recharge rate varies with the percentage of remaining cap so that in fact your neutralizing effectiveness will be highest when the opponents capacitor is closest to 0% and 100%. (I will leave the math and actual formula out of this guide) This means that it is easier to keep someone cap drained than it is to drain them in the first place. This is an important factor in the fighting and fitting section of this guide. | ||
<br> | |||
<br> | |||
===Energy Vampires=== | |||
==Capacitor Warfare and PvE== | ==Capacitor Warfare and PvE== | ||
Revision as of 19:44, 15 June 2010

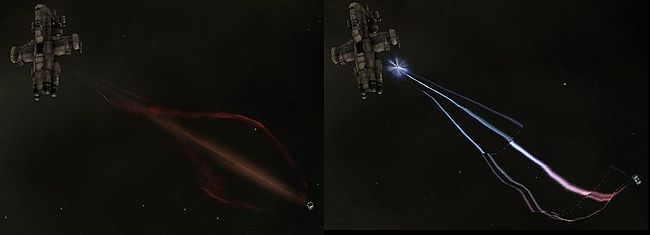
or Why These Pictures are Some of the Prettiest Things You Will See in EVE.
Capacitor Warfare Overview
You have probably heard someone say 'Cap is life' during your time in EVE. There are many good reasons why this is true, and every one of them is also a good reason why Capacitor Warfare is one of the most direct ways to go for the throat of an enemy. Capacitor directly feeds laser and hybrid turrets, keeps active tanks running, and powers the majority of fighting midslot modules including all EWAR modules and all propulsion systems. An enemy without capacitor is an enemny without options which means you instantly get to dictate the flow of the battle - kill them your way or if something goes wrong you can always rest confidently knowing that warp jamming requires cap.
Cap Warfare is the strange cousin of EWAR that no one talks about. Rarely will you see EWAR guides include Cap Warfare even though it is where it rightfully belongs much like tackling. Capacitor Warfare has had its ups and downs in the history of EVE, with its wild days of overpowered glory, and subsequent 'rebalancing' lows. It is still and will always be an extremely viable tactic in the sandbox of EVE, and surely the pendulum will continue to swing back and forth over the impossible 'balanced' mark, but knowing what and how is extremely important even if you never plan to use cap warfare.
Capacitor Warfare, as in direct action taken to reduce or elminate the capacitor of a target, can be accomplished a few ways:
- Using one of two types of Engineering Equipment modules
- Energy Destabilizers - small, medium and heavy energy neutralizers of various meta levels
- Energy Vampires - small, medium and heavy nosferatu of various meta levels
- Using one of three Combat Utility Drones
- Light, medium and heavy energy neutralizer drones based on Amarr drone models - the Acolyte EV-300, Infiltrator EV-600, and Praetor EV-900
(as an aside if you have ever been curious where the word nosferatu comes from check out this link to Nosferatu)
Each of the these systems has its own strengths and weakneses and are very different in implementation although all are focussed on the same goal.
- Energy Destabilizers - ie the assortment of Neutralizers (Neuts)
- Strengths
- Neutralizes large portions of the enemies capacitor every cycle
- Weaknesses
- Requires large amounts of your capacitor
- Long cycle time consistant across all meta levels - 6 seconds for small, 12 seconds for medium, and 24 seconds for large neutralizers (overheating will always reduce cycle time by 15%)
- Short range although it varies across meta levels
- Strengths
- Energy Vampires - ie the assortment of Nosferatus (Nos)
- Strengths
- Amount of cap removed from the target is transferred to you
- Quick cycle time consistant across all meta levels - 3 seconds for small, 6 seconds for medium, and 12 seconds for large nosferatus (overheating will always reduce cycle time by 15%)
- Weaknesses
- Only transfers cap when your PERCENTAGE of capacitor is below the percentage of the targets capacitor
- Transfers small portions of capacitor
- Short range although it varies across meta levels
- Strengths
- Energy Neutralizer Drones
- Strengths
- normal Drone range mechanics
- Neutralizer drones have no impact on your cap
- Weaknesses
- normal Drone weaknesses of vulnerability, flight times etc.
- Constant cycle time of 6 seconds for each type of drone with only small portions of cap neutralized (easy to remember as it is an equivalent amount to the bandwidth of the drone)
- Strengths
So these are the tools at your disposal if you decide to bring the pain directly to your opponents capacitor. Keep reading for how they work, what ships they work best on and how to make them work for you.
How Energy Destabilizers, Vampires, and Neutralizer Drones Work
Energy Destabilizers
Energy Neutralizers are the heavy hitters of cap warfare. They can remove huge amounts of cap and leave an enemy 'capped out' faster than any other form of cap warfare.
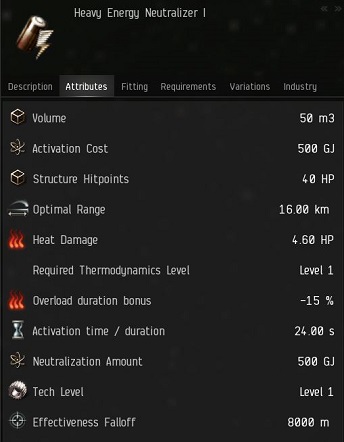
Here is screenshot of the attributes of the meta 0 heavy neut:
Generally all neutralizers will have a similar set of attributes. The different sizes of neutralizer differ significantly, but they all fairly consistent across meta levels. Besides fitting considerations, the only attributes that change from meta 0 all the way to commander modules is the range and the amount of energy neutralized. The cycle time is consistent (6 seconds for small neuts, 12 seconds for medium, and 24 seconds for heavy) as well as the energy 'cost' to neutralize (45 for small, 150 for medium, and 500 for heavy). Accordingly, at each size higher meta modules are more efficient with meta 0 modules destabilizing as much as their activation cost (100% efficiency) up to meta 5 (tech II) and higher modules at 120% efficiency. The range for modules from meta 0 to the highest are: small from 5,250m - 7,350m; medium from 10,500m - 14,000m; and heavy from 21,000m - 39,200m.
So if you are within range of a target and activate an energy neutralizer the activation cost will immediately be deducted from your capacitor and the neutralization amount will be deducted from the targets capacitor (test and verify). Each cycle time if still within range this will be repeated for as long as you have capacitor to run it. Pretty simple, right?
The important thing to remember is that your goal is to 'cap out' your opponent and that their capacitor will continuously be recharging. So if you are not using a large enough neutralizer to overcome the peak recharge rate of their capacitor you are more or less wasting your time. Yes, you will make it harder for them to run cap stable, but likely you would be more efficient using that high slot for something else if that is all you are accomplishing.
So you want: Neutralization Rate which is ((Energy Neutralized in GJ)/(Activation Time in seconds)) > opponent recharge rate in GJ/S
The delta is the rate at which you will cap out your target. Remember however, that the recharge rate varies with the percentage of remaining cap so that in fact your neutralizing effectiveness will be highest when the opponents capacitor is closest to 0% and 100%. (I will leave the math and actual formula out of this guide) This means that it is easier to keep someone cap drained than it is to drain them in the first place. This is an important factor in the fighting and fitting section of this guide.
Energy Vampires
Capacitor Warfare and PvE
Capacitor Warfare Ships
T1 Usage
Ships with Capacitor Warfare Bonuses
Amarr Ships
Sentinel
Pilgrim
Curse
Blood Raider Ships
Cruor
Ashimmu
Bhaalgorn
Fitting and Fighting for Cap Warfare
Credits

