More actions
Salartarium (talk | contribs) m →Chat Policies: added voice procedure and inclusive communication |
Salartarium (talk | contribs) m added link to Opening EVE and Mumble simultaneously |
||
| Line 356: | Line 356: | ||
On a short term basis, if Mumble should go down, during a time critical event/fleet/QRF, revert to using Fleet Chat, and using Fleet interface commands. | On a short term basis, if Mumble should go down, during a time critical event/fleet/QRF, revert to using Fleet Chat, and using Fleet interface commands. | ||
Mumble service restoration will be a priority for Uni Management. | Mumble service restoration will be a priority for Uni Management. | ||
==See also== | |||
[[Opening EVE and Mumble simultaneously]], a step-by-step guide on how to create and setup a shortcut to open EVE Online and Mumble simultaneously on Windows using a batch file. | |||
== References == | == References == | ||
Revision as of 20:45, 7 January 2022
For a summary of EVE University's rules and code of conduct, see EVE University Rules.
Mumble is a third-party VOIP (Voice Over Internet Protocol) application that allows people to communicate verbally both in- and out-of-game. EVE University maintains two different Mumble servers - one "private" and one "public" - as a way of engaging both students and the greater EVE community.
Mumble is mostly used in two situations: PvP and Classes. In PvP it is very useful because, for example, it is faster to call out a primary target than to type it, especially with PvP related lag. In classes it is great as well because we do not want our poor instructors getting Carpal Tunnel Syndrome from typing everything. In effect, it is just a lot easier and faster than typing.
Mumble Quick Connect Guide
At EVE University we have two separate mumble servers. We have a public server accessible by anyone; this is used for classes, Q&As, and the occasional CSM Town Hall. We also have a private mumble server accessible only by E-UNI members and alumni; this is used for all other E-UNI business - fleets, campuses, etc. Most E-UNI activities use the private server, only classes and Q&As use the public server.
The set-up instructions for each are as follows:
- First make sure to set up a mumble password in your account page on the Uni Portal
- Download Mumble from http://www.mumble.info. Versions for many different operating systems are available.
- Install and set it up - starting Mumble for the first time will start two wizards, for certificates and audio tuning. See the FAQ if you have any issues.
- You must set a push-to-talk key - do not use voice activation.
- Click on Server > Connect > Add New... and create two servers using the details below:
| Private Server | Public Server | |
|---|---|---|
| Purpose: | Fleets, chatting, campuses, general purpose | Public classes, Q&As |
| Servername: | EVE University | EVE University (Public) |
| Address: | voice.eveuniversity.org | |
| Port: | 64738 (default) | 64739 |
| Username | <Your E-Uni forum username, i.e: your character name> | |
| Password (only when prompted): | <Your E-Uni forum password> | <None - you won't be prompted> |
| Click to join | Public Mumble | |
A more detailed guide to set-up and troubleshooting is below, along with how to get the overlay to work.
Setting Up Mumble
Audio Tuning Wizard
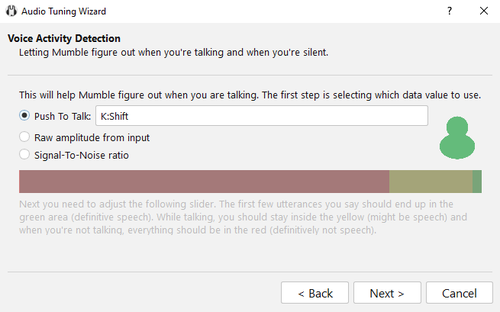
When you run Mumble the first time, an Audio Tuning Wizard is presented to you. If you skip or miss it on the first run you can retake the wizard by clicking Configure > Audio Wizard. It is recommended you go through it carefully, since setting up Mumble correctly will make your and everyone else's life much easier (going through the Audio Tuning Wizard properly will also normalise everyone's voices, such that everyone will sound the same volume regardless of how they have their microphone set up). However there are two things to pay close attention to:
Push-to-Talk
When you reach a screen that looks like the one above select the top radio button, click on the box on the same line and press the key you you want to use as the push-to-talk key.This is your normal push-to-talk key; for certain Fleet roles you may need more than one (see the comments in the Fleet channels), but for general E-UNI activity one is sufficient.
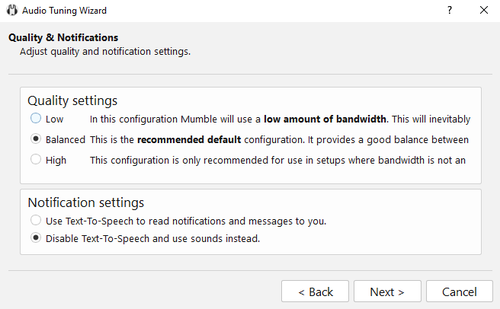
Text-to-speech
When you reach a screen that looks like the one above, it is recommended that you disable the text to speech notifications.
Connecting to the EVE University Server
Once Mumble is all set up and you have run through the Audio Tuning Wizard, you will want to connect to the EVE University server.
- Go to Server in the toolbar --> Connect.
- Click the Add New... button in the bottom right.
- Put anything you like in the Label box ("EVE University" seems sensible), the Address box needs to be voice.eveuniversity.org and the Port needs to be left as default (64738).
- The Username box needs to be your exact E-UNI forum username, which also happens to be your exact character name.
- Click the Connect button.
- The server will reject your connection, and prompt you with a Wrong Password box. You need to use your forum password (i.e. the same password you chose when you registered for our forums) in the box, then click OK. Please note that if you just recently created your Forum account or changed your Forum password, then it will take a few hours to update before Mumble recognizes your password.
- Try again after a few hours and you will be connected to the Mumble server, which will have moved you into the Public Lounge channel.
Speaker and Microphone Choices
When you went through the wizard set-up, you may have left the microphone and speaker choices on "default." This is a normal thing to do, and it means that mumble will send sound out through your normal speaker, and listen on your normal microphone. For many players this will work fine.
If the sound is coming from the wrong speaker, though, like for example your computer speaker instead of your headphones; or if your voice is not coming through clear and strong when you do the microphone check, you may want to change those default settings.
- First open Mumble Preferences.
- To change microphones, click on Audio Input. This is the first item in the Preferences, and is also the page where you set the Push-To-Talk key. At the top of the page is the word "Device" and next to it is a menu list of all the audio input devices connected to your computer. These may have strange names ... mine are things like "USB Audio CODEC" and "Mic 96K" ... so you may just have to click each one and do the microphone check to pick the one that works best.
- To change speakers, click on Audio Output. Again it says "Device" at the top and there is a menu list. There should be at least two devices on this list: your computer's speakers, and your headphones. If you're not sure which is which, try each one with a microphone check until the sound comes out where you want it to.
Note: if you want to listen to Mumble through your computer speakers, the slider labeled "Attenuate Applications By..." will reduce the sound of the EVE game (and any other apps that might be running) by the percentage you choose - but only when Mumble is active. This lets Mumble talk stand out from the sounds of combat and such.
Connecting to the Public EVE University Server
Most of the classes are held on the Public Mumble server in order to provide knowledge to the whole EVE community. The procedures for connecting to the public server are exactly the same as the procedures for connecting to the normal EVE Uni server (connect to server voice.eveuniversity.org), however you must input 64739 as your port instead of 64738. You will not be prompted for a password.
Using the EVE University Mumble
Chat Policies
Please remember that our Communications Policy applies in the Uni Mumble. Moderation can include muting and/or banning. Note that this can severely affect your participation in fleets, classes, and other activities. Keep in mind proper Voice Procedure and attempt to use Inclusive Communication as much as possible.
Notifications
Go to Configure > Settings... > Messages. From there you can disable popup and sound notifications about events you don't care about. By default Mumble makes a loud PING and gives you a notification popup for almost any event on the server - this gets annoying pretty fast.
Mac version: From the Mumble --> Preferences window (make sure the 'Advanced' checkbox in the upper right is checked), select the 'Messages' tab. The only way to eliminate audio notifications is to uncheck items in the 'Soundfile' column.
Setting a Sub-Channel Push-to-Talk Button
Some of our mumble rooms, most notably the fleet and campus channels have sub channels like command, logistics or ewar. The purpose of these sub channels is to give the group within the option to talk to each other without the rest of the fleet being able to hear it. For example the commander of the logistics group can now talk to only the Logistic pilots without confusing everyone else.
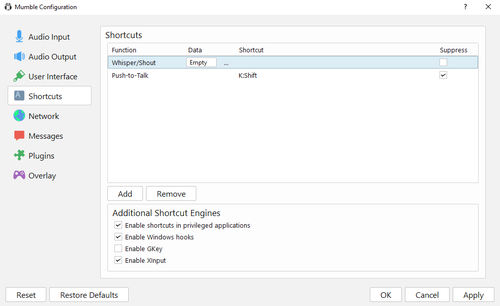
You don't need to do anything to just listen to a sub channel but joining it. Your regular push to talk button will still let you talk to the whole fleet/campus you are in, the sub channels are "linked" to the whole channel. To be able to talk to the sub channel you are in right now, you need to set a second PTT key. To set that up, go to Configure -> Settings -> Shortcuts, which will pop up a window that looks like this:
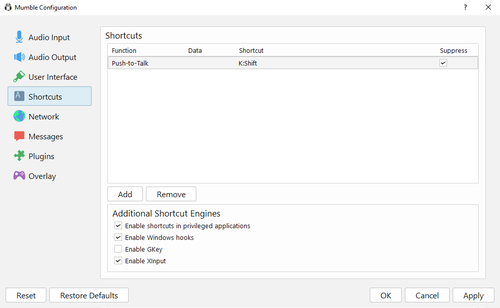
You should already see your existing push-to-talk key set up. It's a good idea to check the Suppress box on any shortcuts, as that will prevent other applications from recognising your key and performing unforseen tasks you had not expected (e.g. warp scrambling stargates).
- Click the Add button in the bottom left, which will bring up a new Unassigned shortcut in the window.
- Click the word Unassigned and select Whisper/Shout from the drop-down list.
- Click the word Empty next to it, which should cause a [...] button to appear next to that - click that [...] button to open a new Whisper Target window.
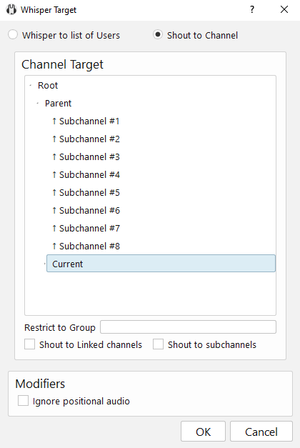
- Make that new Whisper Target window look like this (i.e. Shout to Channel box ticked at the top, and Current channel highlighted), and then click OK. The Shout to Linked channels should be clear. Check Shout to subchannels if you want to be able to talk to the campus sleeper rooms (sometimes listed as "Ready Room").
- Finally click the Shortcut column of your new shortcut and press the key you wish to use.
- You now have a Command chat key set up for fleet channels!
Note that it will only talk to Command chat if you yourself are also in Command. If you are in the general fleet channel it will talk to the general fleet ONLY, i.e. not Command. You can also use this key in any channels that are linked together (e.g. Public Lounge and Combat Lounge) - it will only talk to the current channel, and not the linked channels. Speaking of which...
Student and Public Lounge
These two channels in Mumble are linked. The Student Lounge is restricted to those people actually in EVE University; however the Public Lounge is open to anyone with an account on the EVE University Forums - i.e. any EVE Online player in the whole galaxy can join our Mumble server. The Public Lounge is where you can go while you're awaiting your interview to join EVE University and talk to Unistas in the Student Lounge. The Student Lounge is a place Unistas can go when not busy in a fleet or other Mumble rooms, such as Campus Channels to just relax, chat or help new Unistas with any questions.
This is important when it comes to communicating information about University fleets or war information. Your normal push-to-talk will of course talk to both channels, and you should use that to chat in these two channels. However, the Student Lounge section serves an important purpose, and that is announcing upcoming fleets (or other confidential fleet/war information).
Whilst in the Student Lounge you can use your Command chat push-to-talk key (Whisper Key) to talk to only the Student Lounge in order to announce upcoming fleets, or asking confidential questions concerning fleets or current wars. This should not be used for general chatting, and should only be used for fleet announcements or confidential war/fleet questions. Use of the command chat key in this case should be kept short and clear, as those in the Public Lounge are liable to talk over you.
Orientation Lounge
This is a sub-section of the Student Lounge where you can go when more detailed one-on-one assistance is required - particularly with Orientation questions. If you need some assistance, go to the Student Lounge or Public Lounge and ask if anyone's available to help you. There are often Orientation Officers available in the Student Lounge to help answer questions, but you will find other Unistas are willing and able to help in the absence of an Orientation Officer. The Orientation Lounge is available to anyone providing or receiving detailed assistance or Orientation. Please be mindful, however, if someone's providing Orientation or general assistance in the Orientation Lounge, do not enter and interrupt with general chat. The Student Lounge and Public Lounge are for that purpose. If you need assistance or you are a Unista helping someone else and you cannot do so effectively in the Student Lounge/Public Lounge as other conversations are going on, the Orientation Lounge is the place to go to discuss things privately.
Tokens
Another option with mumble is to set up so called tokens to be able to only talk to specific people. You find a detailed description with the example for ewar pilots here (thanks to Remric for that).
You can also set up keybinds to talk to groups of people, or to single specific people regardless of what channel they are in (we call this one a 'push-to-stalk' key).
Setup a Server Access Token
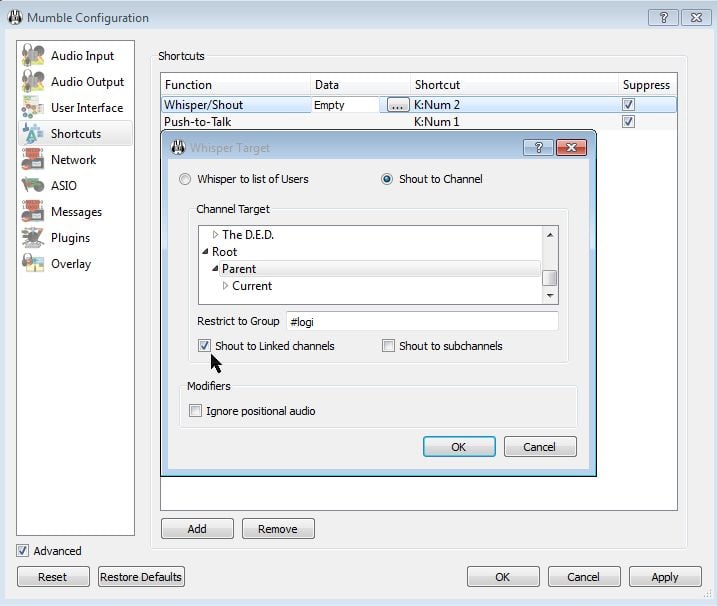
- 1. In Mumble go to Server / Access Tokens
- 2. Name the new token Ewar, logi, bombers, triage, and share this with your group.
- 3. Go to Configure / Settings / Shortcuts (where the Push to Talk PTT key is setup)
- 4. Select Whisper/Shout under Function
- 5. Choose a shortcut key that is different from your other Mumble shortcut keys
- 6. Click "..." under Data
- 7. Select Shout to Channel radio button
- 8. Select Parent for Channel Target
- 9. Restrict to group use hash '#' + Server Access Token (above) in this example #logi
- 10. Check box Shout to Linked Channels
Other Interesting Features
- Right-click on a channel and select Join Channel to move to that channel (double-clicking sometimes produces strange behaviour with nested channels).
- If the name of the channel that you are in is italicized, then your push-to-talk button, in addition to talking to the current channel, will also talk to everybody in every other channel that is also italicized. Italicized names denote linked channels (you can only see this if you are currently in a linked channel).
- Click the small yellow |c| button on any channel (or any person) to see comments on that channel (or person). The |c| will go white once you've read it (and go yellow again if it changes). You can set your own comment by right-clicking on your own name.
- You will automatically be moved to the AFK & Idle channel if Mumble detects no activity on your computer for at least 4 hours. Everybody is automatically muted in that channel, so you can also move yourself there if you desire peace and quiet
- You can create your own channels for EVE purposes (in the On-Demand Channels section) or for any non-EVE gaming purposes (in the Non-EVE Gaming section) by right-clicking on the relevant section and choosing Add. These are temporary channels, you will have admin powers and once the last person leaves the channel will disappear.
- The overview will only appear if somebody speaks - so say hello if you cannot see your overview.
Mumble Overlay
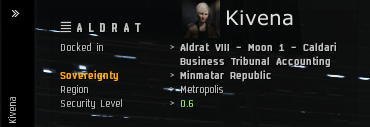
Mumble provides a very handy and customizable overlay. To configure it go to Configure --> Settings --> Overlay option.
Mumble, being the awesome program that it is, shows in this window an example of what the overlay will look like on your current desktop, as well as instructions on how to alter it. One position that works very well is just to the right of the current location name, like the screenshot on the right. You could even put it above the current location, but then - for me at least - it's too small to see easily.
The default setting is for the Overlay to display the name of everyone currently in the channel. As you can imagine, this gets unwieldy very quickly. To change this, right-click on the small example overlay in the window, choose Filter >, and tick Only talking. Also untick Always show yourself, otherwise your name will constantly be displayed on the overlay.
The Edit... option on the right-click menu produces a detailed configuration screen where you can change pretty much anything you like about the overlay: colours, sizes, backgrounds, avatars, etc.
If your overlay is not showing up, it might be because you started Mumble whilst EVE was already running. If necessary simply restart EVE. If the overlay is still not showing, check the troubleshooting section below.
Overlay on Windows 10
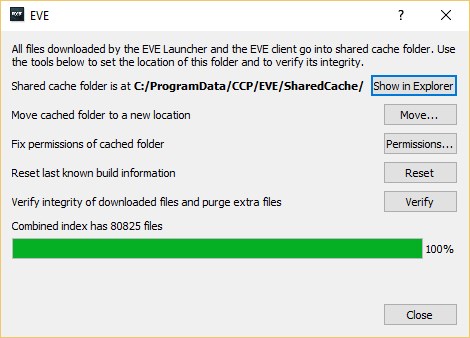
The Mumble Overlay often doesn’t work on the EVE client with Windows 10 without some additional work. Many of the usual work-arounds won’t fix the problem. A reliable fix that is compatible with DirectX 11 can be done with the following two steps.
- Download and install the current Mumble Snapshot from https://www.mumble.info/downloads/. Use the Development Snapshot version instead of the Stable Release version and use the first listed (“Windows” -- Do Not use the “Windows x64” version). You can install the Snapshot version over your current version of Mumble. You don’t have uninstall the current version first.
- Next, put the location of the EVE client, “exefile.exe”, into the Mumble Overlay Whitelist. To find the Whitelist, open the Mumble Configuration (Menu: Configure/Settings or the Gear icon). Then select Overlay on the left side menu. Next select the Overlay exceptions and click on the Whitelist. Use the Add button at the bottom to add the location of your exefile.exe. The familiar Open File window will allow you to find the path, select the file, and add it to the Whitelist.
If you don’t know where your "exefile.exe" file is located, go to the EVE Launcher, open the dropdown menu from the top right corner, and select the Shared Cache option. Alternatively, if your EVE Launcher does not have a dropdown menu on the top right corner but a settings "cog" icon instead: click on it and, in the pop-up window's left-hand sidebar, go to Tools / Cache > Shared Cache. The pop-up window will show the full path of the Shared Cache folder and the Tranquility exefile.exe will be located in the "\SharedCache\\tq\bin folder".
The file might be located in the "ProgramData" folder which is a hidden folder. You might have to unhide it using File Explorer. If you want to add the path for the Singularity or Duality test servers, add the path that contains “\SharedCache\sisi\bin\exefile.exe” or “\SharedCache\duality\bin\exefile.exe” instead of "\SharedCache\tq\bin\exefile.exe".
Overlay on Linux
To actually display the overlay over EVE in Linux after you've enabled it in Mumble's settings you need to have Mumble launched first and then run mumble-overlay in front of the wine command that you use to launch EVE. For example:
mumble-overlay wine explorer /desktop=EVE,1600x1200 "C:\Program Files\CCP\EVE\eve.exe"
If you use a WINEPREFIX, then you would insert it after the WINEPREFIX variable like so:
WINEPREFIX=/home/username/bin/wine/wine-eve/ mumble-overlay wine explorer /desktop=EVE,3200x1180 "C:\Program Files\CCP\EVE\eve.exe"
Overlay on Mac
The Mumble overlay does not work with EVE on macOS.
EVE launcher in unable to integrate with Mumble and add the overlay. EVE launcher can still do it for an older version of Mumble, v.1.2.3.
In 2021-09 a new macOS-native client for EVE is in beta which might fix the issues with Mumble.
If you are reading this and have Mumble overlay working with macOS, please update this section with instructions on how to get it to work!
Instructions below are for future reference and to test new versions of EVE and Mumble on macOS.
Installing the Overlay
In all cases, it is essential that Mumble be running before the EVE client is started for the overlay to work in EVE.
- After downloading and mounting the Mumble install dmg, drag and drop the Mumble application into the folder of your choice.
- Launch Mumble.
- Click Mumble -> Preferences… and go to the Overlay section in the Preferences window that opens.
- Click the [Install Mumble Overlay] button. If prompted, authenticate using an account with Admin rights.
- The window will update once the overlay is installed.
- Tick the [Enable Overlay] checkbox if it's not already ticked.
- Click [OK] to close the Preferences window.
Congratulations, you now have a working overlay! Well, kind of. You'll probably want to make some configuration changes.
Configuring Overlay
- With the Mumble application still running, launch EVE.
- If you run EVE in full-screen mode, press the [Command]+[Enter] keys to put it into windowed mode.
- Switch to Mumble and click Mumble -> Preferences… and go back to the Overlay section.
- In the Layout tab in the bottom half of the window, use the screen preview to:
- Move the red dot to anchor the overlay where you want it.
- Hover the mouse over the overlay and scroll in/out to increase/decrease the size of the overlay.
- Right-click the overlay and in the Filter menu check [Only Talking] (or [Talking and recently active]) and uncheck [Always show yourself].
- Adjust other settings as desired. Right-click the overly and select Edit to customise the look of the overlay (e.g., background and font colour for the talk/shout/whisper).
- Click Ok to save the changes.
- With Mumble running in the background, you can now switch back to EVE. Press [Command]+[Enter] if you want to put EVE in full-screen mode.
Your overlay is now setup and you are ready to go!
Again - be sure to start Mumble first before EVE from here on out.
"In the EVE settings make sure that you have checked "Use Multithreaded OpenGL"'. Without it the overlay will not work in EVE and will crash the client on startup. (credit: Hank Magnusson)
Using Mumble On Your Phone
Android
Mumla is the unofficial Mumble client for Android devices (currently there is no official client). You can download it through the Play Store or F-Droid.
- The first time that you open the application you may be asked to give microphone access to the application and to generate a certificate. Accept and generate.
- To connect to the E-UNI Mumble servers, click the plus (+) icon on the top-right corner and refer to Mumble Quick Connect Guide for the connection details.
- To set up the push-to-talk button, open the hamburger menu on the top-left corner, go to Settings > Audio > Transmit Mode and choose the Push to Talk option.
- Below, there is a section titled Push to Talk Settings. You may leave these as they are by default and, once you connect to a server and join a channel, you will see your push-to-talk button at the bottom labeled as such. Feel free to tweak these settings to your liking.
iOS
You can download Mumble's official client from the App Store also called "Mumble".
Troubleshooting
The Mumble FAQ on the Mumble homepage - http://mumble.sourceforge.net/FAQ - has a lot of useful information, and also has a section on Common Problems and Resolutions which may be helpful.
I can login to other servers but not the UNI server!
The Mumble download comes with a "backwards-compatible" version. That program won't work with our server. Use the up-to-date version.
I can't enter a channel I should be able to!
Mumble takes a few hours to update, so if you have just joined or left EVE University, or changed your forum password, it will take a while to catch up. Try again the following day and if it is still not working ask a Director for assistance.
"Server connection failed: The remote host closed the connection."
Third-party certificates (for example the free one from https://www.startssl.com that Mumble suggests using) do not work with the EVE University Mumble server. Create a new certificate from within Mumble and you should be properly prompted for your password when initially connecting.
I continue getting the message "Server connection failed: The remote host closed the connection."
Click on the Mumble menu: Configure/Settings and a popup window appears. Click on Network and be sure to UNcheck the [ ] Use Quality of Service (QoS) box. Now click Apply at the bottom right then click OK. The window will close and you will be connected to your server.
A referral was returned from the server.
"A referral was returned from the server." error while starting Mumble on Windows Check your system time. Windows certificate check will fail if your clock is some years ahead/behind.
For Windows XP: Install the latest Root Certificate update through Windows Update (it's an optional update) to fix this problem.
For Windows Vista/7: Right-click the Mumble executable, select "Properties", select the "Digital Signature" tab, click "Details" and click "Install certificate".
Installing https://www.startssl.com/certs/ca-bundle.crt to the "Trusted Root Certification Authorities" cert store should also work.
If you compiled Mumble yourself either sign the binary or disable signing.
If you are on windows 7 and this doesn't help you, try this out. Press Start, type MMC and press enter go to File and select Add/Remove Snap-ins in available snap-ins select Certificates and press ADD. you get three options, I personally went with "My User Account"
with that done exit the Snap in management window and double click on the Certificate Icon, then double click on the "Trusted Root Certification Authorities" Right click on the Certificate icon that appears and highlight "all tasks" then click on the Import button.
The import wizard will then ask for the filename of the certificate you want imported. First Save As: https://www.startssl.com/certs/ca-bundle.cr in whatever folder you want then link it to the import tool. follow the wizard's instructions and "Voila" you now should be able to use Mumble
Overlay Not Showing
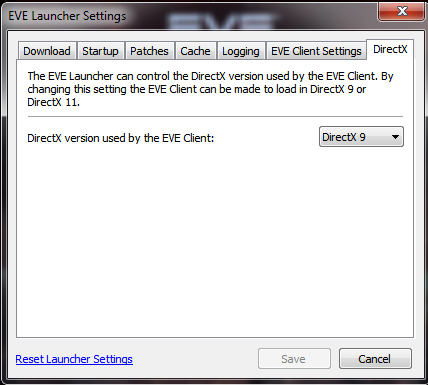
Rubicon added the ability for Eve Online to use DirectX 11 rather than DirectX 9 to run the game. As of version 1.2.6, Mumble's Overlay does not work with DX11. Two options have been found to resolve this...
- Option 1: If you want to keep using DX11, you can update Mumble to the latest snapshot release (snapshot link is to the right of the stable release). WARNING: Some people have experienced EVE client instability (Error message: "CCP ExeFile has stopped working") after upgrading to the latest snapshot.
- Option 2: Force Eve to use DX9
- Click the cog in the upper right hand corner of the launcher
- Click in the DirectX tab on the far right (screenshot below)
- Change the dropdown to DirectX 9
Now, if you have Mumble active and launch the game client, you should be able to see the overlay in-game.
Due to multiple instances of pilots not being able to get the overlay working even with the above and below instructions, I've put together a video which can be found in this forum link http://forum.eveuniversity.org/viewtopic.php?f=31&t=88514 ~Ezekial "Zeke" Calitori
Overlay not showing in Windows 8/Windows Server 2012.
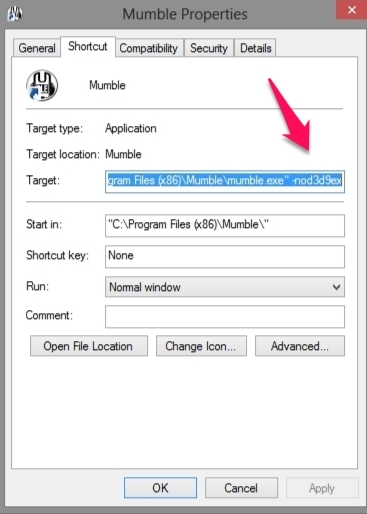
There seems to be an issue with how Mumble injects the overlay in Windows 8/Windows Server 2012. To get the Overlay to work properly just add -nod3d9ex to your Mumble shortcut. ** This workaround seems to be working with Mumble 1.2.4-beta1-4-g90599b8
Overlay not showing when you run Eve via exefile.exe.
If you don't use launcher, but instead run eve via exefile.exe shortcut, Mumble overlay may still not work (launcher setting does not impact direct exefile.exe startup). The solution is to add "/triPlatform=dx9 /noconsole" parameters into your exefile.exe shortcut (just at the end of line in the Target field - after \path\exefile.exe).
Overlay not showing in Windows 8 64 bit or Windows 7 64
When downloading latest snapshot of Mumble you can choose between Windows or Windows x64 version. It is likely that even if you have x64 Windows you should install 32 bit version to get the overlay. The current file that seems to work is mumble 1.3.0~537 snapshot.
Windows 10 microphone and audio issues
Open sound settings, select device properties for the problem device, and click additional device properties. On the advanced tab uncheck "Allow applications to take exclusive control of this device".
Should Mumble go down
EVE Voice was the in-game voice chat functionality. CCP discontinued the feature in early 2018 due to lack of use and the amount of dev time it consumed to keep it functioning as patches, expansions and improvements to the sounds in EVE rolled out.
On a short term basis, if Mumble should go down, during a time critical event/fleet/QRF, revert to using Fleet Chat, and using Fleet interface commands. Mumble service restoration will be a priority for Uni Management.
See also
Opening EVE and Mumble simultaneously, a step-by-step guide on how to create and setup a shortcut to open EVE Online and Mumble simultaneously on Windows using a batch file.

