More actions
No edit summary |
|||
| Line 1: | Line 1: | ||
This guide is intended to introduce beginners to the visual cues EVE Online has for the various modules, so that you can recognise what's being done to your ship in combat (and hopefully, how to counter it). | This guide is intended to introduce beginners to the visual cues EVE Online has for the various modules, so that you can recognise what's being done to your ship in combat (and hopefully, how to counter it). Each visual effect has an animated GIF illustrating what it looks like, however in case the animations do not load properly in your in-game browser each effect also has a link to a static picture as well. | ||
'''WARNING: picture heavy!''' | |||
<br> | <br> | ||
== Local Repairers == | == Local Repairers == | ||
=== Local Armor Repairer === | === Local Armor Repairer === | ||
An armour repairer, as the name suggests, actively repairs the ship's armour whilst the module is active. | An armour repairer, as the name suggests, actively repairs the ship's armour whilst the module is active. | ||
[[ | [[Image:Armour repair.gif]] | ||
The visibility of the armour repairer depends a lot on the ship. | The visibility of the armour repairer depends a lot on the ship. Some ships are easy to see repairing, others are not. | ||
=== Hull Repairer === | === Hull Repairer === | ||
Just as the armour repaire repairs armour, the hull repairer repairs hull damage whilst active. | Just as the armour repaire repairs armour, the hull repairer repairs hull damage whilst active. | ||
[[ | [[Image:Hull repair.gif]] | ||
You won't often see this in space, since hull tanking is daft. | You won't often see this in space, since hull tanking is daft. Whilst similar to the armour repair animation, it is greener and sharper, and the animations are faster. | ||
=== Shield Booster === | === Shield Booster === | ||
The shield booster does for shield what the two previous modules did for armour & hull. | The shield booster does for shield what the two previous modules did for armour & hull. | ||
[[Image:Shieldbooster.gif]] | [[Image:Shieldbooster.gif]] | ||
The shield booster is the easiest of these three to see. | The shield booster is the easiest of these three to see. One thing which sets this apart from the armour & hull repairers is that the animation is offset from the ship surface. | ||
For all three, here is a still picture on a different ship: [[Media:CuesLocalreppers.JPG]] | For all three, here is a still picture on a different ship: [[Media:CuesLocalreppers.JPG]] | ||
== Remote Armor Repairer, Hull Repairer and Shield Transporter == | == Remote Armor Repairer, Hull Repairer and Shield Transporter == | ||
[[Image:CuesRemote.JPG]] | [[Image:CuesRemote.JPG]] | ||
| Line 41: | Line 43: | ||
The shield transporter is seen as a blue star-burst and beam pointed at the target with a cone of blue rings moving towards the target. | The shield transporter is seen as a blue star-burst and beam pointed at the target with a cone of blue rings moving towards the target. | ||
== Nosferatu and Neutralizer == | == Nosferatu and Neutralizer == | ||
[[Image:Cuesnosnneut.JPG]] | [[Image:Cuesnosnneut.JPG]] | ||
| Line 49: | Line 51: | ||
The rightmost picture shows the Neutralizer. The blue and pink beams shift, strobe and move violently when the module is active. | The rightmost picture shows the Neutralizer. The blue and pink beams shift, strobe and move violently when the module is active. | ||
== Warp Scrambler and Webifier == | == Warp Scrambler and Webifier == | ||
[[Image:Cuesscramandweb.JPG]] | [[Image:Cuesscramandweb.JPG]] | ||
| Line 59: | Line 61: | ||
The weibifier is seen as a small and faint star-burst effect around the targeted object. | The weibifier is seen as a small and faint star-burst effect around the targeted object. | ||
== Electronic Counter Measures == | == Electronic Counter Measures == | ||
[[Image:CuesEcm.JPG]] | [[Image:CuesEcm.JPG]] | ||
| Line 71: | Line 73: | ||
The tracking disruptor, sensor dampeners and remote sensor boosters all share the same effect. A faint blue wave emanates from the user and extends towards the target. | The tracking disruptor, sensor dampeners and remote sensor boosters all share the same effect. A faint blue wave emanates from the user and extends towards the target. | ||
== Local Sensor Booster == | == Local Sensor Booster == | ||
A sensor booster increases a ship's targeting range and locking speed, making it easier to catch and pin down ships. | A sensor booster increases a ship's targeting range and locking speed, making it easier to catch and pin down ships. | ||
[[Image:Sensorbooster.gif]] | [[Image:Sensorbooster.gif]] | ||
The ship flashes and strobes white light. Picture: [[Media: | The ship flashes and strobes white light. Picture: [[Media:Local_sensor_booster.JPG]] | ||
== Notes == | == Notes == | ||
This guide has omitted some information due to its inaccessibility to the author. Please feel free to correct any mistakes, add more information or edit this list of graphical ship effects which were not included and need to be added in the future. | This guide has omitted some information due to its inaccessibility to the author. Please feel free to correct any mistakes, add more information or edit this list of graphical ship effects which were not included and need to be added in the future. | ||
Revision as of 15:13, 19 February 2011
This guide is intended to introduce beginners to the visual cues EVE Online has for the various modules, so that you can recognise what's being done to your ship in combat (and hopefully, how to counter it). Each visual effect has an animated GIF illustrating what it looks like, however in case the animations do not load properly in your in-game browser each effect also has a link to a static picture as well.
WARNING: picture heavy!
Local Repairers
Local Armor Repairer
An armour repairer, as the name suggests, actively repairs the ship's armour whilst the module is active.

The visibility of the armour repairer depends a lot on the ship. Some ships are easy to see repairing, others are not.
Hull Repairer
Just as the armour repaire repairs armour, the hull repairer repairs hull damage whilst active.

You won't often see this in space, since hull tanking is daft. Whilst similar to the armour repair animation, it is greener and sharper, and the animations are faster.
Shield Booster
The shield booster does for shield what the two previous modules did for armour & hull.

The shield booster is the easiest of these three to see. One thing which sets this apart from the armour & hull repairers is that the animation is offset from the ship surface.
For all three, here is a still picture on a different ship: Media:CuesLocalreppers.JPG
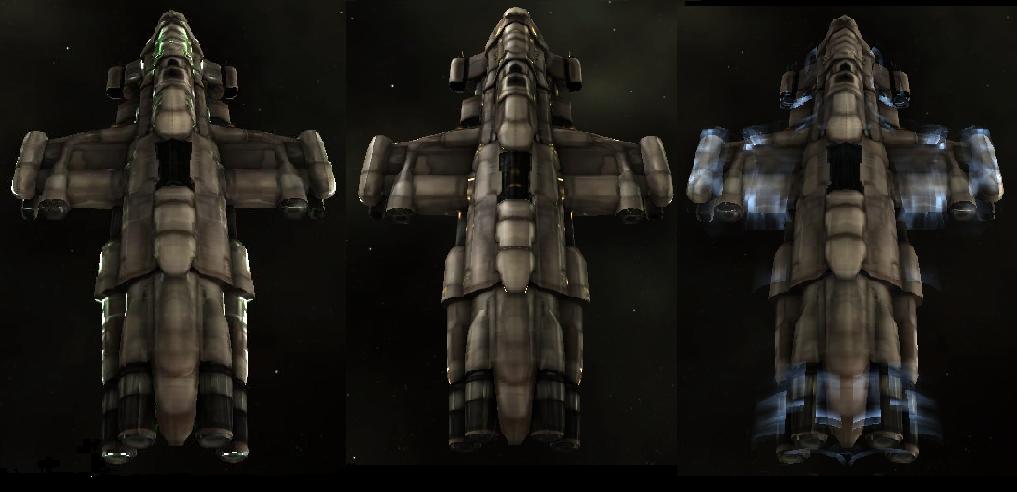
Remote Armor Repairer, Hull Repairer and Shield Transporter

These two pictures represent the cues from the remote armor/hull and shield repairers/transporters.
The first picture represents both the armor repairer and the hull repairer as the animations are the same, a green and orange cone/cyclone which extends from the ship to the target.
The shield transporter is seen as a blue star-burst and beam pointed at the target with a cone of blue rings moving towards the target.
Nosferatu and Neutralizer

The leftmost picture shows an active Nosferatu. There is a red beam pointing towards the target with a shifting and spiraling red cyclone.
The rightmost picture shows the Neutralizer. The blue and pink beams shift, strobe and move violently when the module is active.
Warp Scrambler and Webifier

This Picture illustrates the warp scrambler and the webifier in action.
The warp scrambler is seen on the left with the very faint blue cone extending from the ship towards the can.
The weibifier is seen as a small and faint star-burst effect around the targeted object.
Electronic Counter Measures

Seen here, clockwise from left, is the ECCM, target painter and tracking disruptor.
ECCM is characterized by a blue wave effect coming from the ship as if water.
Target painters are seen as bright red beams between the ship and its target.
The tracking disruptor, sensor dampeners and remote sensor boosters all share the same effect. A faint blue wave emanates from the user and extends towards the target.
Local Sensor Booster
A sensor booster increases a ship's targeting range and locking speed, making it easier to catch and pin down ships.

The ship flashes and strobes white light. Picture: Media:Local_sensor_booster.JPG
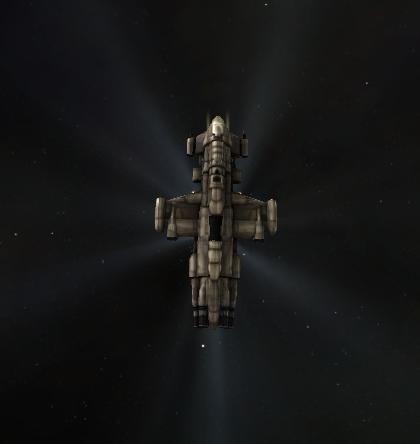
Notes
This guide has omitted some information due to its inaccessibility to the author. Please feel free to correct any mistakes, add more information or edit this list of graphical ship effects which were not included and need to be added in the future.
- Cyno field generator
- Cloaking device
- Jump portal/gate jump
- Jump bridge
- Tractor beam
- Tracking computer
- Salvager