No edit summary |
No edit summary |
||
| Line 83: | Line 83: | ||
So you've been and got blown up and experienced what it is like to die and the mass panic/excitement that you get the first few times you engage in PVP. You now know the best way of getting your POD out of harms way once your ship has been destroyed. In this section we will cover the '''very''' basic's on the aggressive side of the coin. The more detailed descriptions and explanations on all the aspects involved in PVP will be either explained later on in this guide or in a link to a wiki that already explains these finer details. | So you've been and got blown up and experienced what it is like to die and the mass panic/excitement that you get the first few times you engage in PVP. You now know the best way of getting your POD out of harms way once your ship has been destroyed. In this section we will cover the '''very''' basic's on the aggressive side of the coin. The more detailed descriptions and explanations on all the aspects involved in PVP will be either explained later on in this guide or in a link to a wiki that already explains these finer details. | ||
'''As a general rule all of your defensive modules should be active all the time with the odd exception.''' | |||
When you find a target and you have decided to engage you need to do a few things. | When you find a target and you have decided to engage you need to do a few things. | ||
#Lock It Up | #Lock It Up. | ||
#Make sure you are within range of | #Make sure you are within range of your point/scram. | ||
#Activate your offensive modules and overheat when necessary ''(This will be covered in a different section but to summarise Overheat your weapons straight away other modules as needed)'' | #Activate your offensive modules and overheat when necessary ''(This will be covered in a different section but to summarise Overheat your weapons straight away other modules as needed.)'' '''Don't Forget Your Drones.''' | ||
#Either ''Orbit'' your target or ''Manual pilot'' depending on situation (Also Covered Later) making sure you are as close to your weapons optimal range so you can apply the most damage. ([https://wiki.eveonline.com/en/wiki/Turret_damage Explanation Here]) | #Either ''Orbit'' your target or ''Manual pilot'' depending on situation (Also Covered Later) making sure you are as close to your weapons optimal range so you can apply the most damage. ([https://wiki.eveonline.com/en/wiki/Turret_damage Explanation Here.]) | ||
#Activate either your Shield Booster or Armour Repairer (Depending on fit), also overheat when necessary. | #Activate either your Shield Booster or Armour Repairer (Depending on fit) when needed, also overheat when necessary. | ||
#Cross your fingers. | |||
#Either pick up your loot from your targets wreck then warp off or remember how to use your pod saver tab. | |||
Revision as of 22:21, 26 March 2014
Player VS Player Combat
Enclosed within this page I will be trying to cover as much as I possibly can on everything related to PVP from my own experience within EVE including Tip's and Tricks i have learned along the way.
So you have either been mining, missioning, exploring and now you fancy a go at PVP. Well welcome to what hopefully will be a great read to get you started on your track to that first Kill Mail either your own or someone else's is all part of the fun. Most pilots first experience of PVP is when they accidentally jump into a low sec system and there is a nice little gate camp sitting on the other side and 1 of 2 things happen. You either get a massive adrenaline rush and start panic spamming buttons then end up staring at your corpse wondering what just happened. Or you scream as you were in a brand new shiny ship with your training implants in and throw your monitor out the window :-)
Seriously tho the people that start panic'ing and get that adrenaline rush normally once they have calmed down think that was awesome and I want to be able to do that and start looking into pvp (Well thats what happened to me any way but that was 6 years ago lol)
So where do you start...................?!!??>>>>>..............
The Initial Stepping Stone
Ok now either the above has happened to you or you're just a blood thirsty crazy person who wants to start blowing everyone up the following section is what I would recommend that you do.
First and foremost the golden rule ONLY FLY A SHIP THAT YOU CAN AFFORD TO LOSE. Like everything in life the more time, effort and Practice that you put into something the better you will become, and remember that you are going to die an awful lot in the beginning but this is the best way to learn. So a nice cheap ship with cheapish modules will save your pocket and will ultimately mean that you can spend more time dying ehm... Practicing PVP, rather than doing the horrendous task of Carebearing to make the isk so you can once again go and get blown up trying for that first Kill.
A Good couple of fits can be found [|HERE] for you to have a look at, so look at your skills determine what frigate your going to jump into low-sec with and shout "Kamakazi", fit it up appropriately and your on your way to your inevitable death he he he....
I Have This Cheap Suicidal Ship, Now what?
Great your all set up and ready to go and....................... DIE IN A GLORIOUS BALL OF FIRE! So what do you do now?
Now is about the time you're thinking of going into Rancer and showing them what you're made of, well if you do that you may as well be made out of tissue paper because you're not quite there yet my friend. We still have alot of ground to cover and some of the finer details to cover BUT!!!! That can wait for a minute or two, now get your ship, look on DOTLANfor the closest Low/Null Sec system go and get the "KAMAKAZI" feeling out of your system. Once you end up back in that Clone Vat Bay dripping with that smelly horrible gunk they store these things in. (You would think they would look after these better considering the money that they cost :-) ) We will meet back here..
Ok got that all worked out?? Feeling better now your wallet has a few more moths flying out when you go to pay for stuff on the market? Great welcome to the world of PVP, lol now lets get back to it.
Living To Fight Another Day
Pod Saver
Before we go into the details on how to PEW PEW we need to figure out how we can stay alive. I'm not talking about keeping your ship that's destined to turn into a firework, I'm talking about your capsule or POD as it is otherwise known. This is where your "POD SAVER" tab on your overview comes in. Hopefully you all have your overview set up to EVE Uni standards if not go [|Here] and get it all set up, then come back and you will know what I am trying to explain.
Once you know the game is up and your ship is going to be destroyed you want to be able to get your POD out before whom ever is attacking you gets that too (Especially if you have implants.) The best way I have found to do this is as follows.
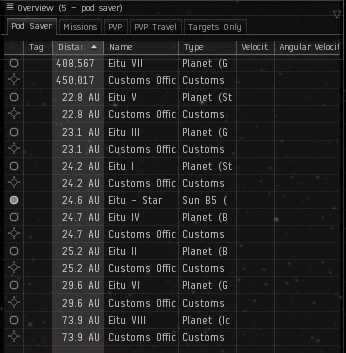
Once you know your dead, for me it's just when I'm about to go into structure on my ship. I Instantly click on my POD Saver Tab on my overview which should look similar to this.
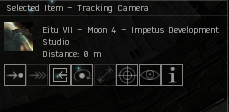
Now once you have the pod saver tab up, click on one of the planets. If you look like your already aligned to one even better. Once you have clicked on a planet on your overview it will be displayed in your selected item window (This one.)
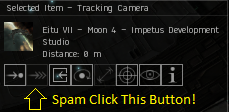
Now, spam click the WARP TO button. You should instantly warp to your chosen planet as soon as your ship gets destroyed and before anyone can even begin to lock onto your POD.
I've Warped My Pod Away But I'm Being Chased!!
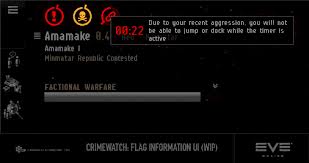
This happens so don't panic! The main thing you need to look at is the top left hand corner of your screen to see if you have an "Aggression Timer." If you have been shooting, applying a Scram, Point or a Stasis Webifier to another capsualeer you will have one of these for 60 seconds from the point in time you were last applying any form of Aggression. Below is what the timers will look like in this situation.
The First red exclamation mark is the "Capsualeer Log-Off Timer"
The Second icon is the "Suspect Timer"
The Third is the "Weapons Timer" and this is the one in this situation that we need to be aware of. A Full description of all the different timers can be found Here On Crimewatch
In this particular example, out of the original 60 seconds there is 22 seconds left on the timer. Whilst this timer is active you are unable to dock in a station or use a jump gate. If your being chased this could be a problem, as you need to get to safety as soon as you can so you do not loose your pod. So what do you do? The answer is simple you "bounce" and by this I mean warp about from celestial to safes if you have them, until the timer expires so you can dock in a station and grab yourself one of the fantastic noob ships, in order to return to your stockpile of PVP ships that you have.
Can I go Shoot Someone Now?
The Basic's on Attacking
So you've been and got blown up and experienced what it is like to die and the mass panic/excitement that you get the first few times you engage in PVP. You now know the best way of getting your POD out of harms way once your ship has been destroyed. In this section we will cover the very basic's on the aggressive side of the coin. The more detailed descriptions and explanations on all the aspects involved in PVP will be either explained later on in this guide or in a link to a wiki that already explains these finer details.
As a general rule all of your defensive modules should be active all the time with the odd exception.
When you find a target and you have decided to engage you need to do a few things.
- Lock It Up.
- Make sure you are within range of your point/scram.
- Activate your offensive modules and overheat when necessary (This will be covered in a different section but to summarise Overheat your weapons straight away other modules as needed.) Don't Forget Your Drones.
- Either Orbit your target or Manual pilot depending on situation (Also Covered Later) making sure you are as close to your weapons optimal range so you can apply the most damage. (Explanation Here.)
- Activate either your Shield Booster or Armour Repairer (Depending on fit) when needed, also overheat when necessary.
- Cross your fingers.
- Either pick up your loot from your targets wreck then warp off or remember how to use your pod saver tab.
I am still working on this page check back soon for more updates Br00ksy


