More actions
No edit summary |
|||
| Line 18: | Line 18: | ||
=== Exporting your current settings === | === Exporting your current settings === | ||
Open your ''Overview Settings'' window and go to the ''Misc'' tab. At the bottom of the tab you'll see two button, ''Import Overview Settings'' and ''Export Overview Settings''. It's '''highly recommended''' that you start by making a backup of your settings by exporting them into one file first, before making another export with another name, with the intention of using the second copy as a work-in-progress file. | Open your ''Overview Settings'' window and go to the ''Misc'' tab. At the bottom of the tab you'll see two button, ''Import Overview Settings'' and ''Export Overview Settings''. It's '''highly recommended''' that you start by making a backup of your settings by exporting them into one file first, before making another export with another name, with the intention of using the second copy as a work-in-progress file. | ||
=== Location of your overview files === | |||
The files will end up in your documents folder. In windows, this will be in your EVE-folder in "My Documents" along with screenshots, chatlots etc (not to be confused with the appdata-location where your other settings are stored). You can either maneuver to this folder or just use the '''Win + R''' command and go to '''%userprofile%\documents\EVE\Overview'''. The folder is created automatically the first time you export your settings, so normally you won't have to do that yourself. | |||
=== Editing the overview file === | |||
The overview is saved in the .yaml file format and can be edited in pretty much any kind of text-editor, like the commonly used [http://sourceforge.net/projects/notepad-plus/ Notepad++], but of course the standard notepad editor that comes comes with Windows works as well. Simply right-click the file and open it with your favourite text-editor to start editing. The majority of the changes you're likely to make (tab and label edits) will be at the very end of the file. | |||
==== File structure ==== | |||
The overview used to be stored in .xml files where you had to hide brackets, tags and other things by rewriting them as < or > for it to parse correctly by the game engine. With the new .yaml files you can write plain html-code and it'll be parsed just fine. | |||
==== Examples ==== | |||
Here are some examples of modifications. | |||
===== Tab appearance example ===== | |||
<table><tr><td align="center">''Original version''</td><td align="center">''Modified version''</td></tr><tr> | |||
<td valign="top" nowrap> | |||
<pre>tabSetup: | |||
- - 0 | |||
- - - bracket | |||
- null | |||
- - name | |||
- <b>. PvP .</b> | |||
- - overview | |||
- 1a - pvp + drones | |||
- - 1 | |||
- - - bracket | |||
- null | |||
- - name | |||
- <b>. PvP Travel .</b> | |||
- - overview | |||
- 2 - pvp travel | |||
- - 2 | |||
- - - bracket | |||
- null | |||
- - name | |||
- <b>. Situational .</b> | |||
- - overview | |||
- 3 - missioning | |||
- - 3 | |||
- - - bracket | |||
- null | |||
- - name | |||
- <b>. Fleet .</b> | |||
- - overview | |||
- 7 - fleetmates | |||
- - 4 | |||
- - - bracket | |||
- null | |||
- - name | |||
- <b>. Pod Saver .</b> | |||
- - overview | |||
- 5 - pod saver</pre></td> | |||
<td valign="top" nowrap> | |||
<pre>tabSetup: | |||
- - 0 | |||
- - - bracket | |||
- null | |||
- - name | |||
- {{co|yellow|<b>. PvP .</b>}} | |||
- - overview | |||
- 1a - pvp + drones | |||
- - 1 | |||
- - - bracket | |||
- null | |||
- - name | |||
- <b>. PvP Travel .</b> | |||
- - overview | |||
- 2 - pvp travel | |||
- - 2 | |||
- - - bracket | |||
- null | |||
- - name | |||
- <b>. Situational .</b> | |||
- - overview | |||
- 3 - missioning | |||
- - 3 | |||
- - - bracket | |||
- null | |||
- - name | |||
- <b>. Fleet .</b> | |||
- - overview | |||
- 7 - fleetmates | |||
- - 4 | |||
- - - bracket | |||
- null | |||
- - name | |||
- <b>. Pod Saver .</b> | |||
- - overview | |||
- 5 - pod saver</pre></td></tr></table> | |||
===== Ship label example ===== | |||
{| class="wikitable" | |||
! Original version | |||
! Modified version | |||
|- | |||
| valign="top" style="background-color:#222222;" | | |||
| valign="top" style="background-color:#222222;" | | |||
|} | |||
Revision as of 17:39, 1 January 2015
Overview manipulation
This page contains information on what's possible to manipulate when it comes to the overview in EVE Online as well as some examples of how to go about it. The overview is essential in showing you what's happening around you. More information about the overview in general and how to set it up according to EVE University standards can be found on the Overview Guide page.
What can you manipulate?

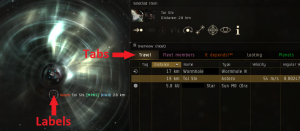
While you can make any number of changes to the overview through the .yaml file, almost all of the things that can be changed ingame is much easier and more reliable to change ingame, with the exception of changing colours, font sizes, styles etc of the tab names and the ship labels / brackets in space.
Tab appearance
The Overview Tabs settings ingame will allow you to add html-formatting, but most people prefer to edit this outside the client anyway due to the highly restrictive input fields. It's much easier to edit those values in a proper text-editor than trying to do it in a tiny little window that shows but a few letters at a time.
Ship labels / brackets in space
Whenever you select a target or hover over a bracket in space you'll get some information about the entity. By manipulating the .yaml file you can customize this to show the information in different colours, font sizes or even with personalized linebreaks etc. These changes will affect your combat notifications as well and show the parts regarding players and player owned entities appropriately formatted, which is an added bonus that leads to improved readability of onscreen combat messages. If you decide to add manual linebreaks or other formatting code, be sure to check that the onscreen combat messages are still readable.
You can only change the appearance of players and player items (like mobile depots) this way, celestials, anomalies, NPC ships etc will have their default appearance no matter what you do.
How do you go about manipulating the overview?


The easiest way to manipulate your overview is to save your current overview and then export it into your documents folder. That way you can open the overview file in a text editor and quickly view your changes ingame by saving the file and importing the new settings. That way you can easily tinker with your overview until you have it just the way you like it.
Exporting your current settings
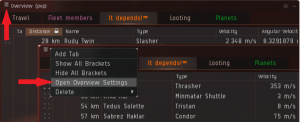
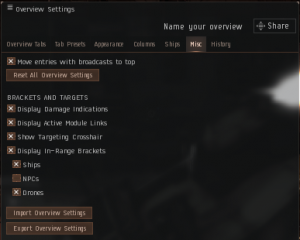
Open your Overview Settings window and go to the Misc tab. At the bottom of the tab you'll see two button, Import Overview Settings and Export Overview Settings. It's highly recommended that you start by making a backup of your settings by exporting them into one file first, before making another export with another name, with the intention of using the second copy as a work-in-progress file.
Location of your overview files
The files will end up in your documents folder. In windows, this will be in your EVE-folder in "My Documents" along with screenshots, chatlots etc (not to be confused with the appdata-location where your other settings are stored). You can either maneuver to this folder or just use the Win + R command and go to %userprofile%\documents\EVE\Overview. The folder is created automatically the first time you export your settings, so normally you won't have to do that yourself.
Editing the overview file
The overview is saved in the .yaml file format and can be edited in pretty much any kind of text-editor, like the commonly used Notepad++, but of course the standard notepad editor that comes comes with Windows works as well. Simply right-click the file and open it with your favourite text-editor to start editing. The majority of the changes you're likely to make (tab and label edits) will be at the very end of the file.
File structure
The overview used to be stored in .xml files where you had to hide brackets, tags and other things by rewriting them as < or > for it to parse correctly by the game engine. With the new .yaml files you can write plain html-code and it'll be parsed just fine.
Examples
Here are some examples of modifications.
Tab appearance example
| Original version | Modified version |
tabSetup:
- - 0
  - - - bracket
      - null
    - - name
      - <b>.  PvP  .</b>
    - - overview
      - 1a - pvp + drones
- - 1
  - - - bracket
      - null
    - - name
      - <b>.  PvP Travel  .</b>
    - - overview
      - 2 - pvp travel
- - 2
  - - - bracket
      - null
    - - name
      - <b>.  Situational  .</b>
    - - overview
      - 3 - missioning
- - 3
  - - - bracket
      - null
    - - name
      - <b>.  Fleet  .</b>
    - - overview
      - 7 - fleetmates
- - 4
  - - - bracket
      - null
    - - name
      - <b>.  Pod Saver  .</b>
    - - overview
- 5 - pod saver |
tabSetup:
- - 0
  - - - bracket
      - null
    - - name
      - {{co|yellow|<b>.  PvP  .</b>}}
    - - overview
      - 1a - pvp + drones
- - 1
  - - - bracket
      - null
    - - name
      - <b>.  PvP Travel  .</b>
    - - overview
      - 2 - pvp travel
- - 2
  - - - bracket
      - null
    - - name
      - <b>.  Situational  .</b>
    - - overview
      - 3 - missioning
- - 3
  - - - bracket
      - null
    - - name
      - <b>.  Fleet  .</b>
    - - overview
      - 7 - fleetmates
- - 4
  - - - bracket
      - null
    - - name
      - <b>.  Pod Saver  .</b>
    - - overview
- 5 - pod saver |
Ship label example
| Original version | Modified version |
|---|---|
|
|
