Difference between revisions of "Override Transfer Array"
(→Objectives: changed) |
(Adding blitz section) |
||
| Line 56: | Line 56: | ||
''Appear to spawn when Deltole hits 50-75% shield.''<br/> | ''Appear to spawn when Deltole hits 50-75% shield.''<br/> | ||
Tama Cerebellum x3 ''(warp disruption frigate)''<br/> | Tama Cerebellum x3 ''(warp disruption frigate)''<br/> | ||
| + | |||
| + | ==Blitz== | ||
| + | ===Ships to ignore:=== | ||
| + | *Mara Paleo | ||
| + | *Eystur Rhomben | ||
| + | |||
| + | ===Kill Order=== | ||
| + | *Kill Auga Hypohysises | ||
| + | *Kill Deltole Tegmentum | ||
| + | *Kill 2 of the 3 Tama Cerebellums, tag the last Tama Cerebellum and don't kill it | ||
| + | **Repeat for the next 2 waves | ||
| + | *Kill the remaining Tama Cerebellums | ||
| + | *Warp off | ||
==Hints and Tips== | ==Hints and Tips== | ||
Revision as of 07:30, 19 June 2011
Forces Required
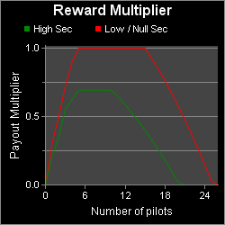
- 5 - 10 pilots
Military Intelligence
Your objective is to destroy the Sansha’s Nation fleet amassing here. They will be making use of logistics arrays, so disabling them may be advisable.
Rewards
- 15,000,000 ISK × ratio
- 2,000 CONCORD LP × ratio
Background Intelligence
One of the most significant evolutions in the Nation’s strategy has been the move away from abducting planetary populations. Their new tactical doctrine, which relies in part upon system-wide capsule interference, is clearly focused on limiting the power and influence of the capsuleer class.
The technology underlying the system-wide capsule overrides is not dissimilar to CONCORD’s own Tracking and Response System (TRS). Where it veers into new territory is in the application of new technologies designed to override local resources in ways previously thought impossible. Intelligence gathered by DED operatives strongly suggests that this facility is chiefly responsible for establishing these overrides.
Synopsis from ISHAEKA-0095. DED Special Operations. Authorized for Capsuleer dissemination.
Encounter
Override Transfer Array Encounter
Objectives
This site has smaller waves than usual due to the immense ship health regeneration speed while the Logistics Station remains active
- Hack Logistics Control Array disabling Remote Logistics Station. requires codebreaker
- Kill all defending Sansha Battleship pirates.
Pirates
Initial Wave
Eystur Rhomben x5 (frigate)(Endlessly Respawn)
Mara Paleo x1 (shield remote repair cruiser)
Auga Hypohysis x2 (web/warp disruptor cruiser)
Deltole Tegmentum x1 (target painter/warp disruptor/neut battleship)trigger
Appear to spawn when Deltole hits 50-75% shield.
Tama Cerebellum x3 (warp disruption frigate)
Second Wave
Mara Paleo x1 (shield remote repair cruiser)
Auga Hypohysis x2 (web/warp disruptor cruiser)
Deltole Tegmentum x1 (target painter/warp disruptor/neut battleship)trigger
Appear to spawn when Deltole hits 50-75% shield.
Tama Cerebellum x3 (warp disruption frigate)
Third wave
Mara Paleo x1 (shield remote repair cruiser)
Auga Hypohysis x2 (web/warp disruptor cruiser)
Deltole Tegmentum x1 (target painter/warp disruptor/neut battleship)trigger
Appear to spawn when Deltole hits 50-75% shield.
Tama Cerebellum x3 (warp disruption frigate)
Blitz
Ships to ignore:
- Mara Paleo
- Eystur Rhomben
Kill Order
- Kill Auga Hypohysises
- Kill Deltole Tegmentum
- Kill 2 of the 3 Tama Cerebellums, tag the last Tama Cerebellum and don't kill it
- Repeat for the next 2 waves
- Kill the remaining Tama Cerebellums
- Warp off
Hints and Tips
- This site can be out-dps'ed with enough fleet damage.
- If doesn't have enough fleet damage, arrays need to be hacked.
- After the array is hacked, the Station will deactivate and be covered in a white cloud until re-activated.
- There are 3 Logistics control arrays. Only 1 is active at a time.
- Arrays activate in clockwise order. Arrays are approximately 100-150km apart.
- The General tactic is to leave one Tama alive from each wave until final Deltole is killed, then kill the Tamas so the Nirajas spawn at end and do not jam during the main part of the site.
- Esyturs warp off after Deltole Tegmentum
- Mara Paleos are generally left alone, as the RR ability pales compared to the logistics tower.
- Final Deltole completes encounter.
