More actions
O'b Haru Sen (talk | contribs) m →Ships |
O'b Haru Sen (talk | contribs) mNo edit summary |
||
| Line 84: | Line 84: | ||
===Fighting Drifters=== | ===Fighting Drifters=== | ||
[[File:drifter-bb-under-attack.png|540px|thumb|right|Drifter battleship under attack by capsuleer fleet]] | |||
There are currently 3 tactics to take down Drifter battleships including their possible Circadian Seeker and sleeper support: | There are currently 3 tactics to take down Drifter battleships including their possible Circadian Seeker and sleeper support: | ||
* Capitals and a few subcapitals (e.g. Paladin, Abaddon) are able to tank the doomsday at full health. This requires a very blingy tank on the primary and a support fleet with dps and logi. | * Capitals and a few subcapitals (e.g. Paladin, Abaddon) are able to tank the doomsday at full health. This requires a very blingy tank on the primary and a support fleet with dps and logi. | ||
| Line 143: | Line 144: | ||
=== Hive Sites === | === Hive Sites === | ||
[[File: | [[File:hive.png|270px|thumb|right|Drifter Hive and support installations close to a shattered planet in a Redoubt wormhole.]] | ||
All Drifter wormholes contain a huge Drifter Hive protected by a sequence of deadspace pockets and connected via acceleration gates and warpable Rifts. The layout of these sites is slightly different in each of the 5 different Drifter wormholes, but the main rooms are the same. The entrance appears as a beacon on the overview under the name of the site, e.g. "Conflux". | All Drifter wormholes contain a huge Drifter Hive protected by a sequence of deadspace pockets and connected via acceleration gates and warpable Rifts. The layout of these sites is slightly different in each of the 5 different Drifter wormholes, but the main rooms are the same. The entrance appears as a beacon on the overview under the name of the site, e.g. "Conflux". | ||
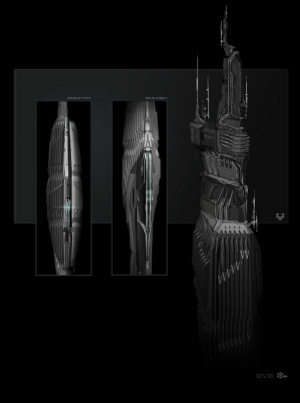
[[File:drifter-nexus-s.png|540px|thumb|right|Drifter Nexus: hundreds of huge bars with sparks flying between them. Their configuration has changed from a "sea urchin" to an S-shape since their first appearance months ago. An enormous semi-transparent blue sphere encompasses them all.]] | |||
# Entrance: Contains warp-in beacon. Warp at range is possible. The beacon is 50-80km from the acceleration gate. | # Entrance: Contains warp-in beacon. Warp at range is possible. The beacon is 50-80km from the acceleration gate. | ||
| Line 151: | Line 154: | ||
# Antechamber or Antichamber: Contains the gate to the final room, the Hive. Protected by various sleeper ships up to battleship size and webbing sleeper frigates. | # Antechamber or Antichamber: Contains the gate to the final room, the Hive. Protected by various sleeper ships up to battleship size and webbing sleeper frigates. | ||
# Hive: Contains the main hive structure. Protected by Hikanta Tyrannos (at 250-400km and aggros on warp in, moves at ~2km/s) plus sleepers up to battleship size. Contains Vault (access with index in hold to get 10 elements). Nexus Transfer gate leads to Nexus room. | # Hive: Contains the main hive structure. Protected by Hikanta Tyrannos (at 250-400km and aggros on warp in, moves at ~2km/s) plus sleepers up to battleship size. Contains Vault (access with index in hold to get 10 elements). Nexus Transfer gate leads to Nexus room. | ||
# Nexus: A giant cluster made up of hundreds of "bars" engulfed by a huge blue sphere. The shape of the bar cluster is changing over time. It started spherical like a sea urchin and currently has an s-shape. | |||
Additionally there are rooms that depend on the specific site: | Additionally there are rooms that depend on the specific site: | ||
Revision as of 20:21, 29 November 2016
Drifters
The Drifters are a mysterious new faction that appeared in New Eden in early YC117 (2015). So far all attempts at communication with them have failed. They are seen by most as invaders and after attacking the Amarr empire and killing empress Jamyl I. the Amarr empire declared war on them. The behavior, fighting tactics and capabilities of the Drifters have been changing continuously since their appearance, so be weary of any changes to the status described here.
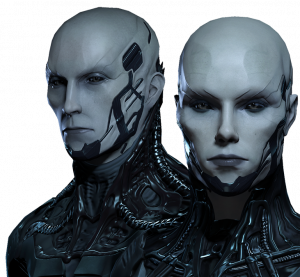
| By all appearances and indications the Drifters are members of the Jove race, albeit far removed and with a strangely altered physiology. The high degree of cybernetic modification that Drifters exhibit seems to go hand in hand with an implacable single-mindedness and utter ruthlessness while pursuing their mysterious goals. Whatever their ends may be, the technology at their command unquestionably rivals and perhaps even surpasses that which other Jove have been seen to use. |
 |
 |
 |
Drifters Faction
The Drifters faction is similar to that of other NPC organizations such as the empire and pirate factions. By default, no capsuleer has standings with them. As soon as you kill Drifter ships, you will quickly gain negative standings (12% per battleship kill). Negative standings don't seem to have any effect currently.
Evidence points to various connections of the Drifters to New Eden's factions:
- Jove observatories have been decloaking in k-space and Jove corpses are floating in the Drifter wormhole systems.
- Sleeper ships and installations also appear together with the Drifters in wormholes.
- Fleets of Sisters of Eve ships can be seen as well in those wormholes and the alpha clone technology pioneered by the SoE may be connected to the Drifters as well.
Vigilant Tyrannos (Corp)
The Drifters faction has one member corp, the Vigilant Tyrannos corporation. Their CEO is Tyrannos Strategos and so far four pilot names have been encountered: Apollo Tyrannos, Artemis Tyrannos, Hikanta Tyrannos and Arithmos Tyrannos. Hikanta is only found in Drifter wormholes, Arithmos only in C5 and C6 wormhole escalations. As the Drifters have been found to harvest capsuleer, Jove and sleeper corpses, one speculation is that all identically named Drifters are clones of each other. The name Tyrannos points to the long lost 2nd Jove Empire, which was erected and by the so called 1st Tyrant Miko Bour and later reigned by so-called Tyrants, powerful but not really tyrannical leaders.
Ships
Little is known about the Drifters' ships, but so far capsuleers have encountered the following ships:
Drifter Battleship
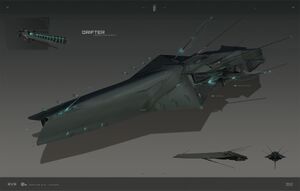
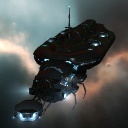
| Drifter Battleship | CONCORD's analysis of this battleship has been hampered by its advanced hull and shielding. The propulsion system is unfamiliar but tentative theories have suggested that the vessel somehow directly interacts with the fabric of space-time while moving. The standard weapon systems of this ship appear to be semi-autonomous and effective against a range of targets. DED contact briefings suggest the free floating turrets are a secondary weapon, with an extremely dangerous primary weapon held in reserve against those this ship's commander considers a significant threat. |
Encounters with these ships have revealed several unique mechanics related to them alone. One such mechanic is that of an "overshield" - an additional layer of shielding coloured blue on the targeting display. When this blue shield has been depleted, target locks on the Drifter break, in the manner of ECM. Many have also reported that the Drifters' weapons deal massive amounts of damage, difficult for any sub-capital ship to tank without a specialised fit. Even capital ships are not immune, with many carriers being lost to Drifters, many by players attempting to test their capabilities. Drifters drop blue loot and Antikythera Elements.
Drifter battleships do about 1300dps of omni damage with their Lux Kontos suspended weapon system. Additionally they may use their doomsday-like weapon that does about 750000 damage. They scram with 5 points at 500km, web up to 40km and NOS up to 40km. Their maximum speed is 3500m/s, but their orbit speed is much lower at about 235m/s. The Drifter battleships found in C5 wormhole escalations seem to be slightly different and do not fire their doomsday.
Detailed stats can be found at Drifter Battleship (chruker).
Autothysian Lancer
These appear to be cruiser sized scout drones that scan all installations and ships in New Eden. They are not hostile unless attacked.
They do about 76dps (EM/Thermal) at ranges up to 100km, have about 10kHP with high resists (73%-85% shield resists, weakest is EM). Their max speed is 1240m/s and they try to orbit at 45km with 155m/s.
Detailed stats can be found at Autothysian Lancer (Schildwall)
Circadian Sleeper
Since the Ascension expansion, Circadian Seekers only appear during the initial tutorial storyline for new players. They have only 20 HP and do minimal damage, so they can be defeated in a Corvette. Detailed stats can be found at Circadian Sleeper (Schildwall)
Fighting Drifters
There are currently 3 tactics to take down Drifter battleships including their possible Circadian Seeker and sleeper support:
- Capitals and a few subcapitals (e.g. Paladin, Abaddon) are able to tank the doomsday at full health. This requires a very blingy tank on the primary and a support fleet with dps and logi.
- A swarm of cheap high burst dps ships (with webs) will take a Drifter down easily, but loose at least one ship in the process.
- Since the doomsday weapon has tracking and signature limits it is possible to survive the doomsday in a fast close orbit. Typically logistics ships with Halo implants are used since they are typically primaried by the Drifter. A fleet of 20-30 ships (dps cruisers and logi) can take down a drifter in seconds with careful piloting and timing.
For more details on ships and tactics see Drifter Hive Doctrines : History and Evolution (pdf)
There are groups organizing public fleets to run sites in Drifter wormholes:
- The ingame channel "Consortium Operations" runs weekly NPSI fleets with a doctrine around T1 cruisers. These fleets are PvE focused and newbie-friendly. The associated roleplaying channel is "Arataka Communications Router".
- The ingame channel "What Drifters?" runs weekly NPSI fleets with a doctrine around T3 destroyers (mainly Confessor). This group is associated with Spectre Fleet and also looks for PvP.
Drifters in Known Space
Circadian Seekers seem to roam all k-space systems and are scanning all ships and stationary objects. In a large number of k-space systems huge Jove Observatories can be found. They are visible on the Overview as a beacon. These Observatories seem to have fallen into disrepair. k-space entries to Drifters wormhole systems seem to only appear in systems with a Jove Observatory. These systems are also roamed by Apollo Tyrannos and Artemis Tyrannos battleships. The battleships and seekers seem to roam the system and guard the Jove Observatories and the Unidentified Wormhole sites.
Drifters Wormhole Systems
There are 5 known Drifters wormhole systems that are similar to shattered C2 wormholes with certain system effects. Although they are named by the typical J-type designations, they are often informally named after their predominant structure: Vidette, Redoubt, Sentinel, Barbican and Conflux. Note that the first four names suggest an advanced military fortification. In each system, both the main hive site and a Sisters of Eve Flotilla appear as beacons on the overview. All Drifter wormhole systems seem to have 20 connections to known space (k-space) plus a C2-C2 static. K-space connections always appear in system with a Jove Observatory. Their k-space connections are quite different from all other wormholes however:
- On the K-space side the wormhole is marked by a beacon called "Unidentified Wormhole" and is thus visible on the default overview.
- On the wormhole side the connections carry the usual K162 designation after being opened, but are deadspaced, so you will always warp in at 80km distance.
- Drifter battleships regularly visit these connections and will attack anybody trying to approach or travel them. A cloak and/or MWD is highly recommended.
- The k-space side connections carry unique signatures that are related to the type of wormhole:
| Drifter System Name | K-space signature | J-Type | System Effect |
|---|---|---|---|
| Vidette | V928 | J164710 | Magnetar |
| Redoubt | R259 | J174618 | Wolf-Rayet |
| Sentinel | S877 | J055520 | Red Giant |
| Barbican | B735 | J110145 | Cataclysmic Variable |
| Conflux | C414 | J200727 | Pulsar |
Combat Anomalies
Each Drifter wormhole contains five unique combat anomalies. They are visited and defended by regular Drifter patrols. More detailed information is available via Drifter Hive Systems Anomalies (pdf). All listed wormholes are of the violent type and not passable.
| Vidette | Ship Graveyard | Sleeper Engineering Station | Spatial Rift | Sleeper Enclave in Coral Rock | Crystals and Stone Circle |
| Redoubt | Ship Graveyard | Caged Wormhole | Spatial Rift Generator | Sleeper Enclave | Hollow Asteroid |
| Sentinel | Monolith | Wormhole in Rock Circle | Opposing Spatial Rifts | Sleeper Enclave Debris | Crystal Resource |
| Barbican | Wrecked Ships | Unstable Wormhole | Spatial Rift | Heavily Guarded Spatial Rift | Crystals |
| Conflux | Monolith | Caged Wormhole | Rock Formation and Wormhole | Particle Acceleration Array | Guarded Asteroid Station |
Hive Sites
All Drifter wormholes contain a huge Drifter Hive protected by a sequence of deadspace pockets and connected via acceleration gates and warpable Rifts. The layout of these sites is slightly different in each of the 5 different Drifter wormholes, but the main rooms are the same. The entrance appears as a beacon on the overview under the name of the site, e.g. "Conflux".
- Entrance: Contains warp-in beacon. Warp at range is possible. The beacon is 50-80km from the acceleration gate.
- Lobby or Split: Contains two acceleration gates plus a warpable rift that leads back to the Entrance. Is protected by 5 Emergent Patrollers (sleepers). The acceleration gates lead to a number of Transfer and Access rooms whose layout depends on the specific system.
- Antechamber or Antichamber: Contains the gate to the final room, the Hive. Protected by various sleeper ships up to battleship size and webbing sleeper frigates.
- Hive: Contains the main hive structure. Protected by Hikanta Tyrannos (at 250-400km and aggros on warp in, moves at ~2km/s) plus sleepers up to battleship size. Contains Vault (access with index in hold to get 10 elements). Nexus Transfer gate leads to Nexus room.
- Nexus: A giant cluster made up of hundreds of "bars" engulfed by a huge blue sphere. The shape of the bar cluster is changing over time. It started spherical like a sea urchin and currently has an s-shape.
Additionally there are rooms that depend on the specific site:
- Access Alpha etc: Contains access units - hackable by data analyzer - named according to the gate: Alpha, Beta, etc; up to Gamma depending on specific system. Protected by sleepers.
- Transfer Alpha etc: Contains no specific installations. Protected by sleepers.
A detailed Drifter Site Overview (pdf) lists the rooms in their original state. Since then the parallel hacking that was required has been dropped.
Drifter Incursions
For a while there were also Drifter Incursions into high sec systems. Multiple Drifter battleships decimated Amarr navy task forces and some capsuleers engaged the Drifters as well.
Drifters in C5 and C6 wormholes
Arithmos Tyrannos spawns at end of capital escalations in C5 and C6 wormholes in a Drifter battleship. He needs to be pointed (3 points WC strength) to keep him from warping away and his ship contains most of the value of the escalation. Arithmos Tyrannos does not use a doomsday weapon. EVE forum post
Related links
Below are links to related pages about Drifters. The IKAME research reports are highly detailed but note their date as there may have been changes in Drifter behavior and sites since then.
- Drifter Complexes Overview (pdf)
- Analysis of Materials Salvaged from Drifter Hives (pdf)
- Historical Review of The Amarr-Drifter War (pdf)
- Drifter Hive Doctrines : History and Evolution (pdf)
- CONCORD Assembly Lowers Alert Status as Capsuleer Encounters with "Drifters" Raise Questions
- Unidentified Structures Uncloaked, Sightings of "Drifters"
- Drifters - An Overview


