More actions
Replaced CSS with template |
Replaced CSS with template, added room headers |
||
| Line 98: | Line 98: | ||
}} | }} | ||
{{MessageBox|Mission briefing | |||
|This time I'd like you to do something a little more daring. The Gallente have set up a high-tech surveillance tower inside Audesder, which has allowed them to find every single one of our spy drones in the system, greatly hindering our intelligence gathering of their forces. It will take them a while to rebuild the tower after you demolish it, giving us time to gather some intel and possibly launch a sneak attack. | |||
I'll give you the coordinates of the surveillance tower. All you have to do is fly over there and take it out. Good luck. | |||
|collapsed=yes}} | |||
This site has normal ship restrictions. | |||
[[File:The Audesder War Effort, Damaging Their Surveillance Capabilities (5 of 8) Room 1 Positions.png|thumb]] | |||
| | |||
===Room 1=== | |||
{{NPCTableHead|Room 1}} | {{NPCTableHead|Room 1}} | ||
| Line 125: | Line 117: | ||
{{NPCTableRow|Battleship|5|Republic Fleet Typhoon}} | {{NPCTableRow|Battleship|5|Republic Fleet Typhoon}} | ||
{{NPCTableRow|Battleship|4|Federation Navy Dominix}} | {{NPCTableRow|Battleship|4|Federation Navy Dominix}} | ||
|} | |} | ||
{{NPCTableHead|Structures}} | |||
{{NPCTableRow|Acceleration Gate|1|Acceleration Gate|note=Locked until all ships are destroyed}} | |||
{ | |||
| | |||
|} | |} | ||
===Room 2=== | |||
{{NPCTableHead|Room 2}} | {{NPCTableHead|Room 2}} | ||
| Line 150: | Line 131: | ||
{{NPCTableRow|Battleship|6|Federation Navy Megathron}} | {{NPCTableRow|Battleship|6|Federation Navy Megathron}} | ||
{{NPCTableRow|Battleship|6|Federation Navy Orion}} | {{NPCTableRow|Battleship|6|Federation Navy Orion}} | ||
|} | |} | ||
{{NPCTableHead|Structures}} | |||
{{NPCTableRow|Acceleration Gate|1|Acceleration Gate|note=Locked until all ships are destroyed}} | |||
|} | |||
===Room 3=== | |||
{{NPCTableHead|Room 3}} | {{NPCTableHead|Room 3}} | ||
| Line 167: | Line 145: | ||
{{NPCTableRow|Battleship|5|Federation Navy Orion}} | {{NPCTableRow|Battleship|5|Federation Navy Orion}} | ||
|} | |} | ||
Mission flagged complete after killing scanner. | |||
??????? "Scanner" was not visible on the overview screenshot. Should it be listed in the Target table, and if so, how ??????? | ??????? "Scanner" was not visible on the overview screenshot. Should it be listed in the Target table, and if so, how ??????? | ||
--> a high-tech surveillance tower <-- where is this in the overview and how to add it to the table? | --> a high-tech surveillance tower <-- where is this in the overview and how to add it to the table? | ||
{| | {{MessageBox|Mission debriefing | ||
|I'm impressed. Again you've come through. Our war effort will benefit greatly from your assistance, I'm sure. | |||
|collapsed=yes}} | |||
|} | |||
=== Recovering the Spy (6 of 8) === | === Recovering the Spy (6 of 8) === | ||
Revision as of 18:41, 7 November 2020
General Minas Iksan - The Audesder War Effort
| General Minas Iksan: |
|---|
 General Minas Iksan is an Imperial Navy Agent from the Amarr Empire. This is a Mission with 8 iterations |
The Audesder War Effort, Hand In The Voucher (1 of 8)
| Level | 4 |
| Type | Courier |
| Objective | Acquire 1x Minas's Voucher (1 m³) |
| Rewards | ~250,000-346,000 ISK + ~238,000-340,000 ISK (48min) |
| Mission briefing |
|---|
| Bring me a voucher from one of the recruiters nearby and you're in. |
Any of the recruiter agents (Fam Kishemas, Fassara Nazarut, Krard Wengalill, Nuo Tuotura, or Zama Fedas) will give you the voucher you need, given 5 training certs from the training grounds, as a reward for Proving Your Mettle.
| Mission debriefing |
|---|
| Good. Now let's get started on your assignments. |
The Audesder War Effort, The Gallente Spy Drones (2 of 8)
| Mission briefing |
|---|
| Your first assignment is to intercept a group of spy drones that the Gallente have deployed in Kenobanala. They are guarded by a few Federation Navy cruisers and an interceptor. They probably haven't figured out that we have them on our radar, so they won't be expecting you. With the element of surprise on your side, this should be an easy job. |
| Message after accepting the mission |
|---|
| I expect you back here with your ship in pristine condition |
| WD | EWAR | L
| ||
|---|---|---|---|---|
| |
4 x Frigate Federation Navy Gamma I Support Frigate | |
||
| |
3 x Frigate Gallente Spy Drone |
|||
| |
6 x Cruiser Federation Navy Thorax | |
||
| |
6 x Cruiser Federation Navy Vexor | |||
| Mission debriefing |
|---|
| Good work. Now on to you're next assignment. |
The Ammatar Traitor (3 of 8)
| Mission briefing |
|---|
| Our intelligence agency has informed us of an Ammatar traitor in our midst. Apparently he's been collaborating with the Minmatar Republic, supplying them with information and even hiring mercenaries to sabotage our operation here. I want you to locate him and take him out. Our last reports indicate that he is most likely hiding near one of the moons within Kenobanala. You will need a probe launcher to pinpoint his location. Once the job is done, return to me with something from his ship and I'll give you your reward. Dismissed. |
Find and eliminate Oggiin Kalda near one of Kenobanala's moons, Ammatar Traitor's Hideout.
| Mission debriefing |
|---|
| Nice job, with him off our backs we can rest more easily here in Fort Kumar. Now get ready for another assignment. |
Planting The Spy (4 of 8)
| Level | 4 |
| Type | Security |
| Objective | Transport 1 x Amarrian Spy (1.0 m³) to Aedald VIII - Moon 5 - Republic Military School |
| Rewards | 1M ISK + 0.6M ISK (6h) |
| Mission briefing |
|---|
| It's time to send you into the front lines, <Character>. Yes that means flying into Audesder. It will be dangerous, there's no doubt about that. But I'm sure you're prepared for those kind of risks, considering you signed up for this job in the first place.
Your first task in Audesder is in fact to fly through Audesder, to Aedald. Our intelligence agency wants to place a spy inside their base, to gather intel on their defensive positions, plans and such. It's too risky sending him straight into the Alliance Barracks, so we're going to start with dropping him off at one of their stations in Aedald, where he'll hitch a ride on one of their ships heading to the barracks in Audesder. That's all you need to know for now, <Character>. Drop him off at Aedald VIII - Moon 5 - Republic Military School, then hurry back here. Try not to be seen by the enemy, or you might compromise our agent's mission. Good luck. |
| Information |
|---|
| The route generated by current autopilot settings contains low security systems |
| Mission debriefing |
|---|
| Excellent! You're really something, <Character>. You should consider joining the Imperial Navy sometime, as a full fledged member. Kezti Sundara would be pleased. But don't leave yet, I have more work for you. |
Damaging Their Surveillance Capabilities (5 of 8)
| Mission briefing |
|---|
| This time I'd like you to do something a little more daring. The Gallente have set up a high-tech surveillance tower inside Audesder, which has allowed them to find every single one of our spy drones in the system, greatly hindering our intelligence gathering of their forces. It will take them a while to rebuild the tower after you demolish it, giving us time to gather some intel and possibly launch a sneak attack.
I'll give you the coordinates of the surveillance tower. All you have to do is fly over there and take it out. Good luck. |
This site has normal ship restrictions.
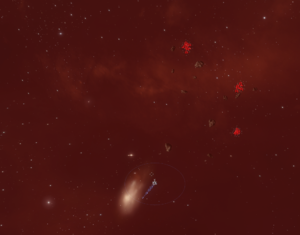
Room 1
| WD | EWAR | L
| ||
|---|---|---|---|---|
| |
1 x Acceleration Gate |
|||
Room 2
| WD | EWAR | L
| ||
|---|---|---|---|---|
| |
5 x Frigate Republic Fleet D-1 Support | |||
| |
4 x Frigate Federation Navy Officer | |||
| |
10 x Cruiser Federation Navy Thorax | |||
| |
6 x Battleship Federation Navy Megathron | |||
| |
6 x Battleship Federation Navy Orion | |||
| WD | EWAR | L
| ||
|---|---|---|---|---|
| |
1 x Acceleration Gate |
|||
Room 3
| WD | EWAR | L
| ||
|---|---|---|---|---|
| |
5 x Frigate Federation Navy Gamma | |||
| |
1 x Frigate Federation Navy Elite Soldier | |
||
| |
5 x Cruiser Federation Navy Thorax | |||
| |
5 x Battleship Federation Navy Orion | |||
Mission flagged complete after killing scanner.
??????? "Scanner" was not visible on the overview screenshot. Should it be listed in the Target table, and if so, how ??????? --> a high-tech surveillance tower <-- where is this in the overview and how to add it to the table?
| Mission debriefing |
|---|
| I'm impressed. Again you've come through. Our war effort will benefit greatly from your assistance, I'm sure. |
Recovering the Spy (6 of 8)
| Level | 4 |
| Type | Security |
| Objective | Bring 1 x Amarrian Spy (1.0 m³) to Minas Iksan's Control Tower in Kenobanala. |
| Rewards | 1 x Ocular Filter - Basic + 0.58M ISK (1h36min) |
| Mission briefing |
|---|
| It's time to retrieve the secret agent you delivered into Minmatar space earlier. He's currently located inside their main base in Audesder, called ‘Alliance Barracks'. It's filled with Gallente and Minmatar ships, and perhaps mercenaries like you as well. It will be extremely dangerous, <Character>. But if we don't get this done quickly, not only will the intelligence operation we put weeks of effort in be for nothing, our agent will also most assuredly be executed.
He will most likely be located inside one of the Minmatar bunkers. Get him out of there in one piece. Good luck. |
| Message after accepting the mission: |
|---|
| I knew I could count on you. |
Objective
Retrieve the secret agent from one of the bunkers in the Alliance Barracks within Audesder. Destroying it should not be neccessary.
As it says, located in the bunker in barracks, but the tower can also be killed for one (link site here) ??? What Site ???
| Mission debriefing |
|---|
| Very well done, <Character>. But there's more to be done! |
Striking At The Blockade (7 of 8)
| Mission briefing |
|---|
| This next mission will most likely be the hardest you've done so far. As you probably know by now, the Minmatar forces have set up a blockade at the main jump gate into Audesder, which they call the 'Minmatar Alliance Defense Brigade'. It's located not far from the stargate itself, and they are equipped with a short-range surveillance tower enabling them to detect any movement of our forces through the gate at all times. Mercenaries like you can generally get past them unhindered, but any official Amarrian strike force sent through there would have to face them or be destroyed.
To get to the point, I want to weaken the Minmatar position near the gate. The best way to do that is to take out their command post, it's destruction will hopefully send them into a disarray, giving us a hefty advantage when we launch our sneak attack. Bring me the Command Post's Bluechip as proof of your deed. Good luck. |
| Message after accepting the mission: |
|---|
| I knew I could count on you. |
| Information: |
|---|
| Go to the Minmatar Alliance Defense Brigade site to get bluechip |
| Mission debriefing |
|---|
| Great work, soldier! Now only one assignment remains, which happens to be critical to our military operation in Audesder. Get ready for the fight of your life! |
The Dreadnought Manufacturing Facility (8 of 8)
| Mission briefing |
|---|
| I hope you are, <Character>, I hope you are … As I mentioned before, this last mission is critical to our campaign. It will definitely test your mettle in battle, and I am certain that you will need backup to complete the assignment. Unfortunately I won't be sending any of my own guys with you, that would most likely compromise the mission anyway, so I do hope you have some merc friends along for the ride.
Your task is to commandeer a full scale assault on the Minmatar Dreadnought Manufacturing Facility in Audesder. It's a massive installation, funded by ORE, the Gallente Federation, the Minmatar Republic and various other allies of theirs. It allows them to quickly build their dreadnought ships and deploy them immediately, with devastating effect on the battle field. If we take it out, it will seriously cripple their war effort, for some at least until they manage to build another one. This should give us the edge we need to attain victory. You have your orders, <Character>, now make us proud. May God be with you. |
| Message after accepting the mission: |
|---|
| Now be careful out there, you hear me? |
| Information: |
|---|
| Warning
This mission is much harder than any of the previous ones. Do not attempt it without serious backup! |
| Information: |
|---|
This is a restricted area. Unauthorized incursions into this area will result in immediate destruction of your ship. You have been warned. |
| WD | EWAR | L
| ||
|---|---|---|---|---|
| |
10 x Cruiser Republic Fleet Stabber | |||
| |
5 x Battleship Republic Fleet Tempest | |||
| |
1 x Acceleration Gate to defensive Barrier | |||
| Positions: |
|---|
 |
| Positions: |
|---|
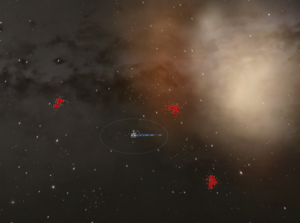 |
| Positions: |
|---|
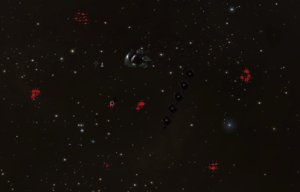 |
| Mission debriefing |
|---|
| Amazing! I'm at a loss for words ... You accomplished something even the old Amarrian war heroes would be proud of! I hope you enjoy your reward, you've most definitely earned it. God be with you, <Character>. |
