More actions
Ellis Ofsol (talk | contribs) mNo edit summary |
→Rewards: Added fleet total payout graph and adjusted layout |
||
| (30 intermediate revisions by 4 users not shown) | |||
| Line 1: | Line 1: | ||
{{Main|Homefront operation}}{{HomefrontOperationsLinks}} | {{Main|Homefront operation}}{{HomefrontOperationsLinks}} | ||
[[File: | [[File:Abyssal Artifact Recovery.jpg|thumb|left|alt=Abyssal Artifact Recovery Miner|Abyssal Artifact Recovery Miner]] | ||
This site will require proficiency in mining, drones, repair, and capacitor transfer. After an initial | This site will require proficiency in mining, drones, repair, and capacitor transfer. After an initial setup period of 90 seconds, asteroids from beyond the rift will appear and a timer will begin. The site will progress through a total of 9 waves divided into three tiers. The enemy fleet compositions will become more difficult and the wave timers become shorter with each tier. | ||
During each wave, a random Abyssal [[Abyssal Deadspace#Weather Effects|Weather]] effect will begin and 12 asteroids will spawn in fixed locations. Each asteroid contains | During each wave, a random Abyssal [[Abyssal Deadspace#Weather Effects|Weather]] effect will begin and 12 asteroids will spawn in fixed locations. Each asteroid contains 30 ore ([[Media:Admixti mutanite description.jpg|Admixti Mutanite]]), each with a mass of 4{{m3}}, for a total of 120{{m3}}. The presence of these asteroids causes an anti-warp [[Tackling#Warp disruption fields|bubble]] until all 12 are depleted. | ||
Mining the asteroids can also expose Faulty Triglavian caches containing artifacts. These caches are time-limited structures and must be destroyed quickly to recover their contents. | |||
{{Expansion past|Prior to the [https://www.eveonline.com/news/view/patch-notes-version-23-02 Version 20.2 Release 2026-03-19.1] upate, Admixti Mutanite asteroids contained 24 units or 96{{m3}} of ore.}} | |||
A wave is cleared only if all asteroids are depleted before the timer ends; otherwise, the site fails. The warp disruption bubble remains until every asteroid is mined. Each completed wave pays out based on its [[#Rewards|difficulty tier]].<gallery> | |||
File:Abyssal Artifact Recover Overview.jpg|Abyssal Artifact Recovery: Site Overview | File:Abyssal Artifact Recover Overview.jpg|Abyssal Artifact Recovery: Site Overview | ||
File:Abyssal Artifact Recovery- Faulty Triglavian Cache.png|Abyssal Artifact Recovery: Faulty Triglavian Cache | File:Abyssal Artifact Recovery- Faulty Triglavian Cache.png|Abyssal Artifact Recovery: Faulty Triglavian Cache | ||
File:Abyssal Artifact Recovery- Mining Locations.png|Abyssal Artifact Recovery: Mining Positions | File:Abyssal Artifact Recovery- Mining Locations.png|Abyssal Artifact Recovery: Mining Positions | ||
</gallery> | </gallery> | ||
== Fleet size & composition ==<!-- clearly stating 5 or 3 man optimal fleet size + roles & Ship classes applicable. Not Including any detailed ships or fits --> | |||
== Fleet size & composition == | |||
<!-- clearly stating 5 or 3 man optimal fleet size + roles & Ship classes applicable. Not Including any detailed ships or fits --> | |||
* Optimal fleet size: 5 ships | * Optimal fleet size: 5 ships | ||
* Fleet composition: T1 Cruisers (DPS), T1 Logistic Cruisers (Logi), Miners | * Fleet composition: T1 Cruisers (DPS), T1 Logistic Cruisers (Logi), Miners | ||
== Type of ships allowed ==<!-- Included to have a comprehensive page on the subject --> | == Type of ships allowed == | ||
<!-- Included to have a comprehensive page on the subject --> | |||
This homefront operation takes place in a [[Deadspace|deadspace pocket]] with an acceleration gate that has ship restrictions. | This homefront operation takes place in a [[Deadspace|deadspace pocket]] with an acceleration gate that has ship restrictions. | ||
| Line 25: | Line 30: | ||
* Tech 1 cruisers | * Tech 1 cruisers | ||
* Tech 1 haulers, including [[Squall]] | * Tech 1 haulers, including [[Squall]] | ||
* [[Venture | * [[Venture]], [[Venture Consortium Issue]] | ||
* [[Pioneer]], [[Pioneer Consortium Issue]], [[Perseverance]] | |||
{{MessageBox|Complete allowed ship list| | |||
Frigate | |||
* Astero | |||
* Atron | |||
* Bantam | |||
* Breacher | |||
* Burst | |||
* Condor | |||
* Crucifier | |||
* Cruor | |||
* Damavik | |||
* Daredevil | |||
* Dramiel | |||
* Executioner | |||
* Garmur | |||
* Griffin | |||
* Heron | |||
* Imicus | |||
* Incursus | |||
* Inquisitor | |||
* Kestrel | |||
* Magnate | |||
* Maulus | |||
* Merlin | |||
* Metamorphosis | |||
* Navitas | |||
* Probe | |||
* Punisher | |||
* Rifter | |||
* Skybreaker | |||
* Slasher | |||
* Succubus | |||
* Tormentor | |||
* Tristan | |||
* Vigil | |||
* Worm | |||
Navy Frigate | |||
* Caldari Navy Hookbill | |||
* Crucifier Navy Issue | |||
* Federation Navy Comet | |||
* Griffin Navy Issue | |||
* Heron Navy Issue | |||
* Imicus Navy Issue | |||
* Imperial Navy Slicer | |||
* Magnate Navy Issue | |||
* Maulus Navy Issue | |||
* Probe Fleet Issue | |||
* Republic Fleet Firetail | |||
* Vigil Fleet Issue | |||
Destroyer | |||
* Algos | |||
* Catalyst | |||
* Coercer | |||
* Corax | |||
* Cormorant | |||
* Dragoon | |||
* Kikimora | |||
* Mamba | |||
* Mekubal | |||
* Sunesis | |||
* Talwar | |||
* Tholos | |||
* Thrasher | |||
Navy Destroyer | |||
* Catalyst Navy Issue | |||
* Coercer Navy Issue | |||
* Cormorant Navy Issue | |||
* Thrasher Fleet Issue | |||
* Cruiser | |||
* Arbitrator | |||
* Augoror | |||
* Bellicose | |||
* Blackbird | |||
* Caracal | |||
* Celestis | |||
* Exequror | |||
* Maller | |||
* Moa | |||
* Omen | |||
* Osprey | |||
* Rupture | |||
* Scythe | |||
* Stabber | |||
* Thorax | |||
* Vexor | |||
Mining Frigate | |||
* Venture | |||
Hauler | |||
* Badger | |||
* Bestower | |||
* Epithal | |||
* Hoarder | |||
* Iteron Mark V | |||
* Kryos | |||
* Mammoth | |||
* Miasmos | |||
* Nereus | |||
* Sigil | |||
* Squall | |||
* Tayra | |||
* Wreathe | |||
ORE Hauler | |||
* Noctis | |||
Faction Mining Destroyer | |||
* Perseverance | |||
* Pioneer Consortium Issue | |||
Faction Mining Frigate | |||
* Venture Consortium Issue | |||
Mining Destroyer | |||
* Pioneer | |||
|collapsed=yes}} | |||
{{Note|You can view in-game ship restrictions for each Homefront Operation by opening the Opportunities window (ALT+J) and double-clicking on a mission.}} | |||
<gallery> | |||
File:Homefronts_ship_restrictions.png|Homefront ship restrictions example | |||
</gallery> | |||
== Mission parameters == | == Mission parameters == | ||
| Line 38: | Line 161: | ||
== Abyssal Artifact Recovery in different empires == | == Abyssal Artifact Recovery in different empires == | ||
These sites have no regional differences. | These sites have no regional differences. | ||
== Hostiles == | == Hostiles == | ||
Each wave spawns an enemy fleet belonging to one of three factions: [[Sleepers]], [[Rogue Drones]], or [[Triglavian Collective|Triglavians]]. Fleet compositions are randomized and may include logistics, capacitor neutralizers, and other forms of [[EWAR]]. Enemies persist until destroyed, so maintaining a minimum level of [[DPS]] is essential to avoid being overwhelmed. | Each wave spawns an enemy fleet belonging to one of three factions: [[Sleepers]], [[Rogue Drones]], or [[Triglavian Collective|Triglavians]]. Fleet compositions are randomized and may include logistics, capacitor neutralizers, and other forms of [[EWAR]]. Enemies persist until destroyed, so maintaining a minimum level of [[DPS]] is essential to avoid being overwhelmed. | ||
{| style="background:#350000; border:1px solid #333333; | |||
Each wave{{Verify|title=Or is it each faction?}} will focus one target and switch periodically as a group. | |||
| style="padding:8px;" |'''WARNING:''' After the 9th and final wave, a 60-second evacuation timer begins. When it ends, a Drifter response fleet led by Tyrannos Basileus will arrive in overwhelming force. No vessel can survive the Basileus battleship’s superweapon. | |||
|} | Asteroid belt rats can spawn in the room, as with other sites that involve mining. These rats are the same faction and threat as any that will spawn in the same system's asteroid belts. They will not share room targets with any of the site NPCs, and they are of little danger. They do not despawn with the site, however, so if you plan to later bring a hauler or salvager it may be good to kill them before you leave. | ||
{| class="wikitable" | {| style="background-color: #350000; border: 1px solid #333333; color: var(--color-inverted-fixed);" | ||
| [[File:Icon_warning.png|link=]] | |||
| style="padding: 8px;" |'''WARNING:''' After the 9th and final wave, a 60-second evacuation timer begins. When it ends, a Drifter response fleet led by Tyrannos Basileus will arrive in overwhelming force. No vessel can survive the Basileus battleship’s superweapon. | |||
! colspan="3" | |} | ||
<div style="display : flex; flex-wrap: wrap; gap: 1.5em;"> | |||
{| class="wikitable sortable" | |||
|- style="background-color: var(--background-color-warning-subtle);" | |||
! colspan="3" | [[File:Sleeper Cruiser.jpg|64px]] [[Sleepers]] | |||
|- style="background-color: var(--background-color-warning-subtle);" | |||
! Prefix | |||
! Info | |||
! Weakness | |||
|- | |- | ||
| | |Enervating | ||
|[[File:Icon_energy_neutralizer_i.png|16px]] Neuts | |||
|{{Damage to resist|Triglavians}} | |||
| | |- | ||
| | |Risen | ||
| | |DPS | ||
| | |{{Damage to resist|Triglavians}} | ||
| | |||
| | |||
|- | |- | ||
|Soothing | |Soothing | ||
|Logi | |Logi | ||
|{{Damage to resist|Triglavians}} | |{{Damage to resist|Triglavians}} | ||
|- | |||
|Stirring | |||
|DPS | |||
|{{Damage to resist|Triglavians}} | |||
|- | |||
|Watchful | |||
|DPS | |||
|{{Damage to resist|Triglavians}} | |||
|- | |||
|''Tyrannos Kyrios'' | |||
|[[File:Icon_energy_neutralizer_i.png|16px]] Neuts | |||
|{{Damage to resist|Triglavians}} | |||
|} | |||
{| class="wikitable sortable" | |||
|- style="background-color: var(--background-color-warning-subtle);" | |||
! colspan="3" |[[File:Logo_faction_rogue_drones.png|64px]][[Rogue Drones]] | |||
|- style="background-color: var(--background-color-warning-subtle);" | |||
! Prefix | |||
! Info | |||
! Weakness | |||
|- | |||
|Alienator | |||
|[[File:Icon_stasis_webifier_i.png|16px]] Webs | |||
|{{Damagetype|ex}} | |||
|- | |||
!Corrupted | |||
|DPS | |||
|{{Damagetype|ex}} | |||
|- | |||
|Machinist | |Machinist | ||
|Logi | |Logi | ||
|{{Damagetype|ex}} | |{{Damagetype|ex}} | ||
|- | |- | ||
| | |Proliferator | ||
| | |DPS | ||
|{{ | |{{Damagetype|ex}} | ||
| | |- | ||
| | |Vitiator | ||
|DPS | |||
|{{Damagetype|ex}} | |{{Damagetype|ex}} | ||
|} | |||
{| class="wikitable sortable" | |||
|- style="background-color: var(--background-color-warning-subtle);" | |||
! colspan="3" |[[File:Logo_faction_triglavian_collective.png|64px]][[Triglavian Collective|Triglavian]] | |||
|- style="background-color: var(--background-color-warning-subtle);" | |||
! Prefix | |||
! Info | |||
! Weakness | |||
|- | |||
|Dominant | |Dominant | ||
|DPS | |DPS | ||
|{{Damagetype|EM}} | |{{Damagetype|EM}} | ||
|- | |- | ||
|Fervent | |Fervent | ||
|DPS | |DPS | ||
|{{Damagetype|EM}} | |{{Damagetype|EM}} | ||
|- | |- | ||
| | |Fortifying | ||
| | |Logi | ||
|{{ | |{{Damagetype|EM}} | ||
| | |- | ||
|Ravenous | |Ravenous | ||
|[[File:Icon_energy_neutralizer_i.png|16x16px]] Neuts | |[[File:Icon_energy_neutralizer_i.png|16x16px]] Neuts or | ||
[[File:Icon_remote_sensor_dampening.png|16x16px]] Damps (Vedmak) | |||
|{{Damagetype|EM}} | |||
|- | |||
|Stalker | |||
|[[File:Icon_target_painter_i.png|16x16px]] Paints | |||
|{{Damagetype|EM}} | |{{Damagetype|EM}} | ||
|- | |- | ||
|Stifler | |Stifler | ||
|[[File:Icon_stasis_webifier_i.png|16x16px]] Webs | |[[File:Icon_stasis_webifier_i.png|16x16px]] Webs | ||
|{{Damagetype|EM}} | |{{Damagetype|EM}} | ||
|- | |- | ||
| | |Stoic | ||
!DPS | |||
|{{Damagetype|EM}} | |{{Damagetype|EM}} | ||
|- | |- | ||
| Line 117: | Line 275: | ||
|{{Damagetype|EM}} | |{{Damagetype|EM}} | ||
|} | |} | ||
</div> | |||
== | == Rewards == | ||
[[File:Unaligned Dekaisogen description.jpg|Unaligned Dekaisogen: Description|right|thumb]] | |||
[[File:Fluctuating Entropic Regulator.jpg|Fluctuating Entropic Regulator: Description|right|thumb]] | |||
[[File:AAR Loot- Spectral Emission Slices.png|AAR Loot: Spectral Emission Slices|right|thumb]] | |||
File: | |||
File: | |||
Each of the 5 pilots in the fleet receive a total payout of 67,500,000 ISK for completing all 9 waves. | |||
Each of the 5 pilots in the fleet receive a total payout of | |||
{| class="wikitable" style="text-align: center;" | {| class="wikitable" style="text-align: center;" | ||
|+ISK payout | |+ISK payout / wave | ||
|- style="background-color: var(--background-color-warning-subtle);" | |||
! | ! Tier | ||
! | ! Waves | ||
! | ! Threat Level | ||
! | ! Timer | ||
! Payout (ISK) | |||
|- | |- | ||
|1 | |1 | ||
| Line 144: | Line 297: | ||
| style="text-align: left;" |Minimal | | style="text-align: left;" |Minimal | ||
|3:00 | |3:00 | ||
| style="text-align: right;" |5, | | style="text-align: right;" |5,000,000 | ||
|- | |- | ||
|2 | |2 | ||
| Line 150: | Line 303: | ||
| style="text-align: left;" |Moderate | | style="text-align: left;" |Moderate | ||
|2:30 | |2:30 | ||
| style="text-align: right;" |7, | | style="text-align: right;" |7,500,000 | ||
|- | |- | ||
|3 | |3 | ||
| Line 156: | Line 309: | ||
| style="text-align: left;" |Severe | | style="text-align: left;" |Severe | ||
|2:00 | |2:00 | ||
| style="text-align: right;" | | | style="text-align: right;" |10,000,000 | ||
|} | |} | ||
<gallery> | |||
File:Abyssal Artifact Recovery Wave Payout Graph.svg|alt=Graph showing ISK Payout per Pilot per Wave vs Number of Pilots|center|thumb|500x500px|Pilot ISK Payout per Wave<ref>Some of these numbers are off by 10 ISK due to [https://eve-industry.org/export/CCP_ROUND.pdf CCP Rounding]</ref> | |||
File:Abyssal Artifact Recovery Total Payout Graph.svg|alt=Graph showing ISK Payout per Pilot per Site vs Number of Pilots|center|thumb|500x500px|Pilot ISK Payout per Site | |||
File:ISK Payout Fleet Total vs Number of Pilots (Abyssal Artifact Recovery).svg|alt=Graph showing Total Fleet ISK Payout per Site vs Number of Pilots|center|thumb|500x500px|Fleet ISK Payout per Site | |||
</gallery> | |||
Not counting any of the Triglavian Artifacts that are recovered from the caches: | |||
* Unaligned Dekaisogen: 500,000 ISK each, sold to NPC buy order | * Unaligned Dekaisogen: 500,000 ISK each, sold to NPC buy order | ||
* Fluctuating Entropic Regulator: 200,000 ISK each, sold to NPC buy order | * Fluctuating Entropic Regulator: 200,000 ISK each, sold to NPC buy order | ||
* Spectral Emission Slices | * Spectral Emission Slices | ||
Total Admixti Mutanite ore amount per site is 3240units (12960{{m3}}), with an ISK value of 16,200,000 ISK. The mutanite can only be sold to NPC buy orders. In practice, you may get more or less than this as a result of residue and crits. | |||
<gallery> | <gallery> | ||
File:Admixti mutanite description.jpg|Admixti Mutanite: Description | File:Admixti mutanite description.jpg|Admixti Mutanite: Description | ||
</gallery> | </gallery> | ||
{{Expansion past|Prior to [https://www.eveonline.com/news/view/patch-notes-version-23-02#h2-1 2026-03-19.1], Electron Spin Resonance keys dropped as loot, and ISK payout per wave per pilot was lower: | |||
* First three waves: 5,372,850 ISK | |||
* Middle three waves: 7,269,130 ISK | |||
* Final three waves: 9,165,440 ISK | |||
* Total site payout: 65,422,260 ISK}} | |||
== Footnotes == | |||
{{reflist}} | |||
== Gallery == | == Gallery == | ||
<gallery> | <gallery> | ||
File:Abyssal Artifact Recover Overview.jpg|Abyssal | File:Abyssal Artifact Recover Overview.jpg|Abyssal Artifact Recovery - Site Overview | ||
File:Abyssal Artifact Recovery- Site Overview 2.png|Abyssal Artifact Recovery | File:Abyssal Artifact Recovery- Site Overview 2.png|Abyssal Artifact Recovery - Site Overview 2 | ||
File:Abyssal Artifact Recovery- Scenic.png|Abyssal Artifact Recovery | File:Abyssal Artifact Recovery- Scenic.png|Abyssal Artifact Recovery - Scenic | ||
</gallery> | </gallery> | ||
[[Category:Homefront Operations]] | [[Category:Homefront Operations]] | ||
Latest revision as of 10:50, 21 March 2026
- Main article: Homefront operation

|
| Homefront Operations |
|---|
|
|
| Universal Sites |

This site will require proficiency in mining, drones, repair, and capacitor transfer. After an initial setup period of 90 seconds, asteroids from beyond the rift will appear and a timer will begin. The site will progress through a total of 9 waves divided into three tiers. The enemy fleet compositions will become more difficult and the wave timers become shorter with each tier.
During each wave, a random Abyssal Weather effect will begin and 12 asteroids will spawn in fixed locations. Each asteroid contains 30 ore (Admixti Mutanite), each with a mass of 4 m3, for a total of 120 m3. The presence of these asteroids causes an anti-warp bubble until all 12 are depleted.
Mining the asteroids can also expose Faulty Triglavian caches containing artifacts. These caches are time-limited structures and must be destroyed quickly to recover their contents.
| A long, long time ago... |
|---|
| Prior to the Version 20.2 Release 2026-03-19.1 upate, Admixti Mutanite asteroids contained 24 units or 96 m3 of ore. |
A wave is cleared only if all asteroids are depleted before the timer ends; otherwise, the site fails. The warp disruption bubble remains until every asteroid is mined. Each completed wave pays out based on its difficulty tier.
-
 Abyssal Artifact Recovery: Site Overview
 -
 Abyssal Artifact Recovery: Faulty Triglavian Cache
 -
 Abyssal Artifact Recovery: Mining Positions


Fleet size & composition
- Optimal fleet size: 5 ships
- Fleet composition: T1 Cruisers (DPS), T1 Logistic Cruisers (Logi), Miners
Type of ships allowed
This homefront operation takes place in a deadspace pocket with an acceleration gate that has ship restrictions.
- Tech 1 frigates, navy and pirate frigates
- Tech 1 destroyers, navy and pirate destroyers
- Tech 1 cruisers
- Tech 1 haulers, including Squall
- Venture, Venture Consortium Issue
- Pioneer, Pioneer Consortium Issue, Perseverance
| Complete allowed ship list |
|---|
|
Frigate
Navy Frigate
Destroyer
Navy Destroyer
Mining Frigate
Hauler
ORE Hauler
Faction Mining Destroyer
Faction Mining Frigate
Mining Destroyer
|
| You can view in-game ship restrictions for each Homefront Operation by opening the Opportunities window (ALT+J) and double-clicking on a mission. |
-
 Homefront ship restrictions example

Mission parameters
- Threat Level: Minimal / Moderate / Severe
- Current wave (9)
- Asteroids Depleted (12)
- Mining Timer
- Intermission Timer
-
 Abyssal Artifact Recovery: Mission Parameters

Abyssal Artifact Recovery in different empires
These sites have no regional differences.
Hostiles
Each wave spawns an enemy fleet belonging to one of three factions: Sleepers, Rogue Drones, or Triglavians. Fleet compositions are randomized and may include logistics, capacitor neutralizers, and other forms of EWAR. Enemies persist until destroyed, so maintaining a minimum level of DPS is essential to avoid being overwhelmed.
Each wave[Verify] will focus one target and switch periodically as a group.
Asteroid belt rats can spawn in the room, as with other sites that involve mining. These rats are the same faction and threat as any that will spawn in the same system's asteroid belts. They will not share room targets with any of the site NPCs, and they are of little danger. They do not despawn with the site, however, so if you plan to later bring a hauler or salvager it may be good to kill them before you leave.
| WARNING: After the 9th and final wave, a 60-second evacuation timer begins. When it ends, a Drifter response fleet led by Tyrannos Basileus will arrive in overwhelming force. No vessel can survive the Basileus battleship’s superweapon. |
 Sleepers Sleepers
| ||
|---|---|---|
| Prefix | Info | Weakness |
| Enervating | ||
| Risen | DPS | |
| Soothing | Logi | |
| Stirring | DPS | |
| Watchful | DPS | |
| Tyrannos Kyrios | ||
 Rogue Drones Rogue Drones
| ||
|---|---|---|
| Prefix | Info | Weakness |
| Alienator | ||
| Corrupted | DPS | |
| Machinist | Logi | |
| Proliferator | DPS | |
| Vitiator | DPS | |
 Triglavian Triglavian
| ||
|---|---|---|
| Prefix | Info | Weakness |
| Dominant | DPS | |
| Fervent | DPS | |
| Fortifying | Logi | |
| Ravenous |
|
|
| Stalker | ||
| Stifler | ||
| Stoic | DPS | |
| Umbral | ||
Rewards


Each of the 5 pilots in the fleet receive a total payout of 67,500,000 ISK for completing all 9 waves.
| Tier | Waves | Threat Level | Timer | Payout (ISK) |
|---|---|---|---|---|
| 1 | 3 | Minimal | 3:00 | 5,000,000 |
| 2 | 3 | Moderate | 2:30 | 7,500,000 |
| 3 | 3 | Severe | 2:00 | 10,000,000 |
-
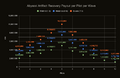 Pilot ISK Payout per Wave[1]
 -
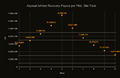 Pilot ISK Payout per Site
 -
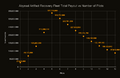 Fleet ISK Payout per Site


.svg)
Not counting any of the Triglavian Artifacts that are recovered from the caches:
- Unaligned Dekaisogen: 500,000 ISK each, sold to NPC buy order
- Fluctuating Entropic Regulator: 200,000 ISK each, sold to NPC buy order
- Spectral Emission Slices
Total Admixti Mutanite ore amount per site is 3240units (12960 m3), with an ISK value of 16,200,000 ISK. The mutanite can only be sold to NPC buy orders. In practice, you may get more or less than this as a result of residue and crits.
-
 Admixti Mutanite: Description

| A long, long time ago... |
|---|
Prior to 2026-03-19.1, Electron Spin Resonance keys dropped as loot, and ISK payout per wave per pilot was lower:
|
Footnotes
- ^ Some of these numbers are off by 10 ISK due to CCP Rounding
Gallery
-
Abyssal Artifact Recovery - Site Overview
-
 Abyssal Artifact Recovery - Site Overview 2
 -
 Abyssal Artifact Recovery - Scenic

