More actions
Making pages for Amarr epic arc chapters |
No edit summary |
||
| Line 44: | Line 44: | ||
.wikitable.NPC .mw-collapsible-toggle {position: absolute; left: 10px; } | .wikitable.NPC .mw-collapsible-toggle {position: absolute; left: 10px; } | ||
}} | }} | ||
{{main|Amarr Epic Arc - Right to Rule}} | |||
This chapter takes place in the Nimedaz constellation. Remember that most missions can be completed - and the next accepted - remotely, minimizing travel time. | This chapter takes place in the Nimedaz constellation. Remember that most missions can be completed - and the next accepted - remotely, minimizing travel time. | ||
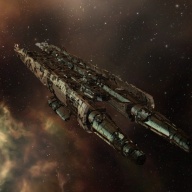
==Mission 1 - Late Reports== | ==Mission 1 - Late Reports== | ||
[[Image:Amarr_epic_02.jpg|thumb|right|192px]] | |||
'''Type:''' Encounter (Sansha's Nation) | |||
'''Summary:''' Destroy all enemy ships and loot 1 Reports (0.1 m3). | |||
'''Tips:''' | |||
*No aggro on warp-in. | |||
*Consider destroying a frigate last so that the Reports drop close to you. | |||
The last ship destroyed in each group will trigger a new wave. | |||
{{NPCTableHead|Initial Group}} | |||
{{NPCTableRow|Elite Frigate|3|Centii Loyal Ravener/Scavenger|point=yes|ewar={{icon|web|24|Stasis webifier}}}} | |||
{{NPCTableRow|Battleship|4|Centus Mutant Lord/Savage Lord}} | |||
|} | |||
{{NPCTableHead|Wave 1}} | |||
{{NPCTableRow|Elite Cruiser|4|Centum Loyal Beast/Juggernaut/Slaughterer/Execrator|ewar={{icon|td|24|Tracking disruption}}}} | |||
{{NPCTableRow|Battleship|4|Centus Beast Lord/Plague Lord|ewar={{icon|td|24|Tracking disrupion}}}} | |||
|} | |||
{{NPCTableHead|Wave 2}} | |||
{{NPCTableRow|Elite Frigate|4|Centii Loyal Manslayer/Plague/Enslaver/Butcher|point=yes|ewar={{icon|web|24|Stasis webifier}}}} | |||
{{NPCTableRow|Battleship|4|Centus Dark Lord/Overlord}} | |||
|} | |||
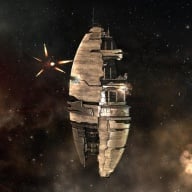
==Mission 2 - The Outclassed Outpost== | ==Mission 2 - The Outclassed Outpost== | ||
[[Image:Amarr_epic_03.jpg|thumb|right|192px]] | |||
'''Type:''' Encounter (Sansha's Nation) | |||
'''Summary:''' Destroy all enemy ships. | |||
The last ship destroyed in each group will trigger a new wave. | |||
{{NPCTableHead|Initial Group}} | |||
{{NPCTableRow|Elite Frigate|4|Centii Loyal Savage/Slavehunter|ewar={{icon|td|24|Tracking disruption}}}} | |||
{{NPCTableRow|Battleship|3|Centus Plague Lord|ewar={{icon|td|24|Tracking disruption}}}} | |||
|} | |||
{{NPCTableHead|Wave 1}} | |||
{{NPCTableRow|Elite Frigate|3|Centii Loyal Servant|point=yes|ewar={{icon|web|24|Stasis webifier}}}} | |||
{{NPCTableRow|Battleship|4|Centus Beast Lord/Plague Lord|ewar{{icon|td|24|Tracking disruption}}}} | |||
|} | |||
{{NPCTableHead|Wave 2}} | |||
{{NPCTableRow|Elite Frigate|3|Centii Loyal Butcher/Plague/Enslaver|point=yes|ewar={{icon|web|24|Stasis webifier}}}} | |||
{{NPCTableRow|Battleship|3|Centus Dark Lord/Overlord}} | |||
|} | |||
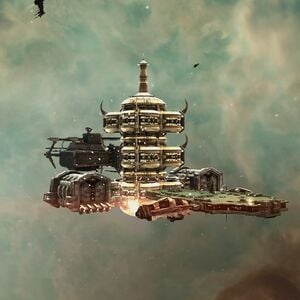
==Mission 3 - Raging Sansha== | ==Mission 3 - Raging Sansha== | ||
[[Image:Amarr_epic_04.jpg|thumb|right]] | |||
'''Type:''' Encounter (Sansha's Nation) | |||
'''Summary:''' Destroy all enemy ships. | |||
'''Tips:''' | |||
*Initial aggro can be as low as a single frigate. | |||
*To minimize incoming damage during this mission, prioritize cruisers, then battleships (but ignore the commander), and leave frigates for last. | |||
*Last ship destroyed in Wave 4 completes the mission objective. | |||
{{NPCTableHead|Initial Group}} | |||
{{NPCTableRow|Elite Frigate|4|Centii Loyal Savage/Manslayer/Slavehunter|ewar={{icon|td|24|Tracking disruption}}}} | |||
{{NPCTableRow|Cruiser|3|Centum Beast/Juggernaut|ewar={{icon|td|24|Tracking disruption}}|trigger=Destroying last cruiser in initial group triggers Wave 2}} | |||
{{NPCTableRow|Elite Cruiser|2|Centum Loyal Mutilator/Fiend}} | |||
{{NPCTableRow|Battlecruiser|4|Centatis Daemon/Wraith/Phantasm}} | |||
{{NPCTableRow|Battleship|5|Centus Dread Lord/Dark Lord/Overlord}} | |||
{{NPCTableRow|Battleship|1|Sansha Commander|trigger=When attacked, triggers Wave 1 then warps out}} | |||
|} | |||
{{NPCTableHead|Wave 1}} | |||
{{NPCTableRow|Battlecruiser|3|Centatis Specter}} | |||
|} | |||
{{NPCTableHead|Wave 2}} | |||
{{NPCTableRow|Elite Frigate|5|Centii Loyal Servant/Butcher/Enslaver|ewar={{icon|web|24|Stasis webifier}}|trigger=Triggers Wave 3 when destroyed}} | |||
{{NPCTableRow|Elite Cruiser|2|Centum Loyal Execrator/Slaughterer|ewar={{icon|td|24|Tracking disruption}}}} | |||
|} | |||
{{NPCTableHead|Wave 3}} | |||
{{NPCTableRow|Cruiser|1|Centum Torturer|trigger=Triggers Wave 4 when destroyed}} | |||
|} | |||
{{NPCTableHead|Wave 4}} | |||
{{NPCTableRow|Elite Frigate|1|Centii Loyal Manslayer/Enslaver}} | |||
{{NPCTableRow|Elite Cruiser|2|Centum Loyal Torturer/Slaughterer/Hellhound|ewar={{icon|td|24|Tracking disruption}}}} | |||
{{NPCTableRow|Battleship|1|Centus Plague Lord|ewar={{icon|td|24|Tracking disruption}}}} | |||
|} | |||
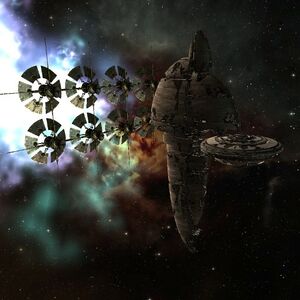
==Mission 4 - Cowardly Commander== | ==Mission 4 - Cowardly Commander== | ||
[[Image:Amarr_epic_05.jpg|thumb|right]] | |||
'''Type:''' Encounter (Sansha's Nation, Amarr Empire) | |||
'''Summary:''' Destroy all enemy ships. | |||
'''Tips:''' | |||
* Be prepared for very heavy dps and large amounts of EWAR | |||
* Make sure to prioritize targets (destroy EWAR ships first) | |||
** Energy neutralizer towers are always primary targets | |||
===Acceleration Gate Entrance=== | |||
Destroying the last ship in the Initial Group will trigger Wave 1. | |||
{{NPCTableHead|Initial Group}} | |||
{{NPCTableRow|Elite Frigate|3|Centii Loyal Minion/Scavenger|ewar={{icon|web|24|Stasis webifier}}}} | |||
{{NPCTableRow|Battleship|4|Centus Plague Lord/Beast Lord|ewar={{icon|td|24|Tracking disruption}}}} | |||
{{NPCTableRow|Sentry|2|Sansha Sentry III|note=250 km range}} | |||
|} | |||
{{NPCTableHead|Wave 1}} | |||
{{NPCTableRow|Elite Frigate|4|Centii Loyal Butcher/Manslayer/Follower|ewar={{icon|web|24|Stasis webifier}}}} | |||
{{NPCTableRow|Battleship|Centus Dark Lord/Overlord}} | |||
|} | |||
{{StructureTable| | |||
{{StructureTableRow|Accl Gate|1|Acceleration Gate|note=Leads to Room 1}} | |||
}} | |||
===Room 1=== | |||
---- | |||
Destroying the last ship in the Initial Group will trigger Wave 1. | |||
{{NPCTableHead|Initial Group}} | |||
{{NPCTableRow|Elite Frigate|4|Centii Loyal Slavehunter/Savage|ewar={{icon|td|24|Tracking disruption}}}} | |||
{{NPCTableRow|Battleship|4|Centus Dark Lord/Overlord}} | |||
{{NPCTableRow|Sentry|2|Sansha Energy Neutralizer I|ewar={{icon|neut|24|Energy neutralizer - 250km range}}}} | |||
{{NPCTableRow|Sentry|2|Sansha Sentry III|note=250 km range}} | |||
|} | |||
{{NPCTableHead|Wave 1}} | |||
{{NPCTableRow|Battlecruiser|3|Centatis Daemon/Devil}} | |||
{{NPCTableRow|Battleship|4|Centus Beast Lord/Plague Lord|ewar={{icon|td|24|Tracking disruption}}}} | |||
|} | |||
{{StructureTable| | |||
{{StructureTableRow|Accl Gate|1|Acceleration Gate|note=Gate is not locked}} | |||
}} | |||
===Room 2=== | |||
---- | |||
{{NPCTableHead|Initial Group}} | |||
{{NPCTableRow|Elite Frigate|3|Centii Loyal Ravener|point=yes|ewar={{icon|web|24|Stasis webifier}}}} | |||
{{NPCTableRow|Elite Cruiser|4|Centum Loyal Torturer/Hellhound/Mutilator|trigger=Last elite cruiser destroyed triggers Wave 1}} | |||
{{NPCTableRow|Battlecruiser|4|Centatis Daemon/Behemoth|trigger=Last battlecruiser destroyed triggers Wave 2}} | |||
{{NPCTableRow|Battleship|4|Centus Plague Lord/Beast Lord|ewar={{icon|td|24|Tracking disruption}}}} | |||
{{NPCTableRow|Sentry|1|Sansha Energy Neutralizer I|ewar={{icon|neut|24|Energy neutralizer - 250km range}}}} | |||
{{NPCTableRow|Sentry|2|Sansha Sentry III|note=250km range}} | |||
|} | |||
{{NPCTableHead|Wave 1}} | |||
{{NPCTableRow|Elite Frigate|3|Centii Loyal Scavenger/Ravener|ewar={{icon|web|24|Stasis webifier}}}} | |||
{{NPCTableRow|Battleship|3|Centus Dread Lord/Tyrant}} | |||
|} | |||
{{NPCTableHead|Wave 2}} | |||
{{NPCTableRow|Elite Frigate|4|Centii Loyal Butcher/Plague/Manslayer}} | |||
{{NPCTableRow|Battleship|Centus Dark Lord/Overlord}} | |||
|} | |||
{{StructureTable| | |||
{{StructureTableRow|Accl Gate|1|Accleration Gate|note=Gate is not locked}} | |||
}} | |||
===Room 3=== | |||
---- | |||
No standing loss for destroying Amarr ships in Room 3. | |||
{{NPCTableHead|Initial Group}} | |||
{{NPCTableRow|Elite Frigate|2|Divine Imperial Imran|point=yes|ewar={{icon|web|24|Stasis webifier}}}} | |||
{{NPCTableRow|Cruiser|3|Imperial Templar Tamir/Donus}} | |||
{{NPCTableRow|Battleship|3|Imperial Martyr/Dominator|ewar={{icon|neut|24|Energy neutralizer - 10km range}}|trigger=Last battleship destroyed triggers Wave 1}} | |||
|} | |||
{{NPCTableHead|Wave 1}} | |||
{{NPCTableRow|Elite Frigate|3|Divine Imperial Valok/Paladin}} | |||
{{NPCTableRow|Elite Cruiser|3|Divine Imperial Tamir|ewar={{icon|td|24|Tracking disruption}}|ewar2={{icon|neut|24|Energy neutralizer - 10km range}}}} | |||
{{NPCTableRow|Battlecruiser|2|Imperial Champion/Templar Justicar}} | |||
{{NPCTableRow|Battleship|4|Imperial Templar Ultara/Dominator|trigger=Last ship destroyed triggers Wave 2}} | |||
{{NPCTableRow|Battleship|3|Imperial Martyr/Ultara/Templar Torah|ewar={{icon|neut|24|Energy neutralizer - 10km range}}}} | |||
|} | |||
{{NPCTableHead|Wave 2}} | |||
{{NPCTableRow|Destroyer|3|Imperial Templar Caius}} | |||
{{NPCTableRow|Battlecruiser|2|Imperial Templar Phalanx}} | |||
{{NPCTableRow|Battleship|2|Imperial Templar Martyr}} | |||
|} | |||
Last ship destroyed in Wave 2 completes the mission objective. | |||
[[Category:Missions]] | |||
[[Category:Epic Arcs]] | |||
Revision as of 17:05, 15 July 2017
- Main article: Amarr Epic Arc - Right to Rule
This chapter takes place in the Nimedaz constellation. Remember that most missions can be completed - and the next accepted - remotely, minimizing travel time.
Mission 1 - Late Reports

Type: Encounter (Sansha's Nation)
Summary: Destroy all enemy ships and loot 1 Reports (0.1 m3).
Tips:
- No aggro on warp-in.
- Consider destroying a frigate last so that the Reports drop close to you.
The last ship destroyed in each group will trigger a new wave.
| WD | EWAR | L
| ||
|---|---|---|---|---|
| |
3 x Elite Frigate Centii Loyal Ravener/Scavenger | |
|
|
| |
4 x Battleship Centus Mutant Lord/Savage Lord | |||
| WD | EWAR | L
| ||
|---|---|---|---|---|
| |
4 x Elite Cruiser Centum Loyal Beast/Juggernaut/Slaughterer/Execrator | |
||
| |
4 x Battleship Centus Beast Lord/Plague Lord | |
||
| WD | EWAR | L
| ||
|---|---|---|---|---|
| |
4 x Elite Frigate Centii Loyal Manslayer/Plague/Enslaver/Butcher | |
|
|
| |
4 x Battleship Centus Dark Lord/Overlord | |||
Mission 2 - The Outclassed Outpost

Type: Encounter (Sansha's Nation)
Summary: Destroy all enemy ships.
The last ship destroyed in each group will trigger a new wave.
| WD | EWAR | L
| ||
|---|---|---|---|---|
| |
4 x Elite Frigate Centii Loyal Savage/Slavehunter | |
||
| |
3 x Battleship Centus Plague Lord | |
||
| WD | EWAR | L
| ||
|---|---|---|---|---|
| |
3 x Elite Frigate Centii Loyal Servant | |
|
|
| |
4 x Battleship Centus Beast Lord/Plague Lord | |||
| WD | EWAR | L
| ||
|---|---|---|---|---|
| |
3 x Elite Frigate Centii Loyal Butcher/Plague/Enslaver | |
|
|
| |
3 x Battleship Centus Dark Lord/Overlord | |||
Mission 3 - Raging Sansha

Type: Encounter (Sansha's Nation)
Summary: Destroy all enemy ships.
Tips:
- Initial aggro can be as low as a single frigate.
- To minimize incoming damage during this mission, prioritize cruisers, then battleships (but ignore the commander), and leave frigates for last.
- Last ship destroyed in Wave 4 completes the mission objective.
| WD | EWAR | L
| ||
|---|---|---|---|---|
| |
3 x Battlecruiser Centatis Specter | |||
| WD | EWAR | L
| ||
|---|---|---|---|---|
| |
5 x Elite Frigate Centii Loyal Servant/Butcher/Enslaver |
|
||
| |
2 x Elite Cruiser Centum Loyal Execrator/Slaughterer | |
||
| WD | EWAR | L
| ||
|---|---|---|---|---|
| |
1 x Cruiser Centum Torturer |
|||
| WD | EWAR | L
| ||
|---|---|---|---|---|
| |
1 x Elite Frigate Centii Loyal Manslayer/Enslaver | |||
| |
2 x Elite Cruiser Centum Loyal Torturer/Slaughterer/Hellhound | |
||
| |
1 x Battleship Centus Plague Lord | |
||
Mission 4 - Cowardly Commander

Type: Encounter (Sansha's Nation, Amarr Empire)
Summary: Destroy all enemy ships.
Tips:
- Be prepared for very heavy dps and large amounts of EWAR
- Make sure to prioritize targets (destroy EWAR ships first)
- Energy neutralizer towers are always primary targets
Acceleration Gate Entrance
Destroying the last ship in the Initial Group will trigger Wave 1.
| WD | EWAR | L
| ||
|---|---|---|---|---|
| |
3 x Elite Frigate Centii Loyal Minion/Scavenger | |
||
| |
4 x Battleship Centus Plague Lord/Beast Lord | |
||
| |
2 x Sentry Sansha Sentry III |
|||
| WD | EWAR | L
| ||
|---|---|---|---|---|
| |
4 x Elite Frigate Centii Loyal Butcher/Manslayer/Follower | |
||
| |
Centus Dark Lord/Overlord x Battleship | |||
Room 1
Destroying the last ship in the Initial Group will trigger Wave 1.
| WD | EWAR | L
| ||
|---|---|---|---|---|
| |
4 x Elite Frigate Centii Loyal Slavehunter/Savage | |
||
| |
4 x Battleship Centus Dark Lord/Overlord | |||
| |
2 x Sentry Sansha Energy Neutralizer I | |
||
| |
2 x Sentry Sansha Sentry III |
|||
| WD | EWAR | L
| ||
|---|---|---|---|---|
| |
3 x Battlecruiser Centatis Daemon/Devil | |||
| |
4 x Battleship Centus Beast Lord/Plague Lord | |
||
Room 2
| WD | EWAR | L
| ||
|---|---|---|---|---|
| |
3 x Elite Frigate Centii Loyal Scavenger/Ravener | |
||
| |
3 x Battleship Centus Dread Lord/Tyrant | |||
| WD | EWAR | L
| ||
|---|---|---|---|---|
| |
4 x Elite Frigate Centii Loyal Butcher/Plague/Manslayer | |||
| |
Centus Dark Lord/Overlord x Battleship | |||
Room 3
No standing loss for destroying Amarr ships in Room 3.
| WD | EWAR | L
| ||
|---|---|---|---|---|
| |
2 x Elite Frigate Divine Imperial Imran | |
|
|
| |
3 x Cruiser Imperial Templar Tamir/Donus | |||
| |
3 x Battleship Imperial Martyr/Dominator |
|
||
| WD | EWAR | L
| ||
|---|---|---|---|---|
| |
3 x Destroyer Imperial Templar Caius | |||
| |
2 x Battlecruiser Imperial Templar Phalanx | |||
| |
2 x Battleship Imperial Templar Martyr | |||
Last ship destroyed in Wave 2 completes the mission objective.
