More actions
Salartarium (talk | contribs) m mistypes |
|||
| Line 4: | Line 4: | ||
------------------------------------------------------------- | ------------------------------------------------------------- | ||
* on editing the attributes, please make sure that you don't | * on editing the attributes, please make sure that you don't | ||
* leave/ | * leave/mistype any tags required. please follow the same | ||
* format below and edit only the values (after the = sign). | * format below and edit only the values (after the = sign). | ||
-------------------------------------------------------------> | -------------------------------------------------------------> | ||
| Line 106: | Line 106: | ||
==Summary== | ==Summary== | ||
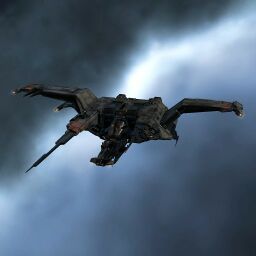
The '''Golem''' is the Caldari [[Marauders|Marauder]]. It is a heavily modified Raven hull that makes use of a [[Bastion Module]] in order to greatly increase its combat performance. It makes great use of Torpedoes or Cruise missiles in conjunction with the bonus to Target Painters, either weapon system is viable however the schools of thought are very competitive. | The '''Golem''' is the Caldari [[Marauders|Marauder]]. It is a heavily modified Raven hull that makes use of a [[Bastion Module]] in order to greatly increase its combat performance. It makes great use of Torpedoes or Cruise missiles in conjunction with the bonus to Target Painters, either weapon system is viable however the schools of thought are very competitive. However, they can both agree that this Marauder is an active shield tanked battleship and is ''very'' effective in level 4 mission running. | ||
Until recently, the Golem was a red-headed | Until recently, the Golem was a red-headed stepchild of the other Marauders, capsuleers often favoring the Vargur or the pirate battleship Machariel. Luckily with Rubicon and the changes to Target Painter cycle times, as well as the Marauders' new bonus to micro jump drives, the Golem has become a more popular choice than in the past. | ||
==Skills== | ==Skills== | ||
| Line 120: | Line 120: | ||
* {{Sk|Shield Upgrades}} should be trained to IV to allow the use of T2 [[Shield Tanking#Shield Hardeners|Shield Hardeners]], [[Shield Tanking#Dampening Amplifiers and Basic Dampening Amplifiers|Resistance Amplifiers]], [[Shield Tanking#Shield Boosters|Shield Boosters]], [[Shield Tanking#Shield Power_Relays|Shield Power Relays]], [[Shield Tanking#Shield Extenders|Shield Extenders]] and [[Shield Tanking#Shield Rechargers|Shield Rechargers]]. | * {{Sk|Shield Upgrades}} should be trained to IV to allow the use of T2 [[Shield Tanking#Shield Hardeners|Shield Hardeners]], [[Shield Tanking#Dampening Amplifiers and Basic Dampening Amplifiers|Resistance Amplifiers]], [[Shield Tanking#Shield Boosters|Shield Boosters]], [[Shield Tanking#Shield Power_Relays|Shield Power Relays]], [[Shield Tanking#Shield Extenders|Shield Extenders]] and [[Shield Tanking#Shield Rechargers|Shield Rechargers]]. | ||
*' {{Sk|Electronic Warfare}} should be trained to level III to allow training of {{Sk|Long Distance Jamming}} which increases the optimal range of target painters by 10% per level. | *' {{Sk|Electronic Warfare}} should be trained to level III to allow training of {{Sk|Long Distance Jamming}} which increases the optimal range of target painters by 10% per level. | ||
* Finally, {{Sk|Hull Upgrades}} should be trained to level IV to allow use of the T2 [[Shield Tanking#Damage Control|Damage Control]] module. | * Finally, {{Sk|Hull Upgrades}} should be trained to level IV to allow the use of the T2 [[Shield Tanking#Damage Control|Damage Control]] module. | ||
==Tactics== | ==Tactics== | ||
The Micro Jump Drive will be primarily used for getting gate to gate; zooming out and measuring a distance with finger and thumb from your ship to 100km out can help you gauge where you need to jump in order to put gates that are outside of 15km in range a second. Inside of 15km, you're better off approaching. | The Micro Jump Drive will be primarily used for getting gate to gate; zooming out and measuring a distance with your finger and thumb from your ship to 100km out can help you gauge where you need to jump in order to put gates that are outside of 15km in range a second. Inside of 15km, you're better off approaching. | ||
==Notes== | ==Notes== | ||
| Line 138: | Line 138: | ||
* 5% additive bonus to all Reinforced Bulkhead modules, for those with discerning tastes. | * 5% additive bonus to all Reinforced Bulkhead modules, for those with discerning tastes. | ||
'''19.01 | '''19.01 Release - 2020-2-23''' - ''"Bastions of War" update'' ([https://www.eveonline.com/article/qo7pm1/patch-notes-version-19-01 Patch Notes]) | ||
* Lock range increased by 30% | * Lock range increased by 30% | ||
* Sensor strength increased by 8 | * Sensor strength increased by 8 | ||
Revision as of 10:56, 29 September 2022

High Amount of High Slots
HIGHLIGHTS
High Amount of Medium Slots
HIGHLIGHTS
RELATED UNI-WIKI REFERENCES
|
Geared toward versatility and prolonged deployment in hostile environments, Marauders represent the cutting edge in today's warship technology. While especially effective at support suppression and wreckage salvaging, they possess comparatively weak sensor strength and may find themselves at increased risk of sensor jamming. Nevertheless, these thick-skinned, hard-hitting monsters are the perfect ships to take on long trips behind enemy lines. SHIP BONUSES
Caldari Battleship bonuses (per skill level):
Ship Attributes
|
Summary
The Golem is the Caldari Marauder. It is a heavily modified Raven hull that makes use of a Bastion Module in order to greatly increase its combat performance. It makes great use of Torpedoes or Cruise missiles in conjunction with the bonus to Target Painters, either weapon system is viable however the schools of thought are very competitive. However, they can both agree that this Marauder is an active shield tanked battleship and is very effective in level 4 mission running.
Until recently, the Golem was a red-headed stepchild of the other Marauders, capsuleers often favoring the Vargur or the pirate battleship Machariel. Luckily with Rubicon and the changes to Target Painter cycle times, as well as the Marauders' new bonus to micro jump drives, the Golem has become a more popular choice than in the past.
Skills
- Cruise Missiles, and Torpedoes should be trained to V, and Cruise Missile Specialization/Torpedo Specialization to at least I to fit T2 Launchers, which do more damage, along with providing the ability to use T2 ammo types.
- Missile Launcher Operation, Rapid Launch, Warhead Upgrades, skills that increase DPS and are thus vital to all missile-based damage dealing ships, should all be trained to at least IV.
- Along with the requisite Engineering and Electronic Systems skills required for adequately fitting most ships. Weapon Upgrades and Advanced Weapon Upgrades should be trained to V (as this is a requirement anyways) to help alleviate fitting problems.
- Guided Missile Precision, Target Navigation Prediction and Target Painting to at least IV to combat smaller targets and gain access to the T2 Target Painter module.
- Missile Projection and Missile Bombardment to at least IV and ideally V to maximize the range at which all missiles travel.
- Drones V, Light Drone Operation V, Medium Drone Operation V, Drone Interfacing IV and Gallente Drone Specialization I/Minmatar Drone Specialization I are all are important for getting as much DPS out of the drone bay as possible.
- Shield Operation and Shield Management should be trained to at least IV to improve shield capacity and recharge rate. While Tactical Shield Manipulation should be trained to V remove shield penetration chance and to allow the use of the T2 Shield Boost Amplifier module.
- Shield Upgrades should be trained to IV to allow the use of T2 Shield Hardeners, Resistance Amplifiers, Shield Boosters, Shield Power Relays, Shield Extenders and Shield Rechargers.
- ' Electronic Warfare should be trained to level III to allow training of Long Distance Jamming which increases the optimal range of target painters by 10% per level.
- Finally, Hull Upgrades should be trained to level IV to allow the use of the T2 Damage Control module.
Tactics
The Micro Jump Drive will be primarily used for getting gate to gate; zooming out and measuring a distance with your finger and thumb from your ship to 100km out can help you gauge where you need to jump in order to put gates that are outside of 15km in range a second. Inside of 15km, you're better off approaching.
Notes
You can write additional notes for Golem here.
Patch History
| A long, long time ago... |
|---|
|
20.03 Release - Build: 2013787 - 2022-03-08 - "Road to Fanfest" Update (Patch Notes) Brand new Role bonuses have been added to all battleships (excluding the Praxis).
19.01 Release - 2020-2-23 - "Bastions of War" update (Patch Notes)
18.04 Release - Build: 1706308 - 2020-04-15 - "Surgical Strike" Update (Patch Notes)
October 2019 Release - 2019-10-15.1 Every Cruiser, Battlecruiser and Battleship now warps faster than before.
|


