More actions
mNo edit summary |
Salartarium (talk | contribs) m eve -> EVE per MoS, https |
||
| Line 5: | Line 5: | ||
The overview folder for the Mac client is now located in the users Documents folder. | The overview folder for the Mac client is now located in the users Documents folder. | ||
# Download your new overview settings. The | # Download your new overview settings. The EVE University overview settings can be downloaded [https://www.dropbox.com/s/bvykqdknfg3g1sk/E-UNI%20STD%20-%20Rhea%20v1.0.yaml?dl=0 here]. | ||
# Move the overview settings file to the | # Move the overview settings file to the EVE Online overview folder. The folder is located at: <br /><blockquote>"MacintoshHD/Users/[username]/Documents/EVE/Overview"</blockquote> If this folder does not exist it can be created manually or by "Saving" a overview under "Overview Settings" when undocked, select "Tab Presets" tab and select "Save". | ||
# In game, undock so you are able to see your overview. Make sure the coast is clear before you undock! Then click the four bars at the top left of your overview then select Import Overview Settings. | # In game, undock so you are able to see your overview. Make sure the coast is clear before you undock! Then click the four bars at the top left of your overview then select Import Overview Settings. | ||
# Under the Import Overview Settings window, select the overview you saved in the left hand list and in the right hand list select "Check All". Then select "Import". | # Under the Import Overview Settings window, select the overview you saved in the left hand list and in the right hand list select "Check All". Then select "Import". | ||
| Line 15: | Line 15: | ||
If you're running EVE Online in windowed mode, you may want to fine-tune the size of the client windows. You can simply select a different resolution in the in-game settings, but you may find they're too small or too big, and don't make best use of your screen real estate. | If you're running EVE Online in windowed mode, you may want to fine-tune the size of the client windows. You can simply select a different resolution in the in-game settings, but you may find they're too small or too big, and don't make best use of your screen real estate. | ||
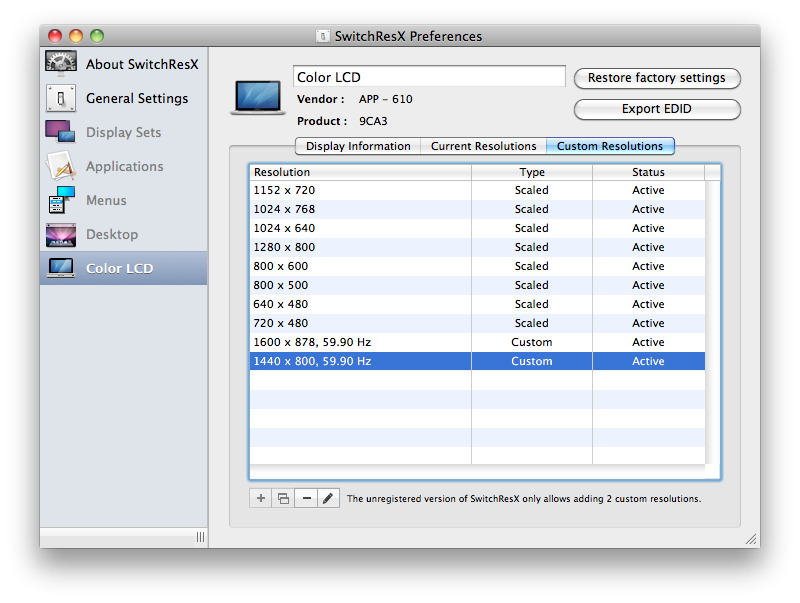
To set up a custom resolution, try a program like [ | To set up a custom resolution, try a program like [httpd://www.madrau.com/indexSRX4.html SwitchResX]. Enter the screen-size you want in the Custom Resolutions tab. Doing this won't change the resolution your monitor is running at, but it will let the EVE Client see it as an option next time you play the game. | ||
[[File:Switchresx.png]] | [[File:Switchresx.png]] | ||
Latest revision as of 05:44, 6 July 2023
This page contains extra information for players using the Macintosh client.
Installing Overview Settings
The overview folder for the Mac client is now located in the users Documents folder.
- Download your new overview settings. The EVE University overview settings can be downloaded here.
- Move the overview settings file to the EVE Online overview folder. The folder is located at:
If this folder does not exist it can be created manually or by "Saving" a overview under "Overview Settings" when undocked, select "Tab Presets" tab and select "Save"."MacintoshHD/Users/[username]/Documents/EVE/Overview"
- In game, undock so you are able to see your overview. Make sure the coast is clear before you undock! Then click the four bars at the top left of your overview then select Import Overview Settings.
- Under the Import Overview Settings window, select the overview you saved in the left hand list and in the right hand list select "Check All". Then select "Import".
- After this you should have the EVE University official overview installed.
Setting up a Custom Resolution In Windowed Mode
If you're running EVE Online in windowed mode, you may want to fine-tune the size of the client windows. You can simply select a different resolution in the in-game settings, but you may find they're too small or too big, and don't make best use of your screen real estate.
To set up a custom resolution, try a program like [httpd://www.madrau.com/indexSRX4.html SwitchResX]. Enter the screen-size you want in the Custom Resolutions tab. Doing this won't change the resolution your monitor is running at, but it will let the EVE Client see it as an option next time you play the game.
External Links
The Macintosh Thread on the official forums.

