Every ship in Eve has a Directional Scanner (d-scan) that can be used to discover the rough location of certain kinds of objects up to 14 AU (appx. 2 x10<sup>9</sup> km) away from the ship. There are other kinds of specialized scanners, such as the [[probe scanning|probe launcher]] (used in Exploration) or the [[Mining#Survey_scanner|survey scanner]] (used in Mining), but the d-scan comes with the ship and requires no additional training or fitting costs.
Every ship in EVE has a Directional Scanner (d-scan) that can be used to discover the rough location of certain kinds of objects up to 14 AU (appx. 2 x10<sup>9</sup> km) away from the ship. There are other kinds of specialized scanners, such as the [[probe scanning|probe launcher]] (used in Exploration) or the [[Mining#Survey_scanner|survey scanner]] (used in Mining), but the d-scan comes with the ship and requires no additional training or fitting costs.
==What d-scan is good for==
== What d-scan is good for ==
The directional scanner can see the following objects in space:
The directional scanner can see the following objects in space:
* All ships and their names. This excludes [[Recon Ships|combat recon]] and [[Cloaking|cloaked ships]].
* All ships and their names. This excludes [[Recon Ships|combat recon]] and [[Cloaking|cloaked ships]].
Line 10:
Line 10:
* Drones
* Drones
* Core and combat scanning probes
* Core and combat scanning probes
* NPCs with "♦" in their name. This includes mining operations and Blood Raider Shipyard fleets.
* NPCs with "♦" in their name. This includes mining operations, Blood Raider shipyard fleets and NPC ships in the [[AEGIS Capital Ship Security Facility]], [[AEGIS Secure Transfer Facility]] and [[SCC Secure Key Storage]].
The directional scanner is not able to see the state of the object (empty, damaged, reinforced, pilot info), nor can it see [[Scanning#Cosmic_signatures|cosmic signatures]], [[Scanning#Cosmic_anomalies|cosmic anomalies]], normal NPCs, beacons or [[bookmarks]].
The directional scanner is not able to see the state of the object (empty, damaged, reinforced, pilot info), nor can it see cosmic signatures, cosmic anomalies, normal NPCs, beacons or [[bookmarks]].
The directional scanner can be used to see most ships or probes that may pose a threat, or to gather intel on objects that are off grid such as enemy fleets. This is especially important in [[wormholes]] as the local chat there does not automatically show other players, and the d-scan is a good tool for this situation.
The directional scanner can be used to see most ships or probes that may pose a threat, or to gather intel on objects that are off grid such as enemy fleets. This is especially important in [[wormholes]] as the local chat there does not automatically show other players, and the d-scan is a good tool for this situation.
==How to use it==
== How to use it ==
[[image:Opendscan.jpg|right|thumb|center]]
[[image:Opendscan.jpg|thumb]]
To open the directional scanner press Alt+D.
To open the directional scanner press {{button|Alt}} + {{button|D}}.
*Alternatively, click the "radar" button (just above the autopilot button) on the left-hand side of the HUD, and when the window with the four items opens, choose the directional scanner.
*Alternatively, click the "radar" button (just above the autopilot button) on the left-hand side of the HUD, and when the window with the four items opens, choose the directional scanner.
Line 26:
Line 26:
By default the d-scan window is docked inside the system map. You can undock it if you wish, in which case you will later need to open the d-scan and the map separately.
By default the d-scan window is docked inside the system map. You can undock it if you wish, in which case you will later need to open the d-scan and the map separately.
The d-scan search begins at your ship and extends out in the shape of a cone. Each scan will produce a report listing the items that it has located within the cone. The list will give you only the names and types of the items; not their distance, or coordinates, or any other data.
The d-scan search begins at your ship and extends out in the shape of a cone. Each scan will produce a report listing the items that it has located within the cone. The list will give you only the names and types of the items; not their distance, or coordinates, or any other data.
Line 37:
Line 37:
You can change the cone's <span style="color:#53B14E">viewing orientation ''in the d-scan window''</span> by left-click dragging to rotate the view and right-click dragging to move the view back and forth. Note that this does not aim the scanner, but only changes the display that you see in the window.
You can change the cone's {{Co|#53B14E|viewing orientation ''in the d-scan window''}} by left-click dragging to rotate the view and right-click dragging to move the view back and forth. Note that this does not aim the scanner, but only changes the display that you see in the window.
[[File:Dscanmovecone.jpg|thumb|left|Aiming the dscan cone]]
[[File:Dscanmovecone.jpg|thumb|left|Aiming the d-scan cone]]
====Aiming the d-scan====
==== Aiming the d-scan ====
The easiest way to aim the scanner is to left-click on an object in the system map and hold until the radial menu pops up - then choose the d-scan icon from the menu. The scan cone will move to point at that object.
The easiest way to aim the scanner is to left-click on an object in the system map and hold until the radial menu pops up - then choose the d-scan icon from the menu. The scan cone will move to point at that object.
* You can also right-click on an object in the map and choose "look at" from the drop down menu.
* You can also right-click on an object in the map and choose "look at" from the drop down menu.
* You can hold down the "v" key and click anywhere in space. With "v" down you can also click-drag to make a rectangle to which the scan will orient.
* You can hold down the {{button|V}} key and click anywhere in space. With {{button|V}} down you can also click-drag to make a rectangle to which the scan will orient.
* If you have brackets turned on in your [[Overview]], you can right-click on any bracket and choose "look at" from the drop down menu.
* If you have brackets turned on in your [[Overview]], you can right-click on any bracket and choose "look at" from the drop down menu.
Line 51:
Line 51:
* In the d-scan window, make sure that "Align with camera" is off.
* In the d-scan window, make sure that "Align with camera" is off.
{{clear}}
==== Using the map ====
====Using the map====
The system map has a number of options that are useful while scanning.
The system map has a number of options that are useful while scanning.
*The top left button allows you to add or remove objects from the map.
*The top left button allows you to add or remove objects from the map.
Line 63:
Line 61:
*The show cone on/off button is sometimes useful when you need an unobstructed view of the system.
*The show cone on/off button is sometimes useful when you need an unobstructed view of the system.
===D-scan parameter controls===
=== D-scan parameter controls ===
The cone starts at your ship and reaches out for up to 14.3AU (''appx. 2 x10<sup>9</sup> km - click the AU label button to change to KM''). The range can be adjusted either by using the interval slider for 1, 5, 10, or 14.3 AUs, or by typing a specific scan range into the box.
The cone starts at your ship and reaches out for up to 14.3AU (''appx. 2 x10<sup>9</sup> km - click the AU label button to change to KM''). The range can be adjusted either by using the interval slider for 1, 5, 10, or 14.3 AUs, or by typing a specific scan range into the box.
Line 71:
Line 69:
The list shows icon, name and type. It does '''not''' show distance or coordinates. Finding the distance to a target and/or its coordinates requires [[Scanning & Probing|more advanced scanning equipment]].
The list shows icon, name and type. It does '''not''' show distance or coordinates. Finding the distance to a target and/or its coordinates requires [[Scanning & Probing|more advanced scanning equipment]].
A variety of filters can be set to narrow down the results of a scan. The filter selector in top right corner of the directional scan window opens a menu of possible filter configurations. The filters are listed, each with a number to the right. The number can be pressed on the keyboard to select a filter - or you can click on the number; or on the checkbox to the left of the filter.
A variety of filters can be set to narrow down the results of a scan. The filter selector in top right corner of the directional scan window opens a menu of possible filter configurations. The filters are listed, each with a number to the right. The number can be pressed on the keyboard to select a filter - or you can click on the number; or on the checkbox to the left of the filter.
Line 77:
Line 75:
With the filter set to "all", anything that can be seen by the scanner will be displayed. With the filter set to "active overview" only objects permitted in the [[overview]] will be shown.
With the filter set to "all", anything that can be seen by the scanner will be displayed. With the filter set to "active overview" only objects permitted in the [[overview]] will be shown.
The d-scan can use any of your overview presets to filter the results. Again, note that the scanner does not see any information about the objects other than name and type. This means that the filtering function will not take into account any of the state settings the overview may have. (''The standard E-UNI overview setup is explained in the [[Overview Guide]].'')
The d-scan can use any of your overview presets to filter the results. Again, note that the scanner does not see any information about the objects other than name and type. This means that the filtering function will not take into account any of the state settings the overview may have. (''The standard E-UNI overview setup is explained in [[Installing the EVE University Overview]].'')
Some common d-scan uses - set these in an overview tab or tabs and then select the tab in the d-scan:
Some common d-scan uses - set these in an overview tab or tabs and then select the tab in the d-scan:
Line 90:
Line 88:
* Upwell structures. While undockable structures aren't visible in overview they are visible in directional scan.
* Upwell structures. While undockable structures aren't visible in overview they are visible in directional scan.
==Practical applications==
== Practical applications ==
In solo PvP the d-scanner can be used to locate opponents at celestials (any stationary object in space) or cosmic signatures or cosmic anomalies.
In solo PVP the d-scanner can be used to locate opponents at celestials (any stationary object in space) or cosmic signatures or cosmic anomalies.
In fleets it is common for intel reports to be made by pasting the scanner results into an [[#Scouting|online parser]]. These can give a Fleet Commander intelligence on enemy fleet compositions to help decide whether an engagement is worth pursuing. Directional scanning is also widely used in mining and exploring to give early warning of hostile ships and/or combat probes. Good scanning can provide the vital seconds needed to escape an incoming attack.
In fleets it is common for intel reports to be made by pasting the scanner results into an [[#Scouting|online parser]]. These can give a Fleet Commander intelligence on enemy fleet compositions to help decide whether an engagement is worth pursuing. Directional scanning is also widely used in mining and exploring to give early warning of hostile ships and/or combat probes. Good scanning can provide the vital seconds needed to escape an incoming attack.
Line 98:
Line 95:
The d-scan is a tool whose fundamental function is to detect hostile targets before a PvP engagement happens - whether they are trying to find you, or you are looking for them. Because it is standard equipment in every ship, and because it requires no specialized training, the d-scan is most pilots' first call for intelligence.
The d-scan is a tool whose fundamental function is to detect hostile targets before a PvP engagement happens - whether they are trying to find you, or you are looking for them. Because it is standard equipment in every ship, and because it requires no specialized training, the d-scan is most pilots' first call for intelligence.
===Offensive Scanning===
=== Offensive Scanning ===
An important use of the directional scanner is to find potential PVP targets. Keep in mind that the scanner only returns ship names and types; never the pilot's name. (''This is the reason why you should rename your ships as soon as you buy them. Your name also appears on the system chat list, and an enemy can match the name with the ship.'') Nor will the d-scan provide you with the specific distance to a ship, or its coordinates.
An important use of the directional scanner is to find potential PvP targets. Keep in mind that the scanner only returns ship names and types; never the pilot's name. (''This is the reason why you should rename your ships as soon as you buy them. Your name also appears on the system chat list, and an enemy can match the name with the ship.'') Nor will the d-scan provide you with the specific distance to a ship, or its coordinates.
The best way to show the use of the d-scan to locate ships is by example. Since every ship, even your capsule, has a d-scanner, you can do this exercise yourself ... and this is the best way to learn how it works. The next few images were created at High Sec Campus in Amygnon. This is a good place to practice scanning because there are almost always a bunch of ships in system.
The best way to show the use of the d-scan to locate ships is by example. Since every ship, even your capsule, has a d-scanner, you can do this exercise yourself ... and this is the best way to learn how it works. The next few images were created at High Sec Campus in Amygnon. This is a good place to practice scanning because there are almost always a bunch of ships in system.
<span style="color:#768d31">Even if you mostly plan to mine or explore, it is worthwhile at least reading this section. Hostile ships WILL be looking for you, and this is how they do it. If you try it yourself, you will have a better feel for the process and more easily defeat it when it happens to you.</span>
{{Co|#768d31|Even if you mostly plan to mine or explore, it is worthwhile at least reading this section. Hostile ships WILL be looking for you, and this is how they do it. If you try it yourself, you will have a better feel for the process and more easily defeat it when it happens to you.}}
(This is but one example. There are a variety of offensive d-scan techniques, covering different tactical situations. [[D-Scan 102]] provides an in-depth look at many of these.)
(This is but one example. There are a variety of offensive d-scan techniques, covering different tactical situations.)
[[image:Qs 01dscanprac.jpg|400px|thumb|left|Celestials in directional scanner.]]
[[image:Qs 01dscanprac.jpg|thumb|left|400px|Celestials in directional scanner.]]
So ... imagine that a hunter is looking for mining targets. The first thing that he or she does is to enter a system and look at the Overview to find a moon or planet with a number of nearby asteroid belts. In this case Amygnon VIII has three belts within d-scan range. So the hunter warps to the moon. The plan is to scan each of the asteroid belts looking for mining ships. Although the scanner will not give the range to a ship, it will give the range to the asteroid belt, enabling the hunter to warp in farily close to the target.
So ... imagine that a hunter is looking for mining targets. The first thing that he or she does is to enter a system and look at the Overview to find a moon or planet with a number of nearby asteroid belts. In this case Amygnon VIII has three belts within d-scan range. So the hunter warps to the moon. The plan is to scan each of the asteroid belts looking for mining ships. Although the scanner will not give the range to a ship, it will give the range to the asteroid belt, enabling the hunter to warp in fairly close to the target.
[[image:Qs 03dscanprac.jpg|300px|thumb|right|View of the planet, its moons and asteroid belts on the map.]]
[[image:Qs 03dscanprac.jpg|thumb|View of the planet, its moons and asteroid belts on the map.]]
Notice that the icon for asteroid belt on the Overview is a pyramid of three dots. This same icon will be used in the d-scan map to show belts.
Notice that the icon for asteroid belt on the Overview is a pyramid of three dots. This same icon will be used in the d-scan map to show belts.
Next the hunter sets the scanner range to match that of the farthest asteroid belt (in this case 5 AU), and sets the angle to something that will blanket the belt (in this case 30°). Using the first menu at the top left of the Map, the hunter unchecks all the boxes except for Asteroid Belts. The next step is to zoom the Map in as close as possible.
Next the hunter sets the scanner range to match that of the farthest asteroid belt (in this case 5 AU), and sets the angle to something that will blanket the belt (in this case 30°). Using the first menu at the top left of the Map, the hunter unchecks all the boxes except for Asteroid Belts. The next step is to zoom the Map in as close as possible.
[[File:Qs 04dscanprac.jpg|left|thumb|Use the radial menu inside the Map to aim the scanner.]]
[[File:Qs 04dscanprac.jpg|thumb|left|Use the radial menu inside the Map to aim the scanner.]]
As you can see on the image to the right, only asteroid belts are now marked on the map (''the icon for a belt is a cluster of 3 dots''). The hunter selects one of these, and using the radial menu (''left click on the belt icon and choose the scanner icon when it pops up'') points the scanner; then the hunter initiates a scan.
As you can see on the image to the right, only asteroid belts are now marked on the map (''the icon for a belt is a cluster of 3 dots''). The hunter selects one of these, and using the radial menu (''left click on the belt icon and choose the scanner icon when it pops up'') points the scanner; then the hunter initiates a scan.
Line 130:
Line 127:
{{clear}}
{{clear}}
The first time you do this, it seems clunky. Setting and scanning takes awhile. But after a few tries, it becomes second nature. You set up the d-scan filter before you even enter the system, and you know from experience what ranges and angles you need to use. In cases where you are looking for ships that can be found in fixed locations ... in asteroid belts, for example, or undocking from a particular station ... this method will find more targets faster than probe scanning will. (You still need probes in situations where your target might be off the grid, or where the target is not located near an object that you can warp to. Remember that the d-scanner never gives you coordinates.)
The first time you do this, it seems clunky. Sitting and scanning takes awhile. But after a few tries, it becomes second nature. You set up the d-scan filter before you even enter the system, and you know from experience what ranges and angles you need to use. In cases where you are looking for ships that can be found in fixed locations ... in asteroid belts, for example, or undocking from a particular station ... this method will find more targets faster than probe scanning will. (You still need probes in situations where your target might be off the grid, or where the target is not located near an object that you can warp to. Remember that the d-scanner never gives you coordinates.)
===Defensive Scanning===
=== Defensive Scanning ===
"Defense" refers to the need to scan for possibly hostile ships while mining or exploring. A better term for this might be "situational awareness" - the need to keep an eye on your environment whenever you are in dangerous territory.
"Defense" refers to the need to scan for possibly hostile ships while mining or exploring. A better term for this might be "situational awareness" - the need to keep an eye on your environment whenever you are in dangerous territory.
Various articles in the UNIWiki discuss the tactics of survival while exploring or mining. For example:
Various articles in the UNIWiki discuss the tactics of survival while exploring or mining. For example:
* From [[Exploration#Survival|Surviving While Exploring]]: "''While running the site, and particularly while in the minigame, keep your overview and Local visible, and keep running D-Scan''."
* From [[Exploration#Survival|Surviving While Exploring]]: "''While running the site, and particularly while in the minigame, keep your overview and Local visible, and keep running D-Scan''."
* [[Lillik's_Guide_to_(relatively)_Safe_Ice_Harvesting|Guide to Ice Mining]]: "''...set your D-scan so it's open and accessible. You'll need this for multiple purposes''."
You will want to read about the specifics of your own profession, but here are a few general comments about using the d-scan for situational awareness.
You will want to read about the specifics of your own profession, but here are a few general comments about using the d-scan for situational awareness.
==== Spam Scan ====
==== Spam Scan ====
Naturally, you will scan the system before you set up your operation. Once you are started, however, you should refresh the scan periodically. You can rescan by clicking on the large SCAN buttion, or you can set up the "Refresh Directional Scan" hotkey.{{Color box | color=#222222 | border=#ffeeee | This hotkey is off by default, so you will have to set it up manually. Open the Game Preferences window (ESC), go to the "Shortcuts" tab, and then go to the "Combat" tab inside of Shortcuts. Find the "Refresh Directional Scan" hotkey and set it to the key of your choice. If you plan to be mining or exploring a lot, you are going to use the key often, so choose a key that's very easy to strike.}}
Naturally, you will scan the system before you set up your operation. Once you are started, however, you should refresh the scan periodically. You can rescan by clicking on the large SCAN button, or you can set up the "Refresh Directional Scan" hotkey.
{{Color box
| color= var(--background-color-warning-subtle)
| border= #ffeeee
| This hotkey is off by default, so you will have to set it up manually. Open the Game Preferences window {{button|ESC}}, go to the "Shortcuts" tab, and then go to the "Combat" tab inside of Shortcuts. Find the "Refresh Directional Scan" hotkey and set it to the key of your choice. If you plan to be mining or exploring a lot, you are going to use the key often, so choose a key that's very easy to strike.
}}
Your goal is to spot ships as soon as they come into range, decide whether they are potentially hostile, and then decide how to respond. There are no specific rules for doing this; you will need to develop a plan that is comfortable for you, but here are a few basic techniques.
Your goal is to spot ships as soon as they come into range, decide whether they are potentially hostile, and then decide how to respond. There are no specific rules for doing this; you will need to develop a plan that is comfortable for you, but here are a few basic techniques.
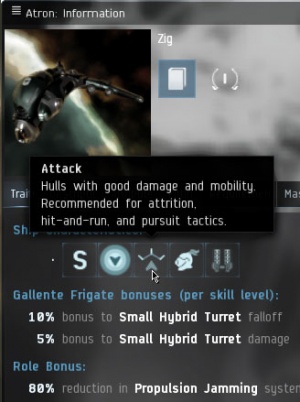
* '''Know your ships'''. Industrials, and even combat ships that are significantly less powerful than yours, can be ignored. [[File:Qs 11dscanprac.jpg|right|thumb|Show Info window for a potential hostile ship.]]You might want to set your Info Window to "Traits". That way if a ship you've never seen before shows up in the scanner, you can do a quick Show Info and immediately see its size and combat characteristics.
* '''Know your ships'''. Industrials, and even combat ships that are significantly less powerful than yours, can be ignored. [[File:Qs 11dscanprac.jpg|thumb|Show Info window for a potential hostile ship.]]You might want to set your Info Window to "Traits". That way if a ship you've never seen before shows up in the scanner, you can do a quick Show Info and immediately see its size and combat characteristics.
* '''Spam to danger level'''. If you are in a wormhole, you probably want to be spamming the scan every few seconds or so ... every 8-10 seconds is often recommended. You do this because ANY ship that shows up is likely to be dangerous, even industrials and exploration frigates, and many will have expert pilots who can locate you very quickly. In a wormhole you may only have seconds to respond to an intrusion, so spam the scan and get every advantage that you can. In a level 0.9 system you may only want to scan every minute or so. Some people don't scan at all in high sec ... but the danger is still there ... high sec gankers are often slow and inexperienced, so you can get away with LESS scanning, but it is tempting fate to do NONE.
* '''Spam to danger level'''. If you are in a wormhole, you probably want to be spamming the scan every few seconds or so ... every 8-10 seconds is often recommended. You do this because ANY ship that shows up is likely to be dangerous, even industrials and exploration frigates, and many will have expert pilots who can locate you very quickly. In a wormhole you may only have seconds to respond to an intrusion, so spam the scan and get every advantage that you can. In a level 0.9 system you may only want to scan every minute or so. Some people don't scan at all in high sec ... but the danger is still there ... high sec gankers are often slow and inexperienced, so you can get away with LESS scanning, but it is tempting fate to do NONE.
* '''Align to exit'''. When you set up your operation, take the time to point your ship in the direction you want to warp should you need to run. This may not turn out to be helpful in terms of speed, but it gives you one less thing to think about if a hostile suddenly appears.
* '''Align to exit'''. When you set up your operation, take the time to point your ship in the direction you want to warp should you need to run. This may not turn out to be helpful in terms of speed, but it gives you one less thing to think about if a hostile suddenly appears.
Line 162:
Line 163:
* If a cloaked ship is using probes, the probes will show up on your scan even though the ship will not. So if you see probes, but no ship, assume that a cloaked ship is out there somewhere.
* If a cloaked ship is using probes, the probes will show up on your scan even though the ship will not. So if you see probes, but no ship, assume that a cloaked ship is out there somewhere.
* Depending on a pilot's skill, cloaked ships may become visible for a few seconds as they move away just after coming through a gate. If you see a brief contact that isn't there when you rescan, treat it seriously. (This is also a good argument for frequent rescanning, even in higher sec systems.)
* Depending on a pilot's skill, cloaked ships may become visible for a few seconds as they move away just after coming through a gate. If you see a brief contact that isn't there when you rescan, treat it seriously. (This is also a good argument for frequent rescanning, even in higher sec systems.)
* Buying and equipping a cloak ship is usually an expensive proposition, and making piracy pay depends not on the ships killed, but the cargo. Many pilots will wait patiently for you to fill your cargo hold before they attack. On your part, you need to know the risk/reward situation. Maybe your ore hold is only half full, but if this is a dangerous system, it still may be time to warp to a base and empty it out. Maybe you haven't checked every artifact that you can see ... but what is the value of the stuff in your cargo hold? Know the risk; and head out when you have enough.
* Buying and equipping a cloak ship is usually an expensive proposition, and making piracy pay depends not on the ships killed, but the cargo. Many pilots will wait patiently for you to fill your cargo hold before they attack. On your part, you need to know the risk/reward situation. Maybe your mining hold is only half full, but if this is a dangerous system, it still may be time to warp to a base and empty it out. Maybe you haven't checked every artifact that you can see ... but what is the value of the stuff in your cargo hold? Know the risk; and head out when you have enough.
* Pilots of cloaky ships tend to be careful and methodical. So, especially when mining, if you move frequently, causing them to need to restart their search, they may either decide that it's too much work, or they may move too fast and make a mistake. Try not to stay in the same place for very long.
* Pilots of cloaky ships tend to be careful and methodical. So, especially when mining, if you move frequently, causing them to need to restart their search, they may either decide that it's too much work, or they may move too fast and make a mistake. Try not to stay in the same place for very long.
===Scouting===
=== Scouting ===
If you are scouting for a fleet, you can pass your scan results to the FC through Mumble or chat. More complete results can also be sent using online parsers like [https://adashboard.info/intel Dashboard]. A parser will organize and check the value of your scan results and set them up to be passed on to your FC.
If you are scouting for a fleet, you can pass your scan results to the FC through Mumble or chat. More complete results can also be sent using online parsers like [https://adashboard.info/intel Dashboard]. A parser will organize and check the value of your scan results and set them up to be passed on to your FC.
Line 174:
Line 175:
In low or null-sec, directional scanning can be used to check for player owned starbases ([[POS_and_YOU|POS]]) and other interesting structures near moons, bases or belts.
In low or null-sec, directional scanning can be used to check for player owned starbases ([[POS_and_YOU|POS]]) and other interesting structures near moons, bases or belts.
==Links==
== Links ==
*This [http://community.eveonline.com/news/dev-blogs/scanning-and-probing-changes-in-parallax/ EVE DevBlog entry] explains the 2015 changes to the d-scan interface. (It also covers changes to probe scanning.)
* Dev blog: [https://www.eveonline.com/news/view/scanning-and-probing-changes-in-parallax/ Scanning and Probing Changes in Parallax] explains the 2015 changes to the d-scan interface. (It also covers changes to probe scanning.)
*Note that as of November 2015, all YouTube videos about D-Scanning are showing the old interface, and so are out of date. You can look for new videos by searching on "EVE directional scan".
* Note that as of November 2015, all YouTube videos about D-Scanning are showing the old interface, and so are out of date. You can look for new videos by searching on "EVE directional scan".
Every ship in EVE has a Directional Scanner (d-scan) that can be used to discover the rough location of certain kinds of objects up to 14 AU (appx. 2 x10⁹ km) away from the ship. There are other kinds of specialized scanners, such as the probe launcher (used in Exploration) or the survey scanner (used in Mining), but the d-scan comes with the ship and requires no additional training or fitting costs.
What d-scan is good for
The directional scanner can see the following objects in space:
The directional scanner is not able to see the state of the object (empty, damaged, reinforced, pilot info), nor can it see cosmic signatures, cosmic anomalies, normal NPCs, beacons or bookmarks.
The directional scanner can be used to see most ships or probes that may pose a threat, or to gather intel on objects that are off grid such as enemy fleets. This is especially important in wormholes as the local chat there does not automatically show other players, and the d-scan is a good tool for this situation.
How to use it
To open the directional scanner press Alt + D.
Alternatively, click the "radar" button (just above the autopilot button) on the left-hand side of the HUD, and when the window with the four items opens, choose the directional scanner.
Either of these will bring up the d-scan window and system map as shown next.
D-scan window docked inside the system map
By default the d-scan window is docked inside the system map. You can undock it if you wish, in which case you will later need to open the d-scan and the map separately.
D-scan window undock/dock switch
The map and the cone
The d-scan search begins at your ship and extends out in the shape of a cone. Each scan will produce a report listing the items that it has located within the cone. The list will give you only the names and types of the items; not their distance, or coordinates, or any other data.
As explained below, you can set the range and width of the cone. The widest search is a sphere. Its report will list any items found anywhere around your ship - but it will not give any directional information. The smallest search is a narrow cone. Its report will list far fewer items than the widest search, but you will know that they lie in the direction of the cone. (This is why it is called a directional scan.) If the scan is at all narrow, then you have to aim it in the direction that you want to scan.
Regardless of the ship's orientation, the scan cone always points in the direction of your camera.
You can change the cone's viewing orientation in the d-scan window by left-click dragging to rotate the view and right-click dragging to move the view back and forth. Note that this does not aim the scanner, but only changes the display that you see in the window.
Aiming the d-scan cone
Aiming the d-scan
The easiest way to aim the scanner is to left-click on an object in the system map and hold until the radial menu pops up - then choose the d-scan icon from the menu. The scan cone will move to point at that object.
You can also right-click on an object in the map and choose "look at" from the drop down menu.
You can hold down the V key and click anywhere in space. With V down you can also click-drag to make a rectangle to which the scan will orient.
If you have brackets turned on in your Overview, you can right-click on any bracket and choose "look at" from the drop down menu.
If you want the scanner to always point in the same direction as your ship, then:
In your ship's HUD, select "First Person" as your camera option
In the d-scan window, make sure that "Align with camera" is off.
Using the map
The system map has a number of options that are useful while scanning.
The top left button allows you to add or remove objects from the map.
The second left button will "focus" the map, putting your ship in the center of the display.
The first right button will dock the map to either side of the screen, or make it full screen.
The directional scanner has some useful features that are integrated into the system map.
"Align with camera" allows you to rotate your perspective in the system map and simultaneously move your camera. On the map you will see a green circle that represents the scan cone, which now always points directly into the screen. Adjust the map, and whatever is in towards the screen from the ship and inside the circle will be scanned.
The show cone on/off button is sometimes useful when you need an unobstructed view of the system.
D-scan parameter controls
The cone starts at your ship and reaches out for up to 14.3AU (appx. 2 x10⁹ km - click the AU label button to change to KM). The range can be adjusted either by using the interval slider for 1, 5, 10, or 14.3 AUs, or by typing a specific scan range into the box.
The cone can be narrow or wide. At its widest it is a 360° sphere; at its narrowest it is a 5° beam. The parameter that controls this is scan angle which is set via a slider in intervals of 5°, 15°, 30°, 60°, 90° 180° and 360°.
Every time the scan button is pressed, the list in the directional scanner window updates to show all relevant objects in the scan cone. The scan also refreshes after you change the range, angle or filter parameters; and after jumping into another system. After a scan it takes two seconds for the scanner to reset.
The list shows icon, name and type. It does not show distance or coordinates. Finding the distance to a target and/or its coordinates requires more advanced scanning equipment.
D-scan results window
A variety of filters can be set to narrow down the results of a scan. The filter selector in top right corner of the directional scan window opens a menu of possible filter configurations. The filters are listed, each with a number to the right. The number can be pressed on the keyboard to select a filter - or you can click on the number; or on the checkbox to the left of the filter.
With the filter set to "all", anything that can be seen by the scanner will be displayed. With the filter set to "active overview" only objects permitted in the overview will be shown.
The d-scan can use any of your overview presets to filter the results. Again, note that the scanner does not see any information about the objects other than name and type. This means that the filtering function will not take into account any of the state settings the overview may have. (The standard E-UNI overview setup is explained in Installing the EVE University Overview.)
Some common d-scan uses - set these in an overview tab or tabs and then select the tab in the d-scan:
Ships. Visible ships, especially moving ones, are indicators that someone is active in the system.
Drones. Drones appearing in space with a ship usually indicate active combat.
Wrecks. If any are visible there has been someone fighting recently.
Combat scanner probes. Seeing these in space is an indicator of hostile intent.
Core scanner probes. Someone else is scanning sites. This is especially useful when running sites yourself as the hostile must scan your site before warping in.
Control towers and force fields. The force field of an active control tower is separate object in directional scan and can tell you if anyone is living in the system.
Precision scans can be used to see if a ship is near a force field, indicating unpiloted ship parked inside force field.
When gathering intel on hostile towers you can take a short range scan of the tower with all structures enabled and copy the results.
Upwell structures. While undockable structures aren't visible in overview they are visible in directional scan.
Practical applications
In solo PvP the d-scanner can be used to locate opponents at celestials (any stationary object in space) or cosmic signatures or cosmic anomalies.
In fleets it is common for intel reports to be made by pasting the scanner results into an online parser. These can give a Fleet Commander intelligence on enemy fleet compositions to help decide whether an engagement is worth pursuing. Directional scanning is also widely used in mining and exploring to give early warning of hostile ships and/or combat probes. Good scanning can provide the vital seconds needed to escape an incoming attack.
The d-scan is a tool whose fundamental function is to detect hostile targets before a PvP engagement happens - whether they are trying to find you, or you are looking for them. Because it is standard equipment in every ship, and because it requires no specialized training, the d-scan is most pilots' first call for intelligence.
Offensive Scanning
An important use of the directional scanner is to find potential PvP targets. Keep in mind that the scanner only returns ship names and types; never the pilot's name. (This is the reason why you should rename your ships as soon as you buy them. Your name also appears on the system chat list, and an enemy can match the name with the ship.) Nor will the d-scan provide you with the specific distance to a ship, or its coordinates.
The best way to show the use of the d-scan to locate ships is by example. Since every ship, even your capsule, has a d-scanner, you can do this exercise yourself ... and this is the best way to learn how it works. The next few images were created at High Sec Campus in Amygnon. This is a good place to practice scanning because there are almost always a bunch of ships in system.
Even if you mostly plan to mine or explore, it is worthwhile at least reading this section. Hostile ships WILL be looking for you, and this is how they do it. If you try it yourself, you will have a better feel for the process and more easily defeat it when it happens to you.
(This is but one example. There are a variety of offensive d-scan techniques, covering different tactical situations.)
Celestials in directional scanner.
So ... imagine that a hunter is looking for mining targets. The first thing that he or she does is to enter a system and look at the Overview to find a moon or planet with a number of nearby asteroid belts. In this case Amygnon VIII has three belts within d-scan range. So the hunter warps to the moon. The plan is to scan each of the asteroid belts looking for mining ships. Although the scanner will not give the range to a ship, it will give the range to the asteroid belt, enabling the hunter to warp in fairly close to the target.
View of the planet, its moons and asteroid belts on the map.
Notice that the icon for asteroid belt on the Overview is a pyramid of three dots. This same icon will be used in the d-scan map to show belts.
Next the hunter sets the scanner range to match that of the farthest asteroid belt (in this case 5 AU), and sets the angle to something that will blanket the belt (in this case 30°). Using the first menu at the top left of the Map, the hunter unchecks all the boxes except for Asteroid Belts. The next step is to zoom the Map in as close as possible.
Use the radial menu inside the Map to aim the scanner.
As you can see on the image to the right, only asteroid belts are now marked on the map (the icon for a belt is a cluster of 3 dots). The hunter selects one of these, and using the radial menu (left click on the belt icon and choose the scanner icon when it pops up) points the scanner; then the hunter initiates a scan.
That first scan is empty (and not shown here). So the hunter clicks on the next belt icon, aims the scanner and takes another snapshot. This second scan shows three ships: a Skiff, a Miasmos and a Moa. Keep in mind that the scanner is finding ALL visible ships in its range, and since there some stations nearby, ships docking and undocking will show up in the scan. On the other hand, the Skiff is a mining vessel, and likely to be in the asteroid belt.
So the hunter warps to that belt. At this point, the Skiff shows up in the Overview at a distance of 123K and can be targeted.
Let's assume that the Skiff pilot, a good Unista, has been keeping close watch and has noticed the hunter's ship as it was lurking by the moon making these scans. The Skiff would not know where the hunter was, but it would know what the hunter was. So even as the hunter is warping in, the Skiff has finished pulling in its drones and aligning for warp. And away it goes!
No problem. The hunter now goes back to the map, selects the third asteroid belt and repeats the scanning process. There it finds a Procurer, surrounded by cargo containers and dead belt pirates. This belt is only 0.3 AU away, and the hunter warps in a mere 21 K from the Procurer.
A short, one-sided fight occurs, and then the hunter grabs the loot and departs from the system.
The first time you do this, it seems clunky. Sitting and scanning takes awhile. But after a few tries, it becomes second nature. You set up the d-scan filter before you even enter the system, and you know from experience what ranges and angles you need to use. In cases where you are looking for ships that can be found in fixed locations ... in asteroid belts, for example, or undocking from a particular station ... this method will find more targets faster than probe scanning will. (You still need probes in situations where your target might be off the grid, or where the target is not located near an object that you can warp to. Remember that the d-scanner never gives you coordinates.)
Defensive Scanning
"Defense" refers to the need to scan for possibly hostile ships while mining or exploring. A better term for this might be "situational awareness" - the need to keep an eye on your environment whenever you are in dangerous territory.
Various articles in the UNIWiki discuss the tactics of survival while exploring or mining. For example:
From Surviving While Exploring: "While running the site, and particularly while in the minigame, keep your overview and Local visible, and keep running D-Scan."
You will want to read about the specifics of your own profession, but here are a few general comments about using the d-scan for situational awareness.
Spam Scan
Naturally, you will scan the system before you set up your operation. Once you are started, however, you should refresh the scan periodically. You can rescan by clicking on the large SCAN button, or you can set up the "Refresh Directional Scan" hotkey.
This hotkey is off by default, so you will have to set it up manually. Open the Game Preferences window ESC, go to the "Shortcuts" tab, and then go to the "Combat" tab inside of Shortcuts. Find the "Refresh Directional Scan" hotkey and set it to the key of your choice. If you plan to be mining or exploring a lot, you are going to use the key often, so choose a key that's very easy to strike.
Your goal is to spot ships as soon as they come into range, decide whether they are potentially hostile, and then decide how to respond. There are no specific rules for doing this; you will need to develop a plan that is comfortable for you, but here are a few basic techniques.
Know your ships. Industrials, and even combat ships that are significantly less powerful than yours, can be ignored. Show Info window for a potential hostile ship.You might want to set your Info Window to "Traits". That way if a ship you've never seen before shows up in the scanner, you can do a quick Show Info and immediately see its size and combat characteristics.
Spam to danger level. If you are in a wormhole, you probably want to be spamming the scan every few seconds or so ... every 8-10 seconds is often recommended. You do this because ANY ship that shows up is likely to be dangerous, even industrials and exploration frigates, and many will have expert pilots who can locate you very quickly. In a wormhole you may only have seconds to respond to an intrusion, so spam the scan and get every advantage that you can. In a level 0.9 system you may only want to scan every minute or so. Some people don't scan at all in high sec ... but the danger is still there ... high sec gankers are often slow and inexperienced, so you can get away with LESS scanning, but it is tempting fate to do NONE.
Align to exit. When you set up your operation, take the time to point your ship in the direction you want to warp should you need to run. This may not turn out to be helpful in terms of speed, but it gives you one less thing to think about if a hostile suddenly appears.
Move around. Particularly if you are mining, when you finish an asteroid, move to another belt and repeat. There are a variety of combat ships that your scanner simply cannot see, and there is no worse feeling that the sudden panic that you feel when a ship decloaks and tackles you. The longer you sit in one place, the more vulnerable you become.
How you respond to a potentially hostile contact depends on your ship's capabilities, your location, and your level of paranoia. If you are mining in an asteroid belt within a few AU of a station, for example, you may see a constant flow of combat ships passing through your scanner. It's the ship that persists on your scan for more than a few seconds that ought to concern you. A reasonable response might be to move to a more distant asteroid belt and watch to see if the same ship reappears. On the other hand, there are very few reasons to be passing through a wormhole, so any contact should be treated with deep suspicion.
Probes
While a good pilot can find you quickly using the d-scan, some hostiles rely primarily on combat probes. In any case, you should always use a d-scan filter that include probes.
While "core" scanner probes cannot locate ships, their presence may indicate a cloaked ship. So you should include them in your filter.
It will generally take at least 4 "combat" probes at a distance of 2 AU or less to pinpoint your position. A good rule of thumb is to run the scan at 360° at a range of 5-10 AU. Probes outside that range are not close to finding you, and ships outside that range will probably take some time to get a fix on your position.
Probes themselves cannot hurt you; it is the ships that are controlling them that you have to worry about. Core scanner probes at a long distance may just be someone scanning for resources and probably should just be watched. Combat probes close to you should suggest a very high level of danger.
Cloaky Ships
Remember that cloaked ships and certain "scan immune" ships will not appear on the directional scanner, so covert ops frigates, stealth bombers, recons, and Tech 3 strategic cruisers (in some configurations) will be able to warp to you without being detected.
If a cloaked ship is using probes, the probes will show up on your scan even though the ship will not. So if you see probes, but no ship, assume that a cloaked ship is out there somewhere.
Depending on a pilot's skill, cloaked ships may become visible for a few seconds as they move away just after coming through a gate. If you see a brief contact that isn't there when you rescan, treat it seriously. (This is also a good argument for frequent rescanning, even in higher sec systems.)
Buying and equipping a cloak ship is usually an expensive proposition, and making piracy pay depends not on the ships killed, but the cargo. Many pilots will wait patiently for you to fill your cargo hold before they attack. On your part, you need to know the risk/reward situation. Maybe your mining hold is only half full, but if this is a dangerous system, it still may be time to warp to a base and empty it out. Maybe you haven't checked every artifact that you can see ... but what is the value of the stuff in your cargo hold? Know the risk; and head out when you have enough.
Pilots of cloaky ships tend to be careful and methodical. So, especially when mining, if you move frequently, causing them to need to restart their search, they may either decide that it's too much work, or they may move too fast and make a mistake. Try not to stay in the same place for very long.
Scouting
If you are scouting for a fleet, you can pass your scan results to the FC through Mumble or chat. More complete results can also be sent using online parsers like Dashboard. A parser will organize and check the value of your scan results and set them up to be passed on to your FC.
Note: To move the entire results of a scan. Click one of the result items. Press Ctrl+A to select all items. Press Ctrl+C to copy all the results. Go to where you want to put the results and press Ctrl+V to paste them.
The d-scanner can also be used to check gates for gate camps or warp disruption bubbles (in null-sec) without warping to the gate's grid. You will need to have an off-grid bookmark near the gate from which you can scan it.
In low or null-sec, directional scanning can be used to check for player owned starbases (POS) and other interesting structures near moons, bases or belts.
Note that as of November 2015, all YouTube videos about D-Scanning are showing the old interface, and so are out of date. You can look for new videos by searching on "EVE directional scan".