Difference between revisions of "Probing In Simple Steps"
m ("Inertia Stabilizers" --> "Inertial Stabilizers") |
(Reformatted and cleaned up the preparation section.) |
||
| Line 1: | Line 1: | ||
| − | == | + | == Preparation == |
| − | + | Sensible preparation in character training and equipment makes probing much easier. | |
| − | + | === Skills === | |
| − | |||
| − | + | ==== Scanning skills ==== | |
| − | |||
| − | |||
| − | |||
| − | |||
| − | |||
| − | + | * {{sk|Astrometrics}} IV/V: useful bonuses to probe strength, scan deviation, and scan time. I unlocks the Core Probe Launcher and all Scan Probes, II unlocks the Expanded Probe Launcher. IV is the prerequisite for supporting skills and should be a short-term priority for the aspiring explorer. | |
| − | + | * {{sk|Astrometric Pinpointing}} II-IV: Reduces maximum scan deviation by 10% per level. | |
| − | + | ** This skill is especially useful in the early phases of probing, and makes life easier. Training high levels of this skill paired with high signal strength will allow you to reduce the scanning radius more aggressively. Levels II and V allow use of Tech 1 and Tech 2 scan pinpointing arrays respectively. | |
| − | + | * {{sk|Astrometric Rangefinding}} III/IV: 10% scan probe strength per level, making it the most important of these skills. Levels II and V allow use of Tech 1 and Tech 2 scan rangefinding arrays respectively. | |
| + | * {{sk|Astrometric Acquisition}} 0-III: 10% reduction in scan time per level. This skill is useful for combat scanning, when every second counts, but is not hugely important otherwise. Levels II and V allow use of Tech 1 and Tech 2 scan acquisition arrays respectively. | ||
| − | + | ==== Other skills ==== | |
| − | |||
| − | |||
| − | |||
| − | |||
| + | * Racial Frigate IV/V: Level II is required for the Tech 1 scanning frigate of each faction ([[Magnate]], [[Imicus]], [[Heron]] and [[Probe]]) and the strong per-level bonuses for scanning on these hulls make training it to IV worthwhile. Level V is a step towards covert ops ships. | ||
| + | * {{sk|Covert Ops}} IV: together with racial frigate V, this skill unlocks the covert ops ships ([[Anathema]], [[Helios]], [[Buzzard]], [[Cheetah]]). New players need not rush into these, but covert ops ships are a good medium-term goal for keen explorers. | ||
| + | ** Note that since the hull bonuses on the covert ops ships are per-level, a covert ops ship only outmatches a Tech 1 exploration frigate in probe strength at Covert Ops IV. | ||
| + | * {{sk|Cloaking}}I or IV: I is needed to use prototype cloaks, handy for Tech 1 exploration frigates; IV is necessary to fit covert ops cloaks and should be trained when a character is on their way to flying covert ops ships. | ||
| + | * {{sk|High Speed Maneuvering}}: to fit MWD. | ||
| + | * {{sk|Archaeology}} III-V: III is a quick train and makes you useful, IV is a good short-term goal for dedicated explorers, V is needed to use the Tech 2 relic analyzer. | ||
| + | * {{sk|Hacking}} III-V: III is a quick train and makes you useful, IV is a good short-term goal for dedicated explorers V is needed to use the Tech 2 data analyzer. | ||
| − | + | === Equipment === | |
| − | |||
| − | |||
| − | |||
| − | |||
| − | |||
| − | |||
| − | |||
| − | |||
| − | |||
| − | |||
| − | |||
| − | |||
| − | |||
| − | |||
| − | |||
| − | |||
| − | |||
| − | |||
The first and most important piece of equipment you need for exploration is a probe launcher, | The first and most important piece of equipment you need for exploration is a probe launcher, | ||
Revision as of 12:26, 30 December 2021
Preparation
Sensible preparation in character training and equipment makes probing much easier.
Skills
Scanning skills
- Astrometrics IV/V: useful bonuses to probe strength, scan deviation, and scan time. I unlocks the Core Probe Launcher and all Scan Probes, II unlocks the Expanded Probe Launcher. IV is the prerequisite for supporting skills and should be a short-term priority for the aspiring explorer.
- Astrometric Pinpointing II-IV: Reduces maximum scan deviation by 10% per level.
- This skill is especially useful in the early phases of probing, and makes life easier. Training high levels of this skill paired with high signal strength will allow you to reduce the scanning radius more aggressively. Levels II and V allow use of Tech 1 and Tech 2 scan pinpointing arrays respectively.
- Astrometric Rangefinding III/IV: 10% scan probe strength per level, making it the most important of these skills. Levels II and V allow use of Tech 1 and Tech 2 scan rangefinding arrays respectively.
- Astrometric Acquisition 0-III: 10% reduction in scan time per level. This skill is useful for combat scanning, when every second counts, but is not hugely important otherwise. Levels II and V allow use of Tech 1 and Tech 2 scan acquisition arrays respectively.
Other skills
- Racial Frigate IV/V: Level II is required for the Tech 1 scanning frigate of each faction (Magnate, Imicus, Heron and Probe) and the strong per-level bonuses for scanning on these hulls make training it to IV worthwhile. Level V is a step towards covert ops ships.
- Covert Ops IV: together with racial frigate V, this skill unlocks the covert ops ships (Anathema, Helios, Buzzard, Cheetah). New players need not rush into these, but covert ops ships are a good medium-term goal for keen explorers.
- Note that since the hull bonuses on the covert ops ships are per-level, a covert ops ship only outmatches a Tech 1 exploration frigate in probe strength at Covert Ops IV.
- CloakingI or IV: I is needed to use prototype cloaks, handy for Tech 1 exploration frigates; IV is necessary to fit covert ops cloaks and should be trained when a character is on their way to flying covert ops ships.
- High Speed Maneuvering: to fit MWD.
- Archaeology III-V: III is a quick train and makes you useful, IV is a good short-term goal for dedicated explorers, V is needed to use the Tech 2 relic analyzer.
- Hacking III-V: III is a quick train and makes you useful, IV is a good short-term goal for dedicated explorers V is needed to use the Tech 2 data analyzer.
Equipment
The first and most important piece of equipment you need for exploration is a probe launcher, and of course probes to launch from it. Any ship can be used for exploration, but the frigates mentioned above offer a bonus and a covert ops frigate is optimal. The normal core probe launcher and core scanning probes are the starting point for scanning signatures. Later these can be upgraded to T2/sister core probe launcher and sister core scanning probes. Sister probes are relatively cheap way to improve your effectiveness in scanning.
For scanning structures, ships and drones an expanded probe launcher and combat scan probes are needed. Combat scan probes can also scan signatures but they aren't as good as core probes. Expanded probe launcher can use both core and combat probes but is much harder to fit than core probe launcher.
The probe launcher and probes are the only mandatory equipment. Other useful equipment should be chosen to fit the job you want to do.
Scan arrays and gravity capacitor rigs increase your probe stats making scanning easier.
Virtue pirate implants increase scan probe strength. Poteque 'Prospector' Astrometric implants decrease scan deviation, scan time or increase probe strength depending on which variant is used.
Of course you also need equipment to run the sutes you scan.
For data and relic sites a data, relic or integrated analyzer is needed, cloak and micro warp drive combo allows you to do Cloak trick and drastically increases survival chances in null security space. You can also fit either nanofibers for speed and agility, inertial stabilizers for agility or warp core stabilizers for running away.
for gas sites a gas cloud harvester is required and for combat sites you need to fit your ship with combat equipment.
Probing
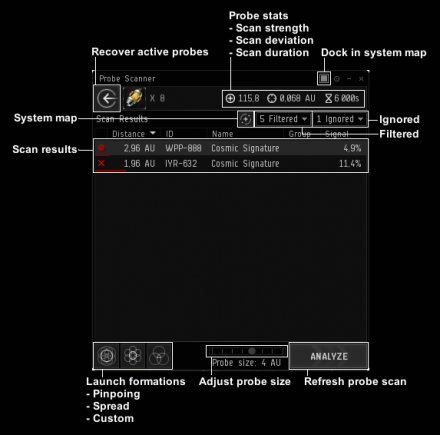
To start probing launch your probes and open both system map and probe scanner window.
It is recommended that you undock probe scanner window from system map by clicking the square icon on top right corner of probe scanner window. This allows you to open and close system map and probe scanner independently.
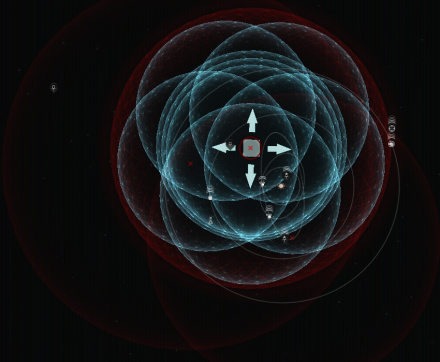
With the probe scanner open the system map now shows information relevant for probing. The red spheres are signatures that need to be probed with probes, green icons are anomalies or completely probed signatures and the blue spheres are your probes.
You have several controls for your probes.
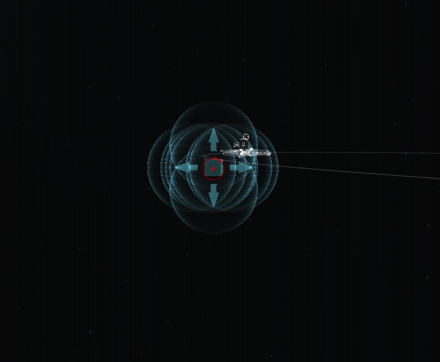
- Drag the cube to move whole probe formation.
- Hold shift to move individual probes.
- Hold control to adjust probe distance from center point.
- Alt+scroll, alt+drag or slider in probe scanner window to resize probes
You can also move your probes to pinpoint formation, spread formation or own saved custom formation in probe scanner window. When scanning signatures only pinpoint formation, formation moving and probe size changes are needed. Sometimes you may encounter a signature you can't get all the way to 100%. You can try moving your probes into more tightly packed pinpoint formation to get few 0.1% signal but placing them too close to each other will reduce scan results.
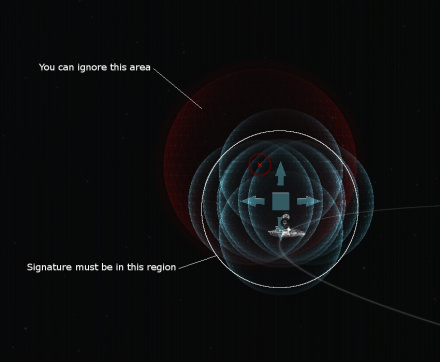
To scan a signature move your probe formation over the signature sphere. Good starting formation is pinpoint formation with size adjusted to cover the whole signature sphere. A trick to initial probe placement is to know that all signatures are within 4 AU from celestial objects. If there is only one celestial near the signature sphere the signature is near it and you can place your probes there. Now refresh probe scan by slicking the "analyze" button in probe scanner window. Depending on your probe placement and probe stats the marker of the signature changes.
If only one probe overlapped with the signature the result is a sphere. You know that the signature is inside that sphere in region that overlaps with one probe only. Place your formation there, adjust size and scan again.
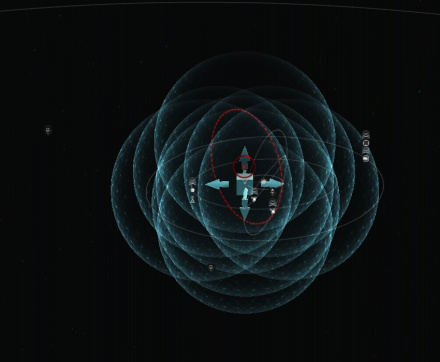
If two probes overlapped with the signature the result is a circle. The signature is somewhere on the circle where only two probes overlap with each other. Make an educated guess, move your formation, resize and scan again.
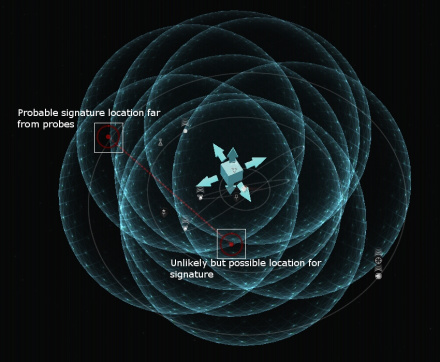
If three probes overlapped with the signature the result is two points connected by a line. The signature is near one of the points. Usualy it is on the point that is further away from your probe formation center. Move your probes, adjust size and scan again.
If four or more probes overlapped with the signature the result is one point. Center your formation on it, reduce probe size and scan again.
Repeat the above steps until the signature is scanned and you can warp to it.
