Difference between revisions of "Setting up a planetary colony"
(Move total quantity conversion data to Planetary Commodities) |
m (Remove link to non existing details page.) |
||
| (48 intermediate revisions by 21 users not shown) | |||
| Line 1: | Line 1: | ||
| − | + | {{PlanetaryIndustryNav}} | |
| − | [[ | + | The purpose of [[Planetary Industry]] is to produce things from stuff you have extracted from planets and make money by selling it on the market. |
| − | + | ||
| − | + | To do anything on a planet, you need a Planetary Command Center matching that planet's type. Once you have deployed this from somewhere in space in the desired system, everything else can be done from anywhere in the universe until you export your items, which must be done in space in the same system as your colony. Picking up your items also must be done in space and uncloaked near either a Customs Office or a launched canister from your Command Center, depending on how you export your products. | |
| + | |||
| + | Your Command Center provides Powergrid and CPU to your entire colony. This limits how many buildings you can put in a colony. Everything takes a certain amount of CPU and Powergrid, including the links between the buildings. | ||
| − | + | If you are building a manufacturing-only colony, then you need processors and a way of getting things to and from the planetary surface. You can put the colony in a small area, anywhere on your chosen planet. | |
| + | If you are building a resource-extraction colony, you need resource extractors and a way to get things up from the planetary surface. | ||
| − | + | If you want smooth processing without waste, if you have excess of one resource/product building up, or need to store your output for later pickup you will need storage. For storage, you can use (in order of capacity) a Planetary Command Center (500 m3), Launch Pad (10,000 m3), or Storage Facility (12,000 m3). | |
| − | + | Once you have a sense of the basics, you can start thinking about tailoring your setup to your needs, setting up longer production chains on one planet (or multiple planets), etc., which you can find more information on at the [[Colony Management]] page. | |
| − | + | == Your First Colony == | |
| − | + | ''This pictorial guide will show you step-by-step how to set up a basic colony for producing P1 products from locally extracted R0 raw materials.'' | |
| + | We will be going over: | ||
| + | # The basic setup of a Command Center (CC), an Extractor Control Unit (ECU) and extractor heads, a Launchpad, a Basic Industry Facility (BIF), and links. | ||
| + | # Routing inputs and outputs to minimize resource loss. | ||
| + | # Exporting via a Launchpad and a Customs Office. | ||
| + | # Exporting via the Command Center. | ||
| + | There are also video guides over at the main [[Planetary Industry#Quick_Start_Videos|Planetary Industry]] page for your perusal. | ||
| − | + | For more details on structures, see [[Planetary Buildings]]. | |
| − | + | {{ important note box | '''WARNING:''' The setup shown in this guide requires that you have at '''bare minimum''' {{sk|Command Center Upgrades}} trained to Level II and {{sk|Remote Sensing}} to Level I. Train these skills before attempting to mimic this setup. Training {{sk|Planetology}} and {{sk|Advanced Planetology}} is also recommended for best results when scanning.}} | |
| − | Buy a "XXX Command Center" on the market. (We are going to a Temperate Planet, so I bought a | + | {| style="width="100%" |
| + | |[[File:Planet_Mode(edited).png|left|300px|There are two ways of entering Planet Mode]] | ||
| + | | colspan="3" | Buy a "XXX Command Center" on the market. (We are going to a Temperate Planet, so I bought a Temperate Command Center). NPCs sell them for only 81,000 ISK, so they're pretty cheap, even for a new player (until you upgrade them, of course). Fly to the system with the Command Center in your cargo (you need at least 1000m3), and sit in space, preferably cloaked if you are (like myself in this example) in low sec or 0.0. Since The Syndicate, the system's owner, is an NPC corp, there is no player sovereignty blocking my deployment. | ||
| + | Select the planet in the Overview and select View Planetry Industry from either the Selected Item box or via the right-click contextual menu. | ||
| − | (There are | + | [[Planetary Industry#Planet_Scanning|Scan for Resources]]. The [[Planets]] and [[Planetary Commodities]] pages are good resources for figuring out what you need to look for to produce what you want. |
| + | |- | ||
| + | |[[File:Unsubmitted_CC.png|left|300px]] | ||
| + | | colspan="3" | Go to the Build Menu and select Command Centers (which we’ll call CCs from now on). Click on “Temperate Command Center” and place it near to where you want to extract resources. In order to build more structures, you’ll need to click “Submit” at the top left. Once you do this, you cannot move your CC or reclaim it. | ||
| + | |- | ||
| + | |[[File:Unsubmitted_ECU.png|left|300px]] | ||
| + | | colspan="3" | Time to start extracting! Select Extractor Control Units (a.k.a. ECUs) and select the only option (Temperate ECU) to place it. There will be a transparent circle surrounding the ECU that is not visible in the image to the right because of how far we’re zoomed in. That circle dictates where our ECU can place its extractor heads, which we’ll get to in a moment. Make sure any resource hotspots you want to extract from are within that circle! Then click “Submit" and accept the 45,000 ISK fee to build the ECU. | ||
| + | |- | ||
| + | |[[File:Installing_Head.png|left|300px]] | ||
| + | | colspan="3" | Once you’ve submitted the changes to place the ECU, you can start surveying for deposits and placing extractor heads. Click the ECU and then click the leftmost button labeled “Install Extraction Program” in the pop-up window. A new window will appear allowing you to install up to 10 extractor heads, adjust the duration of the extraction program, and see a graph showing how many resources each cycle will pull up as well as the grand total. | ||
| + | |- | ||
| + | |[[File:Upgrade1.png|left|300px]] | ||
| + | | colspan="3" | In order to place all 10 heads, we’re going to need to upgrade our CC so it provides more Powergrid and CPU. Click on the CC and select the leftmost button labeled “Upgrade,” then select the next upgrade level and click “Upgrade.” You actually won’t be charged any ISK until you next click the “Submit” button, so don’t be too worried if you discover later that you have a lot of excess Powergrid and CPU. However, the only way to cancel an upgrade is to click the “Cancel” button next to the “Submit” button which will undo ‘''ALL’'’ the edits you’ve made since you last “saved,” so it’s recommended to only upgrade one level at a time. | ||
| + | |- | ||
| + | |[[File:Placed_Heads.png|left|300px]] | ||
| + | | colspan="3" | Okay, we’ve upgraded our CC and installed and placed all our heads! But what if I don’t want to run a program for just one hour? Let’s set the program to a full day... | ||
| + | |- | ||
| + | |[[File:Interference.png|left|300px]] | ||
| + | | colspan="3" | Oops! Our extractor heads are now causing interference with each other because the longer program caused their extraction areas to increase and overlap! If we run the program now we’ll lose some materials as indicated by the red percentages in the Survey Window. We can either spread out our heads or reduce the program duration. Since I’m just making a tutorial, I reset the duration to one hour. Note also how the extraction per cycle has dropped. With a one-hour program the first cycle pulled up 30,000 units. With a 24-hour program the first cycle only pulls up roughly 20,000 units. | ||
| + | |- | ||
| + | |[[File:Extractor-Pad_Link.png|left|300px]] | ||
| + | | colspan="3" | When we’re done fiddling with our extractor heads, we can start the program by clicking the “Install Program” button and then “Submit.” But now we need to store our extracted materials! Since we’re going to eventually be moving our finished products off-planet, let’s use a Launchpad as our storage unit. Place one using the Build Menu near the ECU. Now we need to link the two buildings. {{button|CTRL}} - {{button|LMB}} the ECU, then release {{button|CTRL}} and click the Launchpad. You can do this the other way round, too, or use the Links Menu on either building’s pop-up window. You’ve now set up a link over which products can be routed, at the cost of some CPU and Powergrid based on the link’s length, which is why we tried to minimize the distance between buildings. | ||
| + | |- | ||
| + | |[[File:Routing_Microorganisms.png|left|300px]] | ||
| + | | colspan="3" | Now we need to tell our buildings to actually move stuff across this new link. Click the Products button on the ECUs pop-up, or double-click the structure itself. As you see, Microorganisms are currently not routed. We can fix this by clicking on them, clicking “Create Route,” and then clicking our Launchpad, and clicking “Create Route” again. Now all our Microorganisms will be automatically sent there for storage. | ||
| + | |- | ||
| + | |style="width: 20%"| | ||
| + | [[File:Upgrade2.png|left|300px]] | ||
| + | |style="width: 20%"| | ||
| + | [[File:Placed_BIF.png|300px]] | ||
| + | |style="width: 20%"| | ||
| + | [[File:Selecting_Schematics.png|300px]] | ||
| + | |style="width: 40%"| | ||
| + | Time to start processing our Microorganisms, but first, a second upgrade to our CC! Now place a Basic Industry Facility (BIF) by the Launchpad and create a link between them like we did to our ECU. Now double-click the BIF or select “Schematics” from the pop-up. Select Bacteria and click “Install." | ||
| + | |- | ||
| + | |[[File:Routing_Products.png|left|300px]] | ||
| + | | colspan="3" | You’ll then be taken to the BIF’s Products menu, where it will prompt you to route the Bacteria to a storage facility. Click “Create Route," select the Launchpad, and click “Create Route” again. | ||
| + | |- | ||
| + | |[[File:Routing_Components_from_Pad.png|left|300px]] | ||
| + | |[[File:Routing_to_Second_BIF.png|300px]] | ||
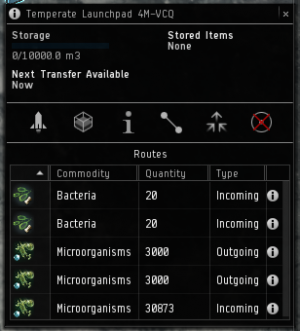
| + | | colspan="2" | The next part can be easy to forget. You need to tell the Launchpad to route the Microorganisms to the BIF as they come in from the ECU. Select the Routes menu from the Launchpad pop-up and note that you have two products coming in but nothing going out for processing. Click the Incoming Microorganisms, “Create Route,” the BIF, and then “Create Route” again, and you’re all set! Remember to repeat this step if you add more BIFs (as I did). The easy way to check is to see if you have as many entries of Outgoing Microorganisms as you do Incoming Bacteria, since Microorganisms are the only component of Bacteria. | ||
| + | |- | ||
| + | |[[File:BIF_in_progress.png|left|300px]] | ||
| + | | colspan="3" | As you can see, I set up three BIFs to keep my Launchpad from filling up with Microorganisms. You can check up on your BIFs by clicking on them to view the remaining time on their current order and how much of the necessary inputs they have ready for the next order. Industry Facilities can only hold one run’s worth of inputs themselves to “prep” for the next run. Anything in excess of this will be thrown away, which is why we went through the extra step of routing the Microorganisms to a storage facility first. | ||
| + | |- | ||
| + | |[[File:POCO.png|left|300px]] | ||
| + | |[[File:POCO_Tax.png|left|300px]] | ||
| + | | colspan="2" | Once we’ve received Bacteria at our Launchpad, we can export it. There are two ways of doing this: via the Player-Owned Customs Office (POCO) or via a container launch from the CC. Let’s look at the POCO method first. Click on the Launch button (the rocket) in the Launchpad pop-up. Simply drag and drop the Bacteria over to the pane labeled “Planetary Customs Office.” As you can see, we’ve been quoted a fee of 1,200 ISK to export, which is equal to (in our case, since we’re in 0.0 and NPC taxes don’t exist on top of player taxes) the base cost of a P1 product, 400 ISK, times 60 units times the 5% player-set tax rate. Click “Transfer” to finalize the export and accept the charges. You can also do this from the POCO in space without having to go through Planet Mode. | ||
| + | |- | ||
| + | |[[File:Access_POCO.png|left|300px]] | ||
| + | |[[File:POCO_to_Cargo.png|left|300px]] | ||
| + | | colspan="2" | Now let’s go pick up our Bacteria. Warp to the POCO and select “Access Customs Office.” Here you’ll be presented with the Transfer window again, but you can also drag-and-drop the Bacteria on the POCO pane of the window into your cargo hold. And ta-da! You now have Bacteria to sell on the market! | ||
| + | |- | ||
| + | |[[File:Expedited_Transfer.png|left|300px]] | ||
| + | |[[File:Expedited_Transfer_Cooldown.png|left|300px]] | ||
| + | | colspan="2" | Now let’s explore the other method of exporting our products, a CC Launch. I didn’t have a link between the Launchpad and the CC before, but you’ll need one. First though, we need to use an Expedited Transfer, since routes can’t be created between two storage buildings. Under the Storage window of the Launchpad pop-up, select “Expedited Transfer” and click the CC. Like the POCO window, you can drag-and-drop the Bacteria into the “To Be Transferred” pane. Then click “Execute Transfer.” Note that there is a cooldown timer based on the volume transferred and the size of the links through which the material is being transferred. The minimum cooldown is 5 minutes. A basic link can move 1,250 cubic metres per hour. Each upgrade doubles this to a maximum of 40,000 at level 5. If you move an entire launchpad full of stuff across basic links, it will take eight hours, compared to 15 minutes for a fully upgraded link. | ||
| + | |- | ||
| + | |[[File:CC_Launch.png|left|300px]] | ||
| + | |[[File:CC_Launch_Cooldown.png|left|300px]] | ||
| + | | colspan="2" | Now click on the CC and select “Launch.” This option costs 50% more than an export to the POCO from the Launchpad, and has a similar cooldown timer. Another key difference from an interface standpoint is that you cannot use drag-and-drop in the Launch window, you must click the item and select “Add” or “Remove.” When you are ready click “Go for Launch." | ||
| + | |- | ||
| + | |[[File:Launch_Can.png|left|300px]] | ||
| + | |[[File:Launch_Can_to_Cargo.png|left|300px]] | ||
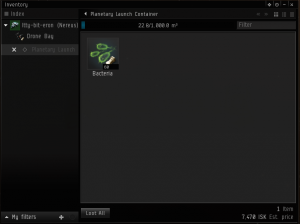
| + | | colspan="2" | Okay, so if our Bacteria weren’t sent to the POCO, where’d they go? Under the Planetary Launches tab of your Journal you’ll see a bookmark for a canister that was generated in space orbiting the planet. You can warp to this can, open it, and loot it like another can. However, the can will be destroyed on “re-entry” after five days, and it shows up on pilots’ [[Directional Scanner Guide|directional scanner]], potentially setting you up to be probed down by combat probes, ganked, and have your goodies stolen, as the can is not secure. A POCO is less expensive per launch and offers secure, personal storage for presumably an indefinite period (most likely excluding the destruction of the POCO itself), but is automatically accessible to anyone in the system, and requires the building of a Launchpad which costs 900,000 ISK and cuts into your colony’s Powergrid and CPU. | ||
| + | |} | ||
| − | + | * Check out the Competition: While we were waiting, we could have checked out who else is on the planet. Sometimes you just see an extractor here or there, sometimes you see the Command Center. If you click on the Command Center you can see all the nodes in their network. Right-click on the background to hide or show other players colonies. Mostly you can just ignore them, except when they are sitting on top of the juicy deposit that is rightfully yours. If you both drink from the same deposit each gets less, just as if you place your own extractor heads too close to each other. The below images are taken from the original guide on this page. For more details. | |
| − | |||
| − | |||
| − | |||
| − | |||
| − | |||
| − | |||
| − | |||
| − | |||
| − | |||
| − | |||
| − | |||
| − | |||
| − | |||
| − | |||
| − | |||
| − | |||
| − | |||
| − | |||
| − | |||
| − | |||
| − | |||
| − | |||
| − | |||
| − | |||
| − | |||
| − | |||
| − | |||
| − | |||
| − | |||
| − | |||
| − | |||
| − | |||
| − | |||
| − | |||
| − | |||
| − | |||
| − | |||
| − | |||
| − | |||
| − | |||
| − | |||
| − | |||
| − | |||
| − | |||
| − | |||
| − | |||
| − | |||
| − | |||
| − | |||
| − | |||
| − | |||
| − | |||
| − | * Check out the Competition: While we | ||
<gallery> | <gallery> | ||
File:PI_YFC-28-Competition.png | File:PI_YFC-28-Competition.png | ||
| Line 84: | Line 107: | ||
File:PI_YFC-29b-CompetitionNetwork.png | File:PI_YFC-29b-CompetitionNetwork.png | ||
</gallery> | </gallery> | ||
| − | + | ||
| − | * | + | * If you're done with this planet, you can tear down your whole colony by deleting the Command Center. You will lose the investment you made in the old Command Center, and all the buildings you built, however, so it's probably best to wait until the colony has paid for itself in products. |
| − | |||
| − | |||
| − | |||
| − | + | [[Category:Guides]] | |
| − | + | [[Category:Industry]] | |
| − | + | [[Category:Planetary Industry]] | |
| − | |||
| − | |||
| − | |||
| − | |||
| − | |||
| − | |||
| − | |||
| − | |||
| − | |||
| − | |||
| − | |||
| − | |||
| − | |||
| − | |||
| − | |||
| − | |||
| − | |||
| − | |||
| − | |||
| − | |||
| − | |||
| − | |||
| − | |||
| − | |||
| − | |||
| − | |||
| − | |||
| − | |||
| − | |||
| − | |||
| − | |||
| − | |||
| − | |||
| − | |||
| − | |||
| − | |||
| − | |||
| − | |||
| − | |||
| − | |||
| − | |||
| − | |||
| − | |||
| − | |||
| − | |||
| − | |||
| − | |||
| − | |||
| − | |||
| − | |||
| − | |||
| − | |||
| − | |||
| − | |||
| − | |||
| − | |||
| − | |||
| − | |||
| − | |||
| − | |||
| − | |||
| − | |||
| − | |||
| − | |||
Latest revision as of 13:23, 28 November 2023
|
| Planetary Industry |
|---|
| Introduction to PI |
| The Basics |
| Advanced |
| Other Resources |
The purpose of Planetary Industry is to produce things from stuff you have extracted from planets and make money by selling it on the market.
To do anything on a planet, you need a Planetary Command Center matching that planet's type. Once you have deployed this from somewhere in space in the desired system, everything else can be done from anywhere in the universe until you export your items, which must be done in space in the same system as your colony. Picking up your items also must be done in space and uncloaked near either a Customs Office or a launched canister from your Command Center, depending on how you export your products.
Your Command Center provides Powergrid and CPU to your entire colony. This limits how many buildings you can put in a colony. Everything takes a certain amount of CPU and Powergrid, including the links between the buildings.
If you are building a manufacturing-only colony, then you need processors and a way of getting things to and from the planetary surface. You can put the colony in a small area, anywhere on your chosen planet.
If you are building a resource-extraction colony, you need resource extractors and a way to get things up from the planetary surface.
If you want smooth processing without waste, if you have excess of one resource/product building up, or need to store your output for later pickup you will need storage. For storage, you can use (in order of capacity) a Planetary Command Center (500 m3), Launch Pad (10,000 m3), or Storage Facility (12,000 m3).
Once you have a sense of the basics, you can start thinking about tailoring your setup to your needs, setting up longer production chains on one planet (or multiple planets), etc., which you can find more information on at the Colony Management page.
Your First Colony
This pictorial guide will show you step-by-step how to set up a basic colony for producing P1 products from locally extracted R0 raw materials. We will be going over:
- The basic setup of a Command Center (CC), an Extractor Control Unit (ECU) and extractor heads, a Launchpad, a Basic Industry Facility (BIF), and links.
- Routing inputs and outputs to minimize resource loss.
- Exporting via a Launchpad and a Customs Office.
- Exporting via the Command Center.
There are also video guides over at the main Planetary Industry page for your perusal.
For more details on structures, see Planetary Buildings.
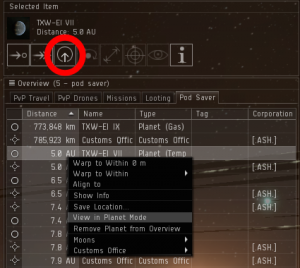
| Buy a "XXX Command Center" on the market. (We are going to a Temperate Planet, so I bought a Temperate Command Center). NPCs sell them for only 81,000 ISK, so they're pretty cheap, even for a new player (until you upgrade them, of course). Fly to the system with the Command Center in your cargo (you need at least 1000m3), and sit in space, preferably cloaked if you are (like myself in this example) in low sec or 0.0. Since The Syndicate, the system's owner, is an NPC corp, there is no player sovereignty blocking my deployment.
Select the planet in the Overview and select View Planetry Industry from either the Selected Item box or via the right-click contextual menu. Scan for Resources. The Planets and Planetary Commodities pages are good resources for figuring out what you need to look for to produce what you want. | |||
| Go to the Build Menu and select Command Centers (which we’ll call CCs from now on). Click on “Temperate Command Center” and place it near to where you want to extract resources. In order to build more structures, you’ll need to click “Submit” at the top left. Once you do this, you cannot move your CC or reclaim it. | |||
| Time to start extracting! Select Extractor Control Units (a.k.a. ECUs) and select the only option (Temperate ECU) to place it. There will be a transparent circle surrounding the ECU that is not visible in the image to the right because of how far we’re zoomed in. That circle dictates where our ECU can place its extractor heads, which we’ll get to in a moment. Make sure any resource hotspots you want to extract from are within that circle! Then click “Submit" and accept the 45,000 ISK fee to build the ECU. | |||
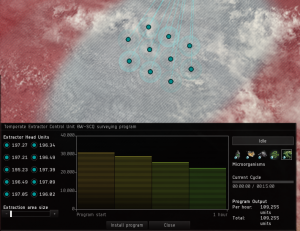
| Once you’ve submitted the changes to place the ECU, you can start surveying for deposits and placing extractor heads. Click the ECU and then click the leftmost button labeled “Install Extraction Program” in the pop-up window. A new window will appear allowing you to install up to 10 extractor heads, adjust the duration of the extraction program, and see a graph showing how many resources each cycle will pull up as well as the grand total. | |||
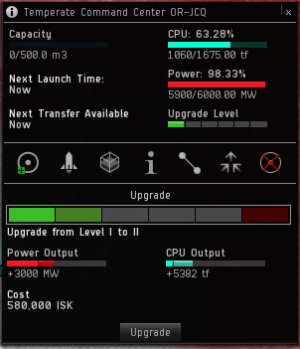
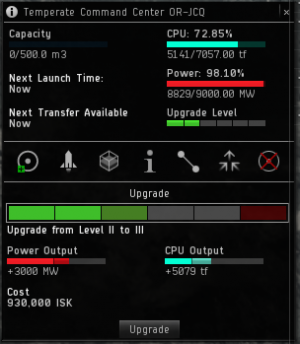
| In order to place all 10 heads, we’re going to need to upgrade our CC so it provides more Powergrid and CPU. Click on the CC and select the leftmost button labeled “Upgrade,” then select the next upgrade level and click “Upgrade.” You actually won’t be charged any ISK until you next click the “Submit” button, so don’t be too worried if you discover later that you have a lot of excess Powergrid and CPU. However, the only way to cancel an upgrade is to click the “Cancel” button next to the “Submit” button which will undo ‘ALL’'’ the edits you’ve made since you last “saved,” so it’s recommended to only upgrade one level at a time. | |||
| Okay, we’ve upgraded our CC and installed and placed all our heads! But what if I don’t want to run a program for just one hour? Let’s set the program to a full day... | |||
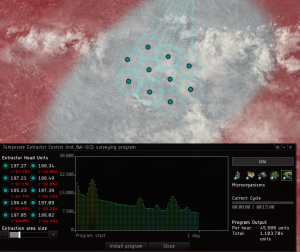
| Oops! Our extractor heads are now causing interference with each other because the longer program caused their extraction areas to increase and overlap! If we run the program now we’ll lose some materials as indicated by the red percentages in the Survey Window. We can either spread out our heads or reduce the program duration. Since I’m just making a tutorial, I reset the duration to one hour. Note also how the extraction per cycle has dropped. With a one-hour program the first cycle pulled up 30,000 units. With a 24-hour program the first cycle only pulls up roughly 20,000 units. | |||
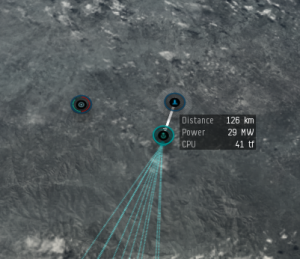
| When we’re done fiddling with our extractor heads, we can start the program by clicking the “Install Program” button and then “Submit.” But now we need to store our extracted materials! Since we’re going to eventually be moving our finished products off-planet, let’s use a Launchpad as our storage unit. Place one using the Build Menu near the ECU. Now we need to link the two buildings. CTRL - LMB the ECU, then release CTRL and click the Launchpad. You can do this the other way round, too, or use the Links Menu on either building’s pop-up window. You’ve now set up a link over which products can be routed, at the cost of some CPU and Powergrid based on the link’s length, which is why we tried to minimize the distance between buildings. | |||
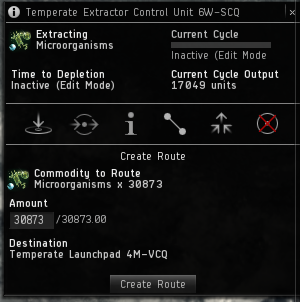
| Now we need to tell our buildings to actually move stuff across this new link. Click the Products button on the ECUs pop-up, or double-click the structure itself. As you see, Microorganisms are currently not routed. We can fix this by clicking on them, clicking “Create Route,” and then clicking our Launchpad, and clicking “Create Route” again. Now all our Microorganisms will be automatically sent there for storage. | |||
|
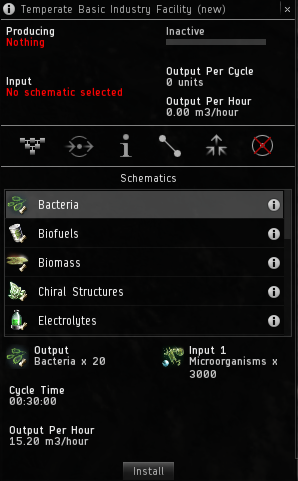
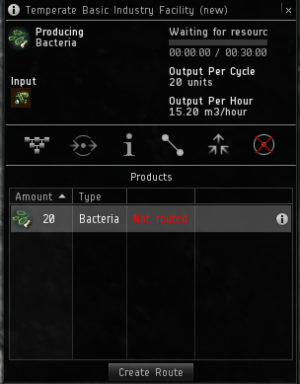
Time to start processing our Microorganisms, but first, a second upgrade to our CC! Now place a Basic Industry Facility (BIF) by the Launchpad and create a link between them like we did to our ECU. Now double-click the BIF or select “Schematics” from the pop-up. Select Bacteria and click “Install." | |||
| You’ll then be taken to the BIF’s Products menu, where it will prompt you to route the Bacteria to a storage facility. Click “Create Route," select the Launchpad, and click “Create Route” again. | |||
|
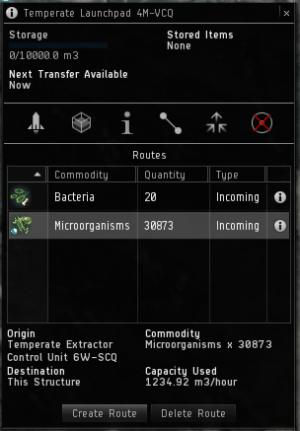
The next part can be easy to forget. You need to tell the Launchpad to route the Microorganisms to the BIF as they come in from the ECU. Select the Routes menu from the Launchpad pop-up and note that you have two products coming in but nothing going out for processing. Click the Incoming Microorganisms, “Create Route,” the BIF, and then “Create Route” again, and you’re all set! Remember to repeat this step if you add more BIFs (as I did). The easy way to check is to see if you have as many entries of Outgoing Microorganisms as you do Incoming Bacteria, since Microorganisms are the only component of Bacteria. | ||
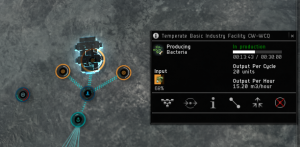
| As you can see, I set up three BIFs to keep my Launchpad from filling up with Microorganisms. You can check up on your BIFs by clicking on them to view the remaining time on their current order and how much of the necessary inputs they have ready for the next order. Industry Facilities can only hold one run’s worth of inputs themselves to “prep” for the next run. Anything in excess of this will be thrown away, which is why we went through the extra step of routing the Microorganisms to a storage facility first. | |||
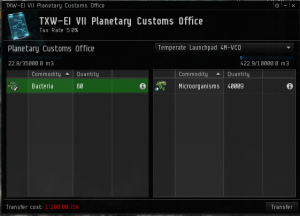
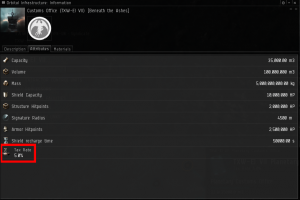
| Once we’ve received Bacteria at our Launchpad, we can export it. There are two ways of doing this: via the Player-Owned Customs Office (POCO) or via a container launch from the CC. Let’s look at the POCO method first. Click on the Launch button (the rocket) in the Launchpad pop-up. Simply drag and drop the Bacteria over to the pane labeled “Planetary Customs Office.” As you can see, we’ve been quoted a fee of 1,200 ISK to export, which is equal to (in our case, since we’re in 0.0 and NPC taxes don’t exist on top of player taxes) the base cost of a P1 product, 400 ISK, times 60 units times the 5% player-set tax rate. Click “Transfer” to finalize the export and accept the charges. You can also do this from the POCO in space without having to go through Planet Mode. | |||
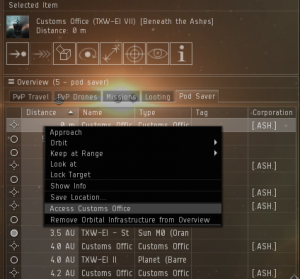
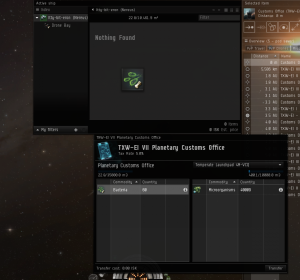
| Now let’s go pick up our Bacteria. Warp to the POCO and select “Access Customs Office.” Here you’ll be presented with the Transfer window again, but you can also drag-and-drop the Bacteria on the POCO pane of the window into your cargo hold. And ta-da! You now have Bacteria to sell on the market! | |||
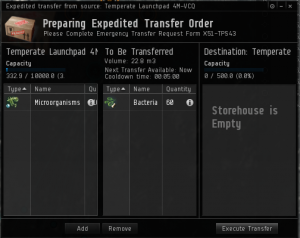
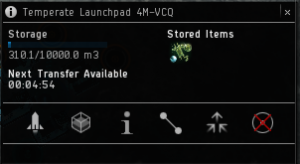
| Now let’s explore the other method of exporting our products, a CC Launch. I didn’t have a link between the Launchpad and the CC before, but you’ll need one. First though, we need to use an Expedited Transfer, since routes can’t be created between two storage buildings. Under the Storage window of the Launchpad pop-up, select “Expedited Transfer” and click the CC. Like the POCO window, you can drag-and-drop the Bacteria into the “To Be Transferred” pane. Then click “Execute Transfer.” Note that there is a cooldown timer based on the volume transferred and the size of the links through which the material is being transferred. The minimum cooldown is 5 minutes. A basic link can move 1,250 cubic metres per hour. Each upgrade doubles this to a maximum of 40,000 at level 5. If you move an entire launchpad full of stuff across basic links, it will take eight hours, compared to 15 minutes for a fully upgraded link. | |||
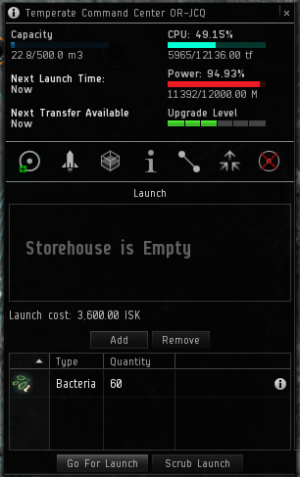
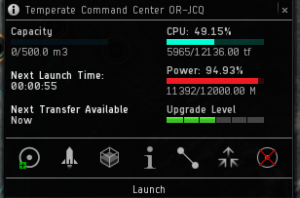
| Now click on the CC and select “Launch.” This option costs 50% more than an export to the POCO from the Launchpad, and has a similar cooldown timer. Another key difference from an interface standpoint is that you cannot use drag-and-drop in the Launch window, you must click the item and select “Add” or “Remove.” When you are ready click “Go for Launch." | |||
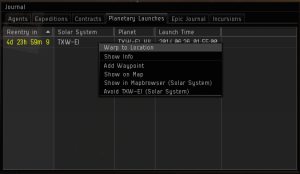
| Okay, so if our Bacteria weren’t sent to the POCO, where’d they go? Under the Planetary Launches tab of your Journal you’ll see a bookmark for a canister that was generated in space orbiting the planet. You can warp to this can, open it, and loot it like another can. However, the can will be destroyed on “re-entry” after five days, and it shows up on pilots’ directional scanner, potentially setting you up to be probed down by combat probes, ganked, and have your goodies stolen, as the can is not secure. A POCO is less expensive per launch and offers secure, personal storage for presumably an indefinite period (most likely excluding the destruction of the POCO itself), but is automatically accessible to anyone in the system, and requires the building of a Launchpad which costs 900,000 ISK and cuts into your colony’s Powergrid and CPU. | |||
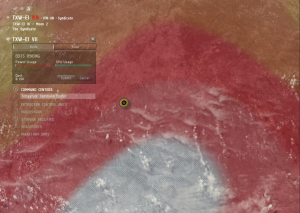
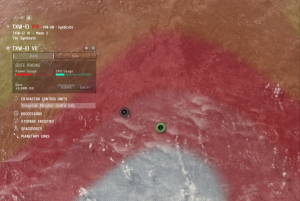
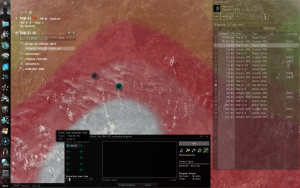
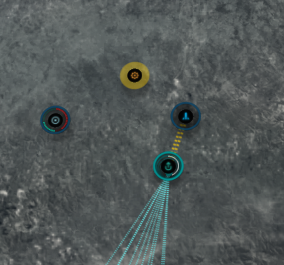
- Check out the Competition: While we were waiting, we could have checked out who else is on the planet. Sometimes you just see an extractor here or there, sometimes you see the Command Center. If you click on the Command Center you can see all the nodes in their network. Right-click on the background to hide or show other players colonies. Mostly you can just ignore them, except when they are sitting on top of the juicy deposit that is rightfully yours. If you both drink from the same deposit each gets less, just as if you place your own extractor heads too close to each other. The below images are taken from the original guide on this page. For more details.
- If you're done with this planet, you can tear down your whole colony by deleting the Command Center. You will lose the investment you made in the old Command Center, and all the buildings you built, however, so it's probably best to wait until the colony has paid for itself in products.
