More actions
| Line 607: | Line 607: | ||
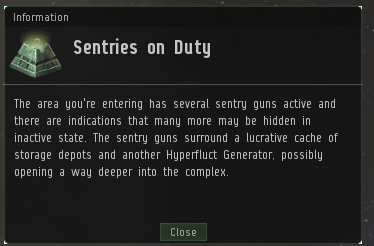
=== Sentries on Duty === | === Sentries on Duty === | ||
This room can be | This room can be challenging, but for frigate pilots, this is generally the most lucrative portion of the site.<br /> | ||
{| style="background:#350000; border:1px solid #333333; padding:0px;" | {| style="background:#350000; border:1px solid #333333; padding:0px;" | ||
| style="padding:0px;" | [[image:Icon_warning.png|56px|link=]] | | style="padding:0px;" | [[image:Icon_warning.png|56px|link=]] | ||
| style="padding:8px;" | '''WARNING:''' | | style="padding:8px;" | '''WARNING:''' | ||
''1. If the Alarm has been tripped in this room, there can be in excess of 16 Sentry Towers active, and frigates will not stand a chance | ''1. If the Alarm has been tripped in this room, there can be in excess of 16 Sentry Towers active, and frigates will not stand a chance. There also can be no warning that the Alarm has been tripped. Overtanked [[Maller|Mallers]] and other hardened ships can survive the initial damage and subsequent DPS. If coming from the Solray room, the message indicating that the Alarm has been tripped shows up only after the ship is already in warp.<br />'' | ||
''2. Do not apply any hostile module or weapon onto the Plasma Chamber structures | ''2. Do not apply any hostile module or weapon onto the Plasma Chamber structures except in very specific circumstances (detailed below). They have enough power to alpha a battleship off the grid ([https://zkillboard.com/related/30005311/201606190200/ or a small fleet]).<br />'' | ||
''3. Do not engage the initial Sentry Towers. Doing so will instantly trip the alarm and spawn the 16 Perimeter Defense sentry towers. The maximum number of Sentry Towers that may be active appears to be 32 (16 Perimeter, 6 initially deployed, and 10 'proximity' ones).'' | ''3. Do not engage the initial Sentry Towers. Doing so will instantly trip the alarm and spawn the 16 Perimeter Defense sentry towers. The maximum number of Sentry Towers that may be active appears to be 32 (16 Perimeter, 6 initially deployed, and 10 'proximity' ones).'' | ||
|} | |} | ||
<br /> | <br /> | ||
The following images are included to provide context and further guidance: | |||
{| class="wikitable" style="margin-left: auto; margin-right: auto; border: none;" | {| class="wikitable" style="margin-left: auto; margin-right: auto; border: none;" | ||
| Line 636: | Line 636: | ||
|} | |} | ||
[[File:3P38_Superior_12.png|200px|thumb|right|Hacking the repair station early does nothing]] | [[File:3P38_Superior_12.png|200px|thumb|right|Hacking the repair station early does nothing]]Start from the Solray room, leaving the Mobile Depot near the lone Storage Depot. | ||
Make sure to do three things before attempting this room: | |||
# Bookmark the location of the Mobile Depot in the Solray Power Plant. | # Bookmark the location of the Mobile Depot in the Solray Power Plant. | ||
# Drop all loot and unneeded modules into the Mobile Depot. | # Drop all loot and unneeded modules into the Mobile Depot. | ||
# Refit into the appropriate fit. | # Refit into the appropriate fit. | ||
Take the Spatial Rift near the Solray Gamma Alignment Unit container. The Sentry Towers will not aggress unless a ship strays too close to the loot containers. | |||
The Remote Defense Grid Unit in the room has three functions | The Remote Defense Grid Unit in the room has three functions: first, it disables any proximity-based Sentry Towers from activating. Second, it re-wires a hostile Sentry Tower into a friendly one. Third, it recalibrates the Vessel Rejuvenation Battery into one that can be hacked to configure it to repair the friendly Sentry Tower. If a ship approaches the Storage Depots and ignores the Remote Grid Defense Unit procedure, then not only will the 6 initial Towers aggress, but up to 10 additional new Sentry Towers can spawn. | ||
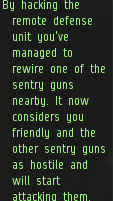
First, hack the Remote Defense Grid Unit. Take your time on this hack, there is no rush. The newly-converted Tower will then aggress the other 5 Sentry Towers, and in turn take damage itself. It can't sustain the incoming damage for long. | |||
{| style="background:#350000; border:1px solid #333333; padding:0px;" | {| style="background:#350000; border:1px solid #333333; padding:0px;" | ||
| Line 655: | Line 654: | ||
|} | |} | ||
'''CAN DIFFICULTY: 9/10 [RED HACK]'''<br /> | :'''CAN DIFFICULTY: 9/10 DATA <span style="color:red">[RED HACK]</span>'''<br /> | ||
<span style="color:green">SUCCESS:</span> The closest Sentry Tower becomes friendly, and aggresses the other Sentry Towers to blow them up, and will in turn begin taking damage itself from the other Sentry Towers.<br /> | ::<span style="color:green">SUCCESS:</span> The closest Sentry Tower becomes friendly, and aggresses the other Sentry Towers to blow them up, and will in turn begin taking damage itself from the other Sentry Towers.<br /> | ||
<span style="color:red">FAILURE:</span> A timer is generated which will activate the Alarm in 45 seconds. When the 45 second timer is up, the RDGU explodes and there is no other way to proceed without | ::<span style="color:red">FAILURE:</span> A timer is generated which will activate the Alarm in 45 seconds. When the 45 second timer is up, the RDGU explodes and there is no other way to proceed without strong tanking abilities. At the 45 second timer mark, the site spawns the 16 Perimeter Defense sentry towers, for a total of 22 Sentry Towers. Frigates will not survive. | ||
[[File:3P38_Superior_44.png|200px|thumb|right|Approximate DPS of all 16 Perimeter Towers (varies)]]For Cruisers and above, there is Plan B. | [[File:3P38_Superior_44.png|200px|thumb|right|Approximate DPS of all 16 Perimeter Towers (varies)]]For Cruisers and above, there is Plan B. | ||
Immediately after hacking this container, active the Microwarpdrive and burn towards the Sentry Repair Station located near the right of your present position. Hacking the Sentry Repair Station will cause it to provide armor and shield reps to the friendly Tower. (The friendly Tower cannot receive remote repairs from ships.) There is enough time for 2 hacks, maybe 3 fast hacks, before the hostile Sentry Towers destroy the friendly Tower: | |||
:'''CAN DIFFICULTY: 8/10 DATA <span style="color:red">[RED HACK]</span>'''<br /> | |||
::<span style="color:green">SUCCESS:</span> The Station will provide shield and armor repairs to the friendly Rewired Sentry Gun.<br /> | |||
::<span style="color:red">FAILURE:</span> No penalty, although if a successful hack is not completed before the hostile Sentry Towers destroy the friendly Tower, then some Towers will remain. | |||
Hostile Towers do not appear to aggress ships even if the hacking the Sentry Repair Station is unsuccessful. Instead, the hostile Towers appear to keep incurring damage and are eventually destroyed, even with the Rewired Sentry Gun destroyed. This is another bug of the site itself. Should it be fixed in the future, simply revert to Plan B. ''Do not aggress the Sentry Towers with weaponry - it will instantly trigger the 16 Perimeter Defense Sentry Towers.'' | |||
Assuming a successful hack of the Sentry Repair Station, simply sit near the Repair Station and wait for the hostile Towers to be eradicated. Do not approach the 3 Unstable Plasma Chambers located north of the warp-in. Getting too close to these could be fatal, and will also trip the alarm. | |||
Hacking the Sentry Repair Station before the Remote Defense Grid Unit does nothing, although a message appears in Local: "Hacking the repair station has no discernible effects on anything in the vicinity. The station continues to provide repair services to to the nearby sentry guns." | |||
When all is clear, the loot is there for the taking, and | When all is clear, the loot is there for the taking, and pilots may hack and loot in peace, with no particular danger: | ||
'''CAN DIFFICULTY: 6 - 9/10 [YELLOW to RED HACKS]'''<br /> | :'''CAN DIFFICULTY: 6 - 9/10 RELIC [<span style="color:yellow">YELLOW</span> to <span style="color:red">RED</span> HACKS]'''<br /> | ||
<span style="color:green">SUCCESS:</span> | ::<span style="color:green">SUCCESS:</span> Contents can be looted.<br /> | ||
<span style="color:red">FAILURE:</span> No penalty. | ::<span style="color:red">FAILURE:</span> No penalty. | ||
Do | ''Do not'' hack the Hyperfluct Generator container yet. | ||
While working on the hacks, avoid using the Microwarpdrive, use "Keep at Range" (2500m) on the last can near the group of Plasma Chambers, and move slowly (around 100m/sec) to avoid triggering the Plasma Chambers. After all worthy containers are hacked, frigate pilots will have completed as much as they can. Take the Spatial Rift to head back to the Solray Room, refit to a travel fit if needed, scoop up any contents inside the Mobile Depot (if it is scooped to the cargohold directly, a jetcan is left behind), pack up the Mobile Depot and depart. | |||
For the T3 Cruisers, Nestor and other similar battleship-level tanked ships, if there was no Mobile Depot left behind anywhere in any other room, you may now proceed to the | For the T3 Cruisers, Nestor and other similar battleship-level tanked ships, if there was no Mobile Depot left behind anywhere in any other room, you may now proceed to the Archive Room. | ||
{| class="collapsible collapsed" style="background-color:#0d2710; background-image: linear-gradient(#071709, #0d2710); border: 1px solid #287833; padding:0.2em; width:{{{width|90%}}}" | {| class="collapsible collapsed" style="background-color:#0d2710; background-image: linear-gradient(#071709, #0d2710); border: 1px solid #287833; padding:0.2em; width:{{{width|90%}}}" | ||
! style="text-align:left" | <span style="color:#44c055">About those Plasma Chambers</span> | ! style="text-align:left" | <span style="color:#44c055">About those Plasma Chambers</span> | ||
|- | |- | ||
| style="font-size:90%; color:#FFFFFF" | {{{1| | | style="font-size:90%; color:#FFFFFF" | {{{1|You can amuse yourself by searching zKillboard for kills by the [https://zkillboard.com/ship/2894/ Invisible Cloud] element. Check for ones with blue loot inside them. The Plasma Chambers deal massive amounts of damage. The damage was first tested with an overtanked [[Maelstrom]], fit like this: | ||
{{ShipFitting | {{ShipFitting | ||
| Line 752: | Line 753: | ||
}} | }} | ||
Damage report: 28000 damage flat, with the | Damage report: 28000 damage flat, with the Adaptive Invulnerability Field overloaded, which almost completely drained the shields. The damage type is unclear. There have also been tests reporting over 50,000 damage. | ||
The explosion radius itself is also big. To test this, I made a line of Atrons from 100km out to 240km. All of them were blown up. This was not conclusive enough, so I found another site after some time. So then inside that one I made another line of Atrons from 240km out to 350km. For that case, only the 240km Atron was popped, but not the one at 250km. So it's probably very safe to say that the detonation radius is 249km, or 250km: the Atron might have been on the raw edge of the line. As for detonating it, any hostile module will work, such as a target painter. Even a gun or missile doesn't have to actually inflict any damage to the Chambers: the mere act of aggression is enough. | The explosion radius itself is also big. To test this, I made a line of Atrons from 100km out to 240km. All of them were blown up. This was not conclusive enough, so I found another site after some time. So then inside that one I made another line of Atrons from 240km out to 350km. For that case, only the 240km Atron was popped, but not the one at 250km. So it's probably very safe to say that the detonation radius is 249km, or 250km: the Atron might have been on the raw edge of the line. As for detonating it, any hostile module will work, such as a target painter. Even a gun or missile doesn't have to actually inflict any damage to the Chambers: the mere act of aggression is enough. | ||
Revision as of 20:45, 18 January 2017
Warning this site is very difficult and you have a high chance of losing your ship.
Good ISK can be made by players with medium skills by just completing Room 1 and 2, skipping the mineroom and archive which significantly reduces the risk.
Some Suggestions:
1) Recommend having Tech 2 Data and Relic analyzers
2) Recommend a Cruiser sized ship or larger
3) Recommend a shield or armor repair module
4) Recommend having good resists as the Solray Power Unit and Archive deal regular damage
5) Recommend large buffer to survive failed hacks in all rooms
6) Recommend a cargo scanner to save time
7) Recommend a Microwarp drive
8) Recommend setting your overview to show all large collidable objects
Entry Point/Warp-In
Hyperfluct Generator – Use a Data Analyzer to hack
Failing the hack starts a short timer (30 – 45 seconds for you to attempt a second hack), if you fail again it will explode and you will lose the site with damage to your ship as well
Picture of Entry Point after successful hack
Take the Spatial Rift
Room 1 (May Start with Room 2 first) Solar Power Unit
DO NOT GO NEAR THE Solray Power Unit until you do the steps below:
1) Hack the Solray Observational Unit – Inside this will be Something like a Radio Ray Modulate, or Infrared or Gamma Ray
2) Place the item you looted in the in the corresponding named Alignment Unit
    a.	Solray Radio Alignment Unit
    b.	Solray Gamma Alignment Unit
    c.	Solray Infrared Alignment Unit
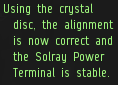
Message Upon Stabilizing the Solray Power Terminal
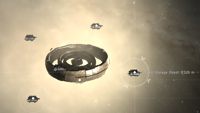
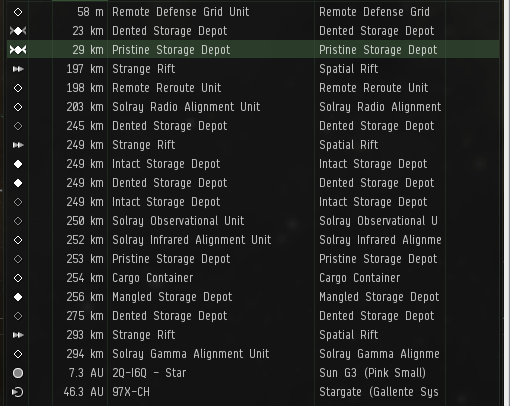
3) Now use the Relic Analyzer on all the cans and retrieve loot. Very small amounts of damage will be coming from the Solar Power Generator (the disc shaped thing)
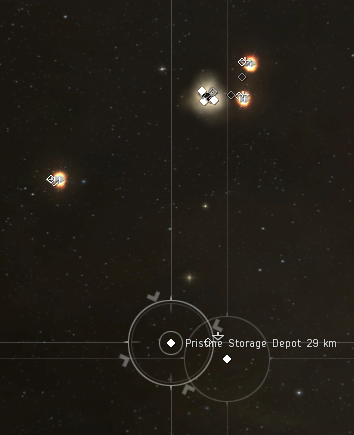
Solray Power Unit and surrounding depots
4) Take the right Most Rift in the first picture above, this will warp you to the Rift with the Remote Reroute Unit
Hack the Remote Reroute Unit.
5) Take the nearby rift back to the other rifts
6) Take the right Most rift, this will lead to a secret room.
7) Secret Room (Often just skipped as the rewards are typically small and don't justify the time or risk taken)
  YOU ARE NOW IN A MINEROOM!  Do not make any sudden moves!
  Wait 15 - 20 seconds - a Remote Defense Grid Unit will appear – DO NOT TURN ON YOUR MWD, GO SLOWLY
  Coming with 10 KM of the Mines will cause them to explode.
  Hack the Remote Defense Grid Unit – Failure will blow up most ships (VERY DIFFICULT HACK)
  Only the very strongest tanked ships with a lot of buffer and resists will survive the blast.
After you succeed the hack 1 or 2 storage depots will appear. SLOW BOAT TO THEM (You are in minefield!)
Grid after hacking the Remote Defense Grid Unit
After Relic Analyzing the one or two depots that appeared, SLOW BOAT TO THE Strange Rifts in the distance, you will likely hit small mines for the first 50KM. Make sure you have a strong buffer tank to handle the blast. Once you are 35 KM away from the nearest mine you can start your microwarp drive burn.
8) Take the topmost rift (in the picture below) to get to the next room
Room 2 – Sentries on Duty (this room may come first)
You will be taking Sentry gun damage in this room
1) Immediately burn to the Remote Defense Grid Unit, Hack it
This will make one of the sentry guns help you: Rewired Sentry Gun
Message after hacking Remote Defense Grid Unit
2) Then immediately burn to the Sentry Repair Station (Preservation Unit is not the correct name, you will not see it on overview) and Hack it
Message about the hostiles targeting you Sentry Gun
3) This will heal your new friendly sentry gun, now wait until it blows up all the other sentry drones. Do not help. Stay within 500 – 1000 of the Sentry Repair Station.
Message after hacking Sentry Repair Station Preservation Unit
4) You may now Analyze the cans on field with mostly safety. However DO NOT GET TOO CLOSE TO THE PLASMA CHAMBERS, should you they will blow up and your ship will too. Do not Shoot them.
When you get too close to the plasma chambers this message appears:
5) Lastly hack the Hyperfluct Generator, if you are lucky it will spawn a new rift close by (skip to step 7)
6) If you are not lucky but did manage to hack the Generator, you will need to hack the Vessel Rejuvenation Battery (stay close to it) and then upon success immediately shoot one of the Plasma Chambers. The scary blast will destroy most ships if you have NOT hacked the Rejuvenation battery. (makes a great tarp)
7) Enter the Rift
Room 3 – The Archive
You are in NO immediate danger on warp in but alwasys watch the local messages closely from here on out
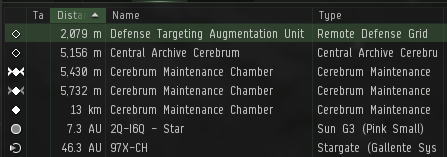
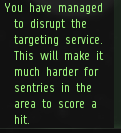
1) Burn with Microwarp drive to the Defense Targeting Augmentation Unit and hack it.
Note: From this point forward always be moving or orbiting something. The Sentry guns (which will be spawning shortly) will have a very hard time hitting you.
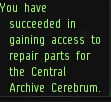
2) Hack 2 or 3 of the Cerebrum Maintenance Chambers (there is no great rush yet)
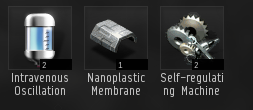
This is the kind of thing in the Maintenance Chambers – Loot them
Loot from Maintenance Chambers
3) Put 3 Oscillation Fluids in the Central Archive Cerebrum. (Putting other things in the Cerebrum will result in an explosion that will blow up your ship. – if you want to experiment be prepared to lose ships)
Message if you put 2 Oscillation Fluids in
(This is the message that appears if you only put 2 Oscillation Fluids in the Cerebrum)
Now things will start going fast.
4) The Central Archive will start throwing out containers/depots and vessel rejuvenation batteries
From this point forward there will be Shockwaves that do considerable damage every 30 seconds, a very strongly tanked T3 Proteus with a repper can take about 5-6 sets of the shockwaves (DO NOT RELY on ACTIVE TANK ONLY, Minimum 2 BUFFER MODS recommended). Be aware that if you enter an area that has a cloud around a wreck it will do additional damage to your ship.
5) Burn to them while scanning them to see which one has the most valuable loot, hack it, loot it, and repeat
Alternate Strategy: Burn to the Vessel rejuvenation battery, hack it, then you can Analyze two nearby cans while being healed by the Vessel rejuvenation battery.
6) This part of the exploration is a calculation on how much more Analyzing and hacking you can do before losing your ship.
Be aware that after 5 or so waves the shockwaves increase in magnitude and you will see slightly different messages in local. If you aren’t tanking the base shock waves well get out now!
You may warp out and warp back to the site (even though it seems to have despawned from local probe scan, as long as it is within 30 -60 seconds from when you warpout. You can try to go back after healing and try a can or two more but typically the escalated shockwave are still in play.
Superior Sleeper Cache
The Superior Sleeper Cache is a Cosmic Signature that can be found in known space using core scanner probes. The Superior Sleeper Cache is the most difficult of the Sleeper Cache sites, and is possibly the most difficult site that can be found via exploration that does no explicitly require combat. Pilots will be risking their ship when trying this or any other Sleep Cache. However, once familiar with these sites, pilots should be able to run the site without taking any damage. Like all Sleeper Cache sites, the Superior Sleeper Cache requires the use of both Data and Relic Analyzers. While ships up to battleships can enter this site, an exploration frigate is highly recommended in order to make use of their hacking bonuses.
Superior Sleeper Caches are incredibly difficult to scan down compared to most other signatures found in known space, and both excellent scanning skills as well as equipment are required to pinpoint the site completely.
Scanning
A probe strength of at least 103 is needed to scan down a Superior Sleeper Cache. A probe strength of 102 will come very close, but will ultimately not be enough. With a probe strength of 104, the site can be located using a tight cube formation.
To view your probe strength:
- Open the fitting window and hover over the probe launcher.
- Click the "Show Charge Info" icon.
- Under the Attributes tab, you should see "Base Sensor Strength". This is your probe strength.
If another pilot has already entered the site, an alternate means of entry would be to switch to combat probes and give him a visit or "share" the loot, if you know what that means. I try to respect the concept of site ownership, however if people abandon the site, I'll usually finish it.
Ship Fittings
Frigates not capable of running a Superior Sleeper Cache in its entirety.
Frigates are not suitable for:
- Checking if the Alarm has been activated in the Sentries on Duty room
- Running the Archive Room
- Running the Mine Room safely. Completion is possible, but should you fail, you will lose your ship
Otherwise, a Heron or Magnate can complete all other sections of the site.
| Exercise caution when altering these fits. These fits have been demonstrated to work, and alteration may result in failing the site or losing the ship. |
The following fit is used for the Solray Room after the Power Terminal has been stabilized.
Heron - Solray Room Fit
Relic Analyzer II
1MN Monopropellant Enduring Afterburner
Small Shield Booster II
5a Prototype Shield Support I
Eutectic Compact Cap Recharger
Damage Control II
Type-D Restrained Capacitor Flux Coil
Small Anti-Thermal Screen Reinforcer I
Small Anti-EM Screen Reinforcer I
Small Gravity Capacitor Upgrade I


- As long as you have Capacitor Systems Operation and Capacitor Management to II, you may simply swap the capacitor recharger for a Small Compact Pb-Acid Cap Battery, but the Afterburner will have to be used only when needed.
- As long as the fit can sustain about 40 EHP/sec (EFT/Pyfa figures) indefinitely, it's good enough.
- Also make sure the Analyzer(s) are set to Auto Repeat OFF.
- Cargo scan the containers before you use this fit to identify which ones are junk and which ones are not (use a fleet of yourself to allow tagging of containers)
Magnate - SolRay Room
1MN Monopropellant Enduring Afterburner
Relic Analyzer II
Eutectic Compact Cap Recharger
Small Armor Repairer II
Damage Control II
Type-D Restrained Capacitor Power Relay
Experimental Energized Adaptive Nano Membrane I
Small Gravity Capacitor Upgrade I
Small Auxiliary Nano Pump I
Small Anti-Explosive Pump I


- You may need to swap the afterburner for a Small Compact Pb-Acid Cap Battery to achieve capacitor stability.
To run the Sentries on Duty room (Turret Room), use the following:
Heron - Std. Sleeper Cache Site Run
Data Analyzer II
5MN Quad LiF Restrained Microwarpdrive
Medium Azeotropic Restrained Shield Extender
Relic Analyzer II
Type-E Enduring Cargo Scanner
Damage Control II
Micro Auxiliary Power Core I
Small Anti-EM Screen Reinforcer I
Small Anti-Thermal Screen Reinforcer I
Small Gravity Capacitor Upgrade I


Magnate - Std. Sleeper Cache Site Run
Relic Analyzer II
Data Analyzer II
5MN Quad LiF Restrained Microwarpdrive
Damage Control II
Small Armor Repairer II
200mm Crystalline Carbonide Restrained Plates
Micro Auxiliary Power Core I
Small Gravity Capacitor Upgrade I
Small Auxiliary Nano Pump I
Small Anti-Explosive Pump I

Use a cargo scanner if possible after completing the two data hacks in the Solray Room.
It can be helpful to use a Small Secure Container (anchor it and set a password!) more so with the Magnate than the Heron. Leave the Secure Container in the Solray Room and bookmark it, and store the loot, cloaks and probe launchers inside it. Bring the Mobile Depot into the Turret Room to refit for the Cargo Scanner after the data hacks are finished.
Quick Guide
- Entry
1. Scan down the site.
2. Hack the entry container. Enter the site.
3. If you land in the Turret Room, take the nearby Spatial Rift to enter the Solray Power Plant. If you're already in the Solray room, proceed to #4.
4. If you land on the farther side of the site near the Remote Reroute Unit, activate the nearby Rift. You may incur some damage as you warp through the Solray Unaligned Power Terminal.
- Always run the Solray Room first.
- Solray Power Plant
5. Hack the Solray Observational Unit.
6. Open container, and observe the "disc" it grants you. It can either be Infrared, Gamma or X-ray.
7. There are three containers in this room. Place the "disc" into the container which matches the name of the disc. This will align the Solray Power Terminal, which considerably reduces the damage it deals.
8. Approach the container in between the two rifts near the Solray Observational Unit. Drop your Mobile Depot there. Hack the Storage Depot and loot it.
9. Refit to your capacitor stable local repairer fit.
10. Approach the Solray Power Terminal and hack all containers. You may cargo scan them first while the Mobile Depot is up if you wish to skip unworthy containers.
11. Refit back to your generic fit, making sure to bring a Microwarpdrive. Drop all loot and unneeded modules in the Mobile Depot and bookmark it.
12. If you're in a frigate or cruiser that has less than 70,000 EHP of omni-resists, consider skipping Phase 3 and proceed to Phase 4, as failure in that stage will cause you to lose your ship. Take the Spatial Rift near the Gamma Ray container into the Turret Room.
- To attempt the Mine Room, take the rift near the Solray Observational Unit.
- Mine Room
13. Hack the Remote Reroute Unit.
14. Take the Rift nearby to head back to the Rift near the Solray Observational Unit. Take the rift near that object (the Infrared Alignment Unit container is nearby). You may incur some damage upon entering, but is should be manageable.
15. Move around a bit in the same direction slowly (no MWD) until a Remote Defense Grid Unit spawns. Hack it.
16. If successful, hack the nearby Storage Depots.
17. Align back to the Solray Room - visible in the distance - and burn the Microwarpdrive or Micro Jump Drive; alternatively, warp out and back in immediately. Continue on to Phase 4.
- Sentries on Duty
18. Upon entering, look for the nearby Remote Defense Grid Unit. Select "Keep at Range" (5000m) on it. Start hacking it.
- WARNING: Failure could mean the loss of your vessel. In the event of failure, warp out and do not re-enter without a strong active tank or solid remote repairs with a strong local buffer.
19. Upon successful hack, immediately burn with the Microwarpdrive to the right towards the Sentry Repair Station. You have enough time for about 2 hack attempts. Hack it. Wait for all Sentry Towers to be eradicated.
20. Hack all loot containers at your leisure. Do not approach the Plasma Chambers nearby. Use "Keep at Range" (2500m) for the can closest to those chambers and approach slowly with no propulsion module active.
- WARNING: Do not aggress the Plasma Chambers except under specific circumstances (detailed below). They have enough power to wipe a battleship clean off the field.
21. If you are in a frigate or any cruiser/battleship that cannot handle extreme damage per second (DPS), this will be the extent of possible completion. Go back to your Mobile Depot, refit to travel fit, collect all loot, pick up the Mobile Depot, and warp out.
- Otherwise, continue to Phase 5.
- Archive Room
- You will need a Strategic Cruiser or Nestor to handle this room, with at least 2000 EHP/sec active reps and minimum 50K EHP of buffer. You must be able to both repair and tank considerable damage. A super-tanked cruiser or battlecruiser (such as a Maller or Prophecy) may be capable of surviving for a time with proper use of the Vessel Rejuvenation Batteries. To ensure that loot is not lost in the event of failure, eject loot at regular intervals to be returned to later.
22. Before running the Archive Room, store all loot and unneeded modules in a Small Secure Container or nearby station. Make sure to bookmark the can; containers cannot be scanned down with combat probes. A safe spot works nicely. Bring the mobile depot.
23. Starting from the Turret Room, hack the Hyperfluct Generator. If successful, take the rift and skip to 27.
24. If unsuccessful, then "Keep at Range" (5000m) from the Vessel Rejuvenation Battery. Lock up one of the Plasma Chambers.
25. Hack the Vessel Rejuvenation Battery. Wait two seconds after the hack is completed and make sure you are within its protection cloud. Immediately thereafter:
26. Aggress one of the Plasma Chambers. Immediately proceed back to the revived Hyperfluct Generator. You will have sixty seconds before the alarm is sounded, which will spawn 16 new Sentry Towers. Hack it quickly. Take the rift.
27. There are a number of damage clouds in this area. Approach the Archive Cerebrum Chambers; a propulsion module will help.
28. Hack the Remote Targeting Defense Augmentation Unit. A Pristine Storage Depot may spawn nearby. Hack it and loot it.
29. Start hacking the Cerebrum Maintenance Chambers. You will need three (3) Intravenous Oscillation Fluid objects. Failure of these hacks may spawn additional Sentry Towers. You may elect to destroy them. Light drones are recommended due to their 50m signature radius.
30. Double-check that your ship is fit properly and prepared.
31. Approach the Central Archive Cerebrum. Place only the 3 Intravenous Oscillation Fluid objects inside it.
32. At this point, start watching the messages in Local more intently. Storage Depots will begin to spawn nearby. Damage from Shockwaves will also commence after a short time, and increase in magnitude. There may be one Depot which is distanced afar from the regular group. You may cargo scan containers to evaluate their worth. When finished (or dead!), warp out of the site, wait for it to despawn. Warp back to any bookmarked containers left inside the site, and continue on.
Visual Guide
 |
 |
 |
 |
 |
 |
 |
 |
 |
 |
Walkthrough
Entry
Having scanned down the site, warp to the result.
Look for a Hyperfluct Generator can. If a Spatial Rift is already up, then someone is there, or has been there.
| WARNING:
If the site has already been accessed, quickly check the Directional Scanner in a 1 AU radius to check for wrecks. If there is one at the site, do not enter. (You can also check zKillboard.) The Rift in the entry room might send you straight into the Turret Room, which might have had the alarm tripped. Unless you have a strategic cruiser or battleship with strong resistances (an overtanked Maller with two EM and two Thermal Hardeners works too), you'll be alpha'd off the field by 16+ Sentry Towers. There is no opportunity to warp out, cloak up, or escape through the nearby rift -- they aggress almost immediately. |
Otherwise, continue on with the hack of the Hyperfluct Generator can:
- CAN DIFFICULTY: 7/10 DATA [RED HACK]
- SUCCESS: The Spatial Rift is spawned, which leads into either the Sentries on Duty area or the Solray Power Plant. Capsules, Dreadnoughts, Carriers, Supercarriers, Titans, and Freighters cannot take the rift.
- FAILURE: You have two minutes to attempt a successful hack of this container. If a successful hack is not completed by that time, the site despawns.
- SUCCESS: The Spatial Rift is spawned, which leads into either the Sentries on Duty area or the Solray Power Plant. Capsules, Dreadnoughts, Carriers, Supercarriers, Titans, and Freighters cannot take the rift.
Activate the rift.
- If you land in the Turret Room, approach and activate the nearby Spatial Rift to warp to the Solray Power Plant.
- If you land in the Solray room, there are three places you may land. Look carefully for three containers, and based on which one you landed near, take the appropriate action:
- Solray Gamma Alignment Unit: Stay here for now.
- Solray Infrared Alignment Unit: Approach the Solray Infrared Alignment Unit.
- Solray Radio Alignment Unit: Take the nearby rift which will send your vessel over to the Solray Gamma Alignment Unit zone, although it can also direct you over to near the Infrared Alignment Unit.
- Note: The destination is random for each site and changes from one site to the next, but it will remain consistent within any one site.
Solray Power Plant
Near the Solray Gamma Alignment Unit container, there is a structure named the Solray Observational Unit. When successfully hacked, pilots can obtain an "alignment disc" which, when placed in the proper container, reduces the strength of the damage cloud created by the Solray Power Terminal. When warping through the Power Terminal's damage radius, vessels may sustain some damage but this damage is manageable.
 |
 |
 |
 |
 |
Hack the Alignment Unit.
| Stay on the side opposite the Solray Power Terminal—it deals ~600 dps omni-damage without being aligned. If someone has been there before, you will need to ascertain whether the Power Terminal has been aligned. There are two ways of doing this: first, the name of the container will have changed; second, you can inspect the Alignment Unit containers to see if the correct disc was placed inside. As a last resort, bring in a cruiser that can tank or have a friendly logistics cruiser capable of restoring ~650 EHP/sec (roughly 250 raw HP/sec). |
- CAN DIFFICULTY: 7/10 DATA [RED HACK]
- SUCCESS: The hacker is free to open the container and collect the alignment disc.
- FAILURE: No penalty.
- SUCCESS: The hacker is free to open the container and collect the alignment disc.
Zoom out to locate the correct container to place the alignment disc. There are three: Infrared, Radio and Gamma Ray Alignment Discs. The Infrared Alignment Disc goes in the Solray Infrared Alignment Unit, the Gamma Ray Alignment Disc goes in the Solray Gamma Alignment Unit, and the Radio Alignment Disc goes in the Solray Radio Alignment Unit. Collect the discs and burn over to the appropriate container. To load the Radio Alignment Disc, take the rift near the Solray Observational Unit to warp over to that container, then take that rift back over to the main area.
With the Solray Power Terminal aligned, it will deal considerably less damage while a vessel is within its damage radius (~14-17km).
Drop a mobile depot near the lone (Dented or Mangled) Storage Depot which is between the Solray Gamma Alignment Unit and the Infrared Alignment Unit. If your Relic Analyzer is equipped, hack the depot while the mobile depot is setting up. Otherwise, wait near it (do not cloak, otherwise the site may despawn) and after it is ready, refit into the capacitor stable self-repper fit with a Relic Analyzer. It may be prudent to cargo scan all nearby containers including the ones inside the Power Terminal's proximity to check for dead-end worthless containers (as it is possible that some may be empty).
- CAN DIFFICULTY: VARIES (RELIC) [YELLOW TO RED HACKS]
- SUCCESS: Contents are ready to be looted.
- FAILURE: No penalty.
- SUCCESS: Contents are ready to be looted.
With 50% resistances to all damage types, the damage cloud deals ~15 damage per second. A ship able to repair more than 30 Effective Hit Points (EHP) per second indefinitely is completely sustainable.
Afterwards, refit back to the generic site running fit with a Microwarpdrive and both Analyzers.
For the frigate pilots, consider skipping the next room and moving on to Sentries on Duty, below. A Strategic Cruiser or Nestor is best for attempting the Mine Room. An overtanked Stratios (2 plates and 2 large shield extenders) should also be fairly safe. Frigate pilots will lose their ship upon failure.
| Specifics of the Power Terminal |
|---|
| Normally, without being aligned, the Power Terminal area of effect damage cloud does 600 DPS to a regular Tech 1 resistance profile, assuming no hardeners. When suitable hardeners are fitted which provide ~65% resists to all damage types, the DPS is about 150 in total on a Stratios. A Moa sustained ~228 DPS with a 62/59/69/74% resist profile. The damage radius is approximately 14km from the Power Terminal unit itself.
Placing the incorrect alignment disc in a container initially announces the message that it has been aligned: "Using the crystal disc, the alignment is now correct and the Solray Power Terminal is stable." But shortly thereafter: "Seems you used the crystal disc incorrectly, the Solray Power Terminal is losing its alignment fast! The solar flare around the Terminal will increase again in approximately 30 seconds." However, the damage per second will actually remain identical. A disc that has been placed into a container cannot be removed. |
Mine Room
- The recommended tank for this room is 70,000 EHP. It can be done with less, so long as the pilot does not fail any hacks. If you wish to attempt this section with a frigate, use the cheapest T1 exploration hull (the virus strength is a requirement) equipped with a Medium Azeotropic Restrained Shield Extender, a Damage Control I, a Limited Adaptive Invulnerability Field I, and a Data Analyzer, with nothing else. In that case, do this room after completing the Turret Room.
 |
 |
 |
 |
To access this room, take the rift near the Solray Observational Unit. The Solray Power Terminal must be aligned first for the rift to work properly, even if the Reroute Unit has been hacked. The landing point is next to the Solray Radio Alignment Unit. Hack the Remote Reroute Unit:
- CAN DIFFICULTY: 7/10 [RED HACK]
- SUCCESS: The Rift is recalibrated to point towards the Mine Room.
- FAILURE: No penalty.
- SUCCESS: The Rift is recalibrated to point towards the Mine Room.
A successful hack changes the direction of the Rift near the Solray Observational Unit to point towards the Mine Room instead of near the Radio Alignment Unit. Take the nearby Rift to head back to the main area, then take the rift near the Observational Unit into the Mine Room itself.
Expect to sustain ~800 damage upon landing or shortly thereafter from a hidden mine. Upon landing, you should see a Remote Defense Grid Unit. Do not activate a Microwarpdrive if you have one equipped. The Remote Defense Grid Unit is approximately 7km off the beacon; some slow manual piloting may be required:
- CAN DIFFICULTY: 10/10 [RED HACK]
- SUCCESS: A Pristine Storage Depot and possibly one or two lower grade containers are spawned.
- FAILURE: Ship will sustain between 10000-25000 damage.
- SUCCESS: A Pristine Storage Depot and possibly one or two lower grade containers are spawned.
If successful, continue by hacking the spawned containers:
- CAN DIFFICULTY: VARIES (RELIC) [YELLOW TO RED HACKS]
- SUCCESS: Contents are available to be looted.
- FAILURE: No penalty.
- SUCCESS: Contents are available to be looted.
When finished, you may Micro Jump Drive back to the main area, burn a Microwarpdrive, or just warp out and warp back in. Continue on to the Turret Room.
| Mine room damage |
|---|
| Upon landing inside the site, even while still in warp, expect to sustain ~2100 damage from a mine, or possibly several mines. An Astero with just a Damage Control II, 200mm plate, and an Anti-Explosive rig sustained 2135 damage, which left it with 65% structure.
After failure of the Remote Defense Grid Unit, a Maelstrom sustained 11760 damage with the Adaptive Invulnerability Field overloaded (59/56/67/72 resists). Log: [ 05:43:10 ] (combat) 560 from Minefield - Hits 11760 damage taken in total. If 11760 is divided by 560, the answer is 21. 21 mines? Possibly. The damage left the brick-tanked Maelstrom (79k shield EHP) with the ship with 62% shields. |
Sentries on Duty
This room can be challenging, but for frigate pilots, this is generally the most lucrative portion of the site.
| WARNING:
1. If the Alarm has been tripped in this room, there can be in excess of 16 Sentry Towers active, and frigates will not stand a chance. There also can be no warning that the Alarm has been tripped. Overtanked Mallers and other hardened ships can survive the initial damage and subsequent DPS. If coming from the Solray room, the message indicating that the Alarm has been tripped shows up only after the ship is already in warp. |
The following images are included to provide context and further guidance:
 |
 |
 |
 |
 |
 |
 |
 |
 |
 |
 |
 |
 |
 |
 |
 |
 |
 |
 |
 |

Start from the Solray room, leaving the Mobile Depot near the lone Storage Depot.
Make sure to do three things before attempting this room:
- Bookmark the location of the Mobile Depot in the Solray Power Plant.
- Drop all loot and unneeded modules into the Mobile Depot.
- Refit into the appropriate fit.
Take the Spatial Rift near the Solray Gamma Alignment Unit container. The Sentry Towers will not aggress unless a ship strays too close to the loot containers.
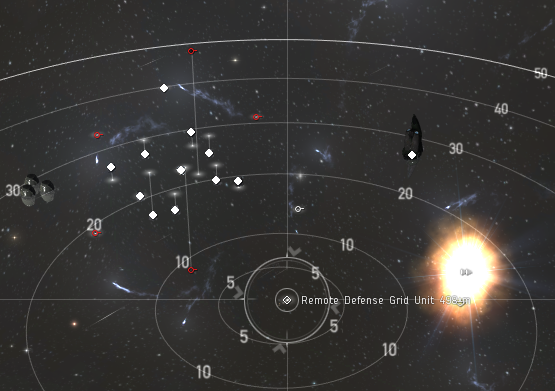
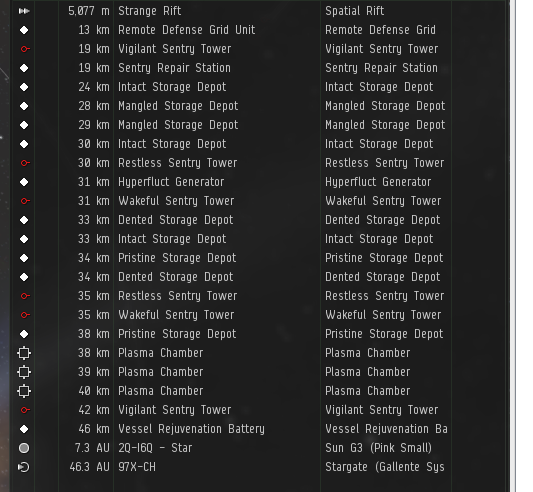
The Remote Defense Grid Unit in the room has three functions: first, it disables any proximity-based Sentry Towers from activating. Second, it re-wires a hostile Sentry Tower into a friendly one. Third, it recalibrates the Vessel Rejuvenation Battery into one that can be hacked to configure it to repair the friendly Sentry Tower. If a ship approaches the Storage Depots and ignores the Remote Grid Defense Unit procedure, then not only will the 6 initial Towers aggress, but up to 10 additional new Sentry Towers can spawn.
First, hack the Remote Defense Grid Unit. Take your time on this hack, there is no rush. The newly-converted Tower will then aggress the other 5 Sentry Towers, and in turn take damage itself. It can't sustain the incoming damage for long.
| WARNING: A present bug in the site seems to indicate that failure of this next hack will spawn the Sentry Towers regardless of whether a successful rehack has been completed. So the countdown to the perimeter Sentries will not be actually canceled, no warning in Local that they are about to spawn, instead you will find 16 Sentry Towers will spawn anyways. In a frigate, warp off the site immediately if you fail the hack. Cruisers and above which can run the Archive Room may choose Plan B. |
- CAN DIFFICULTY: 9/10 DATA [RED HACK]
- SUCCESS: The closest Sentry Tower becomes friendly, and aggresses the other Sentry Towers to blow them up, and will in turn begin taking damage itself from the other Sentry Towers.
- FAILURE: A timer is generated which will activate the Alarm in 45 seconds. When the 45 second timer is up, the RDGU explodes and there is no other way to proceed without strong tanking abilities. At the 45 second timer mark, the site spawns the 16 Perimeter Defense sentry towers, for a total of 22 Sentry Towers. Frigates will not survive.
- SUCCESS: The closest Sentry Tower becomes friendly, and aggresses the other Sentry Towers to blow them up, and will in turn begin taking damage itself from the other Sentry Towers.

For Cruisers and above, there is Plan B.
Immediately after hacking this container, active the Microwarpdrive and burn towards the Sentry Repair Station located near the right of your present position. Hacking the Sentry Repair Station will cause it to provide armor and shield reps to the friendly Tower. (The friendly Tower cannot receive remote repairs from ships.) There is enough time for 2 hacks, maybe 3 fast hacks, before the hostile Sentry Towers destroy the friendly Tower:
- CAN DIFFICULTY: 8/10 DATA [RED HACK]
- SUCCESS: The Station will provide shield and armor repairs to the friendly Rewired Sentry Gun.
- FAILURE: No penalty, although if a successful hack is not completed before the hostile Sentry Towers destroy the friendly Tower, then some Towers will remain.
- SUCCESS: The Station will provide shield and armor repairs to the friendly Rewired Sentry Gun.
Hostile Towers do not appear to aggress ships even if the hacking the Sentry Repair Station is unsuccessful. Instead, the hostile Towers appear to keep incurring damage and are eventually destroyed, even with the Rewired Sentry Gun destroyed. This is another bug of the site itself. Should it be fixed in the future, simply revert to Plan B. Do not aggress the Sentry Towers with weaponry - it will instantly trigger the 16 Perimeter Defense Sentry Towers.
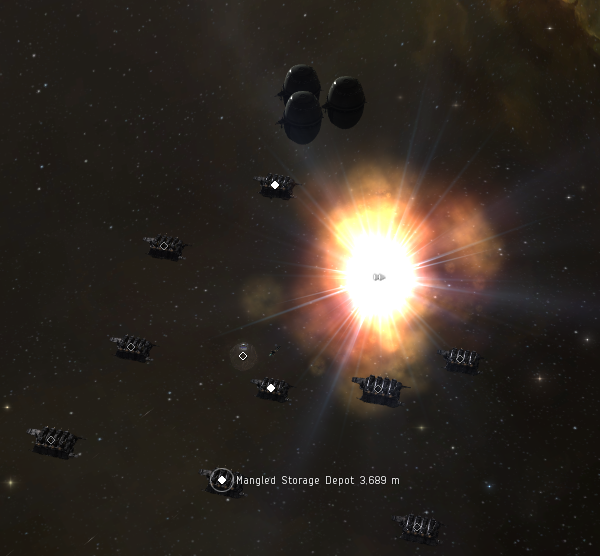
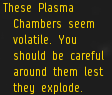
Assuming a successful hack of the Sentry Repair Station, simply sit near the Repair Station and wait for the hostile Towers to be eradicated. Do not approach the 3 Unstable Plasma Chambers located north of the warp-in. Getting too close to these could be fatal, and will also trip the alarm.
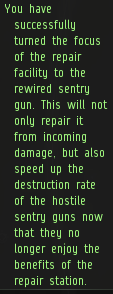
Hacking the Sentry Repair Station before the Remote Defense Grid Unit does nothing, although a message appears in Local: "Hacking the repair station has no discernible effects on anything in the vicinity. The station continues to provide repair services to to the nearby sentry guns."
When all is clear, the loot is there for the taking, and pilots may hack and loot in peace, with no particular danger:
- CAN DIFFICULTY: 6 - 9/10 RELIC [YELLOW to RED HACKS]
- SUCCESS: Contents can be looted.
- FAILURE: No penalty.
- SUCCESS: Contents can be looted.
Do not hack the Hyperfluct Generator container yet.
While working on the hacks, avoid using the Microwarpdrive, use "Keep at Range" (2500m) on the last can near the group of Plasma Chambers, and move slowly (around 100m/sec) to avoid triggering the Plasma Chambers. After all worthy containers are hacked, frigate pilots will have completed as much as they can. Take the Spatial Rift to head back to the Solray Room, refit to a travel fit if needed, scoop up any contents inside the Mobile Depot (if it is scooped to the cargohold directly, a jetcan is left behind), pack up the Mobile Depot and depart.
For the T3 Cruisers, Nestor and other similar battleship-level tanked ships, if there was no Mobile Depot left behind anywhere in any other room, you may now proceed to the Archive Room.
| About those Plasma Chambers |
|---|
| You can amuse yourself by searching zKillboard for kills by the Invisible Cloud element. Check for ones with blue loot inside them. The Plasma Chambers deal massive amounts of damage. The damage was first tested with an overtanked Maelstrom, fit like this:
TwoMaelstrom: Two
EFT
[Maelstrom, Two]
Large Shield Extender II Large Shield Extender II Large Shield Extender II Large Shield Extender II Data Analyzer II Adaptive Invulnerability Field II Reinforced Bulkheads II Reinforced Bulkheads II Reinforced Bulkheads II Reinforced Bulkheads II Damage Control II Large Anti-EM Screen Reinforcer I Large Core Defense Field Extender I Large Core Defense Field Extender I      FITTING DIFFICULTY
EVE VERSION
YC118 1.0
ALPHA CAN USE
UNSET
RECOMMENDED SKILLS
NOTES
The explosion radius itself is also big. To test this, I made a line of Atrons from 100km out to 240km. All of them were blown up. This was not conclusive enough, so I found another site after some time. So then inside that one I made another line of Atrons from 240km out to 350km. For that case, only the 240km Atron was popped, but not the one at 250km. So it's probably very safe to say that the detonation radius is 249km, or 250km: the Atron might have been on the raw edge of the line. As for detonating it, any hostile module will work, such as a target painter. Even a gun or missile doesn't have to actually inflict any damage to the Chambers: the mere act of aggression is enough. |
These images below cover the detonation of the Plasma Chambers.
 |
 |
 |
 |
 |
 |
 |
 |
 |
 |
| Plan B |
|---|
| When I said earlier:
"The Remote Defense Grid Unit in the room has three functions. First, it disables any proximity based Sentry Towers from forming." I didn't say it was untankable. Let's get right to that subject. There are a couple of ships and fits that are viable for the job. First let's talk about what happens. When a player simply approaches the Storage Depots, measured from the warpin beacon towards the Hyperfluct Generator, the initial Sentry Towers will begin to aggress the player around the 10km mark. Their activation range is about 10-12km or thereabouts at this stage. (This is assuming that the Alarm has not been activated. We will get to that stage in a minute.) As the ship continues, hidden Sentry Towers are activated in predefined spots as the ship moves around the area. They also seem to have a limited aggression range or something. In total, 10 Sentry Towers can be activated by proximity and 6 are from the initial spawn. So the Plan is to simply tank them. Any cruiser or above class vessel with around 900-1000 EHP/sec repairs against EM and Thermal damage can survive here as long as it is capacitor stable. Armor tanked vessels are the obvious choice because of the default resistance profile of armor, and because the Relic Analyzer II won't interfere with capacitor modules or tank modules in the mid slots, as with shield tanks. That's not to say a nice Tengu or Slepnir is bad, but just that armor is easier. Choices include any vessel with a bonus to repair amount, resistances, or both (i.e. T2 hulls with the T2 resistance profile). Mallers make a good choice for both low cost and ease of entry; for battlecruisers, Prophecy, Brutix and the Myrmidon are all respectable. Battleships usually have no problem fitting a tank along the suggested lines, so I won't say much there. Here are the fits:
Maller - About Face (Turret Room)Maller: Maller - About Face (Turret Room)
EFT
[Maller, Maller - About Face (Turret Room)]
Large Cap Battery II Large Cap Battery II Relic Analyzer II Medium Armor Repairer II Medium Armor Repairer II Armor Thermal Hardener II Armor Thermal Hardener II Armor EM Hardener II Armor EM Hardener II Medium Auxiliary Nano Pump I Medium Auxiliary Nano Pump I Medium Anti-Thermal Pump I       FITTING DIFFICULTY
EVE VERSION
YC118 1.0
ALPHA CAN USE
UNSET
RECOMMENDED SKILLS
NOTES
Myrmidon - To Tank A Few SentriesMyrmidon: Myrmidon - To Tank A Few Sentries
EFT
[Myrmidon, Myrmidon - To Tank A Few Sentries]
Cap Recharger II Cap Recharger II Large Compact Pb-Acid Cap Battery Large Compact Pb-Acid Cap Battery Relic Analyzer II Medium Armor Repairer II Medium Armor Repairer II Armor Thermal Hardener II Armor Thermal Hardener II Armor EM Hardener II Armor EM Hardener II Medium Nanobot Accelerator I Medium Auxiliary Nano Pump I Medium Auxiliary Nano Pump I    FITTING DIFFICULTY
EVE VERSION
YC118 1.0
ALPHA CAN USE
UNSET
RECOMMENDED SKILLS
NOTES
Prophecy - Sentries on DutyProphecy: Prophecy - Sentries on Duty
EFT
[Prophecy, Prophecy - Sentries on Duty]
Armor Command Burst I, Rapid Repair Charge 10MN Monopropellant Enduring Afterburner Relic Analyzer II Large Cap Battery II Large Compact Pb-Acid Cap Battery Armor EM Hardener II Armor EM Hardener II Armor Thermal Hardener II Armor Thermal Hardener II Medium Armor Repairer II Medium Armor Repairer II Capacitor Power Relay II Medium Anti-Thermal Pump I Medium Auxiliary Nano Pump I Medium Auxiliary Nano Pump I     FITTING DIFFICULTY
EVE VERSION
LATEST
ALPHA CAN USE
NO
RECOMMENDED SKILLS
NOTES
The basic strategy then is to simply ignore the Remote Defense Grid Unit hack entirely, and hack the Storage Depots out. If the 16 Perimeter Defense Towers are online, then things are quite a bit dicier, and I'm not sure these fits shown can handle that kind of DPS. In that case, there is nothing wrong with using a buffer tank, and bringing in logistics cruisers to solve that problem. However, any fit that can survive the Archive Room indefinitely (excess of 2000 EHP/sec) won't have a problem in that case, and may simply continue on hacking. For those in doubt as to whether the Alarm is active or not (i.e. if someone else may have tripped it), just swap out the two armor repairers for a pair of 1600mm plates and have a look. There is enough buffer to survive without reps for about five minutes. If the Perimeter towers are not active, but all 10 proximity towers and the initial 6 towers, then the tank should last for about 6.5 minutes. From Pyfa's numbers, it seems one lone Exequror can repair about 2000 EHP/sec onto a plated fit -- consider that. As long as the logistics vessel does not get aggro (just sit near the beacon), it should work out nicely. That does have a benefit in that the standard bait fit overtanked Maller you might have just has to swap out for all EM and Thermal hardeners, as 90% resists are pretty effective at reducing the incoming DPS. The first time I used a Maller to actively tank the Towers, a certain point came happen where my tank could not hold. (It was repping 829 EHP/sec) I warped out and came back into the site, with heavy heat damage to the modules and hardeners. Upon re-entering the room, I was surprised to see the hostile Sentry Towers shooting...the Storage Depots. A few Towers aggressed, but as the ship crept past the 120km engagement range, the DPS was reduced to the point where shields was regenerating. That may be a useful factoid. (Link) Since that time I have switched to using a Maller for running the entire site -- saves hassle in the Turret Room anyways. The Perimeter Towers (and the initial Towers if the alarm is tripped) themselves have an activation range of 120km. Beyond this point, they will switch from a red box to a yellow box, but will re-engage if a player approaches within that 120km limit. Because of this, a sniping battleship can be used to clear out the Sentry Towers if desired, however this does take some time. To do this, when landing on the beacon, immediately turn the ship around 180 degrees from the area near the Storage Depots and then hit the Micro Jump Drive. (This allows for the maximum distance jumped from the rest of the Towers: hopefully only three or four Towers will still have active aggression.) Use 1400mm Artillery, Sentry Drones or probably large beam lasers. Then it's a matter of carefully positioning around to make sure the Towers in aggression range are limited so it doesn't break the tank, yet still engaging them within optimal of the battleship. Attack Battlecruisers like Oracles won't work because those cannot fit MJDs. Lastly: A damage log of ... a lot of Sentry Towers spawned. Should give you a basic idea of what kind of damage we're talking about here. [ 2016.07.05 23:26:49 ] (combat) 1192 from Wakeful Sentry Tower - Penetrates I don't know what ship that is...unfortunately. The Maelstrom was able to tank most of the damage with just one repairer at about 950 EHP/sec. That is 4743 damage taken over 45 seconds, which turns out to 105.4 DPS incurred. |
PHASE 5: THE ARCHIVE ROOM
It may be very worthwhile reading this before this room is attempted, and watching a video of someone else running it. It's pretty dangerous.

Starting from the Sentries on Duty room, there should be a Hyperfluct Generator container. Hacking it produces two outcomes:
CAN DIFFICULTY: 9/10 [RED HACK]
SUCCESS:
First case: A Spatial Rift is generated, which allows immediate access to the Archive Room.
Second case: A Spatial Rift is not generated, so you'll have a harder time. Here's what needs to be done:
- Lock up one of the Unstable Plasma Chambers. Make sure you have some kind of high slot weapon: drones will not work. Even a 125mm Autocannon on a Nestor is enough. Do not shoot it yet.
- Start hacking the Vessel Rejuvenation Battery, but do NOT finish the hack. When you find the core, and are 1-2 clicks away from success, get ready for the next bit below.
FAILURE: No penalty.
CAN DIFFICULTY: 8/10 [RED HACK]
SUCCESS: A cloud is generated which approximates the area of healing reps. It evaporates after 10 seconds, so timing is important. The cloud will protect even a frigate from the incredible power of the explosion.
FAILURE: No penalty.
Just after you finish the hack, watch Local to see when the message pops up informing of the activation, then quickly shoot a Plasma Chamber. The Vessel Rejuvenation Battery's mad reps will protect you. Quickly turn on the Microwarpdrive over to the now-revived Hyperfluct Generator. There are just 60 seconds to attempt a successful hack before the Perimeter Defense System comes online. When that happens, 16 new Sentry Towers appear. Frigates won't last. Ships that can run the Archive Room fine will be okay to repeat attempts until the Rift is generated.
Assuming the hack goes through in time, take the rift into the Archive Room itself.
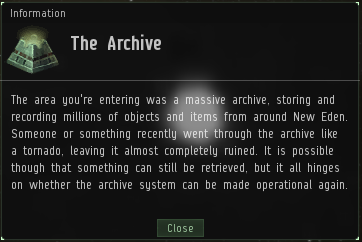
Landing in the vaunted Archive Room, it's time to take in the scenery. There is plenty of local attractions which cause hurt: Sentry Towers, damage clouds near various objects (Smoldering Archive Ruins), and then Shockwaves. There are a number of tasks to perform in this room.
Begin by approach the Defense Targeting Augmentation Unit. From the beacon, a straight line approach is fine. Go ahead and hack it. Before we go farther, any failed hacks in this room may spawn additional Sentry Towers. May:
CAN DIFFICULTY: 8/10 [RED HACK]
SUCCESS: The Sentry Towers, which already have atrocious tracking ability, suffer an additional tracking penalty.
FAILURE: Standard failure result of any can in this site: May spawn additional Sentry Towers.
A successful hack also has the opportunity to spawn a Pristine Storage Depot nearby. You may hack it and loot it. Proceed on to hacking the Cerebrum Maintenance Chambers. Each functions like a normal data or relic site object: it must be hacked first before it can be opened. Same hacking difficulty and failure results as before, red hacks. For the Central Archive Cerebrum to begin operating, three Cerebrum Oscillation Fluid objects are needed, the other items like the Self-Regulating Machine Gears and what not are just scrap. Therefore, hack enough Cerebrum Maintenance Chambers to get what is required:
CAN DIFFICULTY: 8/10 [RED HACK]
SUCCESS: The contents may be extracted.
FAILURE: Additional Sentry Towers may spawn.
I like to shoot the Sentry Towers that lie around the perimeter. As they have a 50m signature radius, Light Neutron Blasters and light drones work good enough. Depending on your fit, their absence can be enough to make sure your tank lasts long enough.
Having 3 Oscillation Fluids (or more) in your cargo hold, go ahead and Open Cargo on the Central Archive Cerebrum.
Place 3 of those Oscillation Fluid items into the Cerebrum; more is not necessary, but 2 won't work either. (The E-UNI wiki says an explosion can occur if foreign material is inserted into the Cerebrum. A test run did not incur such an event.) At this point, a couple of things are initiated: first, the Central Archive Cerebrum will eject Storage Depots of varying grades, and Shockwaves will start coming. The first set are tankable fine in a standard Tech III Strategic Cruiser, though the double massive Shockwaves will most likely be more than most fits and skills can handle. The basic idea then becomes a question of how many cans can be hacked and looted before the incoming damage is more than can be safely tolerated.
Vessel Rejuvenation Batteries will also be ejected from the Cerebrum itself. These are cool. Details are below: they are Data hacks.
Make sure to check for other containers around the area, for those looking to complete the room fully. When finished, warp out. Those who left Mobile Depots in other rooms may need to warp back to collect them and refit for a travel fit.
Congratulations: you have completed the most challenging Sleeper Cache the game has to offer.
| It's time to get gnarly |
|---|
|
Ahem... You may have heard of the damage of this room, and having explored it on the test server, it's imperative for me to communicate my findings for future reference. Starting with the Smoldering Archive Ruins. These minor damage clouds line the area around the central Cerebrum. From their center, they seem to have a damage radius of about 4km, although certain clouds may have a larger radius. A damage log: [ 2016.07.06 00:02:34 ] (combat) 34 from Smoldering Archive Ruins - Hits 151.6 DPS average there, although 131 seems more about right. That hit for 146 throws the average off. A dual-rep Stratios with roughly 350 EHP/sec lasted about a minute before it failed to repair enough, and exploded. They can cause borderline tanks to break when the Colossal waves hit. On to the damage waves. There are four types of waves, and you'll recognize them in Local. "A massive shockwave is approaching the area. ETA is 15 seconds." ...is a single Massive. Two of those timed at the same time is a double massive, three of them at the same time is a triple massive and "A colossal shockwave is approaching the area. ETA is 15 seconds." ...is a colossal wave. Those are the ones that do the most damage, quite a lot actually. A colossal plus a double massive is very intimidating and most tanks will break at the huge DPS overload. The only relief comes from the fact that there is often 15-30 seconds of peacetime between waves, although the period is random; though at least one wave every 20 seconds of some kind of magnitude is expected. This is the damage log of one massive shockwave. [ 2016.06.20 07:03:18 ] (combat) 136 from Shockwave - Hits 4390 damage taken over 5 seconds equals 878 damage per second taken. On the Maelstrom, one X-Large C5-L Emergency Shield Overload repairing 1095 EHP/sec was comfortably sustaining this damage. Two of these simultaneously was not too bad, nothing one repper couldn't fix before the next wave came through. Three definitely needed both shield boosters running. A colossal wave. [ 2016.06.20 07:02:58 ] (combat) 181 from Shockwave - Hits 15005 damage over 9 seconds. 1667 damage per second taken. That's a lot. My thoughts. First I used a Maelstrom. It was fit with the following:
Maelstrom - Sisi Sup. Tester Active copy 2Maelstrom: Maelstrom - Sisi Sup. Tester Active copy 2
EFT
[Maelstrom, Maelstrom - Sisi Sup. Tester Active copy 2]
800mm Heavy 'Scout' Repeating Cannon I, Republic Fleet EMP L 800mm Heavy 'Scout' Repeating Cannon I, Republic Fleet EMP L 800mm Heavy 'Scout' Repeating Cannon I, Republic Fleet EMP L 800mm Heavy 'Scout' Repeating Cannon I, Republic Fleet EMP L 800mm Heavy 'Scout' Repeating Cannon I, Republic Fleet EMP L 800mm Heavy 'Scout' Repeating Cannon I, Republic Fleet EMP L 800mm Heavy 'Scout' Repeating Cannon I, Republic Fleet EMP L 800mm Heavy 'Scout' Repeating Cannon I, Republic Fleet EMP L 5a Prototype Shield Support I X-Large C5-L Emergency Shield Overload I X-Large C5-L Emergency Shield Overload I Adaptive Invulnerability Field II EM Ward Field II Heavy Capacitor Booster II, Navy Cap Booster 3200 Damage Control II Expanded Cargohold II Expanded Cargohold II Expanded Cargohold II Expanded Cargohold II Large Anti-Thermal Screen Reinforcer II Large Core Defense Operational Solidifier I Large Core Defense Capacitor Safeguard II           FITTING DIFFICULTY
EVE VERSION
YC118 1.0
ALPHA CAN USE
UNSET
RECOMMENDED SKILLS
NOTES
Seriously though, because of the extreme tanking requirements here, armor is the way to go. First, armor repairers are more efficient at converting capacitor gigajoules to hitpoints. Secondly, they don't interfere with vital midslots for capacitor mods. Thirdly, buffer modifications work better for the reason stated above. On the downside, shield boosters are easy to oversize, and shield boost amplifiers are cool. But armor is the way to go for this site. So I pulled out a Hyperion, which was fit with dual reppers and three 1600mm plates. While it had enough buffer, it didn't have the capability to fix it fast enough before the next wave. I mean, it was fine for the massives and the double massives, but while it could eat a colossal, it couldn't fix it all up in time. You really need triple reppers on a battleship to get the armor fixed in time for the buffer to work properly to sustain most of the damage of the wave. The Russian bloke used two fits in his videos. This is his Legion:
Legion - Triple Rep Superior Sleeper StableLegion: Legion - Triple Rep Superior Sleeper Stable
EFT
[Legion, Legion - Triple Rep Superior Sleeper Stable]
Relic Analyzer II Dark Blood Cap Recharger Dark Blood Cap Recharger Dark Blood Cap Recharger 1600mm Steel Plates II True Sansha Energized Adaptive Nano Membrane True Sansha Energized Adaptive Nano Membrane Corpum A-Type Medium Armor Repairer Corpum A-Type Medium Armor Repairer Corpum A-Type Medium Armor Repairer Legion Electronics - Emergent Locus Analyzer Legion Defensive - Nanobot Injector Legion Engineering - Capacitor Regeneration Matrix Legion Offensive - Drone Synthesis Projector Legion Propulsion - Chassis Optimization Medium Auxiliary Nano Pump II Medium Auxiliary Nano Pump I Medium Capacitor Control Circuit II            FITTING DIFFICULTY
EVE VERSION
YC118 1.0
ALPHA CAN USE
UNSET
RECOMMENDED SKILLS
NOTES
Here's my Maelstrom skirmishing with the Archive Sentry Guns: [ 2016.06.20 06:41:48 ] (combat) 442 from Impaired Archive Sentry Tower - Hits So to put into numbers, a ship with at least 50K EHP of raw buffer in its chosen tank style (again, armor is the way to go here) and can repair at least 1500 EHP/sec is fine, though 2000-2300 is much better.
Hyperion - Sup. will it work?Hyperion: Hyperion - Sup. will it work?
EFT
[Hyperion, Hyperion - Sup. will it work?]
Light Neutron Blaster II, Federation Navy Antimatter Charge S Light Neutron Blaster II, Federation Navy Antimatter Charge S Light Neutron Blaster II, Federation Navy Antimatter Charge S Light Neutron Blaster II, Federation Navy Antimatter Charge S Light Neutron Blaster II, Federation Navy Antimatter Charge S Light Neutron Blaster II, Federation Navy Antimatter Charge S 100MN Monopropellant Enduring Afterburner Relic Analyzer II Large Cap Battery II Large Cap Battery II Heavy Electrochemical Capacitor Booster I, Cap Booster 3200 1600mm Steel Plates II 1600mm Steel Plates II Energized Adaptive Nano Membrane II Energized Adaptive Nano Membrane II Large Armor Repairer II Large Armor Repairer II Large Armor Repairer II Large Auxiliary Nano Pump I Large Auxiliary Nano Pump I Large Nanobot Accelerator I         FITTING DIFFICULTY
EVE VERSION
YC118 1.0
ALPHA CAN USE
UNSET
RECOMMENDED SKILLS
NOTES
The Vessel Rejuvenation Batteries are ejected periodically. When they are hacked, they generate a cloud which provides serious repping power. It was enough for my Hyperion to tank a colossal wave (and more) and not take a lick of damage to my shield. The shield would stay pegged at 100% regardless of the Shockwave damage, and it also fixed armor as well. They last for about 90 seconds before they expire. And one other thing, which they won't tell you elsewhere: The area of effect damage radius on the shockwaves, measured from the Central Archive Cerebrum, is about 55 to 56km. If you orbit the Cerebrum at 60km, you shouldn't take any damage at all. I ran a battleship in a orbit around the Cerebrum at 60km orbit for about half an hour and didn't take any damage at all. |
Pictures. Let's see them.
 |
 |
 |
 |
 |
 |
 |
 |
 |
 |
 |
 |
 |
 |
 |
 |
 |
 |
 |
 |
Videos. Everybody loves them. Here is a video of a Nestor being used (note the hack failure in the Mine Room); a triple rep Legion (also shiny); and finally, another Legion video where the turret room has all the sentry guns spawned.