More actions
Salartarium (talk | contribs) m proofreading |
|||
| (72 intermediate revisions by 25 users not shown) | |||
| Line 1: | Line 1: | ||
[[Category:Planetary | [[Category:Planetary Industry]] | ||
Colonies are the method in which players interact with planets via [[Planetary | {{PlanetaryIndustryNav}} | ||
Colonies are the method in which players interact with planets via [[Planetary Industry]]. Colonies are established by procuring a Command Center the same type as the planet, and landing it on the planet. Doing so will allow you to build other buildings, and link them together for the purpose of mining the raw resources of the planet and producing goods from them. | |||
== Overview == | == Overview == | ||
This page details objective specific planet colonies or chains of colonies (while [[ | This page details objective specific planet colonies or chains of colonies (while [[Setting up a planetary colony]] discusses the usage of putting [[Planetary Buildings]] to good use on a single planet) | ||
== Colony Types == | == Colony Types == | ||
| Line 16: | Line 17: | ||
The simplest and most straightforward of the industrial ideology, just a ton of extractors with 1 or 2 storage facilities and a command center. Requires the least micromanagement, but does require reorienting the extractors with new deposits when the current one runs dry, for each extractor. If you use the slower/longer deposits then this setup could run for at least day or two without attention. | The simplest and most straightforward of the industrial ideology, just a ton of extractors with 1 or 2 storage facilities and a command center. Requires the least micromanagement, but does require reorienting the extractors with new deposits when the current one runs dry, for each extractor. If you use the slower/longer deposits then this setup could run for at least day or two without attention. | ||
Note: The output of this colony | Note: The output of this colony will strain the capacity of your Command Center to launch rockets with the raw materials, due to the sheer quantity. A Launchpad would cut into productivity, however. This may make the pure Strip Mine colony a rarity versus the similar Mining Complex colony type. | ||
| Line 24: | Line 25: | ||
This technique may be more vulnerable to competition than more centralized colonies since it attempts to extract a large amount of the best deposits on a planet. | This technique may be more vulnerable to competition than more centralized colonies since it attempts to extract a large amount of the best deposits on a planet. | ||
=== Mining Complex === | === Mining Complex === | ||
| Line 32: | Line 32: | ||
Since the goal is to convert most if not all raw material to tier one products, the quantity of goods to export is substantially lower than a plain strip mine, and the m3 is likewise lower. This way a Launchpad could likely be avoided. You may have to include storage facilities in the logistics chain to not waste materials due to occupied processors. | Since the goal is to convert most if not all raw material to tier one products, the quantity of goods to export is substantially lower than a plain strip mine, and the m3 is likewise lower. This way a Launchpad could likely be avoided. You may have to include storage facilities in the logistics chain to not waste materials due to occupied processors. | ||
=== Advanced Mining Complex === | |||
Much like the Mining Complex, this colony seeks to process raw materials into exportable products. However, the goal of this colony is to produce at least Tier 2 products from a single planet's resources. Coolant from a Gas Planet, for example. Extractors must be split so as to generate an equal amount of each raw material needed. Basic Processors then convert the raw into Tier 1 products. Finally, an Advanced Processor is needed to create the Tier 2 product. This colony requires a fair bit of work since raw materials must be located in close proximity to each other and in sufficient quantity to support the multi-stage production. Layout of links becomes critical to conserve CPU and yet be able to handle the flow of materials from all the extractors. Given the need to manage so many products flowing through so many processors, it is often wise to build a launchpad in the center of the complex to serve as both a storage facility and a clearing house for finished goods, ready for export. | |||
With a resource-rich planet and Command Center Upgrade to III or (ideally) IV, it is fairly easy to build two extractor control units and enough extraction heads to feed four basic industry facilities producing two different P1 commodities, which will in turn feed two advanced industry facilities producing one P2 refined commodity. This is an effective way of producing PI materials given the relatively low volume of stuff to move around and the overall low taxes paid. Each advanced industry facility produces 5 P2 commodity per hour, such a planet will produce 7200 P2 products per month (about 10000 m3/month). | |||
=== Factory Complex === | === Factory Complex === | ||
| Line 45: | Line 51: | ||
=== Full Chain System === | === Full Chain System === | ||
Multiple colonies built expressly to complement each other make up a full production chain. There are many variations possible, but maybe some more interesting ones can be put here sometime. | Multiple colonies built expressly to complement each other make up a full production chain. There are many variations possible, but maybe some more interesting ones can be put here sometime. | ||
== Interplanetary Logistics == | |||
''This is about moving stuff '''between''' planets. For moving stuff around '''on''' a planet see [[Setting up a planetary colony#Intraplanetary Logistics|Intraplanetary Logistics]]'' | |||
You do not have to setup your entire production chain on the one planet. You can purchase missing products on the market or produce them on other planets. However, then you need to get them down to the surface. In addition, ultimately you will want to get the fruits of your slave...er, "colonists'" labour to market. | |||
These operations must be done in the system and undocked, and this exposes you to risk, which you should minimize by doing most of them at a safe spot, preferably cloaked or tethered. There are two ways to get goods off a planet (Customs Office, and Launch Container) and one way to get goods down to the planet (Customs Office). Only the actual transfer of goods is done near the "Customs Office (Planet Name) [Owner Name]", which you will have to add to your overview. The Customs Office is like any other container, in that you must be within 2,500 meters to transfer things into and out of it. However it is like your personal hangar in that things placed in it can only be seen by you. However, unlike your personal hangar, it has a capacity of only 35,000 m3. | |||
{| | |||
| valign="top" | [[File:Overview_CustomsOffice.jpg]] | |||
|} | |||
To view a planet's Customs Office you will need to ensure that "Orbital Infrastructure" in the section "Orbitals" is enabled in your overview settings. | |||
{| | |||
| valign="top" | [[File:PI-AccessCustomsOffice.jpg|400px]] | |||
|} | |||
Everything to do with the Customs Office must be done in the system, and in space. While you can perform the Import/Export operations out in the dark at a safe spot (preferably cloaked) or sitting tethered to an Upwell structure, you must go to a known location to actually pick up the goods from the Customs Office. The Launch Container method, while more expensive, can be done from anywhere in the universe, including docked at a station or cloaked. However, you will still have to go to the system to pick up your launch can, and others can pick it up too if you don't get there first. There are some nuances to this: The cans are on directional scan so people can chase them down with substantial effort (and know that you launched them), get a bookmark from you, or probe you down when you arrive on grid to pick it up. The cans themselves do not appear on probe scans. | |||
= | The Customs Office window is accessed either by right clicking on the Office, and choosing "Access Customs Office", selecting the office in overview and clicking the Access Customs Office icon in the Selected Item Menu (looks like an open box) or from the rocket icon on a Launchpad on the planet below.<br style="clear: both" /> | ||
{| | |||
| valign="top" | [[File:PI-ImportToPlanet.jpg|475px]] | |||
|} | |||
Importing: To import items to the planet, you must have a Launchpad (found under Spaceport in your list of buildings.) Having built this, the operation is to place the items in the Customs Office in orbit by accessing the customs office, opening your inventory, flying your transport ship to the customs office, pre-selecting your next target (next customs office or safe spot), pressing "Warp to 0" right when you drop out of warp and drag commodities from your cargo hold to the left side of the customs office (or vice versa) while your ship aligns. Next, when you are back at a safe spot, you can then move (or shift-drag to break up stacks) from the Planetary Customs Office pane on the left, to the launchpad on the right. If you have multiple Launchpads make sure the target one is selected in the drop-down! When you have everything setup to your desire, click on the "Transfer" button in the lower right corner. The items will arrive in your Launch Pad, and can then be transported elsewhere through Expedited Transfer or Routing. There is a cost of 1 ISK/something to import. Experimental numbers below. | |||
For Export, you have two options: Launch or Export. Export is performed in the same way as Import, by accessing the Customs Office, dragging commodities from the Launchpad at the right hand side to the customs office at the left hand side and clicking on the "Transfer" button in the lower right corner. | |||
Some interesting notes about the Customs Office | |||
* There is only one Customs Office per planet shared between all on-planet. | |||
* Even if you don't have a Colony on the planet you can still use the Customs Office and place items in it. | |||
* It is safe to warp away leaving some of your goods in the Customs Office (unless the Customs Office gets destroyed) | |||
[[File: | {| | ||
| valign="top" | [[File:Launch_Setup.jpg|300px]] | |||
|} | |||
Alternatively, you can launch your products into orbit using your Command Center, with a volume limit of 500m3 (which is conveniently the same as the CC's maximum storage capacity). Click on the rocket icon in the Command Center, which brings up the launch prep panel, where you can pick whole stacks to go into the rocket by selecting it and then clicking on the Add button. Once you are satisfied, you can click on launch. It will then launch a package into orbit for you to pickup within the next 5 days. You can find your package and warp to it in your Journal, under the Planetary Launches tab. | |||
To create a warpable bookmark (eg if you want to ask someone else to pickup for you), you must warp to the can and bookmark the can. There is no ranged warp available, but you might land more than 2,000m from the can, so you may be able to do it without being decloaked. You (and others) can not probe down the launch canister with a combat probe, but a ship picking up the package can be probed down to or scanned with the directional scanner, which also shows the can itself. | |||
===Tax Rates=== | |||
High-sec Player-Owned Customs Offices have a 10% NPC [[Tax#Planetary_import.2Fexport_tax|tax rate]], in addition to the tax rate set by the POCO owner, which can vary according to your standings towards the owning corp. Corporations who own Customs Offices can charge as much as they please. | |||
[[ | The NPC portion of the tax rate can be reduced by the [[Skills:Trade#Customs_Code_Expertise | Customs Code Expertise]] skill. | ||
The tax rate shown in the description of a specific high-sec Customs Office is equal to: | |||
<pre> | |||
10% + % Player Tax - 1% per level of Customs Code Expertise | |||
</pre> | |||
NPC-owned Customs Offices outside of high-sec (if any remain, which is unlikely) charge 17%. That rate cannot be reduced (The skill Customs Code Expertise does not affect this). | |||
For Player-Owned Customs Offices outside of high-sec, there is no NPC tax component, so the whole tax rate is '''exactly''' what the owning corp sets it at. Again, Customs Code Expertise does not affect these rates. | |||
Once you know your cumulative tax rates, the formula for the final cost is: | |||
* | <pre> | ||
* | Export fee = Base cost * tax rate (*1.5 if launched via Command Center) | ||
* | Import fee = Base cost * tax rate * 0.5 | ||
* | </pre> | ||
{{example|Example: Exporting a unit of Biomass (P1) using a Launchpad from a low-sec planet with a 10% Player Tax will cost will cost 40 ISK (400 * 10% * 1 ) <br> | |||
Importing that unit of Biomass to a high-sec factory planet will cost at minimum an additional 20 ISK (400 * (10% + % Player Tax) * 0.5 )}} | |||
Base costs for each tier of products can be found in this table. Base costs are '''per unit.''' | |||
{| class="wikitable" style="text-align: center" | |||
[[ | |- | ||
|Commodity level | |||
| Base Cost | |||
|- | |||
|R0 | |||
| 5 ISK | |||
|- | |||
|[[Planetary_Commodities#Tier_1_-_Processed_Materials_.28P1.29 | P1]] | |||
| 400 ISK | |||
|- | |||
|[[Planetary_Commodities#Tier_2_-_Refined_Commodities_.28P2.29 | P2]] | |||
|7,200 ISK | |||
|- | |||
|[[Planetary_Commodities#Tier_3_-_Specialized_Commodities_.28P3.29 | P3]] | |||
|60,000 ISK | |||
|- | |||
|[[Planetary_Commodities#Tier_4_-_Advanced_Commodities_.28P4.29 | P4]] | |||
|1,200,000 ISK | |||
|} | |||
The Launchpad has the greater cost up front, but is far superior to the CC and exports for 2/3 of the cost. It can also launch far larger amounts, and is the only way to import stuff on to the planet. However, keep in mind that you are charged 50% of the export fee to import items to your launchpad. Consider the costs carefully before setting up a multi-planet production chain. Player corporations now own all high-sec customs offices and can set any tax rate they wish—if you have a large factory system making Level 4 items and need to import and export this needs to be kept in mind. | |||
<br style="clear: both" /> | <br style="clear: both" /> | ||
== Player Cooperatives == | |||
As you've probably already noticed, the most money to be made is off of those juicy Tier 4 items. These are the end items that go directly towards [[POS]]/[[Citadels|Citadel]] construction. Most of these sell quite high on the market. Each time you add value to a product, it seems to increase the value of the combined item by a factor of 5-10. | |||
That being said, the resource distribution on each planet combined with the items required to make those end items means that no single end item can be produced on a single planet. In addition, the limit of planets that each player may have is 6 and most Tier 4 items take around 7-10 planets to complete a production chain. Please note that even if you were able to effectively produce the necessary Tier 4 items by yourself on up to 6 separate planets, the odds are that other players are doing that too! Higher supply means lower demand which means less money for you. Therefore, the best thing to do is to start a cooperative with your friends! | |||
The best thing about this approach is that it allows players that have not developed their Planetary Industry skills a great deal to jump in and make, frankly, embarrassing amounts of dosh. Of course, since you're going to be giving other players the fruits of your labor for further processing and trusting them to give you your share of the proceeds then it goes without saying that you should only enter in to this kind of arrangement with people that you trust. Real life friends work great for this, as you can always slash their tires if they steal your stuff. | |||
=== How is this accomplished? === | |||
#Find some (preferably real life) buddies to farm with. | |||
#Pick an end item that requires more than 6 planets to produce. | |||
#Make sure you and your buddies get at least Planetary Management Level III and Command Center Upgrades Level III (and, of course, a couple of ranks in Remote Sensing). | |||
#First, the cooperative should put down Standard Command Centers on all the planets that can feasibly render a Tier 2 item. Make sure all of your planets are relatively close to each other to ease the hauling time. Each Tier 4 item that can be produced includes at least five Tier 2 items that can be produced on a single planet. Make sure that these planets have the resources you need within relatively close proximity, as you don't want to burn your whole CPU/Power Grid on links across a huge distance. | |||
#Next, find those resources that are going to be "problem children". These are the ones that take resources from two or more planets to manufacture or that only occur in low concentrations. Then, set up some planets to extract and refine those resources. Some of these can also be set up with a single Advanced Industry facility to receive items from other planets to make the Tier 3 items. | |||
#Logistics! Arrange for items to be traded amongst each other as needed to produce the necessary Tier 3 items. | |||
#Finally, set up a single Temperate planet with a High Tech Industry facility to fabricate the final product. Dump all the Tier 3 items your cooperative has made into the launch pad and route them to the facility and route the output back to the launch pad. | |||
#More logistics. The goal here is to move your goodies to the most profitable system that you can safely sell them in. These tend to be 0.5 systems that are close to 0.0 space borders. As an additional precaution, you and your buddies might want to fleet up in a PvP loadout to oversee the trip and protect against suicide gankers. | |||
#PROFIT!!!!111 :) | |||
=Colony Layouts= | =Colony Layouts= | ||
| Line 126: | Line 162: | ||
Post effective colony layouts here, with classification as to its goal, and, if possible, a cropped picture of the colony layout. | Post effective colony layouts here, with classification as to its goal, and, if possible, a cropped picture of the colony layout. | ||
When designing the layouts, note that PINs in the arms can be linked together and only 1 link sent back to the main colony rather than needing to directly link to the destination PIN (eg having a bunch of extractors off away from the command center can be linked one to another, and then only one link goes to the command | When designing the layouts, note that PINs in the arms can be linked together and only 1 link sent back to the main colony rather than needing to directly link to the destination PIN (eg having a bunch of extractors off away from the command center can be linked one to another, and then only one link goes to the command center). However, you can only setup a route that makes up to 6 hops. | ||
Also mention the trade-offs between building a link back to your main colony or eating the import/export taxes, CPU/power costs of a launchpad, and lack of automation if you have an isolated sub-colony over on the other side of a very large planet. This is of particular note for a pure mining colony where the export charge was a planned "sunk" cost that you have to pay either way. | Also mention the trade-offs between building a link back to your main colony or eating the import/export taxes, CPU/power costs of a launchpad, and lack of automation if you have an isolated sub-colony over on the other side of a very large planet. This is of particular note for a pure mining colony where the export charge was a planned "sunk" cost that you have to pay either way. | ||
==Barren Planet (P1 Production)== | |||
[[File:PI-BarrenP1MiningColony.jpg]]<br /> | |||
An example of P1 production using a pair of BIFs (Basic Industrial Facilities) along with a single ECU (Extractor Control Unit). The ECU is currently connected to 10 extractor heads, and the raw materials are routed into the Launchpad for temporary storage. Both BIFs are also connected with a links to the central Launchpad. From the Launchpad, there are two routes that feed raw material into the BIFs. The BIFs then route the finished P1 material back to the Launchpad. The CC (Command Center) does '''not''' have to be linked to any of the other buildings. | |||
In a buffered setup where the ECU feeds into the Launchpad (or other storage building), you will not lose any raw materials if the BIFs cannot keep up with the extractors. As long as the field produces more than the BIFs can convert, a small surplus of raw material will build up in the storage location. Later on, when field production drops, the BIFs will catch back up and convert that surplus. | |||
Note that you will probably have to upgrade the link between the ECU and the Launchpad in order to handle the raw output from the ECU. | |||
==P1 Production (2 ECU 4 BIF 1 LP)== | |||
[[File:EVE-PI-HarvestWorld-DualECUs-QuadBIFs.jpg]]<br /> | |||
Another example of P1 production using a pair of ECUs (Extractor Control Unit) feeding four BIFs (Basic Industrial Facilities). The ECU routes the raw materials into the LP (Launchpad) for temporary storage. The BIFs are also connected with a links to the central Launchpad. From the Launchpad, there are routes that feed raw material into the BIFs. The BIFs then route the finished P1 material back to the Launchpad. The CC (Command Center) does '''not''' have to be linked to any of the other buildings. | |||
Note that you may have to upgrade the link between the ECUs and the Launchpad in order to handle the raw output from the ECUs. | |||
==One Planet P0>P2 - Command Center Upgrades IV== | |||
The most common setup used by people to make passive PI income with minimal effort will be the product of P2 commodities on a single planet, with Command Centers IV trained. At maximum efficiency, each planet will be able to produce 240 P2 commodities in a 24hr period. | |||
*Use the scanner to highlight the two highest density areas of resources on the planet. Use the scan slider until you only have one white spot left. This will be the highest density resource spot. | |||
[[ | [[image:Nsc pi 1.png|300px]][[image:Nsc pi 2.png|300px]] | ||
*Drop the Command Center somewhere roughly between the two. It doesn't need to be exact, the only use the Command Center has in this setup is to center the camera when we open Planet Mode. When you are happy with it's position, hit submit. | |||
[[image:Nsc pi 3.png]] | |||
*Open up the Command Center, upgrade it to level IV and hit submit again. | |||
[[image:Nsc pi 4.png]] | |||
*Place a Extractor Control Unit on the boundary of the first resource hotspot. | |||
[[image:Nsc pi 5.png]] | |||
*Do the same on the second resource hotspot. | |||
[[image:Nsc pi 6.png]] | |||
*Place a Launch Pad in the center between the two Extractor Control Units. | |||
[[image:Nsc pi 7.png]] | |||
*Place 2 Basic Industrial Facilities, 1 Advanced Industrial Facility and 1 Storage Facility, in that order, in a line towards the first Extractor Control Unit. | |||
[[image:Nsc pi 8.png]] | |||
*Do the same in the other direction, towards the second Extractor Control Unit. Once you are happy with the layout, hit submit. | |||
[[image:Nsc pi 9.png]] | |||
*Using Planetary Links, link each part of your factory together in one long line. There is no need to link the Command Center. | |||
[[image:Nsc pi 11.png]] | |||
*Install the correct Schematics for the commodities that you wish to build in each Industrial Facility. Basic Industrial Facilities produce P1 while Advance Industrial Facilities produce P2. | |||
[[image:Nsc pi 10.png]] | |||
*Open up the Extractor Control Unit. What we need to achieve here is a {{co|coral|program output higher than 12,000 Units per hour to achieve maximum efficiency}}. You longer that you set the Extraction Area Size (This is the amount of time that the planet will run for) the less the per hour output will be. The more Extractor Head Units that you use, the higher the per hour output will be. Do this for both Extractor Control Units, making sure you are extracting the required P0 resource. Play around here, see what works, but generally, 4 Extractor Heads and a 1 day Extraction Area Size should be more than enough to achieve maximum efficiency in NullSec. Always try to aim for as much as you can per hour though, as this will leave a surplus supply of P0 resources in your Storage Facilities that will allow the planet to continue to produce P2 if you are a couple of hours late to reset it, or just forget entirely. | |||
[[image:Nsc pi 12.png]] | |||
*Now is the tricky bit. We need to create routes to ensure that our products flow correctly between the various Industry Facilities and and up as P2 commodities in our Launchpad. Unfortunately, this cannot really be shown with images. | |||
**Route each P0 resource from the Extractor Control Unit to the closest Storage Facility | |||
**Route each P0 from the Storage Facilities to the two Basic Industrial Facility that require that product (You should have already installed the correct Schematics for the Basic Industrial Facilities earlier) | |||
**Route the output P1 material from all Basic Industrial Facilities to the Launchpad | |||
**Route one of each type of P1 material in the Launchpad (You will see four listed if done right, two of each P1) to both Advanced Industrial Facilities | |||
**Route the P2 output from both Advanced Industrial Facilities back to the launch pad | |||
{| | |||
| valign="top" | [[image:Nsc pi 14.png]] | |||
| valign="top" | [[image:Nsc pi 13.png]] | |||
|} | |||
*Hit submit one last time to turn the whole process on. If you wait a few hours, you can check your Launchpad to see if there is a nice pile of P2 commodities there. If you did, the Planet is set up correctly. The only interaction that you need to have with the whole setup is to re-start the Extractor Control Units to ensure that you maintain that magic number of 12,000 Units per Day. | |||
==One Planet P0>P2 - Command Center Upgrades V== | |||
We will assume that, after setting up the above 5 times, that by the time someone has trained Command Center Upgrades V they have a solid understanding of how the process works. | |||
Command Center Upgrades V allows us to add 2 additional Basic Industry Facilities and 1 additional Advanced Industrial Facility. This will increase the productivity of the Planet by 33%. To achieve maximum efficiency, the Extractor Control Units will need to be running at 18,000 Units per Hour to keep up with the increased demand. You will likely need to drop to 3 Extractor Heads on one resource to have enough space to fit the Advanced Industrial Facility. With some re-positioning of the Extractor Control Units closer to the main site, you can free up some fitting space by reducing the lengths of the links between the Extractor Control Units and the Storage Facility, which should allow you to place that fourth Extractor Head back out. It takes a little effort to get the positioning right and can be fiddly, but at an increase of 33% it definitely is worth the added effort. | |||
*Place the two addition Basic Industrial Facility first, then the Advanced Industrial Facility so that the P0 resources do not run into the transit limit between structures. | |||
[[image:Nsc pi 15.png]] | |||
==Barren Planet (P2 | ==Barren Planet (P2/P3 Factories)== | ||
[[File: | [[File:EVE-PI-FactoryWorld-18.jpg]]<br> | ||
An example of P2 production | An example of a P2/P3 production world with (3) launchpads surrounded by (6) AIFs (Advanced Industrial Facilties). Each cluster is designed so that you can load about 10k m3 of product into the Launchpad and the (6) AIFs around that Launchpad will convert it into the next level of product. This could be P1 to P2 or P2 to P3 steps. In general, a setup like this will allow you to queue up about 54 hours of material for conversion into the next tier. If you are doing a (3) input P3, however, this will only let you run for about 36 hours. You could use all three clusters to do the same conversion, or you could convert 3 different sets of products at the same time. Setup cost is 4.2M for the Command Center plus about 7.2M ISK for the (18) AIFs, (6) LPs and the links. | ||
To queue up exactly 53 hours of P1->P2, you will need 12720 units of each P1 input material (4924.8 m3 of each input). | |||
==Barren Planet (P1 to P3 Factories)== | |||
[[File:EVE-PI-FactoryWorld-P3-2-20.jpg]]<br> | |||
Here is a more complicated factory world (2+20 setup) that takes (4) different P1 products as input and outputs a single P3 product (such as Robotics). The (8) AIFs on the left side are designed to convert the (2) P1 inputs into a P2 product while the (8) AIFs on the right side do the same with the other (2) P1 inputs. The (4) AIFs in the center then pull those (2) P2 products and turn it into P3. As shown, this setup runs for about 41 hours before running dry. | |||
==Barren Planet (P1/P2/P3 to P4 Factories)== | |||
== | [[File:EVE-PI-FactoryWorld-P4-P3P2.jpg]]<br> | ||
[[File: | Here is a complicated set up that utilizes a variety of P1, P2, and P3 materials to consistently make a P4 (this P4 uses 3 P3s as its input). In the center is the HTIF being constantly supplied by the surrounding AIFs (16). | ||
<br> <br> | |||
In this particular setup, one P3 is purchased or produced from another planet to cut down on the total needed production plants. Supplying this P3 allows the HTIF to be constantly supplied with its three requirements using only 4 AIFs (1 P3 from storage, 2 P3s produced using 2 AIFs each for a total of 4 AIFs). | |||
<br><br> | |||
The remaining outer AIFs are used to supply the P2s to the P3 AIFs (the P3s running only require 2 inputs). Based on producing all of the P2s for the AIFs making P3s, it would require 4 AIFs per P2 product, this means an additional 16 AIFs would normally be needed. Since this setup is running off of a level 5 command center, the Power and CPU limits how many AIFs can be built. To balance for this, one P2 product is provided, cutting the needed P2 AIFs down to 12. | |||
<br> | |||
NOTE: At Level 6, the command center can support the additional AIFs and would eliminate the need to supply a P2 material. Or, by eliminating a storage or launch pad, more PG/CPU could be free for AIFs, this cuts down on the runtime though. | |||
<br><br> | |||
The outer AIFs are producing the P2s (4 AIFs per product) to the inner plants. This has a leftover 2 AIFs that can be used for side manufacturing (I use it to produce surplus P2s from my extra materials, covering some of the commodities I buy). | |||
<br><br> | |||
With correct calculations, and some nifty expedited shipments, this setup can run for 63 hours on one refill of 24,000 m3 of starting materials (additional materials will be needed for the extra two plants).<br><br> | |||
Latest revision as of 00:56, 23 October 2022
|
| Planetary Industry |
|---|
| Introduction to PI |
| The Basics |
| Advanced |
| Other Resources |
Colonies are the method in which players interact with planets via Planetary Industry. Colonies are established by procuring a Command Center the same type as the planet, and landing it on the planet. Doing so will allow you to build other buildings, and link them together for the purpose of mining the raw resources of the planet and producing goods from them.
Overview
This page details objective specific planet colonies or chains of colonies (while Setting up a planetary colony discusses the usage of putting Planetary Buildings to good use on a single planet)
Colony Types
Colonies at a high level can be grouped into a few different types, though by no means does this limit players to only aim for these setups. Experiment to your heart's content!
Strip Mine
The simplest and most straightforward of the industrial ideology, just a ton of extractors with 1 or 2 storage facilities and a command center. Requires the least micromanagement, but does require reorienting the extractors with new deposits when the current one runs dry, for each extractor. If you use the slower/longer deposits then this setup could run for at least day or two without attention.
Note: The output of this colony will strain the capacity of your Command Center to launch rockets with the raw materials, due to the sheer quantity. A Launchpad would cut into productivity, however. This may make the pure Strip Mine colony a rarity versus the similar Mining Complex colony type.
Distributed Strip Mine
A variation on a Strip Mine ideal for very large planets using a high quality Command Center. Large planets like Gas Giants end up with deposits spread far and wide with links that cost as much grid as cpu, eating up your grid much faster than smaller planets. With a ton of spare cpu, with launchpads only costing more cpu and isk than storage facilities (as of this writing), you can simply drop a pile of extractors around each suitable mining spot on the planet and transfer everything to a local launch pad. You'll end up with a planet infected with the measles, but you'll manage to use up your CPU better!
This technique may be more vulnerable to competition than more centralized colonies since it attempts to extract a large amount of the best deposits on a planet.
Mining Complex
Generally the same as a Strip Mine, but with one or more level 1 production buildings thrown in. Hooks the extractors to storage or directly to processors and produces tier one products instead of exporting the raw materials directly. This can be done with a single colony on a single planet, and is probably what most non-dedicated PI-ers will go into, if they don't want to bother shuttling materials from colony to colony to further production. Requires the same attentiveness as a Strip Mine, with the added bonus of dealing with production plants, schematics, more complicated routing, and as such, giving it a tad steeper learning curve.
Since the goal is to convert most if not all raw material to tier one products, the quantity of goods to export is substantially lower than a plain strip mine, and the m3 is likewise lower. This way a Launchpad could likely be avoided. You may have to include storage facilities in the logistics chain to not waste materials due to occupied processors.
Advanced Mining Complex
Much like the Mining Complex, this colony seeks to process raw materials into exportable products. However, the goal of this colony is to produce at least Tier 2 products from a single planet's resources. Coolant from a Gas Planet, for example. Extractors must be split so as to generate an equal amount of each raw material needed. Basic Processors then convert the raw into Tier 1 products. Finally, an Advanced Processor is needed to create the Tier 2 product. This colony requires a fair bit of work since raw materials must be located in close proximity to each other and in sufficient quantity to support the multi-stage production. Layout of links becomes critical to conserve CPU and yet be able to handle the flow of materials from all the extractors. Given the need to manage so many products flowing through so many processors, it is often wise to build a launchpad in the center of the complex to serve as both a storage facility and a clearing house for finished goods, ready for export.
With a resource-rich planet and Command Center Upgrade to III or (ideally) IV, it is fairly easy to build two extractor control units and enough extraction heads to feed four basic industry facilities producing two different P1 commodities, which will in turn feed two advanced industry facilities producing one P2 refined commodity. This is an effective way of producing PI materials given the relatively low volume of stuff to move around and the overall low taxes paid. Each advanced industry facility produces 5 P2 commodity per hour, such a planet will produce 7200 P2 products per month (about 10000 m3/month).
Factory Complex
This colony type relies on input from the market or other colonies and as such requires the inclusion of a Launchpad. It will likely be just one planet in a longer chain owned by a single player (or group of cooperating players), though it could also be a standalone turning one product made from market materials into a more profitable market product. Extractors could be added for additional profit, but may eat into the needs for the processors that make up the colony's primary purpose.
High-Tech Composite Plant
This colony is specific to tier four (and maybe five?) products that require both tier one and tier three products. To cut down on logistics, this colony is established on a barren or temperate planet with the raw material for the tier one product component of the desired target product abundantly available. Extractors feed tier one processors that produce that component in-place, and a Launchpad imports the required tier three components for the High-tech processor.
Full Chain System
Multiple colonies built expressly to complement each other make up a full production chain. There are many variations possible, but maybe some more interesting ones can be put here sometime.
Interplanetary Logistics
This is about moving stuff between planets. For moving stuff around on a planet see Intraplanetary Logistics
You do not have to setup your entire production chain on the one planet. You can purchase missing products on the market or produce them on other planets. However, then you need to get them down to the surface. In addition, ultimately you will want to get the fruits of your slave...er, "colonists'" labour to market.
These operations must be done in the system and undocked, and this exposes you to risk, which you should minimize by doing most of them at a safe spot, preferably cloaked or tethered. There are two ways to get goods off a planet (Customs Office, and Launch Container) and one way to get goods down to the planet (Customs Office). Only the actual transfer of goods is done near the "Customs Office (Planet Name) [Owner Name]", which you will have to add to your overview. The Customs Office is like any other container, in that you must be within 2,500 meters to transfer things into and out of it. However it is like your personal hangar in that things placed in it can only be seen by you. However, unlike your personal hangar, it has a capacity of only 35,000 m3.
|
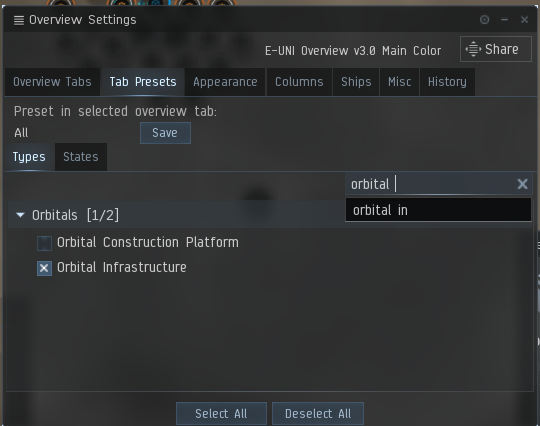
To view a planet's Customs Office you will need to ensure that "Orbital Infrastructure" in the section "Orbitals" is enabled in your overview settings.
|
Everything to do with the Customs Office must be done in the system, and in space. While you can perform the Import/Export operations out in the dark at a safe spot (preferably cloaked) or sitting tethered to an Upwell structure, you must go to a known location to actually pick up the goods from the Customs Office. The Launch Container method, while more expensive, can be done from anywhere in the universe, including docked at a station or cloaked. However, you will still have to go to the system to pick up your launch can, and others can pick it up too if you don't get there first. There are some nuances to this: The cans are on directional scan so people can chase them down with substantial effort (and know that you launched them), get a bookmark from you, or probe you down when you arrive on grid to pick it up. The cans themselves do not appear on probe scans.
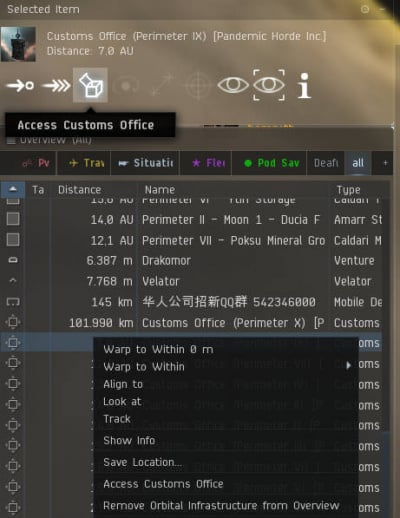
The Customs Office window is accessed either by right clicking on the Office, and choosing "Access Customs Office", selecting the office in overview and clicking the Access Customs Office icon in the Selected Item Menu (looks like an open box) or from the rocket icon on a Launchpad on the planet below.
|
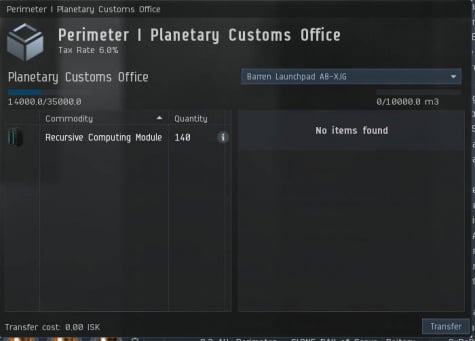
Importing: To import items to the planet, you must have a Launchpad (found under Spaceport in your list of buildings.) Having built this, the operation is to place the items in the Customs Office in orbit by accessing the customs office, opening your inventory, flying your transport ship to the customs office, pre-selecting your next target (next customs office or safe spot), pressing "Warp to 0" right when you drop out of warp and drag commodities from your cargo hold to the left side of the customs office (or vice versa) while your ship aligns. Next, when you are back at a safe spot, you can then move (or shift-drag to break up stacks) from the Planetary Customs Office pane on the left, to the launchpad on the right. If you have multiple Launchpads make sure the target one is selected in the drop-down! When you have everything setup to your desire, click on the "Transfer" button in the lower right corner. The items will arrive in your Launch Pad, and can then be transported elsewhere through Expedited Transfer or Routing. There is a cost of 1 ISK/something to import. Experimental numbers below.
For Export, you have two options: Launch or Export. Export is performed in the same way as Import, by accessing the Customs Office, dragging commodities from the Launchpad at the right hand side to the customs office at the left hand side and clicking on the "Transfer" button in the lower right corner.
Some interesting notes about the Customs Office
- There is only one Customs Office per planet shared between all on-planet.
- Even if you don't have a Colony on the planet you can still use the Customs Office and place items in it.
- It is safe to warp away leaving some of your goods in the Customs Office (unless the Customs Office gets destroyed)
|
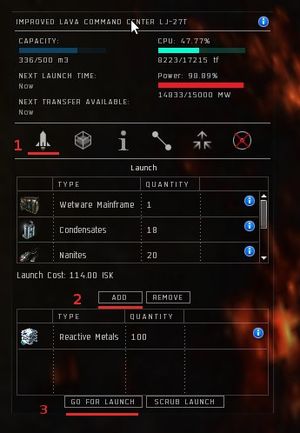
Alternatively, you can launch your products into orbit using your Command Center, with a volume limit of 500m3 (which is conveniently the same as the CC's maximum storage capacity). Click on the rocket icon in the Command Center, which brings up the launch prep panel, where you can pick whole stacks to go into the rocket by selecting it and then clicking on the Add button. Once you are satisfied, you can click on launch. It will then launch a package into orbit for you to pickup within the next 5 days. You can find your package and warp to it in your Journal, under the Planetary Launches tab.
To create a warpable bookmark (eg if you want to ask someone else to pickup for you), you must warp to the can and bookmark the can. There is no ranged warp available, but you might land more than 2,000m from the can, so you may be able to do it without being decloaked. You (and others) can not probe down the launch canister with a combat probe, but a ship picking up the package can be probed down to or scanned with the directional scanner, which also shows the can itself.
Tax Rates
High-sec Player-Owned Customs Offices have a 10% NPC tax rate, in addition to the tax rate set by the POCO owner, which can vary according to your standings towards the owning corp. Corporations who own Customs Offices can charge as much as they please.
The NPC portion of the tax rate can be reduced by the Customs Code Expertise skill.
The tax rate shown in the description of a specific high-sec Customs Office is equal to:
10% + % Player Tax - 1% per level of Customs Code Expertise
NPC-owned Customs Offices outside of high-sec (if any remain, which is unlikely) charge 17%. That rate cannot be reduced (The skill Customs Code Expertise does not affect this). For Player-Owned Customs Offices outside of high-sec, there is no NPC tax component, so the whole tax rate is exactly what the owning corp sets it at. Again, Customs Code Expertise does not affect these rates.
Once you know your cumulative tax rates, the formula for the final cost is:
Export fee = Base cost * tax rate (*1.5 if launched via Command Center)
Import fee = Base cost * tax rate * 0.5
Base costs for each tier of products can be found in this table. Base costs are per unit.
| Commodity level | Base Cost |
| R0 | 5 ISK |
| P1 | 400 ISK |
| P2 | 7,200 ISK |
| P3 | 60,000 ISK |
| P4 | 1,200,000 ISK |
The Launchpad has the greater cost up front, but is far superior to the CC and exports for 2/3 of the cost. It can also launch far larger amounts, and is the only way to import stuff on to the planet. However, keep in mind that you are charged 50% of the export fee to import items to your launchpad. Consider the costs carefully before setting up a multi-planet production chain. Player corporations now own all high-sec customs offices and can set any tax rate they wish—if you have a large factory system making Level 4 items and need to import and export this needs to be kept in mind.
Player Cooperatives
As you've probably already noticed, the most money to be made is off of those juicy Tier 4 items. These are the end items that go directly towards POS/Citadel construction. Most of these sell quite high on the market. Each time you add value to a product, it seems to increase the value of the combined item by a factor of 5-10.
That being said, the resource distribution on each planet combined with the items required to make those end items means that no single end item can be produced on a single planet. In addition, the limit of planets that each player may have is 6 and most Tier 4 items take around 7-10 planets to complete a production chain. Please note that even if you were able to effectively produce the necessary Tier 4 items by yourself on up to 6 separate planets, the odds are that other players are doing that too! Higher supply means lower demand which means less money for you. Therefore, the best thing to do is to start a cooperative with your friends!
The best thing about this approach is that it allows players that have not developed their Planetary Industry skills a great deal to jump in and make, frankly, embarrassing amounts of dosh. Of course, since you're going to be giving other players the fruits of your labor for further processing and trusting them to give you your share of the proceeds then it goes without saying that you should only enter in to this kind of arrangement with people that you trust. Real life friends work great for this, as you can always slash their tires if they steal your stuff.
How is this accomplished?
- Find some (preferably real life) buddies to farm with.
- Pick an end item that requires more than 6 planets to produce.
- Make sure you and your buddies get at least Planetary Management Level III and Command Center Upgrades Level III (and, of course, a couple of ranks in Remote Sensing).
- First, the cooperative should put down Standard Command Centers on all the planets that can feasibly render a Tier 2 item. Make sure all of your planets are relatively close to each other to ease the hauling time. Each Tier 4 item that can be produced includes at least five Tier 2 items that can be produced on a single planet. Make sure that these planets have the resources you need within relatively close proximity, as you don't want to burn your whole CPU/Power Grid on links across a huge distance.
- Next, find those resources that are going to be "problem children". These are the ones that take resources from two or more planets to manufacture or that only occur in low concentrations. Then, set up some planets to extract and refine those resources. Some of these can also be set up with a single Advanced Industry facility to receive items from other planets to make the Tier 3 items.
- Logistics! Arrange for items to be traded amongst each other as needed to produce the necessary Tier 3 items.
- Finally, set up a single Temperate planet with a High Tech Industry facility to fabricate the final product. Dump all the Tier 3 items your cooperative has made into the launch pad and route them to the facility and route the output back to the launch pad.
- More logistics. The goal here is to move your goodies to the most profitable system that you can safely sell them in. These tend to be 0.5 systems that are close to 0.0 space borders. As an additional precaution, you and your buddies might want to fleet up in a PvP loadout to oversee the trip and protect against suicide gankers.
- PROFIT!!!!111 :)
Colony Layouts
Post effective colony layouts here, with classification as to its goal, and, if possible, a cropped picture of the colony layout.
When designing the layouts, note that PINs in the arms can be linked together and only 1 link sent back to the main colony rather than needing to directly link to the destination PIN (eg having a bunch of extractors off away from the command center can be linked one to another, and then only one link goes to the command center). However, you can only setup a route that makes up to 6 hops.
Also mention the trade-offs between building a link back to your main colony or eating the import/export taxes, CPU/power costs of a launchpad, and lack of automation if you have an isolated sub-colony over on the other side of a very large planet. This is of particular note for a pure mining colony where the export charge was a planned "sunk" cost that you have to pay either way.
Barren Planet (P1 Production)
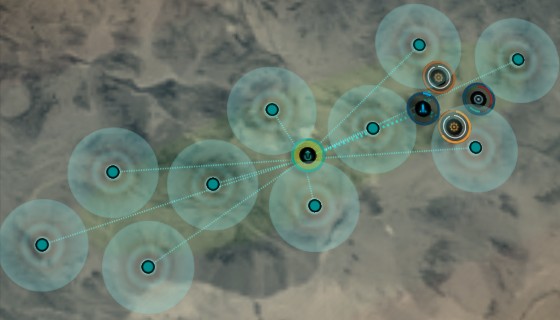
An example of P1 production using a pair of BIFs (Basic Industrial Facilities) along with a single ECU (Extractor Control Unit). The ECU is currently connected to 10 extractor heads, and the raw materials are routed into the Launchpad for temporary storage. Both BIFs are also connected with a links to the central Launchpad. From the Launchpad, there are two routes that feed raw material into the BIFs. The BIFs then route the finished P1 material back to the Launchpad. The CC (Command Center) does not have to be linked to any of the other buildings.
In a buffered setup where the ECU feeds into the Launchpad (or other storage building), you will not lose any raw materials if the BIFs cannot keep up with the extractors. As long as the field produces more than the BIFs can convert, a small surplus of raw material will build up in the storage location. Later on, when field production drops, the BIFs will catch back up and convert that surplus.
Note that you will probably have to upgrade the link between the ECU and the Launchpad in order to handle the raw output from the ECU.
P1 Production (2 ECU 4 BIF 1 LP)
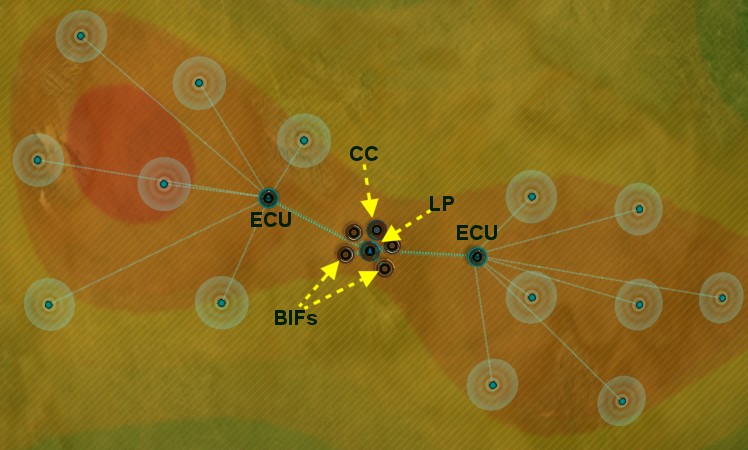
Another example of P1 production using a pair of ECUs (Extractor Control Unit) feeding four BIFs (Basic Industrial Facilities). The ECU routes the raw materials into the LP (Launchpad) for temporary storage. The BIFs are also connected with a links to the central Launchpad. From the Launchpad, there are routes that feed raw material into the BIFs. The BIFs then route the finished P1 material back to the Launchpad. The CC (Command Center) does not have to be linked to any of the other buildings.
Note that you may have to upgrade the link between the ECUs and the Launchpad in order to handle the raw output from the ECUs.
One Planet P0>P2 - Command Center Upgrades IV
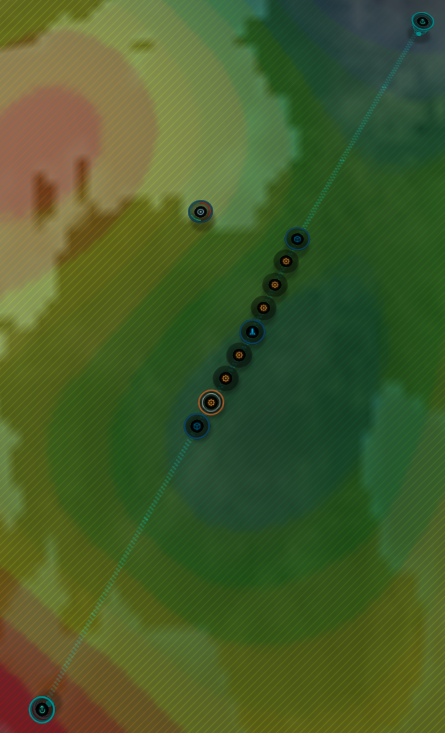
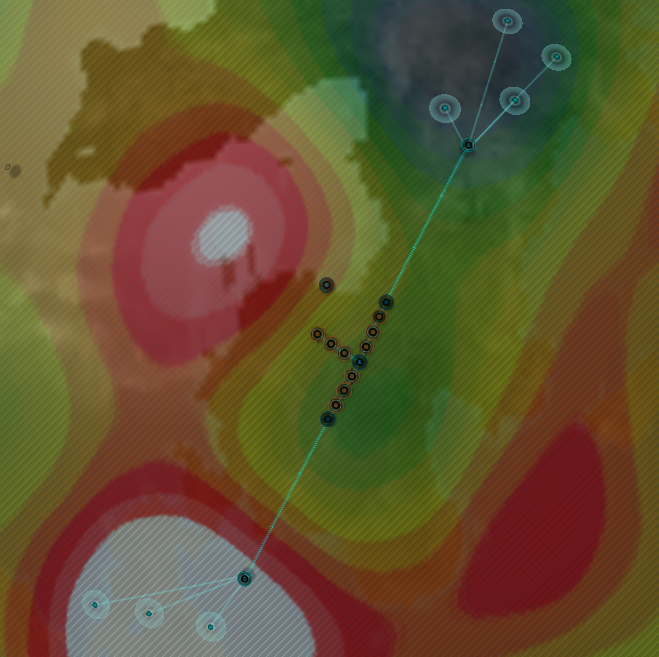
The most common setup used by people to make passive PI income with minimal effort will be the product of P2 commodities on a single planet, with Command Centers IV trained. At maximum efficiency, each planet will be able to produce 240 P2 commodities in a 24hr period.
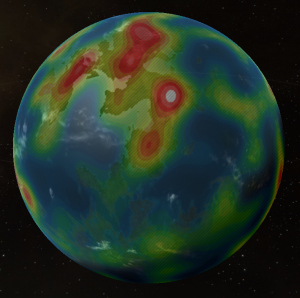
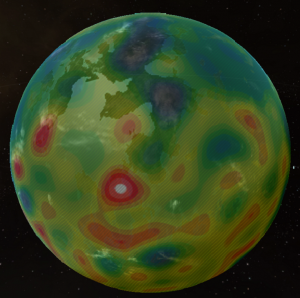
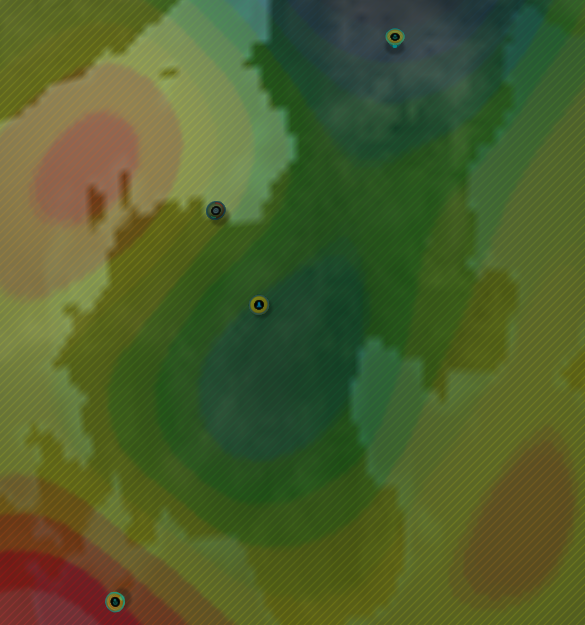
- Use the scanner to highlight the two highest density areas of resources on the planet. Use the scan slider until you only have one white spot left. This will be the highest density resource spot.
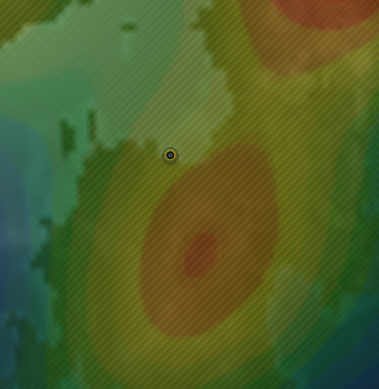
- Drop the Command Center somewhere roughly between the two. It doesn't need to be exact, the only use the Command Center has in this setup is to center the camera when we open Planet Mode. When you are happy with it's position, hit submit.
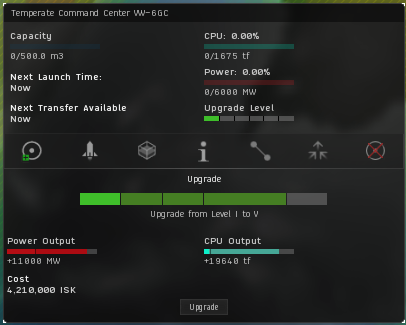
- Open up the Command Center, upgrade it to level IV and hit submit again.
- Place a Extractor Control Unit on the boundary of the first resource hotspot.
- Do the same on the second resource hotspot.
- Place a Launch Pad in the center between the two Extractor Control Units.
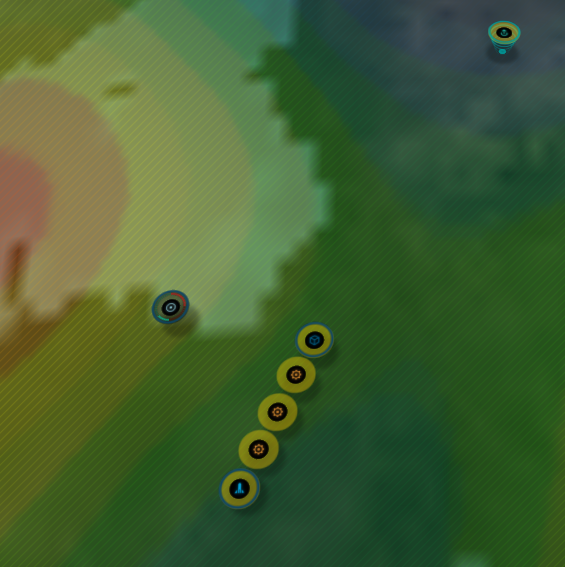
- Place 2 Basic Industrial Facilities, 1 Advanced Industrial Facility and 1 Storage Facility, in that order, in a line towards the first Extractor Control Unit.
- Do the same in the other direction, towards the second Extractor Control Unit. Once you are happy with the layout, hit submit.
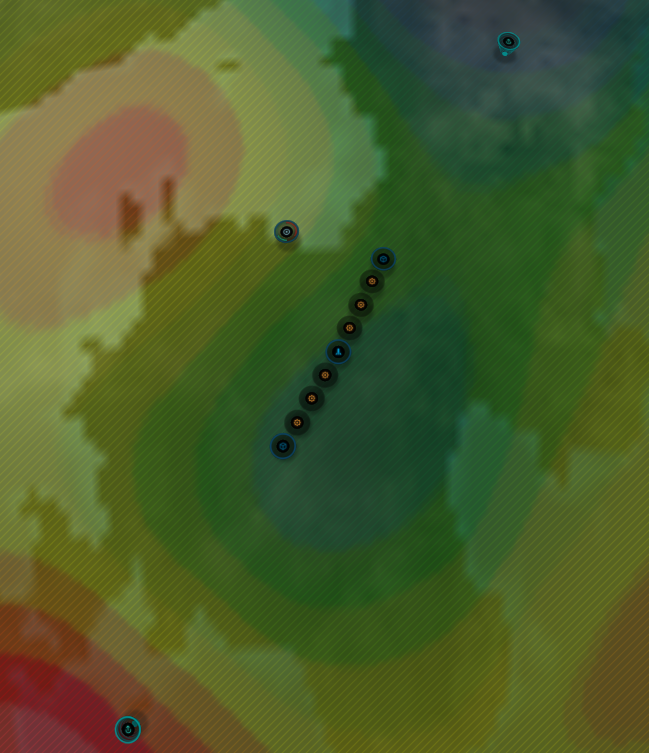
- Using Planetary Links, link each part of your factory together in one long line. There is no need to link the Command Center.
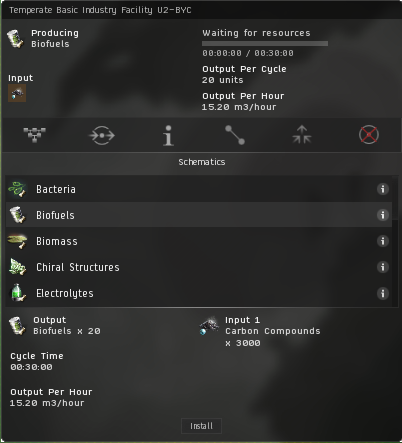
- Install the correct Schematics for the commodities that you wish to build in each Industrial Facility. Basic Industrial Facilities produce P1 while Advance Industrial Facilities produce P2.
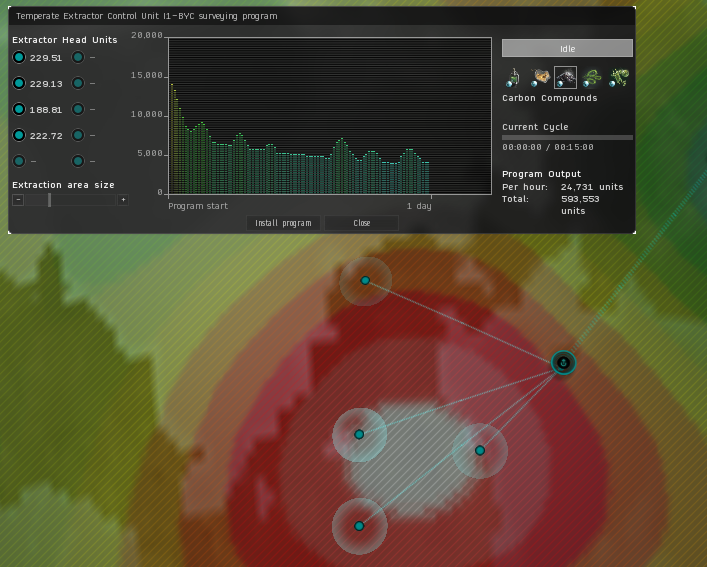
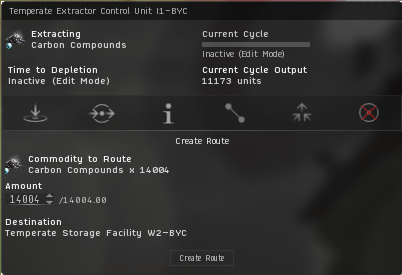
- Open up the Extractor Control Unit. What we need to achieve here is a program output higher than 12,000 Units per hour to achieve maximum efficiency. You longer that you set the Extraction Area Size (This is the amount of time that the planet will run for) the less the per hour output will be. The more Extractor Head Units that you use, the higher the per hour output will be. Do this for both Extractor Control Units, making sure you are extracting the required P0 resource. Play around here, see what works, but generally, 4 Extractor Heads and a 1 day Extraction Area Size should be more than enough to achieve maximum efficiency in NullSec. Always try to aim for as much as you can per hour though, as this will leave a surplus supply of P0 resources in your Storage Facilities that will allow the planet to continue to produce P2 if you are a couple of hours late to reset it, or just forget entirely.
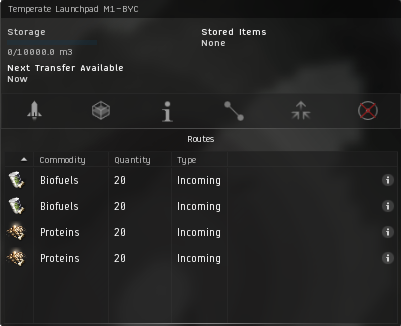
- Now is the tricky bit. We need to create routes to ensure that our products flow correctly between the various Industry Facilities and and up as P2 commodities in our Launchpad. Unfortunately, this cannot really be shown with images.
- Route each P0 resource from the Extractor Control Unit to the closest Storage Facility
- Route each P0 from the Storage Facilities to the two Basic Industrial Facility that require that product (You should have already installed the correct Schematics for the Basic Industrial Facilities earlier)
- Route the output P1 material from all Basic Industrial Facilities to the Launchpad
- Route one of each type of P1 material in the Launchpad (You will see four listed if done right, two of each P1) to both Advanced Industrial Facilities
- Route the P2 output from both Advanced Industrial Facilities back to the launch pad
|
|
- Hit submit one last time to turn the whole process on. If you wait a few hours, you can check your Launchpad to see if there is a nice pile of P2 commodities there. If you did, the Planet is set up correctly. The only interaction that you need to have with the whole setup is to re-start the Extractor Control Units to ensure that you maintain that magic number of 12,000 Units per Day.
One Planet P0>P2 - Command Center Upgrades V
We will assume that, after setting up the above 5 times, that by the time someone has trained Command Center Upgrades V they have a solid understanding of how the process works. Command Center Upgrades V allows us to add 2 additional Basic Industry Facilities and 1 additional Advanced Industrial Facility. This will increase the productivity of the Planet by 33%. To achieve maximum efficiency, the Extractor Control Units will need to be running at 18,000 Units per Hour to keep up with the increased demand. You will likely need to drop to 3 Extractor Heads on one resource to have enough space to fit the Advanced Industrial Facility. With some re-positioning of the Extractor Control Units closer to the main site, you can free up some fitting space by reducing the lengths of the links between the Extractor Control Units and the Storage Facility, which should allow you to place that fourth Extractor Head back out. It takes a little effort to get the positioning right and can be fiddly, but at an increase of 33% it definitely is worth the added effort.
- Place the two addition Basic Industrial Facility first, then the Advanced Industrial Facility so that the P0 resources do not run into the transit limit between structures.
Barren Planet (P2/P3 Factories)
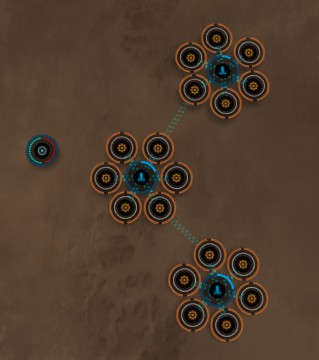
An example of a P2/P3 production world with (3) launchpads surrounded by (6) AIFs (Advanced Industrial Facilties). Each cluster is designed so that you can load about 10k m3 of product into the Launchpad and the (6) AIFs around that Launchpad will convert it into the next level of product. This could be P1 to P2 or P2 to P3 steps. In general, a setup like this will allow you to queue up about 54 hours of material for conversion into the next tier. If you are doing a (3) input P3, however, this will only let you run for about 36 hours. You could use all three clusters to do the same conversion, or you could convert 3 different sets of products at the same time. Setup cost is 4.2M for the Command Center plus about 7.2M ISK for the (18) AIFs, (6) LPs and the links.
To queue up exactly 53 hours of P1->P2, you will need 12720 units of each P1 input material (4924.8 m3 of each input).
Barren Planet (P1 to P3 Factories)
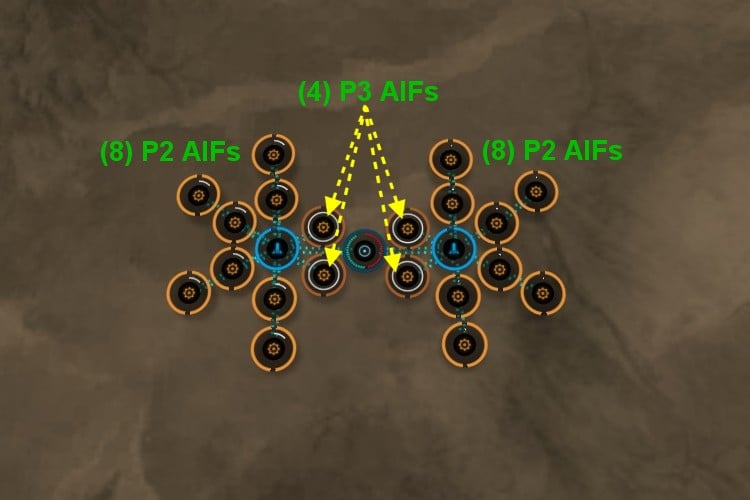
Here is a more complicated factory world (2+20 setup) that takes (4) different P1 products as input and outputs a single P3 product (such as Robotics). The (8) AIFs on the left side are designed to convert the (2) P1 inputs into a P2 product while the (8) AIFs on the right side do the same with the other (2) P1 inputs. The (4) AIFs in the center then pull those (2) P2 products and turn it into P3. As shown, this setup runs for about 41 hours before running dry.
Barren Planet (P1/P2/P3 to P4 Factories)
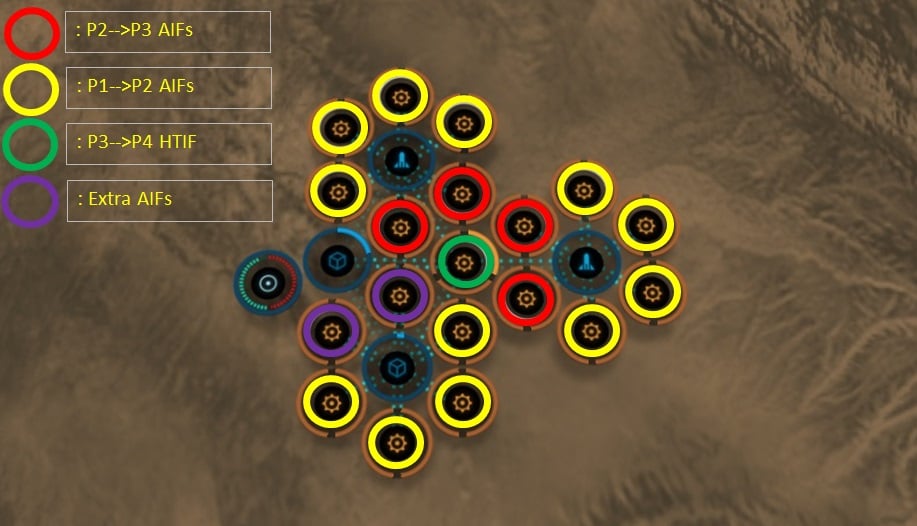
Here is a complicated set up that utilizes a variety of P1, P2, and P3 materials to consistently make a P4 (this P4 uses 3 P3s as its input). In the center is the HTIF being constantly supplied by the surrounding AIFs (16).
In this particular setup, one P3 is purchased or produced from another planet to cut down on the total needed production plants. Supplying this P3 allows the HTIF to be constantly supplied with its three requirements using only 4 AIFs (1 P3 from storage, 2 P3s produced using 2 AIFs each for a total of 4 AIFs).
The remaining outer AIFs are used to supply the P2s to the P3 AIFs (the P3s running only require 2 inputs). Based on producing all of the P2s for the AIFs making P3s, it would require 4 AIFs per P2 product, this means an additional 16 AIFs would normally be needed. Since this setup is running off of a level 5 command center, the Power and CPU limits how many AIFs can be built. To balance for this, one P2 product is provided, cutting the needed P2 AIFs down to 12.
NOTE: At Level 6, the command center can support the additional AIFs and would eliminate the need to supply a P2 material. Or, by eliminating a storage or launch pad, more PG/CPU could be free for AIFs, this cuts down on the runtime though.
The outer AIFs are producing the P2s (4 AIFs per product) to the inner plants. This has a leftover 2 AIFs that can be used for side manufacturing (I use it to produce surplus P2s from my extra materials, covering some of the commodities I buy).
With correct calculations, and some nifty expedited shipments, this setup can run for 63 hours on one refill of 24,000 m3 of starting materials (additional materials will be needed for the extra two plants).

