More actions
m Amarr Mining Campus --> Averon Mining Campus |
m Spelling correction + Minor wording edit. |
||
| Line 1: | Line 1: | ||
{{main|Averon Mining Campus}} | {{main|Averon Mining Campus}} | ||
{{hatnote|This guide is designed to detail the use of [[Drones#Electronic_warfare_drones|ECM Drones]] and [[AMC]] assigned [[ECM Guide|ECM]] [[Griffin]]s for the purpose of defending yourself and other AMC members who may need assistance. For | {{hatnote|This guide is designed to detail the use of [[Drones#Electronic_warfare_drones|ECM Drones]] and [[AMC]] assigned [[ECM Guide|ECM]] [[Griffin]]s for the purpose of defending yourself and other AMC members who may need assistance. For detailed guide about drones, electronic warfare, or ECM, see [[Drones]], [[Drone mechanics]], [[Electronic warfare]] and [[Electronic Counter Measures]].}} | ||
{{eunispecific}} | {{eunispecific}} | ||
{{Important note box|The information contained within this guide are designed to be use for defensive operations only. It is not intended to be a guide to instigating or participating in combat operations in AMC space.}} | {{Important note box|The information contained within this guide are designed to be use for defensive operations only. It is not intended to be a guide to instigating or participating in combat operations in AMC space.}} | ||
| Line 7: | Line 7: | ||
==Electronic warfare at the AMC== | ==Electronic warfare at the AMC== | ||
An unfortunate reality of life in the AMC and of mining in general is that, generally speaking, miners make easy targets. The majority of ships that are used in both solo and fleet mining operations simply cannot withstand the DPS that a well flown, well fitted combat ship can put out. Once tackled, it is usually just a matter of time before the attacker is able to burn through the defences of even a well-tanked mining ship. This often means miners end up on the wrong end of a killmail. | An unfortunate reality of life in the AMC and of mining in general is that, generally speaking, miners make easy targets. The majority of ships that are used in both solo and fleet mining operations simply cannot withstand the DPS that a well flown, well-fitted combat ship can put out. Once tackled, it is usually just a matter of time before the attacker is able to burn through the defences of even a well-tanked mining ship. This often means miners end up on the wrong end of a killmail. | ||
This aggression can come from either normal gankers or enemy war targets (WTs). | This aggression can come from either normal gankers or enemy war targets (WTs). | ||
| Line 23: | Line 23: | ||
===How does ECM help ships escape?=== | ===How does ECM help ships escape?=== | ||
Generally speaking, the successful destruction of another player's ship relies on the aggressor's ability to keep it within range of their offensive weapons. To do this, the first thing most hostile players will do when attacking another ship is | Generally speaking, the successful destruction of another player's ship relies on the aggressor's ability to keep it within range of their offensive weapons. To do this, the first thing most hostile players will do when attacking another ship is disabling that ship's warp drive via a {{co|wheat|Warp Disruptor}} or {{co|wheat|Warp Scrambler}} module. However, the weakness of [[warp disruption]] and other movement-impairing modules is their reliance on a stable target lock on the disrupted ship. By breaking that lock, any movement impairing effects that were applied to disrupted or impaired ship will be removed, leaving it free to warp to a safer location. | ||
==ECM drones== | ==ECM drones== | ||
| Line 45: | Line 45: | ||
Some of these skills may take a little while to train for newer pilots – however the obvious advantage they give in terms of defensive capabilities make it a worthwhile investment. | Some of these skills may take a little while to train for newer pilots – however the obvious advantage they give in terms of defensive capabilities make it a worthwhile investment. | ||
The {{co|wheat|EC-300}} is used in the same way as any other drone - simply lock the target that has locked onto your ship, and send the drones to attack that target. Once deployed the EC-300's will attempt to jam the target repeatedly. If successful, the enemy ship will lose their lock on you and you can warp away to a safer location, generally a [[safe spot]] you have previously set up in the system you are mining in. It is recommended that at all times during ECM | The {{co|wheat|EC-300}} is used in the same way as any other drone - simply lock the target that has locked onto your ship, and send the drones to attack that target. Once deployed the EC-300's will attempt to jam the target repeatedly. If successful, the enemy ship will lose their lock on you and you can warp away to a safer location, generally a [[safe spot]] you have previously set up in the system you are mining in. It is recommended that at all times during ECM you are aligned to your safe spot. The use of drones means there is no need to break the alignment to your place of safety, this dramatically reduces your warp out time if your drones are successful. | ||
Once successful, it is generally considered wise to leave your deployed EC-300's to their fate, as they are cheap and easily replaced. Trying to collect them or waiting for them to return to you uses valuable time that could be better spent making your escape. | Once successful, it is generally considered wise to leave your deployed EC-300's to their fate, as they are cheap and easily replaced. Trying to collect them or waiting for them to return to you uses valuable time that could be better spent making your escape. | ||
| Line 214: | Line 214: | ||
*Dock, get into your AMC Griffin, fit it, and undock. | *Dock, get into your AMC Griffin, fit it, and undock. | ||
**Right click the name of the corpmate under attack in your fleet window. This will allow you to warp to his location. | **Right-click the name of the corpmate under attack in your fleet window. This will allow you to warp to his location. | ||
**Warp to his location within your jammers' range. This will depend on certain skills you have trained. ''Do not warp to 0.'' | **Warp to his location within your jammers' range. This will depend on certain skills you have trained. ''Do not warp to 0.'' | ||
**''Always'' fight on the very edge of the range of your jammers. This gives you the best chance of keep your ship out of danger. | **''Always'' fight on the very edge of the range of your jammers. This gives you the best chance of keep your ship out of danger. | ||
Revision as of 03:58, 6 June 2022
- Main article: Averon Mining Campus
- This guide is designed to detail the use of ECM Drones and AMC assigned ECM Griffins for the purpose of defending yourself and other AMC members who may need assistance. For detailed guide about drones, electronic warfare, or ECM, see Drones, Drone mechanics, Electronic warfare and Electronic Counter Measures.
For a summary of EVE University's rules and code of conduct, see EVE University Rules.
AMC Search & Rescue Operations are intended to give members of the Averon Mining Campus who may not be experienced in EWAR or combat operations a set of tools that will enable them to maximise their chances of escape should they be unfortunate enough to find themselves under attack during AMC Mining Operations.
Electronic warfare at the AMC
An unfortunate reality of life in the AMC and of mining in general is that, generally speaking, miners make easy targets. The majority of ships that are used in both solo and fleet mining operations simply cannot withstand the DPS that a well flown, well-fitted combat ship can put out. Once tackled, it is usually just a matter of time before the attacker is able to burn through the defences of even a well-tanked mining ship. This often means miners end up on the wrong end of a killmail.
This aggression can come from either normal gankers or enemy war targets (WTs).
EVE University often finds itself at war with various player corporations. Despite our best efforts, some of these corporations are aware of the location of the AMC, and during times of war unexpected visits from war targets are not uncommon.
The AMC discourages engaging war targets in open combat, as doing so often encourages more frequent enemy visits to the AMC area. The AMC officers instead recommend that all members of the AMC be capable of defending themselves and, if they wish to do so, their corpmates, using Electronic Countermeasures (ECM).
What is ECM?
- Main article: Electronic Countermeasures
ECM (also known as jamming) is a type of electronic warfare that, when successful, will break any active targeting lock the affected ship has. Further, it will also disrupt the targeting systems of the affected ship after the lock has been broken, making it impossible for the affected ship to re-target anything else for a period of 20 seconds. However, ECM does not prevent the use of weapons and systems that do not require a target lock to function, such as smartbombs or unguided missiles.
How does ECM help ships escape?
Generally speaking, the successful destruction of another player's ship relies on the aggressor's ability to keep it within range of their offensive weapons. To do this, the first thing most hostile players will do when attacking another ship is disabling that ship's warp drive via a Warp Disruptor or Warp Scrambler module. However, the weakness of warp disruption and other movement-impairing modules is their reliance on a stable target lock on the disrupted ship. By breaking that lock, any movement impairing effects that were applied to disrupted or impaired ship will be removed, leaving it free to warp to a safer location.
ECM drones
- Main article: ECM drones
AMC pilots will sometimes find themselves alone and not part of a fleet, such as during solo mining operations or other solo activities. In these situations, the easiest way to retain some ECM capability without fitting EWAR modules is to use ECM drones.
All Mining Barges and Exhumers have drone bays that can fit ten light drones, with the exception of the ![]() Retriever which has a smaller drone bay and can carry only five.
Retriever which has a smaller drone bay and can carry only five.
What this means is that in the majority of cases you can carry a full complement of 5 defensive Light Combat Drones along with 5 Hornet EC-300 Light ECM Drones. Or if you would prefer you could carry more of any one type, however the amount of drones you can fly at any one time depends on the capabilities of the ship you are flying.
Using Hornet EC-300 Drones
- See also: Drone mechanics
Using any drone requires the pilot to have the necessary prerequisite skills.
The Hornet EC-300 requires the following skills to use:
- Drones V (1x)
- Advanced Drone Avionics I (5x)
- Electronic Warfare I (2x)
- CPU Management I (1x)
Some of these skills may take a little while to train for newer pilots – however the obvious advantage they give in terms of defensive capabilities make it a worthwhile investment.
The EC-300 is used in the same way as any other drone - simply lock the target that has locked onto your ship, and send the drones to attack that target. Once deployed the EC-300's will attempt to jam the target repeatedly. If successful, the enemy ship will lose their lock on you and you can warp away to a safer location, generally a safe spot you have previously set up in the system you are mining in. It is recommended that at all times during ECM you are aligned to your safe spot. The use of drones means there is no need to break the alignment to your place of safety, this dramatically reduces your warp out time if your drones are successful.
Once successful, it is generally considered wise to leave your deployed EC-300's to their fate, as they are cheap and easily replaced. Trying to collect them or waiting for them to return to you uses valuable time that could be better spent making your escape.
Rescue operations
During general operations, and particularly during fleet mining operations, it may become necessary to help a corpmate who has been aggressed and tackled by a ganker or war target.
Assisting a corpmate in trouble is entirely optional. Sometimes doing so will involve putting yourself in harm's way. However, the AMC strongly recommends that, if you are in a position to help a corpmate in distress, and are prepared to help, you should do so.
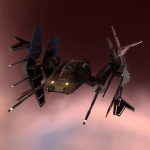
There are two main ways you can help a corpmate in danger: the first, as discussed above, is to target the enemy attacking your corpmate and launch your flight of Hornet EC-300 drones at the target. Once the lock is broken you and your rescued corpmate can warp to a safer location. The second and more effective way is via the use of an AMC ![]() Griffin, as detailed below.
Griffin, as detailed below.
The AMC Griffin

RELATED UNI-WIKI REFERENCES
|
S H I P B O N U S E S
Caldari Frigate bonuses (per skill level): The Griffin is much used by the Caldari Navy as a support vessel in combat squadrons, using its impressive array of electronic gadgetry to disrupt the operation of target ships, making them easy prey for traditional combat vessels. |
Required skills
The skill requirements for flying the Griffin are relatively low for a ship that is so effective against enemy targets. The only skills that are necessary in order to be able to fly the Griffin are:
- Caldari Frigate I (2x)
- Spaceship Command I (1x)
These two skills represent a total training time of approximately 25 minutes. However, these skills only enable getting into the ship, and do not cover the use of ECM or other piloting capabilities. The additional skills necessary for basic effectiveness are:
- Caldari Frigate (2x) - Skills for the specific types of ship you are flying will give you the greatest improvement in ECM effectiveness. 15% bonus to ECM Target Jammer strength per level. +12.5% bonus to ECM Target Jammer optimal range and falloff per level. Requires Spaceship Command I.
- Long Range Targeting (2x) - 5% Bonus to targeting range per skill level. Requires CPU Management II.
- Frequency Modulation (3x) - Increases the falloff distance (this will be explained later) of your ECM modules by 10% per level. Requires CPU Management III and Electronic Warfare II.
- Long Distance Jamming (4x) - Increases the optimal range of your ECM modules by 10% per level. Requires CPU Management IV and Electronic Warfare III.
- Electronic Superiority Rigging (3x) - This will allow you to use the ECM rigs. (See section on ECM modules). Requires Jury Rigging III and Mechanics III.
- Signal Dispersion (5x) - Increases your jam strength by 5% per level. This skill requires CPU Management V and Electronic Warfare IV. If you have decided that you really enjoy being an EWAR pilot this is a great skill to work towards, but it certainly isn't required to have fun flying ECM in fleets.
Some of these skills will develop a pilot's ECM skills far beyond what is required to be effective as a Search & Rescue Pilot within the AMC. Looking at the skills purely from the perspective of return on time invested, Caldari Frigate, Long Range Targeting, and Long Distance Jamming are worth training to at least level III.
Standard fit
Each AMC Griffin comes with all of the modules included in the AMC Griffin standard fit:
Enfeebling Scoped Ladar ECM
BZ-5 Scoped Gravimetric ECM
Umbra Scoped Radar ECM
Hypnos Scoped Magnetometric ECM
5MN Y-T8 Compact Microwarpdrive
Emergency Damage Control I
'Hypnos' Signal Distortion Amplifier I
Small Particle Dispersion Projector I
Small Particle Dispersion Projector I
Small Particle Dispersion Augmentor I
Hornet EC-300 x1


The fit as shown includes one of each type of ECM module. When acting as part of an actual AMC Search & Rescue Operation, however, pilots will usually fit four of the same type of ECM module, assuming the target's ship is known.
Skills
- RIG SLOTS
- Small Particle Dispersion Projector I x 2 - Electronic Superiority Rigging
- Small Particle Dispersion Augmentor I x 1 - Electronic Superiority Rigging
- LOW SLOTS
- Emergency Damage Control I x 1 - Hull Upgrades I, Mechanics I
- 'Hypnos' Signal Distortion Amplifier I x 1 - Electronic Warfare III, CPU Management I
- MID SLOTS
- BZ-5 Neutralizing Spatial Destabilizer ECM x 4 - Electronic Warfare I, CPU Management I
- 5MN Y-T8 Compact Microwarpdrive x 1 - High Speed Maneuvering I, Navigation III, Afterburner III
Notes:
- The skill requirements for all of the ECM modules are identical – just train the above regardless of which racial module is needed for a particular enemy.
- Rigging skills are not necessary to equip rigs or to receive their benefits; they only reduce the drawbacks of using rigs of the relevant type.
Racial ECM Modules
There are four different sensor types that ECM can target, and each is individually favored by one of the main racial factions. Using the correct racial ECM module against enemy ships will greatly increase the chances of successfully jamming the target ship. However, the race-specific modules are not named in a way that makes it obvious what race of ships they are most effective against. Instead, pilots should remember that the color of ECM module matches the background color of the racial ships against which it is most effective.
- Amarr - Radar (yellow-colored jammers)
- Caldari - Gravimetric (blue-colored jammers)
- Gallente - Magnetometric (green-colored jammers)
- Minmatar - Ladar (red-colored jammers)
| Your Target Ship | Which Racial Jammer To Use |
|---|---|
 |
|
 |
|
 |
|
 |
Modules should be fitted for the correct target before undocking. Each AMC Griffin comes with four of each type of racial ECM module – enough to fill four of the five midslots on the Griffin and give the best chance of a successful rescue.
Operations
Using the Griffin
Here is a typical search and rescue scenario:
- A corpmate broadcasts either over Mumble or in the Fleet or AMC OPS channel that he is under attack and has been tackled.
- Before you leap into action, you need to gather some intelligence on the situation at hand:
- Where is the Corpmate? In your system? The next system? How long will it take you to get to them?
- The number and racial type(s) of ship(s) attacking them.
- How many Search & Rescue Pilots are available to assist?
- Before you leap into action, you need to gather some intelligence on the situation at hand:
All of this information will allow you to determine if a rescue attempt is sensible or even possible. For example, if there are many ships attacking your corpmate and he is several jumps away, chances are you will never get to him in time. Even if you are close or in the same system, would rescue be possible? How many enemy ships are there vs. how many available AMC S&R pilots willing to engage? Even 1 to 1 is an extreme risk if there are many enemies, as the AMC Griffin lacks offensive capabilities. If there is a reasonable chance that by attempting a rescue you will be giving the enemy two killmails instead of just one, do not attempt a rescue.
To continue the above scenario, assume that the attack is being carried out by a single war target. There are two S&R pilots available and the rescue will be in the current system. You decide to go ahead and attempt a rescue.
- Warp to the station in system that contains your AMC Griffin. On the way, do the following:
- Ensure you are in fleet with the ship under attack.
- Double check which racial ECM modules you need to fit to combat the attacker.
- Coordinate with the other S&R pilot(s) to ensure you arrive at the attack at approximately the same time.
- Ensure you have your safe spot location close to hand and ready to click.
- Dock, get into your AMC Griffin, fit it, and undock.
- Right-click the name of the corpmate under attack in your fleet window. This will allow you to warp to his location.
- Warp to his location within your jammers' range. This will depend on certain skills you have trained. Do not warp to 0.
- Always fight on the very edge of the range of your jammers. This gives you the best chance of keep your ship out of danger.
- When you arrive on the scene, target the attacking ship.
- Once you have locked on, activate your ECM modules.
- Align to a safe spot or to another, safer location.
- Wait for a successful jam.
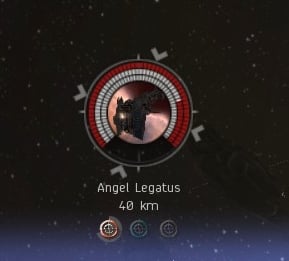
- When you have successfully jammed your target, you will see a gray circle surrounding the jammer that acquired the jam (shown below the locked ship). Hovering over this will tell you how long until the jam ends. The circle will slowly disappear as the jam ticks down. See the image below.
- As soon as you have jammed successfully, warp to a safer location.
- Do not wait for the corpmate who was under attack to get clear. Assume he will do his job, you have done yours.
- Wait at your place of safety for any timers you may have triggered to reduce to zero, or for the hostile pilot to leave the system.
- Dock up and wait at least 20 minutes before you or any of your corpmates venture back out into space.
- If the aggressor or any war targets return to the system with 20 minutes, start the 20 minute timer again.
What if it all goes wrong?
In general, it shouldn't. If you follow the rules above, you should be fine. However, things change in combat all of the time. If anything changes even slightly to affect the pattern of the engagement you should warp to your place of safety immediately. This could include:
- Repeatedly failing to jam
- Any additional targets entering the system
- The corpmate's tank begins to fail
- The corpmate under attack panics and starts behaving in an erratic manner.
What if I am the one under attack?
First and foremost, don't panic. Do the things and only the things that will increase your chances of survival.
- Activate any tank modules you may have fitted to your ship.
- Launch any ECM drones you may have to harass your target.
- Calmly advise your corpmates of your situation via Mumble or chat channels.
- Tell them where you are, how many are attacking you and what they are flying.
- Advise them of the status of your tank. Holding? Failing? If so how fast?
- Don't risk your corpmates warping to you right as your ship explodes and becoming immediate targets.
- Ask if rescue is possible. If so ask them to add you to a fleet or get them added to your fleet if you are already in one.
- Align to a safe spot or safer location. Do not orbit, zigzag or approach the enemy ship. If you are tackled, your only reasonable hope of survival is by the use of ECM. As soon as the lock breaks you need to get out of there. Being aligned reduces warp out time.
- Wait for rescue.
- Warp out immediately upon loss of target lock. Do not wait for the drones to come back, do not try to collect ore in cans. Just get out of there.
- Inform the AMC Search & Rescue pilots of lock break. They should see it but confirm it yourself so they too, can get to their place of safety.
The availability of AMC Griffins does not give any miner an excuse for flying a badly-tanked, badly-fitted or inappropriate ship. You must ensure that your ship has the best tank possible. In this scenario, . Time is your friend and your enemy when tackled, have enough of it to be rescued and all will be well. Have too little of it due to an inadequate tank, and no amount of ECM pilots will get to you in time to save you.

