Difference between revisions of "Targeting"
m (→Modules) |
(→Targeting time: add Signature Radius Suppressor ; targeted ECM can no longer break lock on yourself) |
||
| (59 intermediate revisions by 17 users not shown) | |||
| Line 1: | Line 1: | ||
| − | + | In EVE, you need to target something in order to affect it (repair it, mine it, or attack it). This page discusses how targeting works, and what affects it, and what you can do to improve it. | |
| − | The | + | == Targeting through the UI == |
| + | [[File:Target_overview.png|thumb|Target using the overview]] | ||
| + | [[File:Multiple-targets.png|thumb|Multiple targets locked]] | ||
| + | [[File:hud2.png|thumb|HUD with combat icon. CTRL-click the combat icon to target the ship which is using a warp scrambler on you.]] | ||
| + | [[File:Target_radial_menu.png|thumb|Target using the radial menu]] | ||
| + | [[File:Fitting_screen.png|thumb|The ship fitting screen]] | ||
| + | You can target something by: | ||
| + | * Select the object (either in space or via the overview), and click the "Target" button on the [[overview]]. | ||
| + | * Click and hold the left mouse button on the object in space to activate the radial menu, then move your cursor to the "Target" section (bottom segment) and release. | ||
| + | * Using [[Keyboard controls|keyboard shortcuts]]: the default is {{button|CTRL}} to target (note that you can either select an object and then press {{button|CTRL}} to target it, or hold down {{button|CTRL}} and then click on the object) and the default to un-target is {{button|SHIFT}}+{{button|CTRL}}. An alternate method is to bind a key to the "toggle lock target" command, which allows you to use the same key for both locking and un-locking. | ||
| + | ** This methods works for clicking on ships in the overview, ships in space, or the combat icons above the HUD (which indicate, for example, if a ship is using a warp scrambler on you). It also works on the fleet list (and you can click the "History" tab in the fleet window to target the FC broadcast ship). | ||
| + | |||
| + | Use whichever method most suits your play style, however, many experienced EVE players find that using the third method is the quickest. When you have begun targeting something, you will hear a beeping sound, and a countdown timer around the object in space. Once the countdown timer has reached 0, the target has been locked, and you can fire on it, mine it, etc. | ||
| + | When you have locked a target, it will appear as a circular icon, by default just to the top-left of your overview. You can move the target icons anywhere on the screen by dragging the "target list anchor" icon (to the upper-right of the rightmost locked target icon). | ||
| − | == | + | === Multiple targets === |
| + | You can lock several targets at once (up to the [[#Number_of_targets_locked|maximum defined by your skills and the ship you're flying]]), which will appear as a series of circles. Each target icon shows: | ||
| + | * The target's shields, armor, and structure hit points (as a percentage; it's not possible to see the actual hit points in game) | ||
| + | * The current distance between your ship and the target | ||
| + | * If you have activated modules (e.g. weapons or [[electronic warfare]] modules), these will show up as icons below the target. You can click these icons to deactivate the module active on that particular target. | ||
| − | + | If you have several targets, one will have rotating triangular icons around it. This is the "active target"; any modules you activate will be activated on that target. To change the active target, click on one of the other targets you have locked. | |
| − | + | == Targeting parameters == | |
| + | There are three parameters of interest when targeting: | ||
| + | # How many targets you can have locked at any one time. | ||
| + | # How long it takes to lock a target. | ||
| + | # At what range you can target an object. | ||
| − | + | === Number of targets locked === | |
| + | The number of targets you can have locked at any one time is primarily determined by the ship you're flying and your skills. Each ship has a maximum number of targets they can have locked at any one time, and you can find this information on the "Show Info" screen for a ship. For instance, a [[Merlin]] can only lock five targets at once, whilst a [[Golem]] can lock up to ten targets. For [[Strategic Cruisers]] (T3 ships), the maximum number of locked targets depends on the ship's installed sub-systems. | ||
| − | + | In order to take full advantage of your ship's targeting capabilities you need to train the skills '''Target Management''' and '''Advanced Target Management'''. | |
| + | * {{sk|Target Management|mult=yes|price=yes}}: +1 extra target per skill level, up to the ship's maximum allowed number of targets locked. | ||
| + | * {{sk|Advanced Target Management|mult=yes|price=yes}}: +1 extra target per skill level, up to the ship's maximum allowed number of targets locked. | ||
| − | + | A pilot without any skills can lock up to 2 targets simultaneously, so if you train both Target Management and Advanced Target Management to level V, you will be able to lock 12 targets at once (assuming your ships can support that many). | |
| + | Having a large number of simultaneous targets locked is particularly useful for [[EWAR]] and [[Logistics]] pilots (who need to keep track of many targets at once); combat, mining or hauling pilots will generally not need to train high levels of targeting skills. You can check how many ships you can lock at once on the ship fitting screen, or through an external program like [[PYFA]]. | ||
| − | == | + | ==== Increasing a ship's maximum number of locked targets ==== |
| + | A ship's innate targeting limit (see above) can be increased by installing '''Auto Targeting System''' or '''Signal Amplifier''' modules. As above, you need the necessary targeting skills to take advantage of this higher target limit. | ||
| + | * '''Auto Targeting System''' (high slot): Targets any hostile ship within range on activation. Grants +2 (Auto Targeting System I) or +3 (Auto Targeting System II) bonus to ship's maximum targets. | ||
| + | * '''Signal Amplifier ''' (low slot): Increases scan resolution, targeting range, and maximum number of locked targets by +1 (Signal Amplifier I) or +2 (Signal Amplifier II). | ||
| + | === Targeting time === | ||
| + | How long it takes for you to lock a target depends on the '''signature radius''' of the ship you're targeting, and on your own ship's '''scan resolution'''. To calculate the locking time (in seconds): | ||
| − | = | + | :<math> \displaystyle \text{Targeting time} = \frac{40,000 \,\text{m} }{ \text{Scan resolution} \times \operatorname{arcsinh}^2(\text{Signature radius}) } </math> |
| − | |||
| − | |||
| − | |||
| − | |||
| + | Where: | ||
| + | * Scan resolution of your ship in mmm | ||
| + | * Signature radius of the target in m | ||
| − | |||
| − | + | Smaller ships tend to have high scan resolutions and low signature radii, whereas large ships have the opposite. The higher your scan resolution, and the higher the signature radius of your target, the faster you can lock on - in practice, this means that a small ship will be usually able to lock on to a large ship very quickly, whereas a large ship will take a long time to lock on to a small ship. | |
| − | + | Targets other than ships, such as wrecks, asteroids, hackable containers etc usually have large signature radii (regardless of actual physical size) and can be locked on very quickly even at poor scan resolutions. | |
| − | + | [[File:Lock_speed_graph.png]] | |
| − | + | The lines on the graph represent a few different ships, and the horizontal axis the signature radius of the target ship. As an example (using the ships' base values, without changes due to modules, skills, or implants), a [[Kestrel]] (attack frigate) can lock on to a [[Typhoon]] (battleship) in 1.5 seconds, whereas the same Typhoon will take 19 seconds to lock on to the Kestrel. [[Interceptor]]s have some of the highest scan resolutions; the [[Stiletto]] on the graph above can lock onto almost anything in under two seconds. Conversely, ships with very small signature radii (such as the [[shuttle]] on the graph above) have more time before an enemy locks on to them (9 seconds when being targeted by an [[Omen]], 23 seconds when being targeted by a Typhoon). | |
| − | |||
| − | |||
| − | |||
| − | === | + | ==== Improving your scan resolution and targeting speed ==== |
| + | In order to be able to lock on to your targets faster, you need to increase your ship's scan resolution; this can be done by: | ||
| + | * Modules: | ||
| + | ** '''[[Sensor Booster]]''' (medium slot): Increases your ship's targeting range and scan resolution. Can be loaded with [[scripts]] to give either a bonus to both, or a larger bonus to one (at the expense of no bonus to the other). | ||
| + | ** '''Signal Amplifier''' (low slot): Gives a 10% (Signal Amplifier I) or 15% (Signal Amplifier II) bonus to scan resolution, while also increasing your maximum targeting range and the maximum number of locked targets. | ||
| + | * Skills | ||
| + | ** {{sk|Signature Analysis|mult=yes|price=yes}}: 5% bonus per level to your locking time. | ||
| + | * Rigs | ||
| + | ** '''Targeting System Subcontroller''': Increases your scan resolution at the expense of shield strength. | ||
| + | * Implants | ||
| + | ** '''Zainou 'Gypsy' Signature Analysis''': Provides a 1%-6% bonus to scan resolution | ||
| + | * Help from fleetmates (using [[Remote Sensor Booster]]s) | ||
| − | + | You can also increase your target's signature radius with [[Target Painter]]s, although targeting is rarely the primary reason target painters are used. Note that there are a few modules which reduce your scan resolution, notably [[cloaking|cloaking devices]] (-50% scan resolution; ''covert ops'' cloaking devices don't have this drawback) and warp core stabilisers (-50% scan resolution). | |
| − | + | Fast locking times are particularly important for [[tackler]]s and [[interceptor]]s, who need to tackle a target before it has a chance to escape by warping away. | |
| − | |||
| − | + | ==== Reducing your enemy's locking speed ==== | |
| − | + | {{main|Signature radius}} | |
| + | Conversely, in PvP, you want to minimize your signature radius, so that your opponent takes a long time to lock on to you (giving you time to get a few shots off, or to escape). There are almost no direct ways of reducing your ship's signature radius (other than flying a different ship , some implants and [[Signature radius#Signature Radius Suppressor|Signature Radius Suppressor]] on battleships), so be mindful of the modules which increase it (for instance, turning on your microwarpdrive (MWD) increases your signature radius by 500%). For more discussion on what affects signature radius, see [[signature radius]], keeping in mind that a small signature radius also helps with reducing incoming damage (for more details, see [[missile mechanics]] and [[turret mechanics]]). | ||
| − | + | You can also handicap an opponent by decreasing their scan resolution using [[Remote Sensor Dampener|remote sensor dampening]] (making them take longer to lock on to you) or use [[ECM]] to make them lose lock on you / your fleet members completely. These topics (including possible countermeasures) are covered in much greater detail at [[Electronic warfare]] and [[Electronic Countermeasures]]. | |
| − | |||
| − | |||
| − | ( | ||
| − | * | + | === Targeting range === |
| − | * | + | The range at which you can target another object is primarily dependent on the ship you're flying; you can find its base targeting range on the "Show Info" screen. You can improve this through the '''Long Range Targeting''' skill, for up to a 25% bonus at level V: |
| − | * | + | * {{sk|Long Range Targeting|mult=yes|price=yes}}: 5% bonus to targeting range per skill level. |
| + | Additionally, there are certain modules which you can use to increase your targeting range: | ||
| + | * '''Signal Amplifier''' (low slot): Increases targeting range by 25% (Signal Amplifier I) or 30% (Signal Amplifier II), as well as the maximum number of locked targets and your ship's scan resolution. | ||
| + | * '''Sensor Booster''' (medium slot): Increases targeting range and scan resolution. Can be loaded with scripts to give either a bonus to both, or a larger bonus to one (at the expense of no bonus to the other); for more details, see [[Sensor Booster]]. | ||
| + | Lastly, rigs (e.g. Ionic Field Projector) and implants (e.g. Zainou 'Gypsy' Long Range Targeting) can boost targeting range even further, as can help from a fleetmate (using a [[Remote Sensor Booster]]). | ||
| − | + | Very long targeting ranges are the foundation of ships fitted for sniping, but targeting at longer ranges than your weapons' effective range is a waste, not to mention that the targeting modules are taking up space which would otherwise be used for, for instance, tanking modules - so increasing targeting range is always a trade-off. Certain modules (such as warp core stabilisers) greatly decrease your targeting range. Lastly, you can use [[Remote Sensor Dampener]]s to greatly reduce your enemy's targeting range. | |
| − | + | You can find out your ship's current targeting range on the fitting screen, or through an external tool like [[PYFA]]. | |
| − | |||
| − | + | == Automatic and passive targeters == | |
| + | Besides targeting speed, range, and number, two other modules can affect targeting in a significant way: '''Auto Targeting Systems''' and '''Passive Targeters'''. | ||
| − | + | * '''Auto Targeting System''' (high slot): Targets any hostile ship within range on activation and grants a bonus to ship's maximum targets. | |
| − | + | * '''Passive Targeter''' (medium slot): Allows target lock without alerting the ship to a possible threat. | |
| − | + | Auto Targeting Systems are rarely used, as they take up a valuable high slot and stop you from prioritizing targets - although some pilots use them merely for their +2 target bonus (provided they have a spare high slot) or to reduce the workload on E-War ships. Passive Targeters have a niche use, as they allow you to use non-aggressive modules (eg cargo or ship scanners) on a target without alerting the target - for instance, in order to check what cargo a ship is carrying and whether it's worth [[suicide ganking]]. To use a passive targeter, activate the module, then click on the target you would like to lock. | |
| − | |||
| − | + | [[Category:Game mechanics]] | |
| − | |||
| − | |||
| − | |||
| − | |||
| − | |||
| − | |||
| − | |||
Latest revision as of 06:55, 9 March 2024
In EVE, you need to target something in order to affect it (repair it, mine it, or attack it). This page discusses how targeting works, and what affects it, and what you can do to improve it.
Targeting through the UI
You can target something by:
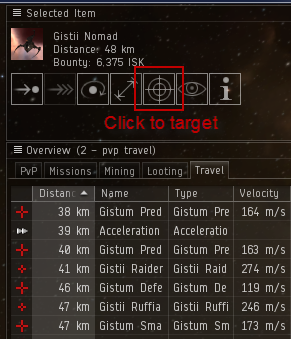
- Select the object (either in space or via the overview), and click the "Target" button on the overview.
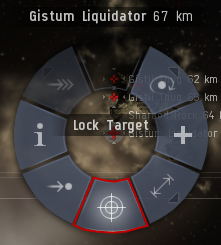
- Click and hold the left mouse button on the object in space to activate the radial menu, then move your cursor to the "Target" section (bottom segment) and release.
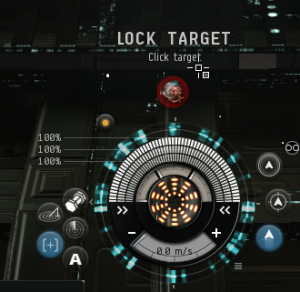
- Using keyboard shortcuts: the default is CTRL to target (note that you can either select an object and then press CTRL to target it, or hold down CTRL and then click on the object) and the default to un-target is SHIFT+CTRL. An alternate method is to bind a key to the "toggle lock target" command, which allows you to use the same key for both locking and un-locking.
- This methods works for clicking on ships in the overview, ships in space, or the combat icons above the HUD (which indicate, for example, if a ship is using a warp scrambler on you). It also works on the fleet list (and you can click the "History" tab in the fleet window to target the FC broadcast ship).
Use whichever method most suits your play style, however, many experienced EVE players find that using the third method is the quickest. When you have begun targeting something, you will hear a beeping sound, and a countdown timer around the object in space. Once the countdown timer has reached 0, the target has been locked, and you can fire on it, mine it, etc.
When you have locked a target, it will appear as a circular icon, by default just to the top-left of your overview. You can move the target icons anywhere on the screen by dragging the "target list anchor" icon (to the upper-right of the rightmost locked target icon).
Multiple targets
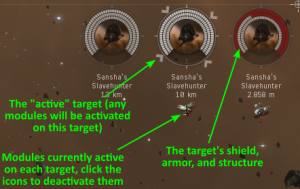
You can lock several targets at once (up to the maximum defined by your skills and the ship you're flying), which will appear as a series of circles. Each target icon shows:
- The target's shields, armor, and structure hit points (as a percentage; it's not possible to see the actual hit points in game)
- The current distance between your ship and the target
- If you have activated modules (e.g. weapons or electronic warfare modules), these will show up as icons below the target. You can click these icons to deactivate the module active on that particular target.
If you have several targets, one will have rotating triangular icons around it. This is the "active target"; any modules you activate will be activated on that target. To change the active target, click on one of the other targets you have locked.
Targeting parameters
There are three parameters of interest when targeting:
- How many targets you can have locked at any one time.
- How long it takes to lock a target.
- At what range you can target an object.
Number of targets locked
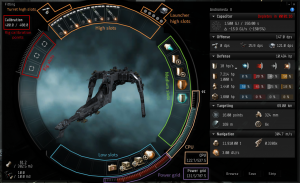
The number of targets you can have locked at any one time is primarily determined by the ship you're flying and your skills. Each ship has a maximum number of targets they can have locked at any one time, and you can find this information on the "Show Info" screen for a ship. For instance, a Merlin can only lock five targets at once, whilst a Golem can lock up to ten targets. For Strategic Cruisers (T3 ships), the maximum number of locked targets depends on the ship's installed sub-systems.
In order to take full advantage of your ship's targeting capabilities you need to train the skills Target Management and Advanced Target Management.
- Target Management (1x, 150k ISK): +1 extra target per skill level, up to the ship's maximum allowed number of targets locked.
- Advanced Target Management (3x, 500k ISK): +1 extra target per skill level, up to the ship's maximum allowed number of targets locked.
A pilot without any skills can lock up to 2 targets simultaneously, so if you train both Target Management and Advanced Target Management to level V, you will be able to lock 12 targets at once (assuming your ships can support that many).
Having a large number of simultaneous targets locked is particularly useful for EWAR and Logistics pilots (who need to keep track of many targets at once); combat, mining or hauling pilots will generally not need to train high levels of targeting skills. You can check how many ships you can lock at once on the ship fitting screen, or through an external program like PYFA.
Increasing a ship's maximum number of locked targets
A ship's innate targeting limit (see above) can be increased by installing Auto Targeting System or Signal Amplifier modules. As above, you need the necessary targeting skills to take advantage of this higher target limit.
- Auto Targeting System (high slot): Targets any hostile ship within range on activation. Grants +2 (Auto Targeting System I) or +3 (Auto Targeting System II) bonus to ship's maximum targets.
- Signal Amplifier (low slot): Increases scan resolution, targeting range, and maximum number of locked targets by +1 (Signal Amplifier I) or +2 (Signal Amplifier II).
Targeting time
How long it takes for you to lock a target depends on the signature radius of the ship you're targeting, and on your own ship's scan resolution. To calculate the locking time (in seconds):
- [math] \displaystyle \text{Targeting time} = \frac{40,000 \,\text{m} }{ \text{Scan resolution} \times \operatorname{arcsinh}^2(\text{Signature radius}) } [/math]
Where:
- Scan resolution of your ship in mmm
- Signature radius of the target in m
Smaller ships tend to have high scan resolutions and low signature radii, whereas large ships have the opposite. The higher your scan resolution, and the higher the signature radius of your target, the faster you can lock on - in practice, this means that a small ship will be usually able to lock on to a large ship very quickly, whereas a large ship will take a long time to lock on to a small ship.
Targets other than ships, such as wrecks, asteroids, hackable containers etc usually have large signature radii (regardless of actual physical size) and can be locked on very quickly even at poor scan resolutions.
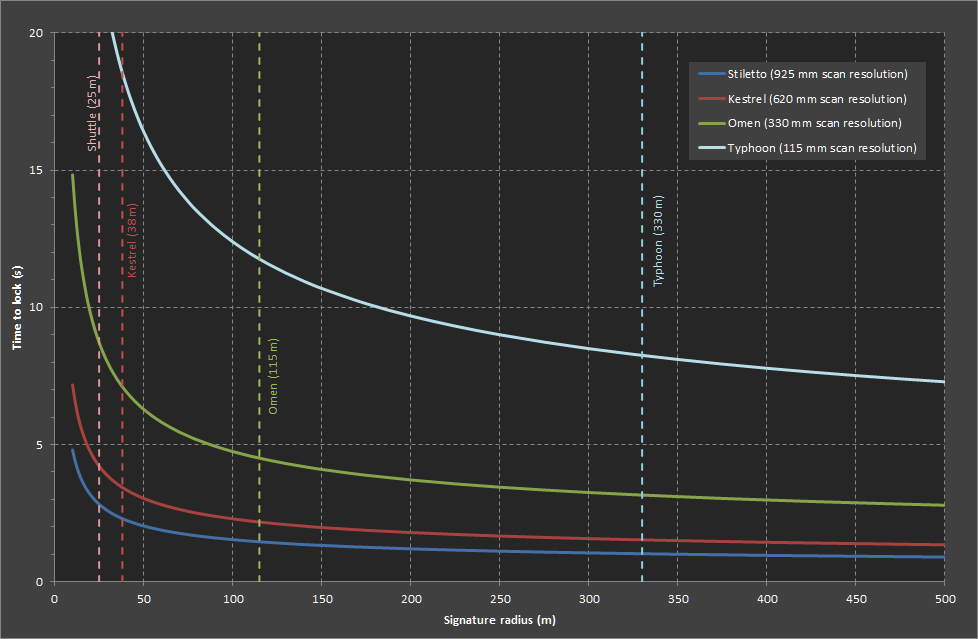
The lines on the graph represent a few different ships, and the horizontal axis the signature radius of the target ship. As an example (using the ships' base values, without changes due to modules, skills, or implants), a Kestrel (attack frigate) can lock on to a Typhoon (battleship) in 1.5 seconds, whereas the same Typhoon will take 19 seconds to lock on to the Kestrel. Interceptors have some of the highest scan resolutions; the Stiletto on the graph above can lock onto almost anything in under two seconds. Conversely, ships with very small signature radii (such as the shuttle on the graph above) have more time before an enemy locks on to them (9 seconds when being targeted by an Omen, 23 seconds when being targeted by a Typhoon).
Improving your scan resolution and targeting speed
In order to be able to lock on to your targets faster, you need to increase your ship's scan resolution; this can be done by:
- Modules:
- Sensor Booster (medium slot): Increases your ship's targeting range and scan resolution. Can be loaded with scripts to give either a bonus to both, or a larger bonus to one (at the expense of no bonus to the other).
- Signal Amplifier (low slot): Gives a 10% (Signal Amplifier I) or 15% (Signal Amplifier II) bonus to scan resolution, while also increasing your maximum targeting range and the maximum number of locked targets.
- Skills
- Signature Analysis (1x, 100k ISK): 5% bonus per level to your locking time.
- Rigs
- Targeting System Subcontroller: Increases your scan resolution at the expense of shield strength.
- Implants
- Zainou 'Gypsy' Signature Analysis: Provides a 1%-6% bonus to scan resolution
- Help from fleetmates (using Remote Sensor Boosters)
You can also increase your target's signature radius with Target Painters, although targeting is rarely the primary reason target painters are used. Note that there are a few modules which reduce your scan resolution, notably cloaking devices (-50% scan resolution; covert ops cloaking devices don't have this drawback) and warp core stabilisers (-50% scan resolution).
Fast locking times are particularly important for tacklers and interceptors, who need to tackle a target before it has a chance to escape by warping away.
Reducing your enemy's locking speed
- Main article: Signature radius
Conversely, in PvP, you want to minimize your signature radius, so that your opponent takes a long time to lock on to you (giving you time to get a few shots off, or to escape). There are almost no direct ways of reducing your ship's signature radius (other than flying a different ship , some implants and Signature Radius Suppressor on battleships), so be mindful of the modules which increase it (for instance, turning on your microwarpdrive (MWD) increases your signature radius by 500%). For more discussion on what affects signature radius, see signature radius, keeping in mind that a small signature radius also helps with reducing incoming damage (for more details, see missile mechanics and turret mechanics).
You can also handicap an opponent by decreasing their scan resolution using remote sensor dampening (making them take longer to lock on to you) or use ECM to make them lose lock on you / your fleet members completely. These topics (including possible countermeasures) are covered in much greater detail at Electronic warfare and Electronic Countermeasures.
Targeting range
The range at which you can target another object is primarily dependent on the ship you're flying; you can find its base targeting range on the "Show Info" screen. You can improve this through the Long Range Targeting skill, for up to a 25% bonus at level V:
- Long Range Targeting (2x, 100k ISK): 5% bonus to targeting range per skill level.
Additionally, there are certain modules which you can use to increase your targeting range:
- Signal Amplifier (low slot): Increases targeting range by 25% (Signal Amplifier I) or 30% (Signal Amplifier II), as well as the maximum number of locked targets and your ship's scan resolution.
- Sensor Booster (medium slot): Increases targeting range and scan resolution. Can be loaded with scripts to give either a bonus to both, or a larger bonus to one (at the expense of no bonus to the other); for more details, see Sensor Booster.
Lastly, rigs (e.g. Ionic Field Projector) and implants (e.g. Zainou 'Gypsy' Long Range Targeting) can boost targeting range even further, as can help from a fleetmate (using a Remote Sensor Booster).
Very long targeting ranges are the foundation of ships fitted for sniping, but targeting at longer ranges than your weapons' effective range is a waste, not to mention that the targeting modules are taking up space which would otherwise be used for, for instance, tanking modules - so increasing targeting range is always a trade-off. Certain modules (such as warp core stabilisers) greatly decrease your targeting range. Lastly, you can use Remote Sensor Dampeners to greatly reduce your enemy's targeting range.
You can find out your ship's current targeting range on the fitting screen, or through an external tool like PYFA.
Automatic and passive targeters
Besides targeting speed, range, and number, two other modules can affect targeting in a significant way: Auto Targeting Systems and Passive Targeters.
- Auto Targeting System (high slot): Targets any hostile ship within range on activation and grants a bonus to ship's maximum targets.
- Passive Targeter (medium slot): Allows target lock without alerting the ship to a possible threat.
Auto Targeting Systems are rarely used, as they take up a valuable high slot and stop you from prioritizing targets - although some pilots use them merely for their +2 target bonus (provided they have a spare high slot) or to reduce the workload on E-War ships. Passive Targeters have a niche use, as they allow you to use non-aggressive modules (eg cargo or ship scanners) on a target without alerting the target - for instance, in order to check what cargo a ship is carrying and whether it's worth suicide ganking. To use a passive targeter, activate the module, then click on the target you would like to lock.
