|
| Exploration |
|---|
| Site types |
| Guides |
- This page is about the hacking site. See Besieged Covert Research Facility for info on the combat site

Ghost Sites are pirate facilities which can be hacked (like data sites), but which have unique mechanics which set them apart.
Finding a Ghost Site

Ghost Sites can be found using the probe scanner, using probes. They show up as cosmic signatures (type: Data sites or type: Combat Site in Dronelands specifically), and occur in all categories of space (hi-sec, low-sec, null-sec and wormhole). They show up in the anomaly list as "<size> <faction> Covert Research Facility". The <size> is solely dependent on the security rating of the system:
- "Lesser" in high-sec
- "Standard" in low-sec
- "Improved" in null-sec
- "Superior" in wormholes
Note: The similarly named "Besieged Covert Research Facility" is NOT a Ghost Site. It is a combat anomaly featuring extremely powerful Mordu's Legion battleships that will easily destroy your hacking ship.
As expected, more difficult Ghost Sites are more difficult to hack, have more rats appear - but have better loot. All have the same number of hackable containers (often called "cans") though.
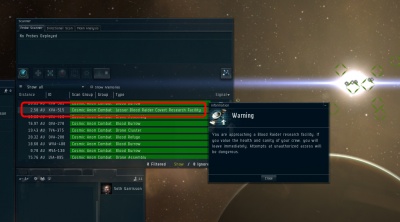
When you enter warp to a Ghost Site, a pop-up message appears that warns the capsuleer that the site is dangerous.
Getting loot
When you enter the site, a 30-second (the minimal time was most likely increased in the July patch) to three-minute timer is started (unless you warp in cloaked; in that case, the timer will start when decloaking). The time is random and only the last 30 seconds are shown as a timer, but it seems that the more ships are in the site at once, the longer the timer (in practice, if running a site solo, you will generally have enough time to hack and loot 2 cans before the timer expires).
Since time is of the essence, it is not generally recommended to scan the containers with a cargo scanner due to the limited time that is available before the rats warp in and make the cans (i.e. containers) explode; however, if you're fast and have not fitted warp core stabilizers to your ship, you can.
The stashes are opened by the hacking mini-game known from data sites; once the hack is complete, you can loot the cans directly. The cans are normally in a square, equal distance from each other, with one having better loot than the rest. It has not been determined if the uniquely named can has the best loot.
The hacking difficulty is comparable to the difficulty of hacking a data or relic site in a system with the same security status. If you fail your hacking attempt, the container you were working on will explode (see also below), unlike with normal data sites. If you failed a hack, you can continue hacking, but the hidden timer is still running. Unlike regular data sites, when these cans explode, they do damage to your ship.
The site timer varies considerably, from around 30 seconds to a few minutes. It is random.
All sites may contain Covert Research Tools. Hi-Sec and Low-Sec usually contain Shattered Villard Wheels, which are a required component to build the ‘Ascendancy’ implant set. Null-sec and Wormholes may contain materials needed to build Capital sized modules.
Possible Hi-Sec Loot:
- Mid-grade Ascendancy Alpha Blueprint Copy
- Mid-grade Ascendancy Beta Blueprint Copy
- Mid-grade Ascendancy Delta Blueprint Copy
- Mid-grade Ascendancy Epsilon Blueprint Copy
- Mid-grade Ascendancy Gamma Blueprint Copy
Possible Low-Sec Loot:
- ‘Wetu’ Mobile Depot Blueprint Copy
- 'Packrat' Mobile Tractor Unit Blueprint Copy
- High-grade Ascendancy Alpha Blueprint Copy
- High-grade Ascendancy Beta Blueprint Copy
- Mid-grade Ascendancy Delta Blueprint Copy
- Mid-grade Ascendancy Epsilon Blueprint Copy
- Mid-grade Ascendancy Gamma Blueprint Copy
- Mid-grade Ascendancy Omega Blueprint Copy
Possible Null-Sec Loot:
- ‘Wetu’ Mobile Depot Blueprint Copy
- ‘Yurt’ Mobile Depot Blueprint Copy
- 'Magpie' Mobile Tractor Unit Blueprint
- High-grade Ascendancy Alpha Blueprint Copy
- High-grade Ascendancy Beta Blueprint Copy
- Mid-grade Ascendancy Omega Blueprint Copy
- High-grade Ascendancy Delta Blueprint Copy
- High-grade Ascendancy Epsilon Blueprint Copy
- High-grade Ascendancy Gamma Blueprint Copy
Possible Wormhole Loot:
- 'Magpie' Mobile Tractor Unit
- ‘Wetu’ Mobile Depot Blueprint Copy
- ‘Yurt’ Mobile Depot Blueprint Copy
- High-grade Ascendancy Delta Blueprint Copy
- High-grade Ascendancy Epsilon Blueprint Copy
- High-grade Ascendancy Gamma Blueprint Copy
- High-grade Ascendancy Omega Blueprint Copy
Source: CCP Affinity
Rats

After the hidden timer expires (irrespective of how many containers you have hacked), a 30 second timer will become visible, and a fleet of rats (based on the local pirate population) will show up to destroy the cans and defend the site. When the visible timer reaches 0, the rats will instantly detonate every canister in the site, even those that have already been successfully hacked. The 30-second countdown will be visible on your NeoCom Opportunities window and the rats will warp in following a short delay after the timer first appears.
These rats have no bounties nor any known drops, but they do a considerable amount of damage (based on the system's security status) that can reach 2000+ raw damage. Most of them do not use warp disruptors, although there is one type of each rat that will warp-disrupt you (confirmed in high sec, null sec & wormhole). As there is usually one of those warp-disrupting rats in any site, you're generally stuck there for the duration. Do note that they will not shut down MWDs so that may be an option for quickly pulling range if they manage to catch you.
The rats' warp disruption range is 24 km. They do not aggress players if the player ship is more than 30 km away.
| WARNING: DO NOT underestimate the damage of the rats. Even in high security space they will do nearly 500 combined DPS which will put strong pressure on even a well-tanked battlecruiser or above. |
These rats do warp out after some time and have a decent amount of tank, so they're generally not worth killing. If you don't warp off before you're warp-disrupted, your best hope is to be able to tank their damage (and the explosive damage from the cans). They have a relatively short range (around 10 km) before reaching their turret DPS falloff, so a fast ship may be able to outrange their most damaging attacks quickly.
The Guristas variant of the site is the most notable exception to this - outranging the rats will not work without strong tank against Thermal damage, since the rats use thermal damage missiles that reach out to 60+ km and have very good damage application even against small targets (32.8m explosion radius). The Serpentis variant is also nasty since their DPS falloff is larger (25 km) versus the other turret-based Ghost Site rats. The Sansha rats also have 34km range missiles with 32.8m explosion radius, but their damage is relatively low compared to their short-ranged turret DPS and can be kited more easily.
The rats equipped with warp disruptors vary from faction to faction.
- Serpentis, Sansha's Nation, Guristas and Blood Raiders - Sentry warp disrupts
- Angel Cartel - Watcher warp disrupts
Explosions

All the containers in the Ghost Site will explode if the hidden timer (see above) runs out.
If you fail a hacking attempt, only the failed can will explode, leaving the others to be hackable.
If the timer runs out, the rats will appear and shoot the containers, which causes them to explode. In this case the explosion may be delayed by 30 seconds, which can allow you to warp out before it blows, assuming you are not warp disrupted.
If you can tank the explosive damage, you can use those extra seconds to continue hacking/looting a can. The rats will continue shooting at you until all four of the main hackable containers' explosion animations have finished playing, which takes roughly 20-25 seconds in practice. But they will warp out when it's their time to do so, even if you're still at the site and alive.
This explosion damage varies: raw explosive damage appears to be based on your ship's current distance to the containers.
- Superior Ghost site (wormholes): 12,000 damage
- Improved Ghost site (nullsec): 10,000 damage
- Standard Ghost site (lowsec): 8,000 damage
- Lesser Ghost site (highsec): 6,000 damage
It also appears that the explosion radius is about 10 km.
Dronelands specific Ghost Sites

In the Dronelands (Cobalt Edge, Etherium Reach, Malpais, Outer Passage, Perrigen Falls, The Kalevala Expanse, and The Spire) Ghost sites spawn as Level 1 Combat sites instead. They can easily be found just by opening the system map, as they are the only signatures that spawn with a 4AU size. Otherwise the sites are functionally unchanged from their counterparts in all other regions of space.
July 2025 Patch Updates
In the Exploration and Industry Balance Rework released on 17 July 2025, CCP introduced several adjustments to Ghost Sites (Covert Research Facilities) aimed at improving risk‑reward alignment and accessibility, particularly for solo explorers.
Key Changes
- Timer consistency: Ghost Site timers are now more predictable. A guaranteed 30‑second delay that is shown as a timer on the left occurs before the container explosions are triggered, allowing a more reliable window to hack containers and warp out. Do note that the rats will spawn at the START of the visible timer.
- Adjusted rewards: Loot tables have been rebalanced so that higher‑risk sites yield proportionally better rewards.
- Reduced cargo volume: Capital Control Components (e.g. Life Support Backup Units and Power Couplings) now have lower volume, easing transport in exploration frigates.
A recording of the CCP Dev Chat discussing these changes is available on YouTube (Dev Chat: July 17 Patch - Exploration, Ghost Sites and Research Tax).
Ship fitting
A ship for running Ghost Sites should perform several roles:
- Hacking the containers (so at least a hacking module, and preferably a bonus to the hacking minigame)
- Quickly flying from one container to another (to be able to hack as many containers as possible before the timer runs out)
- Tank the explosion and the rats
There are 2 methods in running Ghost Site. Blitzing and Face tanking. Blitzing goal is to hack and run before the rats appear, while having enough tank to survive a can explosion. Face tanking allows you to hack and tank the rats while surviving an explosion. It is recommended to prepare for the blitzing method, as the face tank option suffers from horrible hacking performance and renders it useless in higher difficulty hacks. Face tanking in theory will have a lower player skill threshold while allowing one to learn about the site firsthand.
Blitzing
A regular cloaky frigate equipped with a Mobile Depot!
- Heron Navy Issue as a low-budget option
- Covert op Frigate (primarily Buzzard and Helios, while Cheetah and Anathema require rigs to work)
- Astero requires Explosive Shield Reinforcer or Core Defense Field Extender rigs to meet the requirements and suffers from a high price (circa April 2025).
The whole idea of Blitzing is to hack as fast as you can and run when rats show up, while completely disregarding the explosion threat. This is made possible using Explosive Shield Hardener and Medium Shield Extender combined. The cost of Pith-X Explosive Shield Hardener is very cheap due to shield high innate explosive resist, while the Medium Shield Extender gives the buffer needed to reach the required shield EHP to tank the highest explosion damage without burdening the ship slots and fitting resources.
When rats show up, you want to drop your hacking progress and either leave the site, burn 40 km away from them or cloak up to avoid the initial aggro. Make sure your hardener is online/overheated before you tank the explosion that's about to come, because as soon as you hit warp the hack will immediately fail and trigger the explosion.
High slots
- Cloak (T1 for Heron, Covert Op Cloak for Cov Op ships) allows you to wait until the rats leave if you wish to. This is often done in Low Sec Ghost Sites as players often leave the middle can, which will not explode, for last.
Mid slots
- Microwarpdrive (to fly as quickly as possible between containers).
- Data Analyzer (to hack the site). Sites are data only, without relics. It's always better to use the T2 version, if you can fit one.
- Explosive Shield Hardener (preferably Pith-X or Pith-A) Can fit 2 of these in Heron Navy Issue, Buzzard or Helios
- Medium Shield Extender
- Multispectrum Shield Hardener (for 5 mid-slot ships) Optional substitute for a second explosive hardener
Low slots
- Damage Control (gives a blanket of resist buff) helps tanking explosions and rats.
- Micro Auxiliary Power Core (gives PowerGrid) to fit Medium Shield Extender.
Rigs
Cheetah, Anathema, and Astero do not have enough slots or stats, which makes them reliant on rigs to meet the standard (13000 explosive shield EHP). If your demand is lower, you may skip adding rigs. The other ships do not suffer this issue.
- Small Explosive Shield Reinforcer (more explosive resist)
- Small Core Defense Field Extender (more shield amount)
Tank
You want to have at least 13000 Explosive Shield EHP cold so you will have a little bit of buffer to escape the rats after tanking an explosion. This can be achieved by having at least two hardeners and one extender module, which will set your mid-slots format as follows:
- Microwarpdrive
- Data Analyzer
- Explosive Shield Hardener
- Medium Shield Extender
- Shield Hardener (Multispectrum/Explosive/Empty Slot)
and low slots as follows:
- Damage Control
- Micro Auxiliary Power Core
Face Tanking
Not a regular cloaky frigate!
- Armor-tanked T1 cruisers (e.g. a Vexor or a Maller)
- Gnosis battlecruiser
- Stratios
- Strategic (T3) Cruiser
Mid slots
In order to hack the containers as quickly as possible, the following mid-slot modules are needed:
- Microwarpdrive (to fly as quickly as possible between containers).
- Data Analyzer (to hack the site). Sites are data only, without relics. It's always better to use the T2 version, if you can fit one, especially for ships without a bonus to the hacking minigame (T1 cruisers or certain T3 configurations).
- Cargo Scanner (to determine which can/cans are worth hacking).
- Some pilots always cargo scan and cherry-pick.
- Others feel that because of the limited time before rats arrive, it's not worth cargo scanning if you are using warp core stabilizers or anything that causes your targeting to take longer, as you do not want to waste precious time cherry-picking.
- One option is to cargo scan other cans while hacking the first one, to choose the best can to do next.
Tank
Armor-tanked ships are recommended over shield-tanked ships, as when the three mid-slot items listed above are installed, there is generally little room left to fit a good shield tank in the mid-slots. Only ships with many mid slots can mount the necessary shield tank. The Stratios or a Strategic Cruiser can be excellent for running Ghost Sites, but these ships are very expensive and make for juicy targets. The Gnosis is a good choice, as it is not that expensive and has lots of slots for required modules and tank.
T1 exploration frigates or covert ops frigates are not recommended for running Ghost Sites, as while these ships are fast and make for excellent hackers, they tend to be too fragile to survive the explosion and/or the rats in Ghost Sites.
This will work for all areas of hi sec space regardless of pirate faction!
The recommended fitting is as follows:
- 1x 1600mm Armor Plate
- 1x Medium Armor Repairer
- 2x Multispectrum Energized Membranes
- 1x Explosive Armor Reinforcer I
Less might do, but with this you will survive! While not critical, a Damage Control is always a good idea.
It might seem counterintuitive to fit both a plate and a repairer, but remember that without a decent buffer, the explosion might hurt you, while the repairer will keep you alive when the rats start shooting you. You might be fine with just the plate or the repairer in highsec, but when you move on to other parts of space, both will be needed (unless you have logistics). Having the repairer is also a cheap way to fix armor damage.
It is worth remembering that the explosion of the cans is ALWAYS explosive damage, but the rats will deal damage according to their faction, so tank accordingly.
- Guristas - Thermal
- Serpentis - Thermal / Kinetic
- Blood Raider - EM / Thermal
- Sansha's Nation - EM / Thermal
- Angel Cartel - Explosive / Kinetic
Note: You can comfortably tank the rats in a hi-sec Angel Cartel Ghost site with just a damage control and two explosive shield hardeners on a Gnosis. This leaves room for overdrive injectors/I-stabs in the lows and a cargo scanner, data analyzer, sensor booster, and MWD in the mids.
The Egg Thief Tactic
An alternative tactic in Blitzing the ghost site. Blitzing without the explosion tank.
Egg Thief fitting
Any corvette. Fit it with
- a data analyzer
- a Micro Warp Drive (MWD)
An improved version uses a T1 exploration frigate (the hull bonus to hacking makes it easier to successfully hack a can, particularly in the low- or null-sec variants) fitted with a data analyzer, a MWD and a cargo scanner.
How to do it
Keep one thing in mind. Like an angry crocodile, the NPCs will tear you apart on sight. Be fast.
When warping into the site, spot the oddly named can and approach it as fast as possible. Target all four containers, and use the cargo scanner on them all as you approach. Usually one of the cans will have significantly more loot; approach that one to hack-range.
Hack the can quickly, but not recklessly (you don't want to fail the hack).
Once you have hacked it, loot and get out as fast as possible.
You will not succeed every time, but your loss will be quite small while the gain is high.
Other ships too
This tactic is viable with any of the other ships/fits described on this page too. Especially if you're worried about your tank or worried about someone else warping in on you.
Basically: warp in, hack one container (either the oddly-named one; or the best one from a cargo scan), loot it, and then warp out.
Depending on your skills as well as confidence, you may have time to hack more than one container before the rats spawn. As a general rule, you will not be able to hack all of the containers, but if you're very lucky with the hacks, you might be able to pull two or three hacks off.
One final thing to remember is that a single hacking failure costs you your corvette/untanked T1 explorer. If you are about to fail a hack, eject all of your cargo into space and bookmark it. That way, your cargo will not be affected by the destruction of your ship. Return later to pick up the loot after the site despawns.
Ghost Raider Gang
You need 4 x Stratioses fitted with proper tank, as described above, and covert ops cloaks.
With one of the gang in squad command, the gang aligns to the Ghost site, making sure they're further than 2 km apart from each other and cloak up. Squad-warp the gang into the ghost site. Assess and assign each gang member to a can; they slowboat to their respective cans. When each member is within 5 km (Data analyzer range), pause, decloak together and begin hacking. Leave before the rats appear.
See also
Ghost sites were introduced in the Rubicon expansion in late 2013. They were tweaked in December 2015.
- Dev blog introducing ghost sites: https://www.eveonline.com/news/view/ghastly-hotbed-of-spaceship-trauma
- Dev blog introducing the Contested and Besieged Covert Research Facilities: https://www.eveonline.com/news/view/sweeping-death-and-chaos
- 2015 "Data Site Improvements" forum thread: https://forums-archive.eveonline.com/topic/449199
- Great write-up about Ghost Sites (and Sleeper Caches)
