More actions
→How to Manufacture: Updated Manufacturing descriptions and visuals, to better reflect new interface and improve understandability. |
|||
| Line 734: | Line 734: | ||
{{main|Colony Management}} | {{main|Colony Management}} | ||
==== One Planet P0>P2 - Commander Center Upgrades IV ==== | ==== One Planet P0>P2 - Commander Center Upgrades IV ==== | ||
===== Simple Manufacturing Setup ===== | |||
The most common setup used by players to generate passive PI income with minimal effort will be the production of P2 commodities on a single planet, with Command Centers IV trained. At maximum efficiency, each planet will be able to produce 240x P2 commodities in a 24hr period. | The most common setup used by players to generate passive PI income with minimal effort will be the production of P2 commodities on a single planet, with Command Centers IV trained. At maximum efficiency, each planet will be able to produce 240x P2 commodities in a 24hr period. | ||
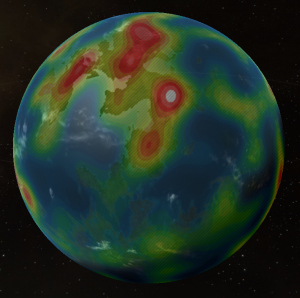
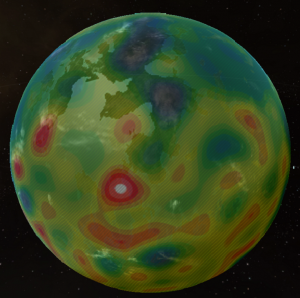
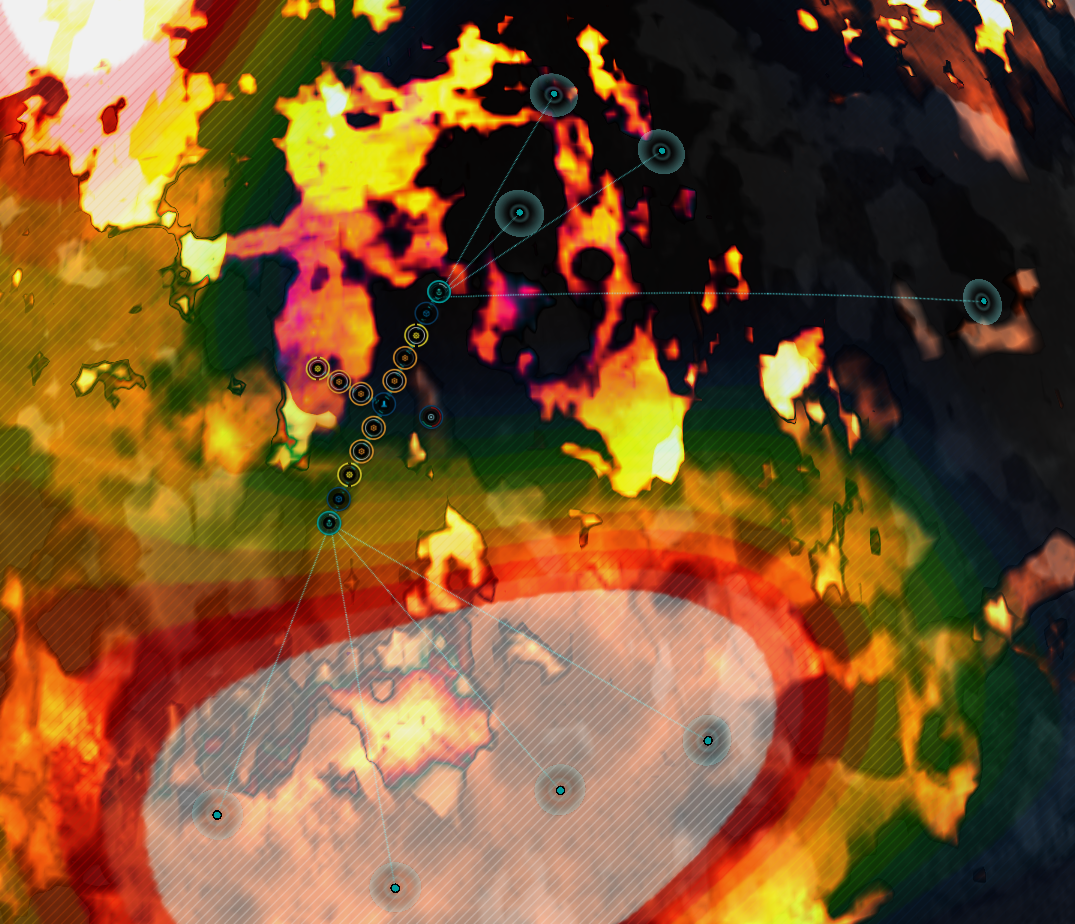
* Use the scanner to highlight | * Use the scanner to highlight two high density areas of the two resources you want to extract on the planet. Use the scan slider until you find the white spots pf those two resources that are as close together as possible. | ||
[[File:Nsc pi 1.png|300px]][[File:Nsc pi 2.png|300px]] | [[File:Nsc pi 1.png|300px]][[File:Nsc pi 2.png|300px]] | ||
* Drop the Command Center (CC) somewhere close to where you want to build your set-up. While it doesn't matter where you place the CC, whenever you (accidentally) double click somewhere else than your structures, your camera will centre on the Command Center. When you are ready to start putting down your PI set-up, place the CC and hit submit. | * Drop the Command Center (CC) somewhere close to where you want to build your set-up. <br> | ||
While it doesn't matter where you place the CC, whenever you (accidentally) double click somewhere else than your structures, your camera will centre on the Command Center. <br> | |||
When you are ready to start putting down your PI set-up, place the CC and hit submit. | |||
* Open up the Command Center, upgrade it to level IV and hit submit again. | * Open up the Command Center, upgrade it to level IV and hit submit again. | ||
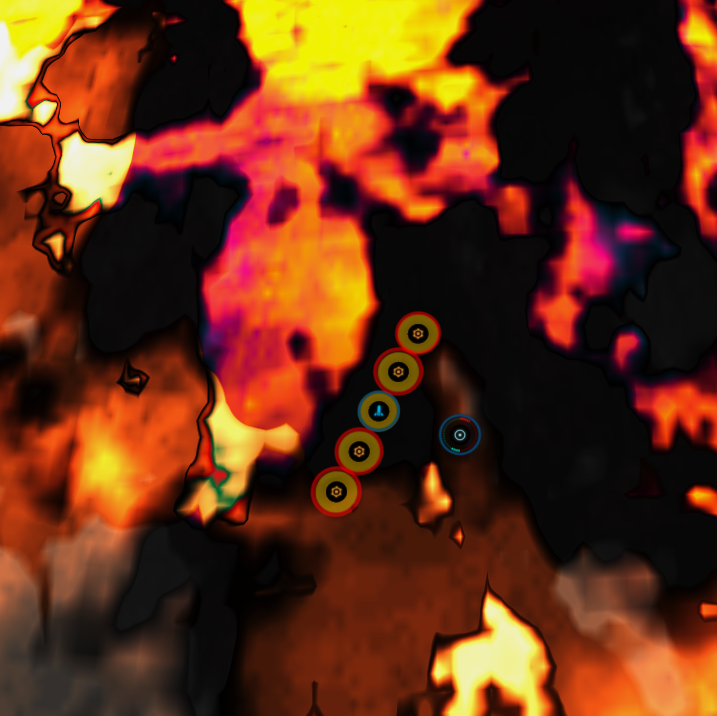
* Start your setup by placing the Launchpad in the centre between the two high-density resource spots you previously identified. | |||
* | * Add two Basic Industry Facilities on both sides of the Launchpad. | ||
[[File:Pi-basic-1.png]] | |||
* | * Add one Advanced Industry Facility on both sides of the Basic Industry Facilities. | ||
[[File: | * Add one Storage Facility on both sides of the Advanced Industry Facility. | ||
* | [[File:Pi-basic-2.png]] | ||
* Place an Extractor Control Unit at the end of each side. | |||
* | |||
[[File: | |||
* | |||
* Using Planetary Links, link each part of your factory together in one long line. There is no need to link the Commander Center. | * Using Planetary Links, link each part of your factory together in one long line. There is no need to link the Commander Center. | ||
[[File: | [[File:Pi-basic-3.png]] | ||
* Install the correct Schematics for the commodities that you wish to build in each Industrial Facility. Basic Industrial Facilities produce P1 while Advance Industrial Facilities produce P2. | * Install the correct Schematics for the commodities that you wish to build in each Industrial Facility. | ||
[[File: | * Basic Industrial Facilities produce P1 while Advance Industrial Facilities produce P2. | ||
* Open up the Extractor Control Unit. | * Whenever you install a Schematic, you will be prompted to route the output of the Facility. All Facility outputs (Basic & Advanced) go to the Launchpad in the centre of your setup. Simply double-click the Launchpad after installing the Schematic. | ||
[[File: | * Hit Submit to complete your production setup. | ||
* Now comes the slightly more complex part of the build. We need to create routes to ensure that our products flow correctly between the various Industry Facilities | [[File:Pi-basic-4.png]] | ||
===== Extraction ===== | |||
* Once you have your production setup (including links) completed, it's time to install the extractor heads to start extracting P0 material. | |||
* Open up the Extractor Control Unit and start placing Extractor Heads around the most dense areas of the respective P0 resource you are extracting. | |||
* We want to extract {{co|coral|at than 12,000 Units per hour}} to keep our Basic and Advanced Industry Facilities running at all times. The longer your extraction cycles, the lower your per hour output will be. The more Extractor Head Units you use, the higher the per hour output will be. | |||
* Do this for both Extractor Control Units, making sure you are extracting the required P0 resource. Play around here, see what works, but generally 4 Extractor Heads and a 1 day extraction cycle should be more than enough to achieve maximum efficiency in the PC9 pocket. | |||
* Always try to aim for as much extract per hour as you can, as this will leave a surplus supply of P0 resources in your Storage Facilities that will allow the (Basic and Advanced) industry facilities to continue to produce P1/P2 in case you are a couple of hours late to reset the Extractors. | |||
[[File:Pi-basic-5.png]] | |||
* Now comes the slightly more complex part of the build. We need to create routes to ensure that our products flow correctly between the various Industry Facilities. <br> | |||
* Hit submit one last time to turn the whole process on. If you wait a few hours, you can check your Launchpad to see if there is a nice pile of P2 commodities there. If you did, the Planet is set up correctly. The only interaction | |||
# Route each P0 resource from the Extractor Control Unit to the closest Storage Facility. Click on ''Products'', double-click on the extracted P0, followed by a double-click on the Storage facility. | |||
# Route each P0 from the Storage Facilities to the two Basic Industrial Facility that requires that product (the two closest ones in the line). If done correctly, the Basic Industrial Facilities should turn (visually) from red to orange. | |||
# Route the output P1 material from all Basic Industrial Facilities to the Launchpad. (Already done if you installed schematics correctly as described above) | |||
# Route one of each type of P1 material in the Launchpad (You will see four listed if done right, two of each P1) to both Advanced Industrial Facilities respectively. | |||
# Route the P2 output from both Advanced Industrial Facilities back to the Launchpad. (Already done if you installed schematics correctly as described above) | |||
[[File:Pi-basic-6.png]] | |||
* Hit submit one last time to turn the whole process on. If you wait a few hours, you can check your Launchpad to see if there is a nice pile of P2 commodities there. If you did, the Planet is set up correctly. | |||
* The only interaction with your planet from here on out is to re-start the Extractor Control Units and occasionally reposition the extractor heads to ensure that you maintain that magic number of 12,000 Units per Day. | |||
==== One Planet P0>P2 - Commander Center Upgrades V ==== | ==== One Planet P0>P2 - Commander Center Upgrades V ==== | ||
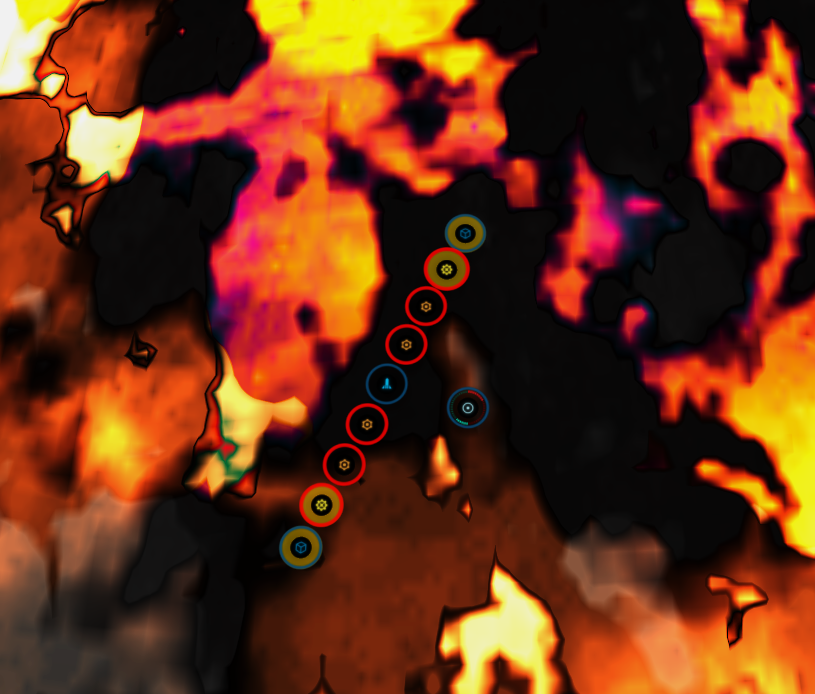
Command Center Upgrades V allows us to add 2 additional Basic Industry Facilities and one additional Advanced Industrial Facility. This will increase the productivity of the Planet by 33%. To achieve maximum efficiency, the {{co|coral|Extractor Control Units will need to be running at 18,000 Units per Hour}} to keep up with the increased demand, you might need to drop to 3 Extractor Heads on one of your extractors to have enough space to fit the Advanced Industrial Facility. This might be difficult to achieve even with daily resets, depending on the resource density and size of planets. If you are using less frequent resets, it is probably best to simply add more extractor heads and stick with the previously described set-up of 4 basic and 2 advances facilities. | Command Center Upgrades V allows us to add 2 additional Basic Industry Facilities and one additional Advanced Industrial Facility. This will increase the productivity of the Planet by 33%. To achieve maximum efficiency, the {{co|coral|Extractor Control Units will need to be running at 18,000 Units per Hour}} to keep up with the increased demand, you might need to drop to 3 Extractor Heads on one of your extractors to have enough space to fit the Advanced Industrial Facility. This might be difficult to achieve even with daily resets, depending on the resource density and size of planets. If you are using less frequent resets, it is probably best to simply add more extractor heads and stick with the previously described set-up of 4 basic and 2 advances facilities.<br> | ||
[[File: | |||
[[File:Pi-basic-7.png]] | |||
[[Category:NSC]] | [[Category:NSC]] | ||
[[Category:Planetary Industry]] | [[Category:Planetary Industry]] | ||
[[Category:Guides]] | [[Category:Guides]] | ||
Revision as of 15:16, 18 September 2023
|
| Null Security Staging |
|---|
| General |
| NSC Activities |
| Preparations |
| Campus Services |
| Guides |
| NSC Activities |

|
| Planetary Industry |
|---|
| Introduction to PI |
| The Basics |
| Advanced |
| Other Resources |
Why you should do PI
- Main article: Planetary Industry
Planetary Industry is a very simple way to generate (near) passive income in EVE with very little investment of both skills and ISK. There are a number of different ways to go about PI but in short, it is the process of setting up a combination of extractors and factories on a planet that will extract resources. Resources and their density are dependent on the type of planet. PI products are used in a variety of activities across EVE, including T2 production, Fuel production, Upwell structure production and charges such as Nanite Repair Paste.
The abundance of resources available on a planet depends on two factors.
- The System Security will affect how abundant resources are on a planet. The lower the security, the higher the resources abundance.
- The number of extractors operating on a planet will reduce the amount of resources available on a planet. If there is too many extractors, the regeneration of resources might end up being lower than the total amount extracted on the planet. There seems to be a lower ceiling of how many resources are available however, meaning a planet will never run out of resources.
The combination of these two factors can lead newer players to believe that PI just isn't worth the hassle. However, this holds only true for PI in High-Sec. As planets in High-Sec already have poor resources density to begin with due to the higher System Security, as well as a significantly higher number of actual players being set up to extract resources per planet, the profit available through PI in High-Sec is often very low. On top of that comes the 10% NPC tax for import/export that is specific to High-Sec and comes on top of the tax charged by the corporation owning the Customs Office of each planet. While this NPC tax can be lowered with the Customs Code Expertise skill, we do not recommend training this skill or setting up Planetary Industry in High-Sec except for learning purposes.
If you are considering Planetary Industry as a serious income source, we recommend considering setting up your PI in EVE University's Null-Sec staging area of PC9-AY. The resources available on a wide variety of planets in the NPC Null-Sec staging area of EVE University are rich and the local traffic of hostiles is relatively low, meaning you can easily turn a great profit for very little effort. Depending on the markets, very simple P0>P2 extraction planets can generate between 3-5M ISK a day. If you are running 5 planets, that is roughly 15-25M ISK or a fully fit T1 Cruiser, per day.
With that in mind, your profits can be significantly higher or lower, depending on the markets, which PI you chose to produce and how often you are willing to reset your extractors or micromanage your setup.
Recommended Skills
- Main article: Creating a Planetary Industry Alt
These are the recommended skills for successfully conducting PI. You will only need the recommended skills, however the advanced skills are definitely worth the train in the long run. The recommended PI skills will allow you to build 5 P0>P2 planets in the PC9 backpocket, while the advanced PI skills will allow for a 6th planet, and the required upgraded Command Center, that can be used for a P4 production planet. The recommended ship skills will allow you to fly the standard E-UNI WH/Null-Sec Epithal fit. The Epithal is the preferred PI industrial due to its unique planetary commodities cargo hold. The advanced ship skills will increase the survivability of the Epithal and the numer of PI materials that it can carry.
| ~ 12 days and 22 hours | ~ 6 days and 1 hour | ~ 40 days and 8 hours | ~ 9 days and 14 hours |
|
Remote Sensing III |
Cloaking III |
Command Center Upgrade V |
Acceleration Control III |
The Epithal
- Main article: Epithal
 |
The Epithal is a specialist Gallente Industrial Ship, similar to the Miasmos, with unique cargo bays that can hold very large amounts of planetary commodities and command centers.
|
Fitted cheaply and with only basic skills needed to fly it, it makes for the perfect PI hauler in Null-Sec. Additionally to a large cargo hold for PI material, it also has a 6000 m³ Command Center Hold, which is sufficient for hauling 6 command centers, making it the go-to PI hauler.
Improved Cloaking Device II
Interdiction Nullifier I
Multispectrum Shield Hardener II
EM Shield Hardener II
Medium Shield Extender II
50MN Y-T8 Compact Microwarpdrive
Warp Core Stabilizer II
Inertial Stabilizers II
Inertial Stabilizers II
Inertial Stabilizers II
Medium Ancillary Current Router I
Medium Hyperspatial Velocity Optimizer I
Medium Core Defense Field Extender I


What to Manufacture?
- Main article: Planetary Commodities
Now that we have the required skills and an Epithal for moving our goods around, we need to choose what to produce with our PI planets. When it comes to what to produce, there is no single right or wrong answer. The markets and the demand for certain goods do change, however three broadbrush groups of PI commodities do turn a solid profit.

|
Coolant (P2), Enriched Uranium (P2), Mechanical Parts (P2), Oxygen (P1) and Robotics (P3) are all used to produce Fuel Blocks and are therefore always in constant demand. This means they also sell well locally and there is no requirement to ship them to Jita. For those who want to go the extra mile, there is also an Ice Belt in AK-QBU which provides the Ice-related materials needed to produce Oxygen Fuel Blocks. |

|
All the P4 commodities are required for the production of a variety of high-end production such as Upwell Structures, certain Implants sets, Capital ships and their modules and more. They are therefore always in high demand and provide a very solid return. They do require the use of a P2>P4 or a P1+P2>P4 factory planet to manufacture, which again requires more effort than the average capsuleer is willing to put into PI. |
To make the most ISK from PI, you should look at both the local market and the Jita market, then compare what items are selling fast with the items that are selling for more ISK. If you find something that is both quick selling and for a higher than the normal amount, that is the product to manufacture. If you want to support EVE University's Production Department, keep an eye on EVE University's Discord channel: #buy-or-sell, where the Production Manager keeps an updated list of PI material in high demand by our Production Department.
Where to Manufacture?
- Main article: Good Planets
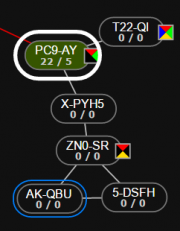
One of, if not the most dangerous places to be in Null-Sec, is on a Gate. Where possible, it is better to limit all your PI production to one system and ideally a system that also has an NPC Station or Upwell Structure blue to the Uni. The tables below show all the planets and systems within the PC9 pocket and also what PI commodities can be produced completely within each systems. One other factor to be aware of is that the further into the pocket you go, the safer you should be due to the increased warning of Neutrals entering PC9-AY. Again, you are never safe in Null-Sec and should not get complacent. Neutrals do log off in the PC9 pocket and there are often wormholes that bring visitors. Always pay attention to local and dock up/go safe if you see anyone not blue.
Here you can find a screenshot of the resource bars of every planet in the PC9 pocket. And here you can find abundances for all the P0 materials on every planet in the PC9 pocket.
Taxes - Player Owned Custom Office (POCOs)
POCOs in Null-Sec are always controlled by a player corporation. Traditionally, POCOs change ownership relatively frequently. The Tax rates in the PC9 pocket are usually between 1.5% and 5% with no additional NPC tax (as is the case in High-Sec). While the current tax rate(s) might inform your decision where to set up your planets, be aware that they might change and thus should not be the sole decider on your PI setup in the PC9 pocket.
T22-QI
List of NPC Stations:
- T22-QI IV - Moon 8 - Trust Partners Warehouse
- T22-QI V - Moon 14 - Intaki Syndicate Academy
- T22-QI VI - Moon 6 - Intaki Syndicate Academy
- T22-QI VI - Moon 9 - Intaki Space Police Testing Facility
- T22-QI VI - Moon 12 - Intaki Syndicate Academy
- T22-QI VI - Moon 13 - Trust Partners Warehouse
X-PYH5
List of NPC Stations: - no NPC stations
| X-PYH5 - Planets | |||||
|---|---|---|---|---|---|

|

|

|

|

|

|
|
X-PYH5 I |
X-PYH5 II |
X-PYH5 III |
X-PYH5 IV |
X-PYH5 V |
X-PYH5 VI |
ZN0-SR
List of NPC Stations:
- ZN0-SR III - Intaki Bank Depository
- ZN0-SR V - Moon 7 - Intanki Bank Depository
- ZN0-SR VI - Moon 4 - Intaki Space Police Assembly Plant
5-DSFH
List of NPC Stations: - no NPC stations
AK-QBU
List of NPC Stations: - no NPC stations
How to Manufacture
- Main article: Colony Management
One Planet P0>P2 - Commander Center Upgrades IV
Simple Manufacturing Setup
The most common setup used by players to generate passive PI income with minimal effort will be the production of P2 commodities on a single planet, with Command Centers IV trained. At maximum efficiency, each planet will be able to produce 240x P2 commodities in a 24hr period.
- Use the scanner to highlight two high density areas of the two resources you want to extract on the planet. Use the scan slider until you find the white spots pf those two resources that are as close together as possible.
- Drop the Command Center (CC) somewhere close to where you want to build your set-up.
While it doesn't matter where you place the CC, whenever you (accidentally) double click somewhere else than your structures, your camera will centre on the Command Center.
When you are ready to start putting down your PI set-up, place the CC and hit submit.
- Open up the Command Center, upgrade it to level IV and hit submit again.
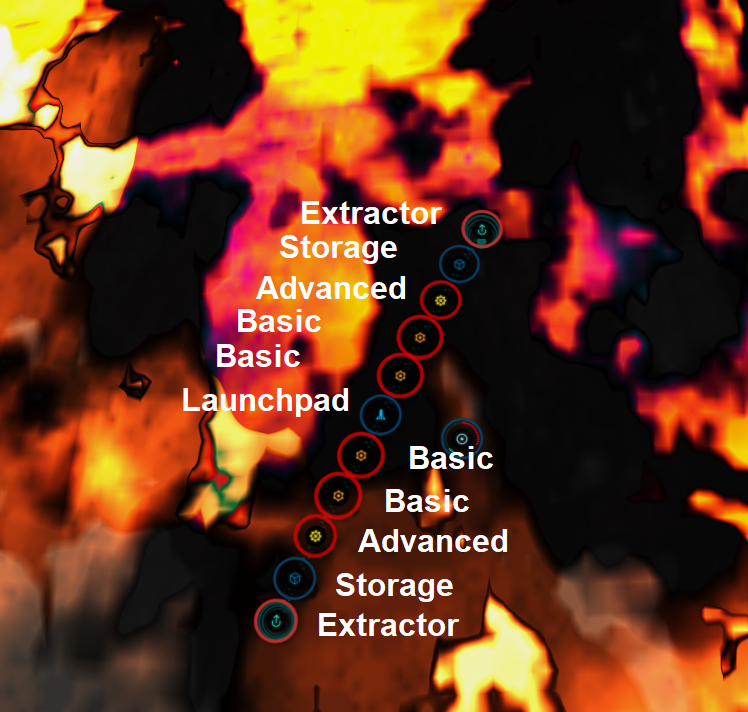
- Start your setup by placing the Launchpad in the centre between the two high-density resource spots you previously identified.
- Add two Basic Industry Facilities on both sides of the Launchpad.
- Add one Advanced Industry Facility on both sides of the Basic Industry Facilities.
- Add one Storage Facility on both sides of the Advanced Industry Facility.
- Place an Extractor Control Unit at the end of each side.
- Using Planetary Links, link each part of your factory together in one long line. There is no need to link the Commander Center.
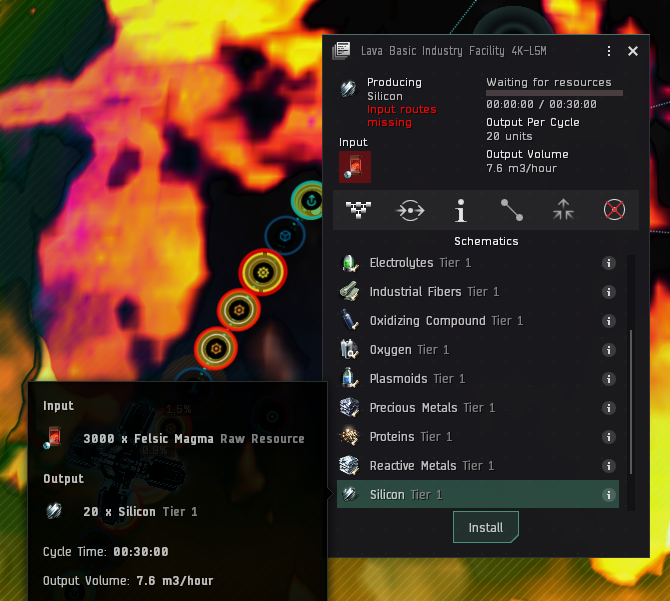
- Install the correct Schematics for the commodities that you wish to build in each Industrial Facility.
- Basic Industrial Facilities produce P1 while Advance Industrial Facilities produce P2.
- Whenever you install a Schematic, you will be prompted to route the output of the Facility. All Facility outputs (Basic & Advanced) go to the Launchpad in the centre of your setup. Simply double-click the Launchpad after installing the Schematic.
- Hit Submit to complete your production setup.
Extraction
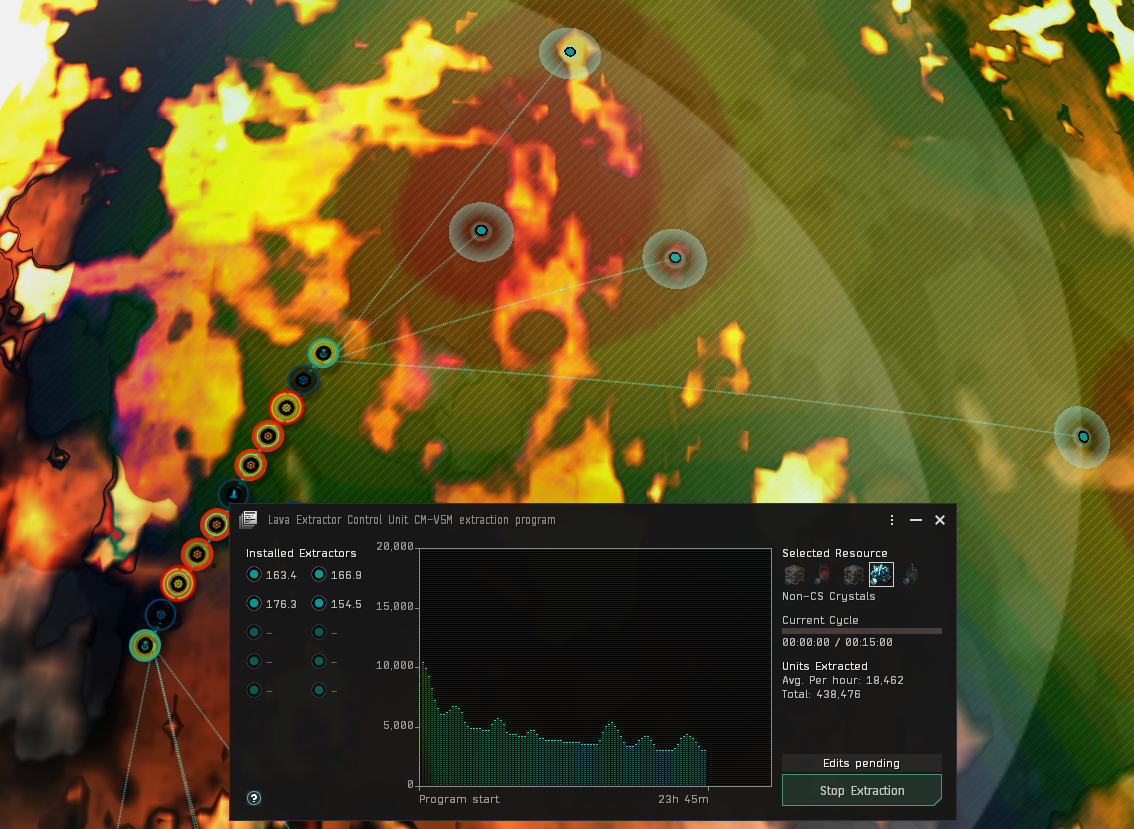
- Once you have your production setup (including links) completed, it's time to install the extractor heads to start extracting P0 material.
- Open up the Extractor Control Unit and start placing Extractor Heads around the most dense areas of the respective P0 resource you are extracting.
- We want to extract at than 12,000 Units per hour to keep our Basic and Advanced Industry Facilities running at all times. The longer your extraction cycles, the lower your per hour output will be. The more Extractor Head Units you use, the higher the per hour output will be.
- Do this for both Extractor Control Units, making sure you are extracting the required P0 resource. Play around here, see what works, but generally 4 Extractor Heads and a 1 day extraction cycle should be more than enough to achieve maximum efficiency in the PC9 pocket.
- Always try to aim for as much extract per hour as you can, as this will leave a surplus supply of P0 resources in your Storage Facilities that will allow the (Basic and Advanced) industry facilities to continue to produce P1/P2 in case you are a couple of hours late to reset the Extractors.
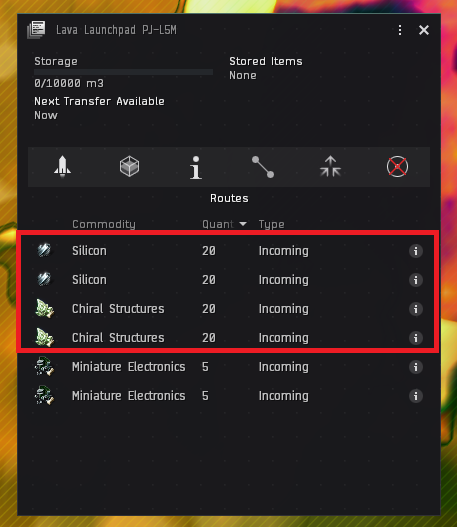
- Now comes the slightly more complex part of the build. We need to create routes to ensure that our products flow correctly between the various Industry Facilities.
- Route each P0 resource from the Extractor Control Unit to the closest Storage Facility. Click on Products, double-click on the extracted P0, followed by a double-click on the Storage facility.
- Route each P0 from the Storage Facilities to the two Basic Industrial Facility that requires that product (the two closest ones in the line). If done correctly, the Basic Industrial Facilities should turn (visually) from red to orange.
- Route the output P1 material from all Basic Industrial Facilities to the Launchpad. (Already done if you installed schematics correctly as described above)
- Route one of each type of P1 material in the Launchpad (You will see four listed if done right, two of each P1) to both Advanced Industrial Facilities respectively.
- Route the P2 output from both Advanced Industrial Facilities back to the Launchpad. (Already done if you installed schematics correctly as described above)
- Hit submit one last time to turn the whole process on. If you wait a few hours, you can check your Launchpad to see if there is a nice pile of P2 commodities there. If you did, the Planet is set up correctly.
- The only interaction with your planet from here on out is to re-start the Extractor Control Units and occasionally reposition the extractor heads to ensure that you maintain that magic number of 12,000 Units per Day.
One Planet P0>P2 - Commander Center Upgrades V
Command Center Upgrades V allows us to add 2 additional Basic Industry Facilities and one additional Advanced Industrial Facility. This will increase the productivity of the Planet by 33%. To achieve maximum efficiency, the Extractor Control Units will need to be running at 18,000 Units per Hour to keep up with the increased demand, you might need to drop to 3 Extractor Heads on one of your extractors to have enough space to fit the Advanced Industrial Facility. This might be difficult to achieve even with daily resets, depending on the resource density and size of planets. If you are using less frequent resets, it is probably best to simply add more extractor heads and stick with the previously described set-up of 4 basic and 2 advances facilities.


