Difference between revisions of "Explorer"
From EVE University Wiki
m (replaced "scanning" link with "Probe scanning") |
|||
| Line 1: | Line 1: | ||
| − | The '''Exploration Career Agent''' is one of the five [[career agents]] in the game, which show new players different types of [[PvE]] activities in EVE. The exploration career agent missions teach you about [[exploration]], [[scanning]], [[hacking]], and [[Gas Cloud Mining|gas cloud mining]]. In total these missions pay about 900k ISK in rewards. | + | The '''Exploration Career Agent''' is one of the five [[career agents]] in the game, which show new players different types of [[PvE]] activities in EVE. The exploration career agent missions teach you about [[exploration]], [[probe scanning]], [[hacking]], and [[Gas Cloud Mining|gas cloud mining]]. In total these missions pay about 900k ISK in rewards. |
== Cosmic Anomalies (1 of 5) == | == Cosmic Anomalies (1 of 5) == | ||
Revision as of 14:13, 24 March 2021
The Exploration Career Agent is one of the five career agents in the game, which show new players different types of PvE activities in EVE. The exploration career agent missions teach you about exploration, probe scanning, hacking, and gas cloud mining. In total these missions pay about 900k ISK in rewards.
Contents
Cosmic Anomalies (1 of 5)
| Type | Exploration |
| Objective | Retrieve Proof of Discovery from a Cosmic Anomaly. |
- Cosmic Anomalies are a class of relatively easy-to-find exploration sites. They are scattered all over the EVE universe and can contain hostile NPC ships, asteroids, and more. This particular mission requires that you find an "Anomaly Training Site". There are two ways of doing this:
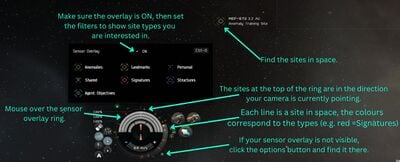
- Using the sensor overlay (a bit cumbersome, but gives you a good feeling of where everything is in space)
- After undocking, fly to somewhere in the star system away from large structures (e.g. to an asteroid belt) - while this isn't strictly necessary, it makes things a bit easier.
- Check that your sensor overlay is active (CTRL+O, or hover your mouse over the sensor ring around your capacitor), and set the filters to just show Cosmic Anomalies (hide Cosmic Signatures, Landmarks, etc.).
- The green lines on the sensor ring around your capacitor indicate where Cosmic Anomalies are in relation to where your camera is pointing. Rotate your camera until one of the green lines is at the top (12 o'clock) of the sensor ring. Then move your camera up and down until you find the anomaly in space. Repeat these steps until you find an "Anomaly Training Site".
- When you've found an Anomaly Training Site, right-click on it in space and select "Warp To" (or hold the left mouse button and use the radial menu).
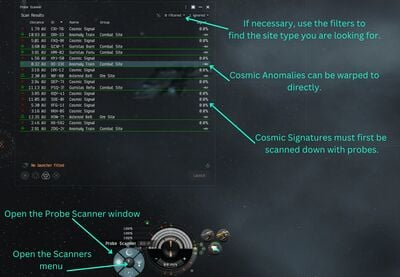
- Using the probe window (an easier method for exploration in general)
- After undocking, open the Probe Scanner window (ALT+P, or through the Scanners button to the left of your capacitor display).
- Check the filters to display Cosmic Anomalies (you can hide the other types of signatures if you want).
- Look for an Anomaly Training Site in the list of anomalies, right-click on it, and select "Warp To".
- Once you get to the anomaly site, look for a training container, approach it, and loot the "Proof of Discovery" documents.
An Introduction to Cosmic Signatures (2 of 5)
| Type | Exploration |
| Objective | Move Go on a guided tour of Cosmic Signatures. |
| Rewards |
- The frigate granted to you when accepting the mission is not necessary to complete the rest of the mission chain. However, you can turn it in for Industry Career Agent mission 10, and thus it is recommended that you do not lose it if you haven't completed that mission yet.
- When you warp to the mission deadspace, an NPC agent named Rulie Isoryn will warp in and give you a guided tour. You need to approach the acceleration gate within 2,500m to activate it and move to the next pocket.
- In the second pocket, loot the container with exploration supplies (a Probe Launcher, Core Scanner Probes, and Civilian Data and Relic Analyzers). Note that you can't fit modules onto your ship in space (you can only do that in a station or near certain special ships with a fitting service).
- The third pocket contains an example of a Data Site. Normally, you would use a Data Analyzer module to hack the structures and thus attempt to find valuable loot, but for this mission you're just sightseeing. Feel free to take a closer look at some of the structures in space (right-click on them and select "Look At", or ALT-click).
- The fourth pocket has an example of a Relic Site, which normally needs a Relic Analyzer module to hack the structures. As before, you do not get to actually hack any objects here for this mission.
- The fifth and final pocket leads to an example of a gas site, which normally needs Gas Cloud Harvesting modules (similar to ore mining modules) to harvest gas, which can then be turned into boosters.
- Your mission objective will be marked as complete a few seconds after reaching the final pocket.
Data Site Scanning (3 of 5)
| Type | Exploration |
| Objective | Scan down and hack a Data Site to retrieve Proof of Discovery - Data Site. |
- Fit a ship (e.g. your shiny new frigate) with a Core Probe Launcher and a Civilian Data Analyzer, and load Core Scanner Probes into your probe launcher (drag them onto the fitted probe launcher in the fitting window).
- Undock and open the Probe Scanner window. Click the "Launch" button to deploy the scanner probes, and position your probes around the solar system and scan.
- Look for data sites, position your probes around them (note that you can double-click on the screen to adjust their vertical position as well), and click "Analyze". After a short delay, the positions of the site will be updated. Follow the new location of the site and keep scanning - you might find it helpful to reduce the radius of the probe formation to raise the scanning strength. Once you've resolved the signature for the Data Training Site to 100%, you can retrieve the probes and warp to it.
- If you feel lost, feel free to watch video guides such as this one from Wingspan
- Once inside the site, approach and target a "Training Container", and activate your Civilian Data Analyzer module. This will start the hacking minigame: explore the board by clicking on the green circles until you find the System Core. Once you've disabled the System Core, you can open the container and loot it for a Proof of Discovery.
Relic Site Scanning (4 of 5)
| Type | Exploration |
| Objective | Scan down and hack a Relic Site to retrieve Proof of Discovery - Relic Site. |
- The approach is exactly the same as in mission 3, except that you're looking for a Relic Training Site.
- Make sure you have a Civilian Relic Analyzer fitted to your ship before undocking. Also remember to reload your probe scanner module (either through the ship fitting window in the station, or by right-clicking on the module once in space, assuming your scanner probes are in your ship's cargohold).
Gas Site Scanning (5 of 5)
| Type | Exploration |
| Objective | Scan down a Gas Site and retrieve Proof of Discovery - Gas Site. |
| Rewards | Gas Passkey (granted upon acceptance); exploration Frigate ( |
- Similar to previous two missions, except that you're looking for a Gas Training Site.
- There is no hacking or mining involved - you can activate the acceleration gate and loot the Training Container as long as you have the Gas Passkey in your cargohold.
- The exploration frigate given to you as reward is the preferred ship of choice for exploration in general due to their bonus to scanning and spacious cargohold capacity.
- Once you complete the mission, you can safely discard the Gas Passkey as it doesn't serve any purpose beyond this mission.

