
|
| Missions |
|---|
| Mission Reports |
| Mission Guides |
| Special Missions |
| Helpful Links |
- This article details the Level 4 Angel & Sansha variant of this mission. For other variants, see Worlds Collide (disambiguation).
Mission Details
| Level | 4 |
| Type | Encounter |
| Objective | Rescue the stranded crew members from the damaged ship in the third room of this deadspace complex. |
| Factions | AngelSansha |
| Best damage to deal | |
| Damage to resist | |
| Warp disruption | All Elite Frigate types. Spy frigates only webs. |
| EWAR | Target Painters (Angel Arch Gistum Crusher) |
| Ship suggestion | Sleipnir, Raven, CNR, Drake |
| Mission briefing |
|---|
| Hmm... Yes, I do have some work for you.
Although Sansha's Nation usually has a firm grip over the criminal strata in our system, the Angel Cartel has been poking its ugly nose in here of late-- which is perfectly fine with us. In fact, watching the two outlawed organizations duke it out is one of my favorite pastimes. If we're lucky, it will give both sides a good bruising, which will only work in our favor. Of course, there's also bad news. An InterBus ship traveling to Azhgabid got caught in the middle of one of the pirate warzones. The ship was damaged beyond repair and can neither warp out nor navigate away from the crossfire. Your task is to rescue the ship's crew. Please retrieve them before any more harm is done; they're already scared out of their minds. The faster you get this done, the better. Good luck. |
Video: [Gila 2021-05-02]
Note: Heavy drone aggro in Angel & Sansha Pocket 2. Setting drones to passive in order to avoid accidental aggro is recommended.
This is not a drone friendly mission. However, one thing I notice since the AI update is a "glitch". If you do not shoot anyone, and you release more than one drone shooting at one target. Once they start shooting at one of your drones you can scoop that drone back into the bay. The foes should not shoot at your other drones. This "glitch" maybe fixed down the road.
This is a time consuming mission if you do both the Angel & Sansha sides.
Blitz:
- Pocket 1: Unlock the Angel Base gate either using a Zbikoki's Hacker Card (or killing the Gist War General). The card will be consumed upon activation.
- Pocket 2 (Angel Base): All ships in Pocket 2 have to be destroyed to unlock the gate.
- Pocket 3 (Research Outpost): Destroy Group 1, grab the hostages from the heron, fly back to your agent. No need to destroy entire groups. - confirmed in July 16, 2014.
- The Zbikoki's Hacker Card can be found in Zor's wreck in The Right Hand of Zazzmatazz or The Damsel In Distress Level 4 mission.
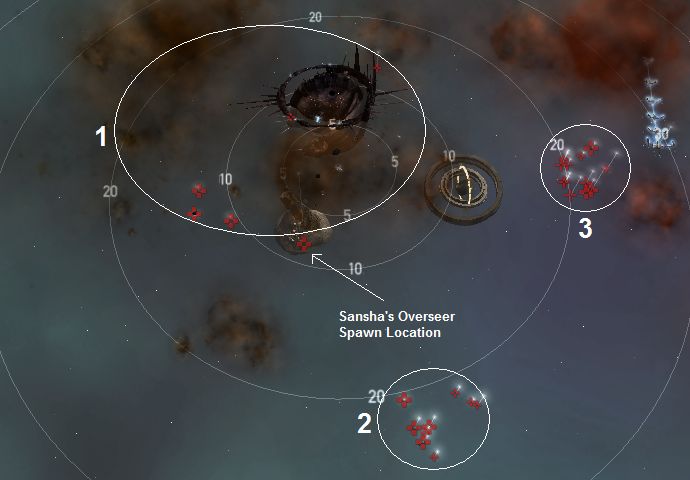
Pocket 1 (War Zone)
The two gates are locked until you kill the trigger ship from each faction. The trigger ships are ALWAYS a Gist War General and Centus Savage Lord from the respective groups.
NO aggro from the initial groups until you attack them. Each group can be aggroed independently. Drones can be safely deployed to attack any group with aggroing the entire pocket.
_(level_4)_First_Pocket.png)
| WD | EWAR | L | ||
|---|---|---|---|---|
| Angel Group: | ||||
| |
4 x Elite Frigate Arch Gistii Impaler/Hunter | |
|
|
| |
1 x Elite Cruiser Arch Gistum Smasher/Crusher | |
||
| |
5 x Battlecruiser Gistatis Primus/Tribuni | |||
| |
3 x Battleship Gist War General/General/Commander |
|||
| Sansha Group: | ||||
| |
3 x Elite Frigate Centii Loyal Ravener/Scavanger | |
|
|
| |
3 x Battlecruiser Centatis Specter/Wraith | |||
| |
4 x Battleship Centus Savage Lord/Overlord/Beast Lord/Dark Lord |
|||
NOTE: I notice since the AI update the ships react to the type of drones you use. While using long range sentry drones the foes try to get out of the drones ranges by getting closer. While using short range sentry drones the foes try to move away.
Tip:
- Drones/fleet members maybe targetted as the NPC ships reset their targetting when moving back to their spawn points.
Pocket 2 (Angel Base)
On warp-in, Group 1 will auto aggro. The Angel Spy frigates do not scramble but they do web. DO watch for Thugs and Outlaws scrams. All ships in this pocket have to be destroyed to unlock the gate.
Tip:
- Once Group 1 has been eliminated, it is fairly safe to deploy your drones for the remaining groups. Keep a close watch on your drones’ target to ensure that they do not stray and mistakenly attack a neutral group.
- Recommended order for elimination: Group 1, Group 2, Group 3 and finally Group 4.
- An Angel Overseer battleship will have a random chance to spawn in this pocket. The chance to spawn seems to be based on triggering the Angel Base warp gate in Pocket 1 and then completing the warp into this pocket.
Warning:
- DO NOT deploy your drones to attack Group 1. (I'm going to say this is optional. I didn't move and I had my drones attack group 1 with no problem. However, everyone in the room did target my drones and not me. T1 hobgoblin)
- Any attack on the Angel Spy frigates by fleet members will aggro the entire pocket. It is safe however, for them to kill the sentry guns in Group 1.
- The FIRST ship that had warped into the pocket may kill the Angel Spy frigates without repercussions, as long as you stick to turret weapons/missiles.
- NO aggro from the other groups until you attack them. Each group can be aggroed independently.
_(level_4)_Angel_Base.png)
| WD | EWAR | L | ||
|---|---|---|---|---|
| Group 1 (2-3km, Auto-aggro): | ||||
| |
2 x Frigate Angel Viper (named Angel Spy) | |
||
| |
3 x Sentry Angel Sentry Guns | |
||
| Group 2: | ||||
| |
3 x Battlecruiser Gistatis Praefectus/Tribuni | |||
| |
2 x Battleship Gist Saint/Warlord | |||
| Group 3 (20-30km) | ||||
| |
5 x Destroyer Gistior Seizer/Thrasher | |||
| |
3 x Elite Cruiser Arch Gistum Phalanx/Centurion | |||
| Group 4 (20-30 km) | ||||
| |
6 x Elite Frigate Arch Gistii Thug/Outlaw | |
|
|
| |
4 x Battleship Gist General/Commander | |||
| Random spawn | ||||
| |
1 x Battleship Angel Overseer | |||
Pocket 2 (Sansha Base)
On warp-in, Group 1 will auto aggro. The Sansha Spy frigates do not scramble but they do web.
Tip:
- Once Group 1 has been eliminated, it is fairly safe to deploy your drones for the remaining groups. Keep a close watch on your drones’ target to ensure that they do not stray and mistakenly attack a neutral group.
- Recommended order for elimination: Group 1, Group 2 and finally Group 3.
- A Sansha's Overseer battleship will have a random chance to spawn in this pocket. The chance to spawn seems to be based on triggering the Sansha Base warp gate in Pocket 1 and then completing the warp into this pocket.
Warning:
- DO NOT deploy your drones to attack Group 1.
- Any attack on the Sansha Spy frigates by fleet members will aggro the entire pocket. It is safe however, for them to kill the battleships in Group 1.
- The FIRST ship that had warped into the pocket may kill the Sansha Spy frigates without repercussions, as long as you stick to turret weapons/missiles.
- NO aggro from the other groups until you attack them. Each group can be aggroed independently.
| WD | EWAR | L | ||
|---|---|---|---|---|
| Group 1 (Auto-aggro) | ||||
| |
2 x Frigate Sansha Spy | |
||
| |
3 x Battleship Centus Dread/Savage/Dark/Beast Lord | |||
| Group 2 | ||||
| |
5 x Destroyer Centior Monster/Abomination | |||
| |
4 x Battleship Centus Dark Lord/Beast Lord/Overlord | |||
| Group 3 | ||||
| |
4 x Elite Frigate Centii Loyal Scavanger/Ravener | |
|
|
| |
5 x Elite Cruiser Centum Loyal Hellhound/Fiend | |||
| |
3 x Battleship Centus Savage/Plague/Mutant/Slave Lord | |||
| Random Spawn (Auto-aggro) | ||||
| |
1 x Battleship Sansha’s Overseer | |||
Pocket 3 (Research Outpost)
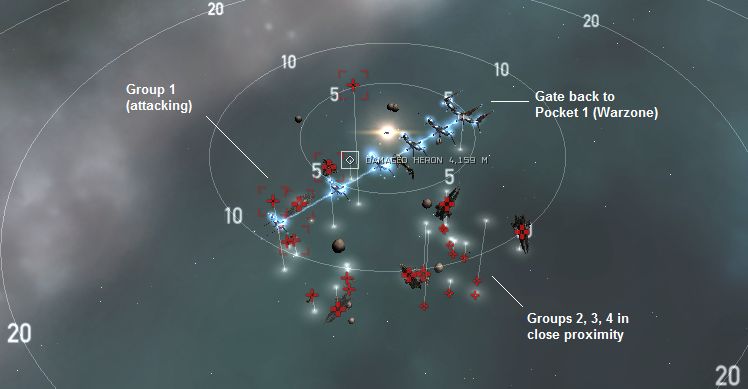
You will warp-in randomly around 5km from the Heron. In addition to the immediate aggro from Group 1, there is a small chance that one or more other groups will aggro due to proximity triggers. If this happens, start moving away from the remaining neutral groups and check if the webbing/scrambling Elite Frigates have you locked. Kill them first if they have you locked.
If you are fleeted with friends, have them focus fire on Group 1 or any groups that have been aggroed by mistake. The FIRST ship needs to act as an Fleet Commander and assign the appropriate targets. A common mistake is to have everyone shoot random or their closest target, which leads to the whole pocket being aggroed.
Sometimes fleet members that enter later will land differently and aggro groups that were unaggroed. If this includes the elite frigates and they scramble the new arrival, it can mean a quick death. All fleet members should have at least enough tank to survive until the scramblers are cleared. Having the lead ship tank the entire pocket is extremely difficult, as it can put down 1300-1500 DPS, in a wide variety of configurations. Here are some (extreme) examples:
- 50% Exp, 31% Therm, 16% Kin, 2% EM
- 63% Exp, 15% EM, 15% Kin, 6% Therm
- 58% Exp, 23% Kin, 12% EM, 7% Therm
NO drone aggro for the entire pocket. You can deploy drones normally.
Tip:
- Warping-in from either Angel or Sansha Base does not change the ship combination for this pocket. It will always be Angel ships.
| WD | EWAR | L | ||
|---|---|---|---|---|
| Group 1 | ||||
| |
3 x Elite Cruiser Arch Gistum Phalanx/Centurion | |||
| |
2 x Battleship Gist War General/Warlord | |||
| Group 2 | ||||
| |
4 x Battlecruiser Gistatis Legionnaire/Primus | |||
| |
1 x Battleship Gist Warlord/Malakim | |||
| Group 3 | ||||
| |
5 x Destroyer Gistior Thrasher/Seizer | |||
| |
3 x Battleship Gist Saint/Warlord/Malakim | |||
| Group 4 | ||||
| |
4 x Elite Frigate Arch Gistii Hijacker/Rogue | |
|
|
| |
1 x Battleship Gist Nephilim/Cherubim | |||
Bounty:
26,300,000.00
Loot + Salvage:
13,500,000.00
| ||||||||||||||