This short guide is for players who may have done EVE's introductory tutorial mission but have not done any other combat.
It is very simple, and to keep it simple a lot has been left out. It will tell you everything you need to do to set up a reasonable combat frigate and take it out on a Level I Security Missions. Beyond that, there is much more to learn--eventually.
This guide focuses on very basic PvE combat, but University members are welcome and encouraged to try participating in player vs player (PvP) combat at any point, including when they're fresh to the game. Stepping into PvP is discussed at the end of this guide.
Getting ready
Combat in EVE is complicated. An EVE expert knows his or her ship's capabilities and how to equip weapons and gear to match; knows enemy ships and their capabilities; knows how to use the data presented on-screen; knows the physics of ships and projectiles in space.
It's a lot to learn. And you will learn it, but not all at once. So, for now here is enough to get started.
To fight you need at least:
- A ship
- Weapons and ammunition for the ship
- Certain gear to improve your ship's combat abilities
- The skills to make use of the ship, the weapons, and the gear
Practice at using your ship in combat will come with time. If your goal is to learn how to use your ship while losing it as few times as possible, then you probably want to do something like this:
- Start with Security missions,
- Join an E-Uni combat fleet
- Join as many combat fleets as you can, and work your way up
- All the while training higher level skills.
This guide assumes that you are starting at step 1. It will put you in a PvE-oriented ship. These are not the fastest or most powerful in the game, but you can use them to run Level 1 Security missions.
First, pick a ship
The process you go through for evaluating and picking a combat ship is extensive, and you will need to read more about it as you improve your combat skills. For now, just assume that you might very well lose the first three or four ships that you take out, and so be sure to buy an inexpensive ship that you can fly with a few basic skills. Don't worry too much about details, just get a ship that works, buy some good insurance, and go try it out.
Here are four ships - one for each faction. In each case, you need the [faction name] Frigate skill trained to Level I. You should already have trained that while you were running the tutorial missions, but if not, it only takes a few minutes. You will also need the weapons skills for the ship you choose trained to Level I, as well as a few gear-related skills. Since the weapons and gear skills can be different from ship to ship, they are listed after the list of ships.
(If you want a different faction's ship, you can train that Faction Frigate skill, but keep in mind that you will also have to train some shield, armor and/or weapons skills as well.)
| FACTION | SHIP | DEFENSE | OFFENSE | COMMENTS |
|---|---|---|---|---|
| Gallente | Atron | shields | ion charge blasters | fastest, least defense |
| Minmitar | Rifter | shields | projectile autocannon | most balanced, can also use missiles |
| Caldari | Kestrel | shields | guided missiles | best shields, longest range, slowest |
| Amarr | Punisher | armor | laser ray beam | best armor, lasers don't need ammo |
If you want to check the details, you can use the Compare Tool to look at the four ships side by side. (If you've never used the Compare Tool before, you can skip this for now.)
Each ship needs skill training for its offense and defense, and also to improve its power grid and cpu abilities. Here are some key skills that improve your ability to fight with each of these ships. IMPORTANT: Although Level I is enough to get started, you should try to get each skill to Level III before you begin to train any higher level skills.
Gallente Atron — Shield: Management, Operation, and Upgrades; Gunnery: Gunnery, Small Hybrid Turret
Minmitar Rifter — Shield: Management, Operation, and Upgrades; Gunnery: Gunnery, Small Projectile Turret
Caldari Kestrel — Shield: Management, Operation, and Upgrades; Missiles: Light Missiles, Missile Launcher Operation, Missile Bombardment
Amarr Punisher — Armor: Hull Upgrades, Mechanics, and Repair Systems; Gunnery: Gunnery, Small Energy Turret
All combat frigates benefit from these — Ship Command: Spaceship Command, Faction Frigate; Engineering: Powergrid Management, CPU Management, Capacitor Systems Operation; Navigation: Navigation, Evasive Maneuvering, Afterburner, Fuel Conservation;
These are only the minimum. Even trained to Level III, they will only give you the basic piloting skills. To be an expert combat pilot, you need a much wider range of abilities. So, when you have time, look at the E-Uni full list of basic skills for more information.
Fitting the ship
Now that you have a ship, you will need to equip it. Weapons are your first concern, of course, but you also need defensive items such as shield extenders or armor plates, and other tools for improving your combat. A "fit" is a set of weapons and gear that fits your ship ... that is, a set that does not use more power or cpu than your ship can supply.
Fitting is a complicated, time-consuming process. You can, and should, read all the details about how to fit a ship. But for now, you just need a fit that works. In the following table, you'll find a link to each of the ships described earlier as well as an example "fit" you can start using right away:
| FACTION | SHIP | FIT NAME |
|---|---|---|
| Gallente | Atron | "Derptron" fit |
| Minmitar | Rifter | "PVE Basic Skills" fit |
| Caldari | Kestrel | Basic PVE fit |
| Amarr | Punisher | L1/L2 PVE Missions fit |
For example, here is the recommended fit for the Atron:
Type-D Restrained Reinforced Bulkheads
Type-D Restrained Overdrive Injector
Damage Control I

5MN Quad LiF Restrained Microwarpdrive
Faint Epsilon Scoped Warp Scrambler
X5 Enduring Stasis Webifier

Modal Light Ion Particle Accelerator I
Modal Light Ion Particle Accelerator I
Small Gremlin Compact Energy Neutralizer
Modal Light Ion Particle Accelerator I

Small Transverse Bulkhead I
Small Transverse Bulkhead I
Small Transverse Bulkhead I
Federation Navy Antimatter Charge S x360
And here is what those items do:
- Modal Light Ion Particle Accelerator - blaster weapons, a type of high-damage turret gun,
- 5MN Quad LiF Restrained Microwarpdrive - a common propulsion module that increases ship speed significantly,
- Type-D Restrained Overdrive Injector - increases the power of the ship's engines,
- Faint Epsilon Scoped Warp Scrambler - creates a warp disruption field that prevents nearby ships from going to warp speed,
- Damage Control I - prevents damage to the ship
- Small Transverse Bulkhead - increases a ship's hit points by taking away cargo space,
- Small Gremlin Compact Energy Neutralizer - attacks a target ship by sapping their power,
- Federation Navy Antimatter Charge - this is the ammunition used by the particle accelerators

You can buy all of the items in the Regional Market. Or, if you have the E-UNI rank of Freshman, you may be able to find some of them in the free gear hangar at the communities. Once you have the gear in your own hangar, just open the "Fitting" window and drag each piece of gear onto your ship.
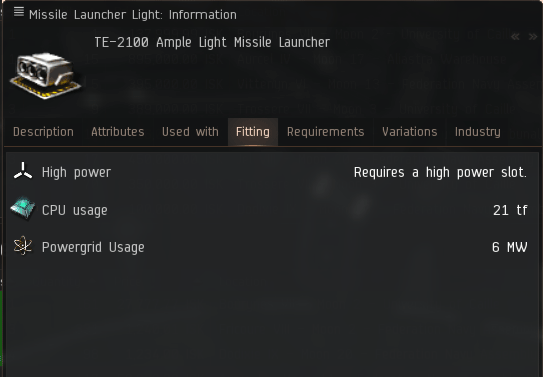
Notice how as you install each piece of gear, the "CPU" and "Powergrid" meters change their values. Each piece of gear uses some power and/or cpu capacity. All of your gear must fit on the ship without overloading either of these meters.
IMPORTANT: Some skills reduce the amount of power and cpu needed for some of the equipment, and this lets you fit more powerful gear. (Look, for example, at Power Grid Management or CPU Management.) If you find that you cannot fit all suggested items into your ship, you may need to improve some of your skills before you can fly.
For example, if you do not have the skill "Propulsion Jamming I", you will not be able to fit the device "Faint Epsilon Scoped Warp Scrambler". This is how fitting goes. You need the skills to make the equipment work.
All of this may seem like a lot to do before you even leave the station, and it is, but a badly fitted ship is doomed to die. Luckily, there are literally thousands of pre-made fittings that are always being made and shared by fit enthusiasts.
Where is the enemy?
In space, the enemy ships may be behind you, or above you; you just can't assume that you will be able to see them visually. Instead, you need to depend on your ship's scanners and data analyzers to locate and display your targets. The key window for this is the Overview.
You will learn this faster if you actually try it out. So, before you read on, undock your ship and fly to a point where you can see your station.
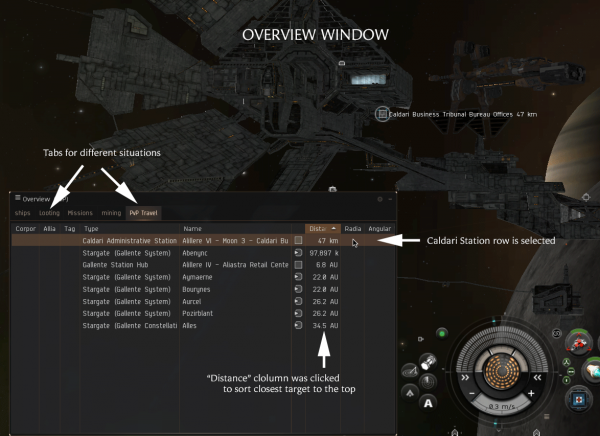
The Overview Window comes up automatically whenever you undock your ship. It shows you every item that your ship's scanners can locate, and it gives you information about each item.
In combat you will be mostly concerned with enemy ships that you want to target. To find them, first click on the word "Distance". This is at the top of a column of numbers, and clicking on it will sort the display on those distance values. You may have to click twice: you want to have the shortest distance at the top of the display.
Since you are floating right next to the place you just undocked from, that station should be the first item that you see at the top of the Overview. Click anywhere in its row to select it. The row will turn a darker color.

Before going on, it's important to take some time to think about how the Overview Window works. As you can see, it displays a list of items, along with data about those items, and you can sort the items based on the data.
But there are a huge number of items in space. And in combat you are going to want to focus in on just the items that matter during the fight. To make that possible, the Overview has a way to select different sets of items for different situations.
Across the top of the Overview are a set of five tabs. These give you five different Overview set-ups.
- You don't need to think about this much, right now, but as soon as you can, you do need to go to the E-Uni Overview page in UniWiki and do the setup. This is quick and easy. It gives you five Overview tabs that are extremely useful in various piloting situations. DOING THIS SET-UP IS REQUIRED FOR ALL E-UNI COMBAT FLEETS.
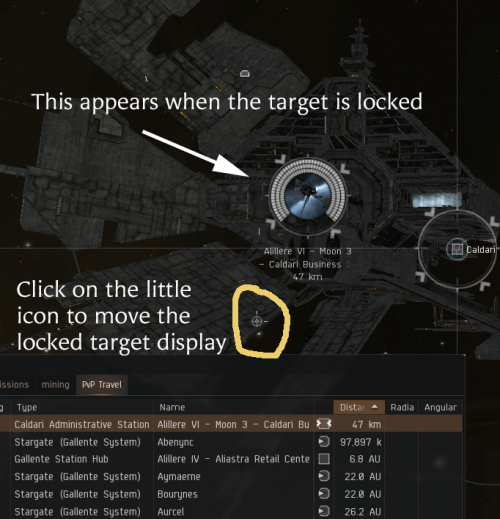
OK, now on to the basics. If you click on a row in the Overview window, and hold down the mouse button, a wheel menu will appear. Drag the mouse to any icon in this wheel to select it. Do that now. Click on the station row, hold the mouse until the wheel comes up, and drag straight down to the icon that looks like a target.

In fact it IS a target. Choosing this icon will lock that row in as one of your targets. When this happens, a separate display will appear on your screen. You can click on this any time to select that target.
If you ask about it in Chat, you will find that nearly every player has a different opinion about where the Overview Window and Locked Targets should be placed on their screen. Where you put them are up to you, but they are easy to move:
- The Overview Window has a moving bar all along its top edge. Just click there and drag the window to a spot that works for you.
- When you have targets up, if you look really close you will see a little circle-with-a-target-in-it icon somewhere near the set of locked target displays. There is only one icon, and when you click on it and drag, you move all of the locked target displays.

As you do more and more combat, you will get a feel for where you want these displays. If you want, move them now and put them somewhere that seems comfortable.
How (and when) to shoot
It does no good to fire your weapons at a ship that is too far away to hit. It's hard to practice this without real targets, so now might be a good time to get yourself a Level 1 Security Mission and start fighting.
If you don't know where the missions are, click the Agent Finder button on your Neocom Menu. At the top of Agent Finder window, move the little grey slider arrow to 1. And to the left, set the menu for Agent Type to Security. This will show all the Agents who offer Security Missions at Level 1.
Look at the locations of the Agents. Pick one in a star system with a security rating of 1.0 or 0.9 (because you do not want criminals trying to kill you while you do your missions). Right click on the agent's location to set your destination to that Agent's station and fly there.
When you land, you will see the Agent in the Station Overview. Double-click on the agent and read the mission offer. Accept it and set your destination to the mission's location. Be sure that your ship is ready--check your fitting and ammunition supply--then undock and go. (When you are in space, information about your current mission will appear at the very top left of your screen. You can also open the "Journal" service and find the mission information in there.)
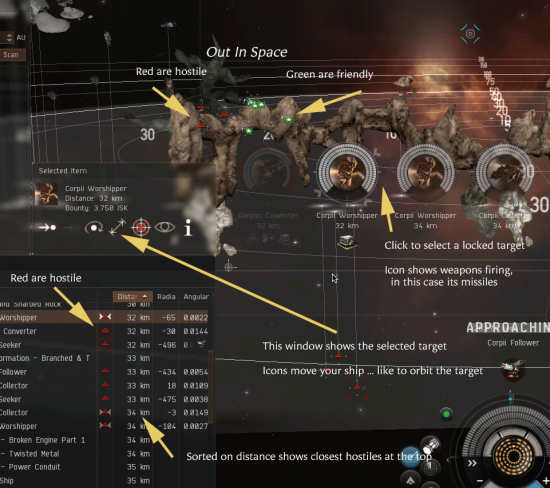
When you find the NPC enemies, they will show up as little red icons in your Overview Window. You can see this in the next image. The enemy is always red, in your Overview, and also out in space. (The green icons are my ship's drones; green ships are always friendly.)

Each Locked Target Display has the name of the enemy below it, and its distance from your ship. Do not start to fire until your ship is within range. If you don't know the range of your weapons, check that now (hover the cursor over the relevant module button and look at the tooltip) and remember the distance. Firing before you are in range is just a waste of ammunition.
To fire at an enemy, simply click the Locked Target Display and then click your weapon. When firing starts, a little icon of your weapon will appear underneath the locked target. As your weapon hits, the white ring around the locked target will turn red, indicating that the shields, and then the armor, of the enemy are being destroyed. Just before you kill an enemy, there will be a little beeping sound, and then the Locked Target Display will fade and vanish.
That's pretty much it. Kill them all and head home.
Losing a ship
And, of course, sooner or later you will face an enemy who is too big, or you will slip up and make a mistake, and then your ship will explode and you will find yourself in your pod. If this happens in a mission, don't worry: NPCs do not shoot at pods, so just fly home and buy another ship.
In PvP, players very much do target pods. There is a specific tab in the EVE University overview called "Warpout". You can use this to pull your pod safely out of almost any PvP situation in highsec or lowsec.
Getting into PvP
Many players find the idea of PvP intimidating, but it's a large and exciting part of the EVE experience. EVE has a relatively flat skill system, which means that new characters in cheap ships can make a difference on the battlefield. There absolutely are useful roles which a new character can fill; the Short Skill Plan will make a character able to sit in a battle-ready Tech 1 frigate in about 6 hours of training (for omega clones; double that time for alpha clones).
If you're a member of EVE University, don't feel that you have to save up money to buy ships before trying out PvP. EVE University communities usually have beginner PvP ships available from their flight decks (ask more experienced members at the campus near you), and for strategic operations in wartime the University lends out free ships. There are also often organized PvP roams with accessible, subsidized ships available. Keep an eye on the University Discord and calendar, and ask about PvP opportunities.
And here are some pages for further reading to start:
- Tackling--this is the act of holding down an enemy in place so they can't warp away; it's one of the essential jobs that a new character can do.
- Fitting:
- Fitting ships covers basic principles of fitting
- Fitting skills lists which skills make fitting easier
- PYFA is a third-party tool that lets you experiment with fits
- Ships and ship recognition:
- Ship categorization
- Tactical Overview--a very brief primer on the abilities of different classes of ship
- Faction Ship Guides--these give all of the ships for a particular faction and describe their particular attributes
- Ship Replacement Program--E-Uni will replace your ship if it is destroyed in the line of duty
- Weapon systems:
- Skills and skill planning:
