Difference between revisions of "AIR New Player Experience"
m (Updated the Dramiel link) |
(Update tutorial with new NPE content) |
||
| (2 intermediate revisions by 2 users not shown) | |||
| Line 27: | Line 27: | ||
=== Find a Ship === | === Find a Ship === | ||
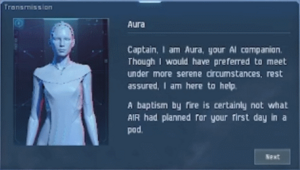
| − | [[File:Meet-aura.png|thumb | + | [[File:Meet-aura.png|thumb|Aura, your AI companion.]] |
| − | Aura, your on-board AI, tells you someone has destroyed an Association for Interdisciplinary Research (AIR) cloning facility. You are in a [[ | + | Aura, your on-board AI, tells you someone has destroyed an Association for Interdisciplinary Research (AIR) cloning facility. You are in a [[Capsule]] and need to find a [[Ship]]. |
# Rotate and zoom your [[Camera]] to locate a Ship, an {{sh|Astero}}. | # Rotate and zoom your [[Camera]] to locate a Ship, an {{sh|Astero}}. | ||
| Line 37: | Line 37: | ||
=== Evacuation === | === Evacuation === | ||
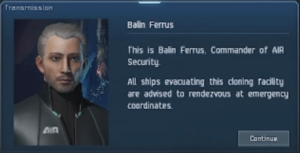
| − | [[File:Meet-ballin.png|thumb | + | [[File:Meet-ballin.png|thumb|Ballin, Commander of AIR Security.]] |
Ballin Ferrus, Commander of AIR Security, has arrived with a civilian transport fleet. Join them and evacuate to a rendezvous point. | Ballin Ferrus, Commander of AIR Security, has arrived with a civilian transport fleet. Join them and evacuate to a rendezvous point. | ||
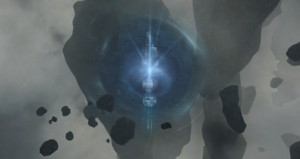
| − | [[File:Anomaly-AIR.png|thumb | + | [[File:Anomaly-AIR.png|thumb|An anomaly cloaking a structure.]] |
# Click on Ballin Ferrus' Ship in the [[Overview]] interface. Click Approach. | # Click on Ballin Ferrus' Ship in the [[Overview]] interface. Click Approach. | ||
| − | # Once near, Ballin will boost your [[ | + | # Once near, Ballin will boost your [[Shields]] and repair your [[Tanking#Armor_tanking|Armour]]. Wait until the fleet enters and then exits warp. |
# Select the Anomaly, then click Approach. | # Select the Anomaly, then click Approach. | ||
| Line 64: | Line 64: | ||
=== A New Clone === | === A New Clone === | ||
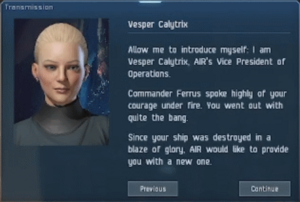
| − | [[File:Meet-vesper.png|thumb | + | [[File:Meet-vesper.png|thumb|Vesper, AIR's Vice President of Operation.]] |
After your Capsule is destroyed, you will wake up in a new Capsule in your Home Station. Vesper Calytrix, AIR's Vice President of Operation, will help you get back on your feet: equip a module, train [[Skills]] and travel to meet the [[Career Agents]]. | After your Capsule is destroyed, you will wake up in a new Capsule in your Home Station. Vesper Calytrix, AIR's Vice President of Operation, will help you get back on your feet: equip a module, train [[Skills]] and travel to meet the [[Career Agents]]. | ||
| − | + | # Open the Air Career Program in the [[Neocom]]. | |
| + | # Click the '''Claim All''' to claim your [[ISK]] rewards. | ||
| + | # Close the Air Career Program window. | ||
| + | # Click the [[Neocom#Redeem_Items | Redeem Items]] button to optionally redeem your ISK rewards. | ||
| + | # Close the Redeem Items window. | ||
# Click '''Board my Corvette''' in the Station Services Panel to board a new Ship. | # Click '''Board my Corvette''' in the Station Services Panel to board a new Ship. | ||
| − | # Open your [[Neocom#Inventory_2|Inventory]] by clicking the Inventory button in the | + | # Undock using the '''Undock''' button in the Station Services Panel. |
| − | + | # Select the system's sun in the Overview. | |
| − | # Open your [[Fitting]] interface. Here you can see your Ship statistics. Drag-and-drop your Mining Laser Upgrade | + | # Click the highlighted '''Warp to Within (0m)''' button. |
| − | # The Mining Laser Upgrade | + | # Select one of the three highlighted '''[Air] Bowhead Wreck''' in your Overview. |
| − | # You do not have the Skills required to activate the module. Fear not because | + | # Click the highlighted '''Open Cargo''' button to loot a Civilian Mining Laser Upgrade module. Note that all three wrecks will contain one, but you only need 1 to proceed. |
| − | # Open | + | # Close the [[Neocom#Inventory_2|Inventory]] window. |
| − | # Click Apply Skill Points and Confirm to quickly learn the new Skills. This process is called Skill Injection. | + | # Select the highlighted AIR Laboratories station. |
| − | # | + | # Click the highlighted '''Dock''' icon. |
| + | # Open your [[Neocom#Inventory_2|Inventory]] by clicking the Inventory button in the Neocom. Here you can see what Ships and Items you have stored in the Station. | ||
| + | # Open your [[Fitting]] interface. Here you can see your Ship statistics. Drag-and-drop your Civilian Mining Laser Upgrade module from your ship's Cargo Hold to an empty Low Slot in the Fitting interface. | ||
| + | # The Civilian Mining Laser Upgrade module is grey. Bring it Online by clicking on it in the Fitting interface. | ||
| + | # You do not have the Skills required to activate the module. Fear not because you will soon be provided the means to obtain them. | ||
| + | # Select the highlighted '''Add To Queue''' button. | ||
| + | # Open the highlighted Skills interface from the Neocom. | ||
| + | # Click the the highlighted '''Apply Skill Points''' button and then '''Confirm''' to quickly learn the new Skills. This process is called Skill Injection. | ||
| + | # Click the highlighted AIR Skill Plan, then click '''Start Training'''. | ||
| + | # Close the Skill interface and click on the grayed out Civilian Mining Laser Upgrade module in your Fitting interface to Online it. | ||
# Close the Fitting and Inventory interfaces. | # Close the Fitting and Inventory interfaces. | ||
| + | # Open the highlighted Opportunities interface from the Neocom, and then select '''Introductions'''. | ||
| + | # Select '''Hidden Prospects''' then click '''Accept'''. | ||
# Undock. | # Undock. | ||
| − | ===Mining NPE=== | + | === Hidden Prospects (Mining NPE) === |
| − | |||
| − | |||
| − | |||
| − | |||
| − | |||
| − | |||
| − | |||
| − | |||
| − | |||
| − | |||
| − | |||
| − | |||
| − | |||
| − | |||
| − | |||
| − | |||
| − | |||
| − | |||
| − | |||
| − | |||
| − | |||
| − | |||
| − | |||
| − | |||
| − | |||
| − | |||
| + | # Click '''Warp To Site''' in the Opportunities interface. | ||
| + | # Approach the Nephrite asteroid and lock it. | ||
| + | # Once you are within 10km of the asteroid, stop your ship and activate your Mining Laser. | ||
| + | # Open your inventory. | ||
| + | # Keep mining until the asteroid is depleted. | ||
| + | # Orbit the next asteroid and activate your afterburner. | ||
| + | # Again, keep mining until the asteroid is depleted. | ||
| + | # Select the third asteroid, approach until you're within 10km, and, again, activate your Mining Laser. | ||
| + | # Once the asteroid is depleted, a {{sh|Dramiel}} wreck will spawn. Approach it, then open its cargo using the '''Open Cargo''' button, and click '''Loot All'''. | ||
| + | # Select the AIR Laboratories station on your overview and click '''Dock'''. | ||
| + | # Open your Cargo Hold and drag the ore that you've mined to your Item Hangar. | ||
| + | # Right-click on the ore and select '''Sell This Item'''. | ||
| + | # Press '''Sell'''. | ||
| + | # Click your Wallet, and press '''Market Transactions'''. | ||
| + | # Click '''Transactions''' and then close your Wallet and Inventory. | ||
| + | # Open the '''AIR Career Program''' and select any of the paths. | ||
| + | # Select '''Career Agent Missions''' , then '''Complete <Path> Mission 2''', and finally '''Track''' | ||
| + | # Select '''Find Career Agents''' to open the Agency. | ||
| + | # In the Agency interface, click '''Set Destination'''. | ||
| + | # Close the Agency and Air Career Program interfaces and undock. | ||
| + | # Click '''Jump'''. Once you've arrived, repeat with the next two gates until you've arrived. | ||
| + | # Select the highlighted station and click '''Dock'''. | ||
| + | # Select your preferred Career Agent and click '''Start Conversation'''. | ||
| + | # Click '''Accept'''. | ||
| + | # Open the Skill interface and select the AIR skill plan corresponding to your chosen Career Agent. | ||
| + | # Congratulations! You've now finished the AIR New Player Experience. | ||
| + | # Tutorial prompts will continue to guide you as you complete your accepted mission. | ||
{{GettingStartedNav}} | {{GettingStartedNav}} | ||
Latest revision as of 21:32, 15 February 2024
"Meet the Association for Interdisciplinary Research (AIR), a new technology-focused organization making a splash on New Eden's corporate landscape. AIR's main goal is the pursuit of scientific knowledge through a variety of research and development endeavors. One such endeavor is the AIR Capsuleer Training Program, a project designed to help pilots achieve their dreams of becoming the best and brightest Capsuleers in New Eden."
AIR New Player Experience is a tutorial available after Character Creation that teaches brand new capsuleers about New Eden.
You will learn:
- basic Camera controls
- how to use the Selected Item interface
- how to use the Overview interface
- how to Approach, Orbit and Lock Target
- how to use and what Turrets, an Afterburner and ECM modules do
- what happens when your Capsule is destroyed
- how to use the Fitting, Inventory and Skill Plans
- about Skill Points, Skill Injectors and Skillbooks
- how to mine and sell your items
You will meet:
- Aura, your trusty AI companion
- Ballin Ferrus, Commander of AIR Security
- Vesper Calytrix, AIR's Vice President of Operation
To advance the tutorial, either complete the objective or click "Next" or "Continue" button.
Tutorial
Find a Ship
Aura, your on-board AI, tells you someone has destroyed an Association for Interdisciplinary Research (AIR) cloning facility. You are in a Capsule and need to find a Ship.
- Rotate and zoom your Camera to locate a Ship, an
 Astero.
 - Left click the highlighted Ship.
- Using the Selected Item interface, click Approach. Your Capsule will start flying towards the Astero.
- Once you are in range, click Board Ship. You will take control of the damaged Astero.
Evacuation
Ballin Ferrus, Commander of AIR Security, has arrived with a civilian transport fleet. Join them and evacuate to a rendezvous point.
- Click on Ballin Ferrus' Ship in the Overview interface. Click Approach.
- Once near, Ballin will boost your Shields and repair your Armour. Wait until the fleet enters and then exits warp.
- Select the Anomaly, then click Approach.
Defend the Fleet
A hostile fleet will attack the civilian transport fleet. Defend them as best as you can.
| WD | EWAR | L
| ||
|---|---|---|---|---|
| |
3 x Frigate Hostile Frigate | |||
| |
1 x Cruiser Hostile Cruiser | |||
| |
2 x Battleship Hostile Battleship | |
|
|
- Select Ballin Ferrus' ship, then click Orbit.
- Select the Hostile Frigate, click Orbit. Left click to active the Afterburner module.
- Once near, click Lock Target. Left click both Turret modules to open fire.
- Select the Hostile Cruiser, Orbit, Lock Target and use the Stasis Webifier module to slow it down. Left click both Turret modules to open fire.
- Select the Hostile Battleship, Orbit, Lock Target and use the Multispectral ECM module.
- Die! The Hostile Battleships will destroy both your Ship and your Capsule.
A New Clone
After your Capsule is destroyed, you will wake up in a new Capsule in your Home Station. Vesper Calytrix, AIR's Vice President of Operation, will help you get back on your feet: equip a module, train Skills and travel to meet the Career Agents.
- Open the Air Career Program in the Neocom.
- Click the Claim All to claim your ISK rewards.
- Close the Air Career Program window.
- Click the Redeem Items button to optionally redeem your ISK rewards.
- Close the Redeem Items window.
- Click Board my Corvette in the Station Services Panel to board a new Ship.
- Undock using the Undock button in the Station Services Panel.
- Select the system's sun in the Overview.
- Click the highlighted Warp to Within (0m) button.
- Select one of the three highlighted [Air] Bowhead Wreck in your Overview.
- Click the highlighted Open Cargo button to loot a Civilian Mining Laser Upgrade module. Note that all three wrecks will contain one, but you only need 1 to proceed.
- Close the Inventory window.
- Select the highlighted AIR Laboratories station.
- Click the highlighted Dock icon.
- Open your Inventory by clicking the Inventory button in the Neocom. Here you can see what Ships and Items you have stored in the Station.
- Open your Fitting interface. Here you can see your Ship statistics. Drag-and-drop your Civilian Mining Laser Upgrade module from your ship's Cargo Hold to an empty Low Slot in the Fitting interface.
- The Civilian Mining Laser Upgrade module is grey. Bring it Online by clicking on it in the Fitting interface.
- You do not have the Skills required to activate the module. Fear not because you will soon be provided the means to obtain them.
- Select the highlighted Add To Queue button.
- Open the highlighted Skills interface from the Neocom.
- Click the the highlighted Apply Skill Points button and then Confirm to quickly learn the new Skills. This process is called Skill Injection.
- Click the highlighted AIR Skill Plan, then click Start Training.
- Close the Skill interface and click on the grayed out Civilian Mining Laser Upgrade module in your Fitting interface to Online it.
- Close the Fitting and Inventory interfaces.
- Open the highlighted Opportunities interface from the Neocom, and then select Introductions.
- Select Hidden Prospects then click Accept.
- Undock.
Hidden Prospects (Mining NPE)
- Click Warp To Site in the Opportunities interface.
- Approach the Nephrite asteroid and lock it.
- Once you are within 10km of the asteroid, stop your ship and activate your Mining Laser.
- Open your inventory.
- Keep mining until the asteroid is depleted.
- Orbit the next asteroid and activate your afterburner.
- Again, keep mining until the asteroid is depleted.
- Select the third asteroid, approach until you're within 10km, and, again, activate your Mining Laser.
- Once the asteroid is depleted, a
 Dramiel wreck will spawn. Approach it, then open its cargo using the Open Cargo button, and click Loot All.
 - Select the AIR Laboratories station on your overview and click Dock.
- Open your Cargo Hold and drag the ore that you've mined to your Item Hangar.
- Right-click on the ore and select Sell This Item.
- Press Sell.
- Click your Wallet, and press Market Transactions.
- Click Transactions and then close your Wallet and Inventory.
- Open the AIR Career Program and select any of the paths.
- Select Career Agent Missions , then Complete <Path> Mission 2, and finally Track
- Select Find Career Agents to open the Agency.
- In the Agency interface, click Set Destination.
- Close the Agency and Air Career Program interfaces and undock.
- Click Jump. Once you've arrived, repeat with the next two gates until you've arrived.
- Select the highlighted station and click Dock.
- Select your preferred Career Agent and click Start Conversation.
- Click Accept.
- Open the Skill interface and select the AIR skill plan corresponding to your chosen Career Agent.
- Congratulations! You've now finished the AIR New Player Experience.
- Tutorial prompts will continue to guide you as you complete your accepted mission.


