The combat in this mission is easily the most challenging yet. If you're having trouble, read up on [[Gunnery Guide|how gunnery works in EVE]].
The combat in this mission is easily the most challenging yet. If you're having trouble, read up on [[Gunnery Guide|how gunnery works in EVE]].
* Keep an eye on your range to your enemies; try to keep it around your weapon's optimal and falloff range (for hybrid, laser, and projectile artillery weapons try to keep them at about your optimal range; projectile autocannon weapons have such short optimal ranges that it's best to keep them inside your falloff range).
* Keep an eye on your range to your enemies; try to keep it around your weapon's optimal and falloff range (for hybrid, laser, and projectile artillery weapons try to keep them at about your optimal range; projectile autocannon weapons have such short optimal ranges that it's best to keep them inside your falloff range).
* Also keep an eye on your enemies' angular velocity (you can select to have it shown as a column on the Overview): a high angular velocity makes them difficult to hit; slow them down using your Stasis Webifier module. Also, the farther away they are from you, the lower their angular velocity will be. Additionally, using the "Stay at Range" command (as opposed to the "Orbit" command) usually reduces an enemy's angular velocity (because you'll tend to be flying directly at or away from them, as opposed to around them), but, for the same reasons, it also makes your ship easier to hit. Experiment a little to see what works best for your ship and weapon.
* Also keep an eye on your enemies' angular velocity (you can select to have it shown as a column on the Overview): a high angular velocity makes them difficult to hit; slow them down using your Stasis Webifier module. Note that the farther away they are from you, the lower their angular velocity will be. Additionally, using the "Stay at Range" command (as opposed to the "Orbit" command) usually reduces an enemy's angular velocity (because you'll tend to be flying directly at or away from them, as opposed to around them), but, for the same reasons, it also makes your ship easier to hit. Experiment a little to see what works best for your ship and weapon.
You can also experiment with different ammunition for your guns. All the [[turrets|turret weapons]] have a range of ammunition to choose from, ranging from short-range high-damage ammunition to long-range low-damage ammunition. You've probably been using the former, but you may want to buy some of the latter from the market and experiment with staying further away from the rats (and therefore hopefully out of their weapons' range) and hitting them with your longer-range ammunition. Your Stasis Webifier will, once again, come in handy to ensure your ship is faster than theirs and can therefore dictate the range at which the fight occurs, to your advantage.
You can also experiment with different ammunition for your guns. All the [[turrets|turret weapons]] have a range of ammunition to choose from, ranging from short-range high-damage ammunition to long-range low-damage ammunition. You've probably been using the former, but you may want to buy some of the latter from the market and experiment with staying further away from the rats (and therefore hopefully out of their weapons' range) and hitting them with your longer-range ammunition. Your Stasis Webifier will, once again, come in handy to ensure your ship is faster than theirs and can therefore dictate the range at which the fight occurs, to your advantage.
Line 460:
Line 460:
Fly to the mission location and locate the "damaged vessel". Target it, and, once you're in range (your Remote Armor Repair module has a maximum range, just like your guns), activate the Remote Armor Repair module. After the repair module completes a cycle, the friendly ship will warp off; you have completed your mission and can return to your agent.
Fly to the mission location and locate the "damaged vessel". Target it, and, once you're in range (your Remote Armor Repair module has a maximum range, just like your guns), activate the Remote Armor Repair module. After the repair module completes a cycle, the friendly ship will warp off; you have completed your mission and can return to your agent.
Repairing other ships in combat (referred to as "[[Guide to Logistics|logistics]" in EVE) is an important but somewhat specialised part of EVE gameplay. Most fleets (except perhaps the very smallest gangs) will include one or several logistics ships, who will try to keep their fleetmates alive under fire. While this mission gives a very basic introduction, it over-simplifies things perhaps a bit too much. For one thing, the "damaged vessel" wasn't actually damaged (you could see their shield/armor/structure status when you targeted them). Additionally, the mission implies that using your repair module repaired the damaged vessel's warp drive - in reality, there is no way to "damage" a ship's warp drive, although you can (see [[#Your Undivided Attention (3 of 10)|mission 3]]) use modules to temporarily prevent ships from warping away.
Repairing other ships in combat (referred to as "[[Guide to Logistics|logistics]]" in EVE) is an important but somewhat specialised part of EVE gameplay. Most fleets (except perhaps the very smallest gangs) will include one or several logistics ships, who will try to keep their fleetmates alive under fire. While this mission gives a very basic introduction, it over-simplifies things perhaps a bit too much. For one thing, the "damaged vessel" wasn't actually damaged (you could see their shield/armor/structure status when you targeted them). Additionally, the mission implies that using your repair module repaired the damaged vessel's warp drive - in reality, there is no way to "damage" a ship's warp drive, although you can (see [[#Your Undivided Attention (3 of 10)|mission 3]]) use modules to temporarily prevent ships from warping away.
'''{{co|#9ef37c|Objective:}}''' A Remote Armor Repair Systems skillbook, which allows you to use Remote Armor Repair modules (the [[Techs,_Tiers_and_Meta_levels#Civilian_Modules|Civilian]] repair module you used for this mission doesn't require any skills to use).
'''{{co|#9ef37c|Reward:}}''' A {{sk|Remote Armor Repair Systems}} skillbook, which allows you to use Remote Armor Repair modules (the [[Techs,_Tiers_and_Meta_levels#Civilian_Modules|Civilian]] repair module you used for this mission doesn't require any skills to use).
=== The Stand (5 of 10) ===
=== The Stand (5 of 10) ===
Line 471:
Line 471:
Undock, warp to the mission's deadspace location, and activate the acceleration gate there. In the first deadspace pocket there is a lone rat; destroy it. Once it's destroyed, a large fleet warps in, including several cruisers (again, note their Overview icons), who will use Stasis Webifiers and [[EWAR Guide|other forms of electronic warfare on you]]. If you want to you can try and fight them, but you've got no hope. As the rats are not using Warp Disruptors on you, you ''could'' warp away and save your ship (which is what you'd normally do if you were overwhelmed), but in this case, the mission requires that your ship be destroyed by the rats.
Undock, warp to the mission's deadspace location, and activate the acceleration gate there. In the first deadspace pocket there is a lone rat; destroy it. Once it's destroyed, a large fleet warps in, including several cruisers (again, note their Overview icons), who will use Stasis Webifiers and [[EWAR Guide|other forms of electronic warfare on you]]. If you want to you can try and fight them, but you've got no hope. As the rats are not using Warp Disruptors on you, you ''could'' warp away and save your ship (which is what you'd normally do if you were overwhelmed), but in this case, the mission requires that your ship be destroyed by the rats.
Once your ship is destroyed, you will (once again) be left floating in your pod in space. Almost all rats (there are very few rare exceptions) ignore your pod (they don't try to destroy it or prevent you from warping away), so look around for a wreck with your character's name on it - that's all that's left of your ship. In EVE, when your ship is destroyed <!-- can I see my wreck? -->, half of the fitted modules and cargo are destroyed (along with all the fitted rigs), while the other half drop into space for anyone in the vicinity to pick up - and it's usually picked up by your victorious opponent (unless you were only fighting rats and there were no other players nearby).
Once your ship is destroyed, you will (once again) be left floating in your [[pod]] in space. Almost all rats (there are very few rare exceptions) ignore your pod (they don't try to destroy it or prevent you from warping away), so look around for a wreck with your character's name on it - that's all that's left of your ship. In EVE, when your ship is destroyed <!-- can I see my wreck? -->, half of the fitted modules and cargo are destroyed (along with all the fitted rigs), while the other half drop into space for anyone in the vicinity to pick up - and it's usually picked up by your victorious opponent (unless you were only fighting rats and there were no other players nearby). It's not uncommon for your ship to be destroyed while playing EVE, so learn to treat your ships as expendable (or as the [[Golden Rules|first golden rule of EVE]] says, never fly what you cannot afford to lose).
You have completed the mission; return to your agent.
You have completed the mission; return to your agent.
=== Don't Look Back (6 of 10) ===
'''{{co|#9ef37c|Objective:}}''' Use an Afterburner module.
Your agent gives you a Civilian Afterburner; fit it to a ship (any ship will do, even your Corvette).
5. "The Stand" . Fly into pirate base, kill >1 enemy, see how long you survive. Given a combat frigate (e.g. Incursus). Read the bold red text ;-)
Warp to the mission's location, and activate the acceleration gate there. In the first deadspace pocket, locate the "Asteroid Station" on your Overview and fly towards it (e.g. using the "Approach" command). Since the station is a long way away, activate your afterburner module to speed up your ship. When you get close to the station, the mission will be completed and you can return to your agent.
Fit it with cheap modules (mostly weapons), and insure it! Well, you should be insuring pretty much every ship at the start of the game...
Warp to location, go through accel gate.
Destroy the lone frigate.
Reinforcements show up, including your first cruisers, and some drones. They SD you and web you (see effects bar), and will destroy your ship.
Note that they don't destroy your pod - very few NPCs do, but players will. Return to agent.
6. "Don't Look Back". Given a civilian afterburner.
=== Weapon of Choice (7 of 10) ===
Fit the AB to your ship.
'''{{co|#9ef37c|Objective:}}''' Use your race's other weapon system to destroy a rat.
Fly to location, activate accel gate.
Fly towards the "Asteroid Station". activate your AB to fly faster.
When you get close to the station, the mission will complete. Return to agent.
7. "Weapon of Choice." Introduction to race's secondary weapon (Gallente: Drones).
In addition to the [[turrets|turret weapons]] you've been using up to now, each race also uses another weapon system:
Given 2x civilian hobgoblin light drones.
* [[Drones]] for Amarr and Gallente
Activate a ship with a drone bay, and load the drones into the bay.
* [[Missile Launchers|Missiles]] for Caldari and Minmatar
Warp to location. [explain how to use drones] [minmatar and caldari probably have missiles at this point]
Once the rat is dead, recall your drones (don't forget!), and return to agent.
8. "The Pacifist". Follow FC instructions.
==== Drones ====
Warp to location.
Drones are small semi-autonomous spacecraft which you can order to attack hostile ships. Your agent gives you two light drones (Civilian Hobgoblin) drones; in order to use them, you must use a ship with a drone bay, such as the Gallente Velator Corvette, the Gallente Tristan or Imicus Frigates, or the Amarr Tormentor or Magnate Frigates (the Amarr Impairor Corvette or the Gallente Incursus Frigate would also work, although they both have very small drone bays that can only fit one of the two drones you were given). Activate one of these ships and move your drones into the ship's drone bay <!-- screenshot -->
Follow FC instructions: take accel gate, don't engage.
Upon command, fly to prison facility and retrieve hostages.
Return to agent.
I guess this mission is supposed to teach you about following FC instructions?
9. "Glue". Given a Civilian Stasis Web. Use it on a pirate.
Undock from the station. Once in space, note that a new window has appeared on your UI: the drone control window, <!-- screenshot --> which shows you which drones you have in your drone bay and which you have in space. Warp to the mission's location.
Fit the civilian web on your ship. (can also use a normal web)
<!-- this whole section needs to be checked for naming -->
Warp to location.
There is a single weak rat there that you need to destroy, so you can take your time to learn how drones work. Select the drone(s) in your drone bay, right-click and select "Launch". Your drones will now start orbiting your ship (and you can see them in the "In Space" section of the drone control window), awaiting your command. Target the rat, and order your drone(s) to attack it by selecting them, right-clicking on them, and selecting "Attack" (alternatively, the much easier shortcut key is {{button|R}}).
Approach pirate ship. Use stasis web on him.
CONCORD will warp in and destroy his ship.
Note how your drone(s) fly towards the rat, and once they get close, start orbiting it and firing on it. While rats (and players) can and do attack drones, this rat will likely explode before it gets the chance. Once the rat has been destroyed, recall your drones to your drone bay (they won't follow you if you warp away), and return to your agent's station to complete the mission.
Return to agent.
Reward: Destroyer skillbook. Start training it if you want to use a Destroyer in the next mission.
==== Missiles ====
Missile ships use guided missiles which automatically home in on their target. Like guns, missiles have a limited range (roughly equivalent to their speed multiplied by their maximum flight time), but unlike guns, they are completely ineffective beyond their maximum range. Unlike guns they can't miss their target, but they do take time to cover the distance from your ship to the target, and will deal less damage to small and fast targets <!-- must be updated once I've flown the mission -->
=== The Pacifist (8 of 10) ===
'''{{co|#9ef37c|Objective:}}''' Follow instructions and retrieve hostages from a structure.
You can use any ship you like for this mission. Undock from the station and warp to the mission's location.
A window will pop up with instructions from your (NPC) fleet commander, giving you detailed instructions; follow them closely. As soon as the fleet commander tells you to:
* Activate the acceleration gate
* In the first deadspace pocket, don't engage any enemy ships
* Fly to the prison structure and retrieve (loot) the hostage
* Return to your agent
This mission is very straightforward, and is intended to teach you to follow instructions from your fleet commander when flying in player [[fleets]] (there are no scenarios in EVE where you are flying in an NPC-controlled fleet).
=== Glue (9 of 10) ===
'''{{co|#9ef37c|Objective:}}''' Use a Stasis Webifier on a rat.
Fit your ship with a Stasis Webifier ("web") module (either one you have lying around, or the Civilian module your agent gives you for this mission). Warp to the mission's location, approach the rat, and (once you're within range - webs have a maximum range, beyond which they have no effect) activate the module.
[[CONCORD]] ships will then warp in and destroy the rat. The mission is complete, you can return to your agent.
This mission is intended to teach you about using webs, but if you've previously done the military career agent missions you should by now be more than familiar with their use. Webs are very commonly used in PvP (although more rarely used in PvE), as they slow down the enemy ship, making them easier to hit, and making it easier for you to keep your ship at an ideal distance for the weapons you have fitted.
'''{{co|#9ef37c|Reward:}}''' A Destroyer skillbook. Inject and start training it to at least level I, as you'll be flying a Destroyer in the next mission.
=== The Exam (10 of 10) ===
'''{{co|#9ef37c|Objective:}}''' Destroy a rat.
Your agent gives you a [[Destroyer]] (e.g. a [[Catalyt]]). Destroyers are larger and slower than the Frigates you've been flying so far, but can mount many more weapons, making them particularly good at fighting Frigates. Assemble and activate your new Destroyer, then fit modules to it. It's recommended that you fit:
* As many turret weapons as will fit. You can strip your current ships of their module, or buy new modules from the market (they are not particularly expensive). It's best to only mount identical weapons (don't, for instance, mix long-range and short-range weapons, as no matter at what range you are, half your weapons will be ineffective).
* A propulsion module (afterburner or microwarpdrive).
You can fit the remaining slots on your ship with modules of your choice, if you want; a web probably isn't a bad idea. Keep in mind that you need to have trained at least level I in the Destroyer skill (that you received at the end the last mission) in order to fly your Destroyer.
Undock and warp to the mission location. There will be three rat Frigates for you to fight; one of them is the "terrorist leader" you're meant to destroy, the other are his wingmen. The terrorist leader will be flying a more advanced faction Frigate, which will warp disrupt (preventing you from warping away) and web (slowing you down) you.
Use the skills you've learned so far to win the fight. Keep at the appropriate range for weapons, turn on your propulsion module, use a web on your target (if necessary, and if you fitted one), and fire all your guns at one target it's destroyed. It's up to you whether you want to destroy the terrorist leader or his wingmen first - but keep in mind that as long as the former is alive, his warp disruptor will prevent you from fleeing should the fight go badly for you.
Once the terrorist leader has been destroyed, return to your agent.
10. "The Exam". Given a Destroyer (e.g. Catalyst). Kill rat.
Warp to location.
3 frigates. Terrorist leader will WD you and web you. So you can't warp out.
Choose to either fight the wingmen or the terrorist leader first.
Once he's dead, return to agent.
Total rewards: ~1.5M ISK
== Advanced Military agent ==
The Advanced Military agent
Line 566:
Line 586:
You're now on your way to the Career Agents. There are three sets of five agents per faction, but they all offer identical missions.
You're now on your way to the Career Agents. There are three sets of five agents per faction, but they all offer identical missions.
-->
-->
== Military Agent ==
<!-- == Military Agent ==
'''Cash Flow For Capsuleers'''
'''Cash Flow For Capsuleers'''
Line 581:
Line 601:
Part 10: Racial combat frigate (e.g. Tristan for Gallente, Merlin for Caldari, Rifter for Minmatar), Sharpshooter skillbook<br>
Part 10: Racial combat frigate (e.g. Tristan for Gallente, Merlin for Caldari, Rifter for Minmatar), Sharpshooter skillbook<br>
<!-- == Industry Agent ==
== Industry Agent ==
It is possible to overlap these agents, for example, when you're waiting for a manufacturing job to build.
It is possible to overlap these agents, for example, when you're waiting for a manufacturing job to build.
Revision as of 18:26, 17 January 2017
The Career Agents are a part of EVE Online's new player training. Following on from the tutorial, the career agents offer missions which showcase and explain some of the main PvE activities in EVE Online, as well as expanding on the topics covered in the tutorial. There are five career agents, each offering between 5 and 10 sequential missions covering a certain area of the game:
Industry
Business
Exploration
Military
Advanced Military
The agents are not exclusive (i.e. doing one set of missions doesn't "lock" you into a pre-set "career path", as there are no such things in EVE) you can do as many of the agents' missions as you want.
It is highly recommended that you complete all the mission chains (or arcs if you will) given by the five career agents, even if you already know what you'd like to do in EVE. The missions give a good overview of some of the mechanics of the game, and good financial rewards for a new player. It is also good to have a basic idea of how each career works - for example, even if you don't plan to do any exploration, it is good to have an idea of how other players are able to scan and find you while you are in space doing any number of activities. Also, it's likely that over the course of your time in EVE you will want to try doing many different things.
However, keep in mind that they offer no training in PvP (which make up a very substantial part of the game). Additionally, EVE is a sandbox game, and much of the attraction of the game is forging your own path as opposed to following a pre-set path - so the career agent "careers" should only be seen as one of many things you can do in EVE.
The career agents (like nearly all other agents) can be accessed through the Station Services window at their station. Right-click on an agent to start a conversation with them.
Finding the Career Agents
If you've followed the tutorial, you will have flown to the station housing the career agents; all five agents are always located in the same station. If you skipped the tutorial, you can locate the closest set of career agents (there are three sets of agents per faction, but they all offer the same missions):
Open the Help menu in-game (F12, or click on the "?" icon in your NeoCom)
Look for the section called "Career Advancement" on the Support tab.
Click on the button "Show Career Agents". This will open another window which will present you with the 5 closest Career agents to your current location.
Next to each agent there will be a button labelled "Set Destination". Click it to plot a route to the system and station where the agents are.
You can do the agents in any order you like (with the exception of the Advanced Military agent, which you should do after the Military agent).
Introduction
If you're doing the Career Agent missions right after the tutorial, you may notice that some of the mission mechanics have changed.
An uncompleted and a completed mission in the Info Panel. The currently active mission now shows up in the Info Panel (left side of the screen) under "Agent Missions". Each mission entry has a drop-down menu through which you can read a summary of the objectives. Additionally, once you've completed the objectives for a mission (including, if applicable, returning any items to the correct station), a green tick mark will appear in the Info Panel.
The missions will also be entered into your mission journal (accessible through the NeoCom, or ALT-J)
In order to start a mission you must first talk to the agent (right-click on the agent (in the "Agents" panel in the Station Services window), and select "Start Conversation") and accept a mission. Once you've completed the objectives, you must return to the agent's station, and talk to him/her again to complete it. You will then be offered the next mission in the mission chain.
The career agent missions often give bonus rewards for completing them particularly quickly, although the timeframe given is usually more than generous.
Any agents you accept missions from will be automatically added to your address book (accessible through the People & Places window in the NeoCom). You can use this to find your agent again should you be unsure where to go.
In many ways, the career agents work similarly to "normal" mission agents in EVE, with two important differences:
The career agents only have a limited set of missions available. Normal mission agents will continue to offer you new missions indefinitely as long as you have the required standings
The career agents will sometimes give you ships, modules, or skillbooks as mission rewards. Normal mission agents almost always pay only ISK and loyalty points.
It's possible to decline a mission from a Career Agent, but this will prevent you from completing the rest of the missions in that agent's mission arc. Therefore, if you want to take a temporary break from a mission chain, click the "Delay" button (instead of the "Reject" button) when a mission is offered.
While many of the rewards from the Career Agents are useful in the rest of the game, some missions reward you with a "Civilian" module. These modules are much worse than even the basic Tech 1 modules and should be ditched at the earliest possible opportunity.
Many of the Career Agent missions have you interacting with objects in space (asteroids, containers, acceleration gates, etc); depending on your Overview settings these may not appear in your Overview. Therefore, the Career Agent missions are a good opportunity to get to know the Overview settings, and (if necessary) to modify them so that you can see all the relevant objects in your Overview. If you're unsure whether your Overview settings are wrong (or if you're just in the wrong place), it may be a good idea to look at the "All" Overview preset from time to time.
The Career Agents assume that you've done the tutorial (or are at least familiar with the concepts taught in the tutorial) before starting their missions.
Objective:Move a small item from one station to another.
Don't forget to put the item into your ship's cargo hold (you can use any ship you like) before you undock. You can click the "set a destination" button (from the Info Panel drop-down menu) to plot a course to the station where you have to drop off the item; the next stargate/station on your route will be highlighted in yellow on your overview. Once you get to the destination station, you can start a conversation with your agent remotely (either through the Station Services panel or through the Info Panel drop-down) to complete the mission, but you must return to him/her to start the next mission. If you're not sure where to return to, you can look up any agents you have previously interacted with in your address book (accessible through the "People & Places" button on the NeoCom).
Balancing the Books (2 of 10)
Objective: Use a salvager module to salvage useful components from a wreck.
Warp to the mission location through the drop-down menu in the Info Panel.
You are given a Civilian Salvager module; fit it to your ship (depending on what ship you're using, you may have to remove another high-slot module to make room for the Salvager. Make sure to keep at least one weapon fitted to your ship). The objective wreck is located in a deadspace area, warp to the deadspace location (right-click in space or on the drop-down menu from the Info Panel) and activate the acceleration gate. There will be some very weak rats in the deadspace pocket; destroy them, then target the wreck, approach to within your Salvager's range (5000 m) and activate the Salvager. After a few cycles the Salvager will be successful, and you can open the wreck in space and retrieve the item. Return to your agent's station and deposit the item into your Item Hangar on the station to complete the mission.
Note that normal salvaging in EVE (outside the Career Agent missions) works slightly differently - you still target wrecks and activate your Salvager module, but any salvaged components are automatically deposited in your ship's cargo bay (no need to manually open a container in space). If you want, you can try this out on the wreck of the rat in the deadspace pocket.
Reward: A Venture mining frigate, which you can find (along with all your other ships) in the Ship Hangar in the station.
Balancing the Books (3 of 10)
Objective:Mine some Veldspar ore and reprocess it into at least 333 Tritanium minerals.
The actual objective is to turn in 333 units of Tritanium to the agent - therefore, if you want, you could just buy the Tritanium off the market (or, if you did the Tutorial, use some of the Tritanium you received as a reward). The price of Tritanium on the local market will fluctuate based on supply and demand, but will usually be around 5-6 ISK per unit (so 333 units will cost you around 2000 ISK, which is a negligible amount of money).
If you want to do this mission the "normal" way, fit a mining module (e.g. a Miner I from the Tutorial, or the Civilian Miner you received when you accepted the mission) to a ship (the Venture you received from the last mission is ideal, as it's a mining frigate, but you could also use most any other ship). You can go to any asteroid belt in the system and find an asteroid with an ore which can be reprocessed into Tritanium (which, in high security space, is virtually any kind of asteroid) - alternatively, the mission has created a beacon with a single large "private" Veldspar asteroid. Given the competition for asteroids in newbie star systems, the beacon is probably the safer bet.
Warp to the beacon, target the asteroid, and turn on your mining module. There is a weak rat near the asteroid - you can either destroy it (if you brought a combat ship), or ignore it, as it doesn't do enough damage to seriously threaten your Venture.
Reprocessing 200 units of Veldspar into Tritanium.
100 units of Veldspar ore reprocess into 415 units of Tritanium (you can find this out by either looking at the reprocessing table on the wiki, or by right-clicking on the Veldspar in-game, selecting "Show Info", and looking at the "Industry" tab) under ideal conditions (100% reprocessing yield). Particularly as a beginner character you will typically have around 50% reprocessing yield (which can be improved by training skills), so you will need at mine at least 200 units of Veldspar in order to get the required 333 Tritanium. Return to the station, move the ore from your ship into your Item Hangar on the station (note that, if you were using your Venture, the ore is in the Venture's special Ore Hold as opposed to the normal Cargo Hold), right-click on the ore and select "Reprocess". Note that you pay a small fee for reprocessing.
Reward: A Reprocessing skillbook. Training this skill will improve your reprocessing yield.
Balancing the Books (4 of 10)
Objective:Hack a structure with a Data Analyser module.
Fit the Civilian Data Analyser module to a ship (with at least a modicum of combat ability, e.g. your Corvette). Warp to the mission's deadspace pocket and activate the acceleration gate. Inside the deadspace pocket there is a Data Storage Device with a weak rat guarding it. Destroy the rat, then approach the Data Storage Device, target it, and activate your Data Analyzer module. This will start the hacking minigame: explore the board by clicking on the green circles until you find the System Core. Once you've disabled the System Core, you can open the container and loot its contents.
Return to your agent and hand in the Encoded Data Chip. You will also have looted a Datacore - but it's not used for anything, you can leave it in your Item Hangar in the station.
Balancing the Books (5 of 10)
Objective: Move a small item from one station to another.
The agent gives you an Overdrive Injector System module, which increases your ship's speed - if you want, you can fit it on your ship (although it won't make much of a difference for this mission). To use an Overdrive Injector System module you need to have trained the Hull Upgrades skill, which is the case for every new pilot. As usual for hauling missions, don't forget to put the item you're meant to transport into your ship's cargo hold and undock. This journey is a bit longer than the one from the first Business mission, so you will want to use the Autopilot to plot the shortest course to your destination (click on "Set Destination" in the Info Panel). As usual, don't get into the habit of using the Autopilot to actually fly your ship - the trip will be much faster if you manually warp from gate to gate.
When you have arrived at your destination, talk to your agent to complete the mission, then return to them.
Reward: An Expanded Cargohold module (increases the size of your ship's cargo bay). You receive this module at your agent's station.
Balancing the Books (6 of 10)
Objective: Acquire a Tracking Computer module.
Buying a Tracking Computer from the market.
How you acquire the Tracking Computer module is up to you. The fastest way is to buy it from another player through the market (the module usually costs around 60-70k ISK), although make sure you either buy it in the current station (in the Market window, sort by the "Jumps" column, and see if there is a module being sold in your station at a reasonable price), or else buy it somewhere else (it may be cheaper?) and fly to the station where you bought it to pick it up.
Alternatively, you can use this mission to learn about basic manufacturing. When you accepted the mission you received a Mass Production skillbook, which, when trained, allows to manufacture multiple items at once. It's not necessary to train the skill to complete the mission (as you'll only be manufacturing one thing at a time), but training the skill is vital if you want to go deeper into manufacturing.
First, you need to buy a blueprint for the Tracking Computer module. Blueprint Originals (BPOs) are sold on the market (by NPCs, so the prices are fixed - this particular blueprint costs around 100k ISK). It's likely that the closest seller is in another star system, so you will need to fly to their station in order to pick up the blueprint you bought.
Once you have the blueprint, return it to your station (or, for that matter, to any nearby station with an Industry facility) and open the Industry window (right-click on the Blueprint, select "Use Blueprint"). This will tell you what materials you need to manufacture the Tracking Computer (Tritanium and Megacyte minerals).
You then need to acquire these minerals. Right-click on the minerals and open the "Show Info" window, which will tell you what ores can be reprocessed to obtain these minerals. Tritanium is extremely common, while Megacyte can only be obtained from rare nullsec ores. While you could fly to nullsec and mine the ores yourself, it's probably easier to buy the minerals directly from the market.
Once you have the minerals, you can start the manufacturing job, which takes about half an hour for this particular module. Once it's done, open the Industry window (from the Station Services window), open the "Jobs" tab at the bottom, and click on "Deliver".
Reward: A Mining module.
Balancing the Books (7 of 10)
Objective: Hack a structure with a Relic Analyser module.
This mission is very similar to mission 4, except that you need to fit the Civilian Relic Analyser module (instead of the Data Analyser you used earlier). Also, after the first acceleration gate, there will be two rats that you need to destroy, before activating a second acceleration gate, which will take you to a second deadspace pocket. Kill the two rats in the second pocket, approach, lock, and hack the container (called an "Ancient Ship Structure"), and loot the contents.
Reward: An Afterburner module.
Balancing the Books (8 of 10)
Objective: Move a small item from one station to another.
Another very simple hauling mission, just like mission 1.
Reward: A Limited Social Adaptation Chip implant, which you can "plug in" to your character's head to increase their Charisma attribute by 1 point, which slighly increases your training speed for skills which use the Charisma attribute. You should plug the implant into your head (right-click on it and select "Plug in"). Note that should your pod be destroyed, any implants you have plugged in will be destroyed too. You can view your plugged-in implants in your Character Sheet (click on your portrait in the upper left-hand corner), on the Character --> Augmentations tab.
Balancing the Books (9 of 10)
Objective: Acquire 2 Afterburner modules.
When you accept the mission your agent gives you an Expanded Cargohold module (although it's not really relevant to completing the mission).
Similar to mission 6, now you need to acquire two 1MN Afterburner I modules. Again, the easiest way is to buy them from the market (keeping in mind that you received one as a reward from mission 7); a 1MN Afterburner costs about 30k ISK. Alternatively you can manufacture one - even though it requires a larger variety of minerals (all of which can be reprocessed from ores mined in high-security space) to manufacture than the Tracking Computer from mission 6. The agent also mentions that you could loot a module from a destroyed ship: player ships in EVE drop about half of their cargo and modules when they are destroyed (the other half is lost). So while you could, in theory, fit a combat ship, go into low- or null-security space, and fight other players until you destroy one who happened to use a 1MN Afterburner module, it's probably not a reasonable path for a new player.
Reward: An Advanced Industry skillbook, which, when trained, speeds up your manufacturing speed. Note that only Omega characters can use this skill - you can tell by the orange border around the icon, and by the letter Ω which appears when you mouse over the icon.
Balancing the Books (10 of 10)
Objective: Manufacture ammunition.
Your agent gives you a Blueprint Copy (BPC) for some race-specific ammunition (e.g. hybrid rounds, laser crystals), and even though the mission text says that you must manufacture them, there (yet again) nothing stopping you from buying them from other players on the market.
If you do decide to manufacture them yourself, follow the same steps as for any other kind of basic manufacturing (see also mission 6). Keep in mind that you need to produce a moderate quantity of ammunition (e.g. 5000 rounds of hybrid ammunition, or 50 laser crystals), increase the value of the "job runs" field in the Industry window until you get the desired outcome. As manufacturing jobs run sequentially the total manufacturing time can take several hours - but you can do other things (including other missions) during this time if you want. Once the manufacturing job is complete, open the Industry window again, select the "Jobs" tab, and click on "Deliver".
Reward: Your race's Fast Industrial ship. These ships are very weak in combat, but can carry large amounts of cargo.
Cosmic Anomalies are a class of relatively easy to find exploration sites. They are scattered all over the EVE universe and can contain hostile NPC ships, asteroids, and more. This particular mission requires that you find an "Anomaly Training Site". There are two ways of doing this:
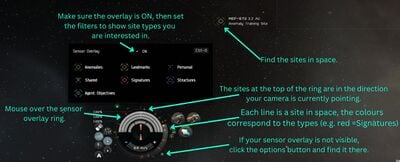
Find sites using the sensor overlay. Using the sensor overlay
After undocking, fly to somewhere in the star system away from large structures (e.g. to an asteroid belt) - while this isn't strictly necessary, it makes things a bit easier.
Check that your sensor sensor overlay is active (CTRL-O, or hover your mouse over the sensor ring around your capacitor), and set the filters to just show Cosmic Anomalies (hide Cosmic Signatures, Landmarks etc).
The green lines on the sensor ring around your capacitor indicate where Cosmic Anomalies are in relation to where your camera is pointing. Rotate your camera until one of the green lines is at the top (12 o'clock) of the sensor ring. Then move your camera up and down until you find the anomaly in space. Repeat these steps until you find an "Anomaly Training Site".
When you've found an Anomaly Training Site, right-click on it in space and select "Warp To" (or hold the left mouse button and use the radial menu).
Find sites using the probe scanner window. Using the probe window
After undocking, open the Probe Scanner window (ALT-P, or through the Scanners button to the left of your capacitor display).
Check the filters to display Cosmic Anomalies (you can hide the other types of signatures if you want).
Look for an Anomaly Training Site in the list of anomalies, right-click on it, and select "Warp To".
While the first method gives you a good feeling of where everything is in space, the second method is usually the easier one. Once you get to the anomaly site, look for a training container, approach it, and loot the "proof of discovery" documents. Return to your agent's station, move the documents into your Item Hangar in the station, and complete the mission.
Your agent gives you a Frigate (although, strangely enough, not an exploration Frigate); undock in it (or in any other ship, for that matter). The tour starts in a deadspace area, warp to the it (right-click in space or on the drop-down menu from the Info Panel). When you get there, another NPC agent will warp in and give you a guided tour (via text boxes - read them!):
Approach and activate the first acceleration gate, which will fling your ship into the first "deadspace pocket".
Activate the acceleration gate there to get to the second pocket. There will be a container with exploration supplies and modules (a Probe Launcher with Core Scanner Probes, and Civilian Data and Relic Analysers). Loot them; note that you can't fit modules onto your ship in space (you can only do that in a station or near certain special ships with a fitting service).
Activate the acceleration gate to get to the third pocket. This is an example of a Data Site; normally you would use a Data Analyzer module to hack the structures and thus attemt to find valuable loot, but for this mission you're just sightseeing. Feel free to take a closer look at some of the structures in space (right-click on them and select "Look At", or ALT-click), as they are quite pretty.
Activate the acceleration gate to get to the fourth pocket. This is an example of a Relic Site, which normally needs a Relic Analyzer module to hack the structures.
Activate the acceleration gate to get to the fifth pocket. This is an example of a gas site, which normally needs Gas Cloud Harvesting modules (similar to ore mining modules) to harvest gas, which can then be turned into boosters.
Return to your agent's station.
Data Site Scanning (3 of 5)
Objective: Scan down and hack a Data Site.
Fit a ship (e.g. your shiny new frigate) with a Core Probe Launcher and a Civilian Data Analyzer, and load Core Scanner Probes into your probe launcher (drag them onto the fitted probe launcher in the fitting window). Normally it's a better idea to use an exploration frigate for, well, exploration, but for the purposes of this tutorial any ship will do.
Undock and launch your probes (click on the probe launcher), then open the Probe Scanner window and the Star Map (CTRL-F10, or use the "Map" button on the NeoCom), and resize the windows so that you can see both at the same time. Don't forget to reset the filter on your Probe Scanner window to show Cosmic Signatures. Next, position your probes around the solar system and scan (this is probably best explained in a video, such as this one from Wingspan) until you find a Data Training Site. Once you've resolved the signature to 100%, warp to it (by right-clicking on the signature in the Probe Scanner window).
Once inside the site, look for a "Training Container", approach and target it, and activate your Civilian Data Analyzer module. This will start the hacking minigame: explore the board by clicking on the green circles until you find the System Core. Once you've disabled the System Core, you can open the container and loot its contents. Recover your probes (there's a button for it in the Probe Scanner window) and return to your agent's station - even though this happens automatically when you dock, it's still a good habit to get into.
Relic Site Scanning (4 of 5)
Objective: Scan down and hack a Relic Site.
This is a very similar mission to mission 3, except that you're looking for a Relic Training Site instead of a Data Site, so make sure you have a Civilian Relic Analyzer fitted to your ship before undocking. Remember to reload your probe scanner module (either through the ship fitting window in the station, or by right-clicking on the module once in space, assuming your scanner probes are in your ship's cargo hold).
Gas Site Scanning (5 of 5)
Objective: Scan down a Gas Site.
Same as mission 4, except that you're looking for a Gas Site. You don't need any gas mining equipment - your agent gives you a passkey (an item), make sure to put it into your cargo hold before you undock! Then scan down a Gas Training Site like you previously scanned down a Data and a Relic site. When you have scanned one down and warped to it, activate the acceleration gate inside the site to get to the second pocket. Look for the Training Container, loot its contents, and return to your agent.
Reward: Your faction's exploration Frigate. This is the kind of ship you should use for your future scanning endeavours.
Industry agent
The industry career agent missions teach you about mining, reprocessing, manufacturing, and hauling. In total these missions pay about 1.5M ISK in rewards.
Your agent gives you a Miner module (used for mining ore); fit it to a Venture mining frigate (if you have one from the tutorial or the business agent missions; if not, then any other ship will do) and undock from the station. Note that you may get a warning about "insufficient cargo space" if you're flying a Venture - you can safely ignore it, as the game somehow "forgot" that your Venture has a special ore bay which can hold many times more ore than you need to mine for this mission.
The mission has created a "private" deadspace pocket for you with a single Veldspar asteroid, warp to it (to warp to the deadspace location, right-click in space or on the drop-down menu from the Info Panel). Once you're there, target the asteroid and activate your mining lasers. It shouldn't take more than a few minutes for you to mine the required 1000 units of Veldspar (although since you need more Veldspar for other missions, keep mining for a few more minutes and get a little more, it will save you a few trips later); once you're done, return to the agent's station, move the ore from your ship to the station Item Hangar, and start a conversation with the agent to complete the mission.
Unlike many other missions, in this case you can't short-circuit the mission objectives by just buying the Veldspar from other players through the market, you actually have to go mine it in the deadspace pocket the mission created for you.
Making Mountains of Molehills (2 of 10)
Objective:Reprocess Veldspar into at least 150 units of Tritanium minerals.
The actual objective is to turn in 150 units of Tritanium to the agent - therefore, if you want, you could just buy the Tritanium off the market (or, if you did the Tutorial, use some of the Tritanium you received as a reward). The price of Tritanium on the local market will fluctuate based on supply and demand, but will usually be around 5-6 ISK per unit (so 150 units will cost you around 1000 ISK, which is a negligible amount of money).
If you want to do this mission the "normal" way, take some of the Veldspar you almost certainly have left over from doing mission 1, right-click on it in your Item Hangar, and select "Reprocess". Veldspar (like any other ore) can only be reprocessed in stacks of 100 (don't worry about getting the stack size exactly right; any excess will simply not be reprocessed); 100 Veldspar reprocess into 415 units of Tritanium (you can find this out by either looking at the reprocessing table on the wiki, or by right-clicking on the Veldspar in-game, selecting "Show Info", and looking at the "Industry" tab) under ideal conditions (100% reprocessing yield). As a beginner character you will typically have around 50% reprocessing yield (which can be improved by training skills), so you will need at reprocess 100 units of Veldspar in order to get the required 150 Tritanium. Reprocessing is instantaneous, but you do pay a small fee.
This mission introduces you to basic manufacturing. Your agent gives you a Blueprint Copy (BPC) for 1MN Civilian Afterburner modules. As in many other cases, you could buy the modules from other players (using the market), but in this case it probably isn't worth it, as these modules are so rarely used (they are Civilian modules, and therefore almost worthless) that they are surprisingly expensive to buy.
Right-click on the BPC and select "Use Blueprint". This will open the Industry window, showing you what materials you need to manufacture the module and how long it takes. Since you want to manufacture 2 modules, increase the "number of runs" to 2 to get an updated quote. Note that you cannot produce more than two modules from the BPC you were given - BPCs (unlike Blueprint Originals (BPOs)) can only be used a limited number of times (in this case, 2). You should have enough Veldspar left over from previous missions to reprocess into the required amount of Tritanium - if not, you can always buy more on the market. Once you have enough Tritanium, start the manufacturing jobs (as the two jobs run sequentially, this takes about ten minutes in total). Once they are completed, open the Industry window, select the "Jobs" tab, and click on "Deliver".
Reward: An Expanded Cargohold module (increases the size of your ship's cargo bay).
Making Mountains of Molehills (4 of 10)
Objective: Destroy hostile NPCs and mine enough Veldspar to reprocess into 7000 units of Tritanium.
First you have to destroy two rogue drone NPCs (rats) at the deadspace location - these are very weak and can be handled by any combat ship (even a Corvette). Fit up a combat ship with at least one weapon, warp to the deadspace area, and destroy the rats.
Then you have a choice: you can go back to the deadspace location in a mining ship (the rats will not respawn) and mine enough Veldspar (about 4000 units) to refine into 7000 units of Tritanium, or you can buy the Tritanium from the market (it usually costs around 45k ISK for 7000 units). Alternatively, you may well have enough Veldspar and/or Tritanium left over from previous missions to complete the mission without any additional mining.
Reward: A Miner module.
Making Mountains of Molehills (5 of 10)
Objective: Transport a small amount of cargo (40 m³) to another station in a nearby star system.
When you accept the mission your agent gives you an Afterburner module module; you can fit it to your ship if you like, although it's not really relevant to completing this mission.
Don't forget to put the item into your ship's cargo hold (you can use any ship you like) before you undock. Click the "set a destination" button (from the Info Panel drop-down menu) to plot a course to the station where you have to drop off the item; the next stargate/station on your route will be highlighted in yellow on your overview. Don't get into the habit of using the Autopilot to actually fly your ship - the trip will be much faster if you manually warp from gate to gate.
Once you get to the destination station, you can start a conversation with your agent remotely (either through the Station Services panel or through the Info Panel drop-down) to complete the mission, but you must return to him/her to start the next mission. If you're not sure where to return to, you can look up any agents you have previously interacted with in your address book (accessible through the "People & Places" button on the NeoCom).
Reward: Another Expanded Cargohold module.
Making Mountains of Molehills (6 of 10)
Objective: Manufacture (or otherwise acquire) 20 Cap Booster items.
A step up from mission 3, manufacturing the Cap Boosters (from a BPC given by the agent) is a little more involved.
It needs three different kinds of minerals to manufacture (Tritanium, Pyerite, Mexallon - you can find this out by plugging the BPC into the Industry window and checking the inputs).
Then, in turn, right-click on the three input minerals and check their "Show Info" windows to determine what ores they are reprocessed from (or you can look at the ore table on the wiki.
You will discover that all three minerals can be reprocessed from Pyroxeres or Plagioclase ore, which can be found in systems with a security status of 0.9 and below.
Fit up your Venture and find the nearest 0.9 (or below - but don't go into lowsec) system, then go from asteroid belt to asteroid belt looking for the right kind of ore.
Once you have mined enough of the right kind(s) of ore, return to your station, reprocess the ore into minerals, and start the manufacturing process.
Alternatively, you can just buy either the minerals or the Cap Boosters from the market; they are usually not particularly expensive. However it's may still be worth going through the steps above in order to get a better understanding of the thought process behind manufacturing.
Making Mountains of Molehills (7 of 10)
Objective: Transport a small item to another station.
A very simple courier mission (like mission 5. Note that this mission (amongst others) requires that you to put up a small sum of ISK as "collateral", which is returned to you after you complete the mission. While the amount is trivial, the principle of collateral for hauling is heavily used for hauling contracts between players (to deter the hauler from just stealing the goods they were meant to be hauling).
Reward: A Overdrive Injector System module (increases your ship's speed).
Making Mountains of Molehills (8 of 10)
Objective: Manufacture a Civilian Shuttle.
While manufacturing a ship sounds more daunting than manufacturing ammunition and modules (which is what you've been doing so far), it works exactly the same way. View the BPC (for manufacturing a Shuttle) your agent gives you in the Industry window to see that it requires about 2800 units of Tritanium minerals - by now you should have no problems acquiring (mining, reprocessing, or buying) the necessary materials. The actual manufacting is fairly rapid too - around 5 minutes.
Unfortunately you can't circumvent the manufacturing by buying the shuttle off the market - your agent wants a specific kind of Civilian Shuttle which isn't available on the market.
Making Mountains of Molehills (9 of 10)
Objective: Mine some ore and destroy the rat that appears.
Fit up a ship with both a weapon and a mining laser (your Corvette does the job just fine), undock, and warp to the deadspace location (sometimes it's in an adjacent star system). Inside the deadspace pocket there will be several asteroids, start mining them with your mining laser. After a minute or so a single weak rat shows up - destroy it. It drops a cargo container when destroyed; loot it, and return to your agent. While you're flying back, right-click and select "Show Info" on the "Production Assistant" you just "rescued", noting with amusement both the description and that it falls under the "Livestock" item category. Capsuleers in EVE can have a dark sense of humour.
Making Mountains of Molehills (10 of 10)
Objective: Acquire a Frigate.
Your agent gives you a BPC for a Frigate (probably the same one you received in the second exploration career mission) and asks you to manufacture it. You're probably very familiar with the process by now (from, amongst other things, mission 6), but manufacturing a proper combat Frigate will take a few more kinds of minerals, which you can either reprocess from ore or buy from other players. Since you'll be needing non-trivial amounts (from a new player perspective) of minerals, it probably makes sense to check the prices (if you are buying some/all the materials) in nearby stations to avoid paying far above their market value. It will probably take a bit of flying around to bring all the minerals to your agent's station.
Of course, you can go the "easy" route and buy a finished Frigate off the market - or even turn in the Frigate you received from the second exploration career mission. To do the latter, unfit all the modules (you can do this quickly by right-clicking on the ship in the Ship Hangar and selecting "Strip Fitting"), then repackage the Frigate.
This mission nicely illustrates that, in EVE manufacturing, time can be exchanged for money and vice-versa. Keep this in mind should you go deeper into manufacturing - you can try to acquire all the necessary materials yourself, or you can pay someone else to do it for you (by buying their ore, minerals, or modules/ships via the market - remember, in EVE, almost everything has been manufactured by players), and it's up to you to find the right balance and make the most of both your time and (in-game) money.
Reward: Your race's Fast Industrial ship. These ships are very weak in combat, but can carry large amounts of cargo.
Military agent
The military career agent missions teach you about PvE combat. In total these missions pay about 2M ISK in rewards.
Use any combat-capable ship you have (your Corvette is sufficient) and undock from the station.
Move your mouse over your weapon to show its characteristics.Set your ship's default orbit distance.
Before you warp to anywhere, move your mouse cursor your weapon and note its optimal and falloff ranges: these are the maximum distances at which your weapon will be effective against enemies. It's probably a good idea to set your ship's default "orbit" and "keep at range" distances to a distance around your weapon's optimal range - this will make it easier for you to command your ship to try and maintain the ideal distance between it and enemy ships. To do this, right-click on any entry in the Overview, go into the "Orbit" sub-menu, then into the "Set Default" sub-menu, and select the appropriate range. Repeat for "Keep at Range".
Right-click in space to warp to the mission location.
Note that the mission takes place in a deadspace pocket specifically created for this mission; to warp to it, either use the drop-down menu in the Info Panel (left side of the screen) or right-click anywhere in space.
Rats targeting and firing at your ship.
Once you arrive at the deadspace pocket, you will encounter several rats; order your ship to approach the closest rat. As you get closer, take a look at their icons in the Overview: if there is a yellow box around them, it means that they are targeting your ship. If the box turns red, it means they are firing their weapons at you. Target the closest one, order your ship to either orbit or keep at range from that enemy, and activate your weapon.
After you have destroyed the first rat, two more rats will appear, but they will likely be much further away, and you probably won't be able to target it or fire your weapons (effectively) at them because they are too distant. Order your ship to fly toward them (using either the "Approach", "Orbit", or "Keep at Range" commands). If your ship has a propulsion module (e.g. an Afterburner or a Microwarpdrive) fitted, you can activate it to increase your ship's speed.
As you're flying towards the more distant rats, select one of them, and take a look at the "Selected Item" window (by default, just above your Overview). Note that the rat has a bounty - this is an amount of ISK you will receive if you destroy it. More difficult rats (usually found in lower-security star systems) have higher bounties. Destroying rats for their bounties (known as "ratting") is one way to earn ISK as a combat pilot.
While your ship is firing at the first rat, you can already target the other nearby rats; you can have a number of enemies targeted simultaneously. Destroy the rats one by one. Once a green check mark appears next to the mission name in the Info Panel then you've completed the mission.
Return to your agent's station (by either right-clicking in space or using the drop-down menu in the Info Panel and start a conversation with them to complete the mission.
Reward: A race-appropriate weapon for your ship (e.g. a Railgun, Beam Laser), including ammunition.
Cash Flow for Capsuleers (2 of 10)
Objective: Destroy rats and retrieve civilians.
Fit the weapon you received as a reward from your last mission on your ship - if you were using a Civilian weapon before, then this new weapon will be a significant upgrade. However, note that all non-civilian ship-mounted weapons require ammunition:
You load ammunition into your weapon by dragging it onto the fitted weapon on the Fitting screen (ALT + F). It's also a good idea to carry some spare ammunition in your ship's cargo bay, so that you can reload your weapon with fresh ammunition once it's empty. While the mission text recommends you fit a Shield Booster or Armor Repairer module, it's not really necessary; if you happen to have one lying around, by all means fit it to your ship.
Undock from the station and warp to the mission's deadspace pocket; you will encounter several rats. As before, target them, order your ship to stay at an ideal distance for your weapons, and destroy them. If you have an Afterburner module it can be a good idea to keep it activated if you're orbiting enemies, as it will make your ship more difficult to hit.
When you destroy the last rat in the deadspace pocket it will drop a cargo container into space; if you cannot see it on your overview, switch to a different overview preset. Either right-click or use the radial menu on the cargo container's entry in the Overview and select the "Open Cargo" command. You need to be within 2500 m to retrieve items from containers in space; if you're further away, your ship will automatically fly closer before opening a window where you can retrieve ("loot") the items from the container.
Different wrecks on the overview.
Before you return to your agent, note that the enemies you destroyed leave behind wrecks (again, if you cannot see any wrecks on your overview, switch to a different overview preset). Some of these wrecks contain loot, and these are marked with a specific icon. If you want to retrieve the loot in the wrecks (it's not mandatory for completing the mission), use the same method as you used for the cargo container above. While most items you loot will have relatively little value, the amount does add up over time, and specific "elite" rats can drop very valuable items when destroyed.
Note that the mission listing on the Info Panel doesn't show a green check mark - that's because even though you have retrieved the civilans, you haven't yet returned them to the agent's station, which is a requirement for completing the mission. Therefore, return to your agent's station. While you're flying back, right-click on the civilians you rescued (in your ship's cargo bay) and select "Show Info"; note with dark amusement that, to capsuleers (like yourself), civilians are classified as "Livestock".
Objective: Destroy rats and retrieve items from a cargo container.
While your Corvette is more than capable of handling this mission, you might as well take your shiny new combat Frigate out for a spin. Before you can use it, however, you must first assemble it: Find it in your Ship Hangar, right-click on it and select "Assemble". Then right-click on your ship again and select "Make Active" to, well, activate it (i.e. to have your character change from piloting your Corvette to piloting your new Frigate).
There are two things you should do before taking your new ship out:
Fit some modules to it.
At the very least your ship needs some weapons - your agent will have given you two race-appropriate turret weapons (e.g. Railguns or Beam Lasers); open the Fitting screen and drag the turrets to your ship's High Power Slots ("high slots"). Don't forget to load them with ammunition. If your ship has more than two turret slots you can also fit the weapon you received in mission 1 - although if you fitted it to another ship for mission 2 you will need to remove it first. To do this, either activate the previous ship and drag the weapon from the Ship Fitting screen to the Item Hangar, or right-click on the previous ship and select "Strip Fitting" (which will remove all the modules currently fitted to that ship and put them in your Item Hangar).
Some kind of propulsion module (afterburner or microwarpdrive) would be helpful, but don't fret too much if you don't have one to hand. Later missions will reward you with one, or, if you're impatient, you can always buy one from other players through the market.
Insure your ship. It's good practice to always insure your ships as a new player. The insurance premiums are very low, and the insurance will pay you most of the value of the ship's hull (excluding any modules or cargo) should it be destroyed.
Once you're ready, undock from the station. Once in space you'll notice that you have an icon for each of your weapon modules - while you can target and fire each weapon individually, it's almost always a good idea to fire them together at one target. You can make this easy by dragging the modules onto each other to "stack" them, allowing you to fire all your weapons with a single click or button press.
The EWAR (electronic warfare) display shows any hostile EWAR affecting your ship.
Warp to the mission's deadspace location, and start fighting the rats there. You will encounter some Drone rats for the first time (you can identify them by their icon on the Overview, compared with the Frigates and Corvettes you have been fighting so far) . Some of these (the helpfully named Webber Drones) will use Stasis Webifier modules on you (this is referred to as "webbing"), slowing your ship down and making it easier to hit with weapons. An icon will apear above your capacitor indicating that an enemy is webbing you; you can move your mouse over it to show which enemy is doing the webbing. You may wish to destroy these first.
A Destroyer rat (note the different Overview icon) will also appear and taunt you in the Local chat channel, but will warp off before you can engage it. The last rat that you destroy will drop a cargo container into space; as before, loot its contents, and return to your agent's station.
Cash Flow for Capsuleers (4 of 10)
Objective: Approach a structure in space.
This mission is very simple. Fly to the mission's deadspace location, and find the "Smuggler Stargate" on your Overview. You may need to switch to a different Overview preset (or modify the presets) in order to see it. Order your ship to approach it; as you're flying, take the time to admire the pretty scenery. When you get close enough, the mission will complete (look for the green tick mark in your Info Panel) - return to your agent's station. Note that your ship will start taking damage as you approach the stargate, but unless you stay in the vicinity for a long time you won't be in danger.
Reward: A 1MN Afterburner module. Unless you've already done so, fit it to your combat Frigate.
Cash Flow for Capsuleers (5 of 10)
Objective: Activate a resistance module, destroy one rat.
Your agent will give you a Shield Hardener module, which, when fitted to your ship and activated, will reduce the damage your ship takes from a specific damage type. There are four damage types in EVE (Electromagnetic, Thermal, Kinetic, and Explosive), and your ship is differently susceptible to each. Fit the Shield Hardener module to your ship (it's a mid slot module; if you don't have any spare mid slots, remove one of the existing modules and fit the Shield Hardener) and undock.
To see the effects of the Shield Hardener in action, once in space, open the Fitting window. Then open the Attributes panel (on the right-hand side of the Fitting window) and make sure the "Defense" section is expanded (i.e. the details are visible). This part of the Fitting window shows you how much damage your ship can take before being destroyed (commonly known as "tank") - note that your tank is made up of shields, armor, and structure, and each has a different resistance to the four damage types. Assuming you're being shot at by all four damage types equally, adding the three tank types together gives you your ship's "effective hitpoints" (EHP), which are a good overall indication of how tough your ship is.
Note your shields' resistance to the four damage types, then activate your Shield Hardener module (it doesn't provide any benefits unless it's active). Note how your shields' resistance to the module's damage type increase, and how this also increases your ship's effective hit points. NPCs (rats) in EVE are very predictable in what damage types they deal - your agent will have given you a Shield Hardener to counter the local rats' preferred damage type.
Fly to the mission's deadspace location, and activate your Shield Hardener module. Destroy the one rat, and return to your agent.
Cash Flow for Capsuleers (6 of 10)
Objective: Destroy a structure.
By now you've probably used a bit of ammunition, so before you undock, make sure you have some spare ammunition in your combat ship's cargo hold before undocking (unless you're using Laser weapons, whose Tech 1 ammunition doesn't run out). You should also make sure that all your weapons are fully reloaded - either drag ammunition onto them in the Fitting screen, or (once you're in space), right-click on the weapon and select "Reload all".
Undock and fly to the mission's location, where you will find an acceleration gate which leads you to a deadspace pocket. Approach and activate it, and it will fling your ship to a deadspace pocket. There are a few frigate rats here; you have to destroy them (and the additional ones which warp in, there are quite a few) to be able to activate the next acceleration gate. Don't forget to activate your shield hardener and your afterburner to make your ship more resistant to enemy fire and harder to hit.
Once all the rats have been destroyed, activate the acceleration gate, which will fling your ship to a second deadspace pocket, containing the outpost structure you're meant to destroy. The outpost itself goes down easily, but the moment it's destroyed two rats and two sentry guns (powerful immobile turrets) spawn. The frigates aren't a big threat, but the sentry guns will do significant damage to your ship if they hit you, so make sure you're flying as fast as you can around them (turn on your afterburner!). These sentry guns have poor tracking, and by flying around them at high speed you're maximising your ship's angular velocity and therefore making it difficult for the sentry guns to hit you.
Return to your agent's station. Your ship has probably taken some armor damage in the last fight. If you have an Armor Repair module (note that you get one from the next mission) you can fit it to your ship and activate it the next time you're in space to repair your armor (your shields will regenerate on their own). Alternatively, if you're docked at a station with a Repairshop, you can use it to repair your ship for a small ISK fee. Click on the Repairshop icon in the Station Services panel (right-hand side of the screen), select your ship, and click "Repair Item".
Reward: A Limited Ocular Filter implant, which you can "plug in" to your character's head to increase their Perception attribute by 1 point, which slighly increases your training speed for skills which use the Perception attribute. You should plug the implant into your head (right-click on it and select "Plug in"). Note that should your pod be destroyed, any implants you have plugged in will be destroyed too. You can view your plugged-in implants in your Character Sheet (click on your portrait in the upper left-hand corner), on the Character --> Augmentations tab.
Cash Flow for Capsuleers (7 of 10)
Objective: Destroy rats.
Your agent gives you an Armor Repairer module, which, once fitted and activated, will gradually repair your ship's armor while using up some of your ship's capacitor energy. Using a module like this to repair your armor during a fight is called "active armor tanking". Fit it to your ship and undock.
Warp to the mission's deadspace location and start engaging the rats. There will be several waves of rats, so it's likely that your ship's armor will start taking damage. When it does, activate your armor repairer and note how it repairs a chunk of your armor at the end of each module cycle. Your capacitor probably doesn't recharge quickly enough for you to run your armor repair module all the time (particularly if you're also using an afterburner, which you should be), so turn it off when you don't need it.
To fight as effectively as possible, make sure to keep your ship within your weapons' optimal range of your current target (using the "Orbit" or "Keep at Range" commands). Additionally, keep your Shield Hardener running and keep your ship's speed up (with your afterburner) to make your ship as hard to hit as possible. If you start to get overwhelmed with rats, warp out, repair your shields and armor, and then return to the deadspace location.
There is a large asteroid complex in the middle of the deadspace site. Note that you can shoot your weapons through it to hit rats on the other side, but you can't fly through it (you'll bounce harmlessly off it if you get too close, but this does slow you down considerably). If you're constantly bumping into it, fly your ship manually away from the asteroid; the rats will follow you, and you can re-engage them in open space.
Once all the rats have been destroyed, return to your agent.
Cash Flow for Capsuleers (8 of 10)
Objective: Retrieve VIPs.
Warp to the mission's deadspace location, and approach the "Le Fleur Inn" (as usual, check your Overview preset and settings if you can't see it - the inn is a "Large Collidable Structure", and your overview must be set to display these). As you approach the structure, it will explode, damaging your ship.
The mission is now complete and you can return to your agent. Alternatively, when the hotel exploded a number of rats warp in, and you can engage them for bounties and loot. This group of rats is a step up from the rats in the last mission, but they are a good opportunity to practice the tactics you used in the last mission.
Reward: Two Overdrive Injector System modules, which increase your ship's speed.
Cash Flow for Capsuleers (9 of 10)
Objective: Destroy a structure.
If you have a spare low slot on your ship, fit one (or even both) of the Overdrive Injector System modules you received as a reward from the last mission; more speed never hurt anyone.
Undock and warp to the mission location, where you will find an acceleration gate guarded by three rats (you can destroy them, and the three additional ones which warp in, but it's optional and not much of a challenge at this point). Activating the acceleration gate flings your ship into the next deadspace area, where you will find the Narcotics Warehouse you're supposed to destroy; do so to complete the mission. If you want, you can also kill the three rats guarding the warehouse (as well as the three additional ones which warp in), but they are optional.
Reward: A Stasis Webifier module, which slows down enemy ships (making them easier to hit).
Cash Flow for Capsuleers (10 of 10)
Objective: Destroy the pirate leader's capsule.
Fit the Stasis Webifier you received from your previous mission to your ship, as it's helpful in destroying enemy ships faster.
Set a destination to the mission location (it's located in a system a few jumps away from your agent) and fly to the destination system via the stargates (the stargates on your route are marked in yellow on your Overview). Once you've arrived at the destination system, warp to the deadspace location, and activate the acceleration gate to enter the first deadspace pocket.
This mission consists of three deadspace pockets, connected via acceleration gates. You have to destroy all the rats in each pocket to be able to use the acceleration gate there to enter the next pocket. These "deadspace complexes" (a series of deadspace areas connected by acceleration gates) are fairly common in higher-end PvE missions. Note that if you have to warp out of a pocket (e.g. because your ship is taking too much damage and you need to repair), you will have to go through each pocket sequentially to reach your previous location; however, the rats in those pockets will not respawn.
The first pocket contains five Corvette rats, and two more Frigate rats which warp in once you've destroyed the Corvettes.
The second pocket contains four Frigate rats, and four more Frigates (in two groups) which warp in once the previous group has been destroyed.
The third (and final) pocket contains a Stasis Tower and three Frigate rats. The Stasis Tower uses a Stasis Webifier to slow your ship down, making it take more damage from the rats. The pirate leader you're here to kill is manning the Stasis Tower; once you destroy it, he ejects in his capsule. This is similar to what happens when a player's ship is destroyed, but unlike a player, the pirate leader doesn't immediately warp off in his capsule, giving you plenty of time to destroy it and complete the mission. His frozen corpse will then remain floating in space; unlike player corpses, unfortunately (or fortunately, depending on your point of view on such things) you can't take it back with you. EVE can be a very dark game if you look too closely.
The combat in this mission is easily the most challenging yet. If you're having trouble, read up on how gunnery works in EVE.
Keep an eye on your range to your enemies; try to keep it around your weapon's optimal and falloff range (for hybrid, laser, and projectile artillery weapons try to keep them at about your optimal range; projectile autocannon weapons have such short optimal ranges that it's best to keep them inside your falloff range).
Also keep an eye on your enemies' angular velocity (you can select to have it shown as a column on the Overview): a high angular velocity makes them difficult to hit; slow them down using your Stasis Webifier module. Note that the farther away they are from you, the lower their angular velocity will be. Additionally, using the "Stay at Range" command (as opposed to the "Orbit" command) usually reduces an enemy's angular velocity (because you'll tend to be flying directly at or away from them, as opposed to around them), but, for the same reasons, it also makes your ship easier to hit. Experiment a little to see what works best for your ship and weapon.
You can also experiment with different ammunition for your guns. All the turret weapons have a range of ammunition to choose from, ranging from short-range high-damage ammunition to long-range low-damage ammunition. You've probably been using the former, but you may want to buy some of the latter from the market and experiment with staying further away from the rats (and therefore hopefully out of their weapons' range) and hitting them with your longer-range ammunition. Your Stasis Webifier will, once again, come in handy to ensure your ship is faster than theirs and can therefore dictate the range at which the fight occurs, to your advantage.
The advanced military career agent missions continue to teach you about PvE combat; you should complete the military career agent missions before you do them. In total these missions pay about 1.5M ISK in rewards.
You should always read mission text carefully, but this particularly the case for these missions. If you don't follow the mission objectives carefully you will likely fail them.
The Swap (1 of 10)
Objective: Destroy rats.
If you've been doing the military career missions so far, then this mission will be a nice easy warm-up exercise. Take a fully fitted combat frigate (e.g. the one you've been using for the military career missions), fly to the deadspace mission area, and destroy three waves of Frigate rats.
Angel of Mercy (2 of 10)
Objective: Blow up your ship to destroy a structrure.
You will lose your ship in this mission! Luckily, your agent has given you a new Frigate ("rigged with explosives", although that's just flavour text; it's a normal ship); activate it. You could also use any other Frigate you have (but not a Corvette or another ship class) - but if you do, make sure there are no modules or cargo on it. Since you know you're going to lose it, insure it at the highest level you can afford to get a bit more money back.
Undock and warp to the mission's deadspace area, and activate the acceleration gate there. The target structure is there; approach it. When you get to within 0 m, your ship will explode, destroying the structure (enjoy the lightshow). You will be left floating in space in your pod; return to your agent's station. If you check your wallet you will notice that you received the insurance payout from losing your ship.
Your Undivided Attention (3 of 10)
Objective: Use a Warp Disruptor module on a rat.
Your agent gives you a Warp Disruptor module, which is one of the two common module types (the other being a Warp Scrambler) which prevents other ships from warping away. Fit it to your main combat frigate and undock.
Fly to the mission's deadspace location, target the "fleeing pirate" ship (despite the name, he will wait patiently for you), and activate your Warp Disruptor module. Any other nearby rats will warp off, and you have completed the mission. Return to your agent.
Warp Disruptors (and Scramblers) are particularly useful when fighting other players (PvP), as they will tend to warp off if they think that they are losing the fight, so you need to use a Warp Disruptor / Scrambler to force them to stay if you want to destroy their ship. Conversely, NPC ships (rats) will almost never warp away, so you almost never need to fit a Warp Disruptor / Scrambler in PvE combat.
A Friend in Need (4 of 10)
Objective: Use a Remote Armor Repair module to repair a friendly ship.
Your agent gives you a Remote Armor Repair module, which repairs the armor of another friendly ship. Fit it to your combat frigate (depending on what other modules you have fitted you may have to remove a turret; you can do so, as you won't need to fight any ships in this mission) and undock.
Fly to the mission location and locate the "damaged vessel". Target it, and, once you're in range (your Remote Armor Repair module has a maximum range, just like your guns), activate the Remote Armor Repair module. After the repair module completes a cycle, the friendly ship will warp off; you have completed your mission and can return to your agent.
Repairing other ships in combat (referred to as "logistics" in EVE) is an important but somewhat specialised part of EVE gameplay. Most fleets (except perhaps the very smallest gangs) will include one or several logistics ships, who will try to keep their fleetmates alive under fire. While this mission gives a very basic introduction, it over-simplifies things perhaps a bit too much. For one thing, the "damaged vessel" wasn't actually damaged (you could see their shield/armor/structure status when you targeted them). Additionally, the mission implies that using your repair module repaired the damaged vessel's warp drive - in reality, there is no way to "damage" a ship's warp drive, although you can (see mission 3) use modules to temporarily prevent ships from warping away.
Reward: A Remote Armor Repair Systems skillbook, which allows you to use Remote Armor Repair modules (the Civilian repair module you used for this mission doesn't require any skills to use).
The Stand (5 of 10)
Objective: Destroy at least 1 rat, then lose your ship.
You will lose your ship in this mission (again)! Unlike in mission 2 you will actually need to do some fighting beforehand, so fit your combat frigate with a few cheap weapons, minimal ammunition, and little else (everything you fit on and carry in your ship will be destroyed in this mission). If you haven't already done so, insure your ship to the highest level you can afford (in general, you should be insuring most of your ships at the start of the game).
Undock, warp to the mission's deadspace location, and activate the acceleration gate there. In the first deadspace pocket there is a lone rat; destroy it. Once it's destroyed, a large fleet warps in, including several cruisers (again, note their Overview icons), who will use Stasis Webifiers and other forms of electronic warfare on you. If you want to you can try and fight them, but you've got no hope. As the rats are not using Warp Disruptors on you, you could warp away and save your ship (which is what you'd normally do if you were overwhelmed), but in this case, the mission requires that your ship be destroyed by the rats.
Once your ship is destroyed, you will (once again) be left floating in your pod in space. Almost all rats (there are very few rare exceptions) ignore your pod (they don't try to destroy it or prevent you from warping away), so look around for a wreck with your character's name on it - that's all that's left of your ship. In EVE, when your ship is destroyed , half of the fitted modules and cargo are destroyed (along with all the fitted rigs), while the other half drop into space for anyone in the vicinity to pick up - and it's usually picked up by your victorious opponent (unless you were only fighting rats and there were no other players nearby). It's not uncommon for your ship to be destroyed while playing EVE, so learn to treat your ships as expendable (or as the first golden rule of EVE says, never fly what you cannot afford to lose).
You have completed the mission; return to your agent.
Don't Look Back (6 of 10)
Objective: Use an Afterburner module.
Your agent gives you a Civilian Afterburner; fit it to a ship (any ship will do, even your Corvette).
Warp to the mission's location, and activate the acceleration gate there. In the first deadspace pocket, locate the "Asteroid Station" on your Overview and fly towards it (e.g. using the "Approach" command). Since the station is a long way away, activate your afterburner module to speed up your ship. When you get close to the station, the mission will be completed and you can return to your agent.
Weapon of Choice (7 of 10)
Objective: Use your race's other weapon system to destroy a rat.
In addition to the turret weapons you've been using up to now, each race also uses another weapon system:
Drones are small semi-autonomous spacecraft which you can order to attack hostile ships. Your agent gives you two light drones (Civilian Hobgoblin) drones; in order to use them, you must use a ship with a drone bay, such as the Gallente Velator Corvette, the Gallente Tristan or Imicus Frigates, or the Amarr Tormentor or Magnate Frigates (the Amarr Impairor Corvette or the Gallente Incursus Frigate would also work, although they both have very small drone bays that can only fit one of the two drones you were given). Activate one of these ships and move your drones into the ship's drone bay
Undock from the station. Once in space, note that a new window has appeared on your UI: the drone control window, which shows you which drones you have in your drone bay and which you have in space. Warp to the mission's location.
There is a single weak rat there that you need to destroy, so you can take your time to learn how drones work. Select the drone(s) in your drone bay, right-click and select "Launch". Your drones will now start orbiting your ship (and you can see them in the "In Space" section of the drone control window), awaiting your command. Target the rat, and order your drone(s) to attack it by selecting them, right-clicking on them, and selecting "Attack" (alternatively, the much easier shortcut key is R).
Note how your drone(s) fly towards the rat, and once they get close, start orbiting it and firing on it. While rats (and players) can and do attack drones, this rat will likely explode before it gets the chance. Once the rat has been destroyed, recall your drones to your drone bay (they won't follow you if you warp away), and return to your agent's station to complete the mission.
Missiles
Missile ships use guided missiles which automatically home in on their target. Like guns, missiles have a limited range (roughly equivalent to their speed multiplied by their maximum flight time), but unlike guns, they are completely ineffective beyond their maximum range. Unlike guns they can't miss their target, but they do take time to cover the distance from your ship to the target, and will deal less damage to small and fast targets
The Pacifist (8 of 10)
Objective: Follow instructions and retrieve hostages from a structure.
You can use any ship you like for this mission. Undock from the station and warp to the mission's location.
A window will pop up with instructions from your (NPC) fleet commander, giving you detailed instructions; follow them closely. As soon as the fleet commander tells you to:
Activate the acceleration gate
In the first deadspace pocket, don't engage any enemy ships
Fly to the prison structure and retrieve (loot) the hostage
Return to your agent
This mission is very straightforward, and is intended to teach you to follow instructions from your fleet commander when flying in player fleets (there are no scenarios in EVE where you are flying in an NPC-controlled fleet).
Glue (9 of 10)
Objective: Use a Stasis Webifier on a rat.
Fit your ship with a Stasis Webifier ("web") module (either one you have lying around, or the Civilian module your agent gives you for this mission). Warp to the mission's location, approach the rat, and (once you're within range - webs have a maximum range, beyond which they have no effect) activate the module.
CONCORD ships will then warp in and destroy the rat. The mission is complete, you can return to your agent.
This mission is intended to teach you about using webs, but if you've previously done the military career agent missions you should by now be more than familiar with their use. Webs are very commonly used in PvP (although more rarely used in PvE), as they slow down the enemy ship, making them easier to hit, and making it easier for you to keep your ship at an ideal distance for the weapons you have fitted.
Reward: A Destroyer skillbook. Inject and start training it to at least level I, as you'll be flying a Destroyer in the next mission.
The Exam (10 of 10)
Objective: Destroy a rat.
Your agent gives you a Destroyer (e.g. a Catalyt). Destroyers are larger and slower than the Frigates you've been flying so far, but can mount many more weapons, making them particularly good at fighting Frigates. Assemble and activate your new Destroyer, then fit modules to it. It's recommended that you fit:
As many turret weapons as will fit. You can strip your current ships of their module, or buy new modules from the market (they are not particularly expensive). It's best to only mount identical weapons (don't, for instance, mix long-range and short-range weapons, as no matter at what range you are, half your weapons will be ineffective).
A propulsion module (afterburner or microwarpdrive).
You can fit the remaining slots on your ship with modules of your choice, if you want; a web probably isn't a bad idea. Keep in mind that you need to have trained at least level I in the Destroyer skill (that you received at the end the last mission) in order to fly your Destroyer.
Undock and warp to the mission location. There will be three rat Frigates for you to fight; one of them is the "terrorist leader" you're meant to destroy, the other are his wingmen. The terrorist leader will be flying a more advanced faction Frigate, which will warp disrupt (preventing you from warping away) and web (slowing you down) you.
Use the skills you've learned so far to win the fight. Keep at the appropriate range for weapons, turn on your propulsion module, use a web on your target (if necessary, and if you fitted one), and fire all your guns at one target it's destroyed. It's up to you whether you want to destroy the terrorist leader or his wingmen first - but keep in mind that as long as the former is alive, his warp disruptor will prevent you from fleeing should the fight go badly for you.
Once the terrorist leader has been destroyed, return to your agent.
Read the mission descriptions carefully when doing the Advanced Military path. Two of the missions require losing your ship, so make sure you use the ship supplied by the agent and get platinum insurance. The Advanced Military Agent will give a Letter of Recommendation that can be used to enter the NPC Factional Warfare corporation. Factional Warfare Guide
Skillbooks: Propulsion Jamming, Remote Armor Repair Systems (Amarr and Gallente) or Shield Emission Systems (Minmatar and Caldari), Small Energy Turret (Amarr), Light Missiles (Caldari), Drones (Gallente), Small Projectile Turret (Minmatar), Destroyers.
Rewards
When you first begin the tutorial in EVE your first mission will be given to you by a tutorial agent at the station in your starter system. After you complete that mission, you will be directed to contact the career agents. These agents are found in a nearby solar system, and will provide you with missions that will give you a very basic overview of some of the many career choices in EVE.
Career agent also provide a significant standing boost to their associated faction.
Each career mission
Base faction gain
No.of parts
Exploration
~0.99%/~1.25%/1.5%
5/5
Business
1.5%
10/10
Industry
1.5%
10/10
Military
1.5%
10/10
Advanced Military
1.5%
10/10
Note:(You only get the standing gain by finishing the last part of mission for a career agent and those mission will be highlighted yellow and name as Storyline mission.)
Note 2:( Exploration base % depend on the faction you are doing for amarr = ~0.99% caldari/minmatar = ~1.25% gallente = 1.5% dont ask me why, ccp just hate everyone except gallente :P)
Possible standing gain from finishing three set of agent for one faction
Set
Gain starting from 0 standing
1
~0.702
2
~1.354
3
~1.962
Note:(You also take standing hit for rival faction)
Thus by finishing 2 set of career mission can help unlock level 2 mission for that faction.
If you plan on applying to join Eve University, it is required that you have at least started, if not completed, all the career agent missions.
Starter Systems in EVE
These are the starter systems in EVE. Each one has a single station, and a single Level 1 Quality 0 agent ("Aura," the ship-board computer persona) who will provide you with your first two missions during the tutorial. The system at which you start in is dependent on the corporation you pick when you create the character, for instance, creating a new Minmatar player with a corporation of "Republic Military School" will place you in Ammold - which happens to be the nearest starter system to Aldrat.
Amarr
Sehmy VIII - Moon 2 - Hedion University
Emrayur III - Moon 1 - Royal Amarr Institute
Chaven VIII - Moon 1 - Imperial Academy
Minmatar
Hulm VIII - Moon 2 - Republic University
Ammold V - Republic Military School
Ryddinjorn VI - Moon 2 - Pator Tech School
Gallente
Cistuvaert V - Moon 12 - Center for Advanced Studies
Duripant VII - Moon 6 - Federal Navy Academy
Bourynes VII - Moon 2 - University of Caille
Caldari
Todaki VI - Moon 1 - School of Applied Knowledge
Kisogo VII - State War Academy
Amsen VI - Moon 1 - Science and Trade Institute
Note that every character can access the final starter missions one time at each location. The rewards are minimal, and the end result is to send you to the nearest set of Career Agents (listed below). However, if after leaving your school you decide to visit one of the other schools, the first mission you are given grants you a rookie ship of the race associated with the school.
Career Agents and Systems
You can locate your career agents at any time by clicking on the help button in your NeoCom. At the bottom of the help window, you will find a button labeled 'Show Career Agents'. Clicking on that button will bring up a list of your career agents. Clicking on the 'Set Destination' button will set your autopilot to the career agent's location. You can only do each career agent once so please do not quit any of their mission you will not be able to talk to them again if you do.
The following are the career agents and systems in EVE: