Difference between revisions of "Mining Primer for Complete Beginners"
m (→Locating and Targeting Asteroids: add Dotlan link) |
m (Update link.) |
||
| (27 intermediate revisions by 12 users not shown) | |||
| Line 1: | Line 1: | ||
| − | This | + | :''This is a step-by-step beginner tutorial for mining, aimed at players who may have done EVE's introductory tutorial but not much else. For a more in-depth explanation of mining mechanics, see [[mining]].'' |
| + | This guide covers everything you need to do to set up an entry-level mining frigate and take it out to mine ore. There is much more to learn, but this is a start. | ||
| − | ==Getting Ready== | + | == Getting Ready == |
| − | Mining in EVE is not complicated, and in high security systems it is | + | Mining in EVE is not complicated, and in [[high-sec|high security systems]] it is relatively safe. Some players mine while doing other things on their computers, though it is not clear that mining is ''that'' safe, even in 1.0 System Security. But more on that later. |
| − | |||
| − | |||
| − | |||
| − | |||
| − | |||
| − | |||
| − | |||
| − | |||
| − | |||
| − | |||
| − | |||
| − | |||
| − | |||
| − | At that point, you will be able to mine the basic ores profitably with relative safety . | + | To mine you need at least: |
| + | * A ship | ||
| + | * Mining lasers for the ship | ||
| + | * Certain gear to improve your ship's mining and defensive abilities | ||
| + | * The skills to make use of the ship, the lasers, and the gear | ||
| + | |||
| + | If your long term goal is to efficiently mine ore for your own use and/or for profit, then you probably want to follow a career path that goes something like this: | ||
| + | # Start with Veldspar, Scordite, Pyroxeres and Plagioclase ore in high security systems, | ||
| + | # Improve your refining skills with {{sk|Simple Ore Processing}} to at least Level IV, | ||
| + | # Acquire the skills you need to operate a [[Mining Barge]], | ||
| + | # Improve your refining skills to at least level III with {{sk|Coherent Ore Processing}} for Omber and/or Kernite processing | ||
| + | |||
| + | At that point, you will be able to mine the basic ores profitably with relative safety. Then it will be time to think about mining for ice, gas, and high value ores in more dangerous places, such as low security systems, null security systems, and [[wormholes]]. | ||
This guide assumes that you are starting at step 1. It will put you in a mining frigate fitted out for basic mining and show you the skills needed for refining the ore. It will also show you some of the paths you can follow as your mining skills develop. | This guide assumes that you are starting at step 1. It will put you in a mining frigate fitted out for basic mining and show you the skills needed for refining the ore. It will also show you some of the paths you can follow as your mining skills develop. | ||
| − | ==First, Get a Ship== | + | == First, Get a Ship == |
| − | Although the process you go through for | + | Although the process you go through for picking a ship is extensive, and you will need to read more about it as you improve your mining skills, for now there is really only one ship you can use: the {{Ship|Venture}}. You should have received a Venture when you did the EVE [[Career Agents|Industry "career" mission]]. If you didn't do the mission, or no longer have the ship, you need to purchase one now. |
| − | The Venture is well suited for a beginning miner. Its abilities include a bonus to mining speed as well as an attribute that makes it harder for | + | The Venture is well suited for a beginning miner. Its abilities include a bonus to mining speed as well as an attribute that makes it harder for other players to attack you. On the other hand, it does not hold nearly as much ore as the larger [[Mining Barge#Mining Barge|Mining Barges]] do, and so you will find yourself making frequent trips back to a station to drop off your load. |
| − | Each mining ship needs skill training for its primary task, and also to improve its power grid and | + | Each mining ship needs skill training for its primary task, and also to improve its power grid and CPU abilities. In addition, a certain amount of defensive weaponry is needed to kill the NPC pirates ("rats") who guard the asteroid belts. Here are some necessary skills that you need to use a mining frigate. |
| + | {{ note box | '''IMPORTANT''': Although Level I is enough to get started, you should try to get each skill to Level III before you begin to train any higher level skills. | italics = no }} | ||
| − | {{ | + | '''Resource Processing''': |
| + | * {{sk|Mining}} – faster mining speed | ||
| + | * {{sk|Mining Upgrades}} – install mining improvement gear | ||
| + | * {{sk|Reprocessing}} – better mineral processing in general | ||
| + | * {{sk|Reprocessing Efficiency}} – even better mineral processing | ||
| + | * {{sk|Salvaging}} – faster salvaging speed | ||
| + | |||
| + | '''Drones''': | ||
| + | * {{sk|Drones}} – control more drones | ||
| + | * {{sk|Drone Interfacing}} – drones do more damage | ||
| + | * {{sk|Light Drone Operation}} – damage bonus to light drones | ||
| + | * {{sk|Salvage Drone Operation}} – use salvage drones | ||
| + | |||
| + | '''Space Ship Command''': | ||
| + | * {{sk|Spaceship Command}} – quicker spaceship movement | ||
| + | * {{sk|Mining Frigate}} – use mining frigates | ||
| + | |||
| + | '''Engineering''': | ||
| + | * {{sk|Power Grid Management}} – more ship power | ||
| + | * {{sk|CPU Management}} – more ship CPU processing | ||
| + | * {{sk|Capacitor Systems Operation}} – more ship capacitor | ||
| + | These are the minimum. Even trained to III, they will only give you the basic skills. To be an expert miner, you need a much wider range of abilities. So, when you have time, first look at this list of [[Mining#Skills|Mining Skills]], and then look at the [[Basic Skills|E-Uni full list of basic skills]] for more information. | ||
| − | + | == Second, Fit the Ship == | |
| − | + | Now that you have a ship, you will need to equip it. Mining lasers are your first concern, of course, but you also need drones for defense, an afterburner, and other gear to improve your mining abilities. A "fit" is a set of lasers, drones and gear that fits your ship that is, a set that does not use more power or CPU than your ship can supply. | |
| − | |||
| − | |||
| − | |||
| − | |||
| − | |||
| − | + | Devising fittings can be a complicated, time-consuming process. You can, and should, read all the details about how to fit a ship, one day. But for now, you just need a fit that works. | |
| − | |||
| − | |||
| − | |||
| − | |||
| − | + | For mining in high-sec systems (Level 1.0-0.8), here is a good fit. The large text is the name of the item; the small print describes what the item does. | |
| − | |||
| − | |||
| − | + | * Two of EP-S Gaussian Scoped Mining Laser - <small>mines an asteroid for ore</small> | |
| − | * | + | * Salvager I - <small>salvages stuff from dead pirate ships</small> |
| − | * | + | * 1MN Y-S8 Compact Afterburner - <small>gives the ship a quick burst of speed</small> |
| − | * | + | * Medium Azeotropic Restrained Shield Extender - <small>increases shield strength</small> |
| − | + | * Small Azeotropic Restrained Shield Extender - <small>increases shield strength (Note - you won't have enough Powergrid yet to fit 2 Mediums)</small> | |
| − | + | * Mining Laser Upgrade I - <small>increases the mining laser's yield</small> | |
| − | |||
| − | |||
| − | |||
| − | |||
| − | |||
| − | |||
| − | |||
| − | |||
| − | |||
| − | |||
| − | |||
| − | |||
| − | |||
| − | |||
In addition you will need: | In addition you will need: | ||
| − | *Two | + | * Two drones - <small>defend your ship from NPC rats </small> |
| + | |||
| + | Exactly which drones you need depends on the type of rats in the region where you are mining. This will be covered in the "[[#Dangers|Dangers]]" section of this guide. | ||
| − | + | You can buy all of the items in the Regional Market. Or, if you have the E-Uni rank of Freshman, you may be able to find them in the [[Corporation Hangar|free gear hangar]]. Once you have the gear in your own hangar, just open the "Fitting" window and drag each piece of gear onto your ship. | |
| − | |||
| − | You can buy all of the items in the Regional Market. Or, if you have the E- | ||
| − | |||
| − | |||
| − | |||
| − | |||
| − | + | Notice how as you install each piece of gear, the "CPU" and "Powergrid" meters change their values. Each piece of gear uses some power and/or cpu capacity. All of your gear must fit on the ship without overloading either of these meters. | |
| − | + | Here, for example are the fitting requirements for a particular mining laser. Each item that you want to fit will show this data in its Get Info window. | |
| + | [[File:QSG_mining_laser.png|thumb|center|upright=2.0|alt=mining laser fitting requirements]] | ||
| − | ==Next, Where Is the Ore?== | + | '''Important''': Some skills reduce the amount of powergrid and CPU needed for some of the equipment, and this lets you fit more powerful gear. (Look, for example, at {{sk|Power Grid Management}}, {{sk|CPU Management}} or {{sk|Mining Upgrades}}.) If you find that you cannot fit all suggested items into your ship, you may need to improve some of these skills before you can fly. (''While it's not something a skilled miner would do, you could also turn off some of your equipement. If you take the Afterburner offline, for example, you will gain cpu and power for use elsewhere ... but you will not have a burst of emergency speed anymore. Or you could turn the Salvager I off and just not salvage wrecks.'') Similarly, if you have CPU and powergrid to spare, you can look at better lasers that mine ore faster. |
| + | |||
| + | == Next, Where Is the Ore? == | ||
The Overview Window that comes up automatically whenever you undock your ship shows every item that your ship's scanners can locate, and it gives you information about each item. You will use your Overview Window in conjunction with your ship's built-in Tactical Display to find the asteroids you want to mine. | The Overview Window that comes up automatically whenever you undock your ship shows every item that your ship's scanners can locate, and it gives you information about each item. You will use your Overview Window in conjunction with your ship's built-in Tactical Display to find the asteroids you want to mine. | ||
The process goes like this – each step will be covered in detail below: | The process goes like this – each step will be covered in detail below: | ||
| − | #Fly to an Asteroid Belt | + | # Fly to an Asteroid Belt |
| − | #Release your Drones (''safety first!'') | + | # Release your Drones (''safety first!'') |
| − | #Set the Overview Window Tab to Mining and sort on Type | + | # Set the Overview Window Tab to Mining and sort on Type |
| − | #Turn on the Tactical Display | + | # Turn on the Tactical Display |
| − | #Select asteroids in the Overview and check them out in the Tactical Display | + | # Select asteroids in the Overview and check them out in the Tactical Display |
| − | #Fly to a place where you are in range of the asteroids that you need | + | # Fly to a place where you are in range of the asteroids that you need |
| − | #Mine until your ship is full | + | # Mine until your ship is full |
| − | #Collect your drones ... DO NOT FORGET ... they will not come automatically | + | # Collect your drones ... DO NOT FORGET ... they will not come automatically |
| − | #Return to base, dump the ore, repeat from Step 1 | + | # Return to base, dump the ore, repeat from Step 1 |
| − | So | + | So, before you can start mining, you need to set up your Overview Window to "see" the kinds of things you care about in an asteroid belt. |
| − | {{ note box |If you have already completed the E-Uni [[ | + | {{ note box |If you have already completed the E-Uni [[Overview Setup#Setting Up Your Overview|Overview Set-Up procedure]], then this next step will be easy. Otherwise, you should do the E-Uni Overview Setup. This is quick and easy. Return here once you have the E-Uni Settings installed.}} |
| − | To make a mining overview tab, you will take the E-Uni " | + | To make a mining overview tab, you will take the E-Uni "PvP" tab and modify it a bit: |
| − | #Right-click on the "white bars" icon at the top left of your Overview and select "Open Overview Settings" | + | # Right-click on the "white bars" icon at the top left of your Overview and select "Open Overview Settings" from the pull down menu |
| − | # | + | # Click on one of your tabs ... preferably not the first or last one |
| − | #Right click and select "Load Preset to Tab > 1 - pvp"[[File:QSG_overview_menu_mining.png|center|400px|<small>Click to Englarge</small>alt=overview showing pull down menu for tab preset selection]] | + | # Right click and select "Load Preset to Tab > 1 - pvp"[[File:QSG_overview_menu_mining.png|center|400px|<small>Click to Englarge</small>alt=overview showing pull down menu for tab preset selection]] |
| + | At this point you have loaded the standard "PvP" settings. Next you make some changes to those settings to add the things you want to see while mining; then you save those settings as "Mining". | ||
| − | + | In the Overview Settings window click "Tab Presets" at the top. And then click "Types". And then: | |
| − | + | * Right-click on "Asteroid" and choose "Select All" | |
| + | * Under "Celestial" check "Asteroid Belt" and "Cargo Container" and "Wreck" | ||
| + | * Under "Entity" check "Scatter Container" and "Spawn Container" | ||
| + | * Under "NPC" check "Pirate NPC" | ||
| + | * Click the "Save" button, name the preset "Mining", and save it | ||
| − | + | If all has gone well, this Overview tab will now show asteroid belts, and when you fly to a belt, it will show individual asteroids. If you are attacked by NPC pirates ("rats"), they will show up, and if you kill them, you will see their wrecks. Also, any containers that drop from salvaged wrecks will appear, as will any containers that you drop yourself. | |
| − | |||
| − | |||
| − | |||
| − | |||
| − | + | (''If things don't seem to be working properly, you may have to go back through the set-up process and verify it. I did it three times, myself, before I got it right. If it still seems confusing, ask in chat or on Discord and someone will help you out.'') | |
| − | |||
| − | (''If things don't seem to be working properly, you may have to go back through the set-up process and verify it. I did it three times, myself, before I got it right. If it still seems confusing, ask in | ||
Now you're all set up to locate asteroids, but first, a word about security. | Now you're all set up to locate asteroids, but first, a word about security. | ||
| − | ===Dangers=== | + | === Dangers === |
There are six ways to die in mining: | There are six ways to die in mining: | ||
| − | *War Targets | + | * War Targets |
| − | *Professional | + | * Professional criminals |
| − | *Amateur | + | * Amateur criminals |
| − | *Idiot | + | * Idiot ciminals |
| − | *NPC | + | * NPC pirates ("rats") |
| − | *Other NPC | + | * Other NPC entities |
| − | ====War Targets and Criminals==== | + | ==== War Targets and Criminals ==== |
| − | War Targets are players who are at war with E-UNI and want to kill you. They will show up on your Overview Window in blinking red, but by that time they will probably be close enough to start shooting at you, so you want to see them sooner. The same goes for | + | War Targets ("WTs") are players who are at war with E-UNI and want to kill you. They will show up on your Overview Window in blinking red, but by that time they will probably be close enough to start shooting at you, so you want to see them sooner. The same goes for criminals, who will show up in blinking yellow, or sometimes just unblinking yellow (for amateurs, especially). |
There are two ways to spot these dangers: | There are two ways to spot these dangers: | ||
| − | #Set your local system | + | # Set your local system Local chat window large enough to let you see everyone in it. You do not care about the text of the messages, you only need to see the names of the people. War Targets will be tagged with a blinking red icon, and criminals with yellow icons. |
| − | #Keep your [[ | + | # Keep your [[Directional Scanner Guide|Directional Scanner]] window open and hit the Scan button once every few minutes. Open the d-scanner by clicking on the "Scanners" tab of your Main Console and selecting the option to the right. When the window opens, check the "Use Overview Preset" box and select the "1 - PvP" preset tab from the pull down menu. This preset will show ships and probes, but it will not clutter up the display with asteroids. |
[[File:QSG_PVP_scan.png|center|400px|alt=Directional Scanner set to Mining preset]] | [[File:QSG_PVP_scan.png|center|400px|alt=Directional Scanner set to Mining preset]] | ||
| − | You are especially looking for " | + | You are especially looking for "combat probes". Combat probes can locate your ship exactly, so if you see them, pull up stakes immediately and dock. Also, groups of light ships fitted out for combat--frigates and cruisers--may be a gang of people forming up to attack miners and haulers in the system. Or they may not; be vigilant and use your judgment. |
| + | |||
| + | War Targets are especially dangerous, because, if you can see them, then they can see you, and they will probably be motivated to come look for you. If you see a WT, you probably should call in your drones, stop your lasers and dock at a nearby station. This is inconvenient, but a Venture will not hold up against a serious combat ship. You will, at this stage of the game, probably lose more money by losing your Venture than you give up by docking up. | ||
| − | + | Professional criminals make a living from the loot they collect by killing ships. Since you have a small mining frigate, your loot is probably not worth the effort. Amateur criminals, on the other hand, are looking to practise their skills, and these may attack you. They will have smaller ships, though, and you may be able to escape. Idiot criminals are players in powerful ships who are either too angry or too stupid to realize that attacking small ships in secure systems is a losing proposition. They are infrequent, but there's no way to predict them. | |
| − | + | If you see a single criminal in the Chat list, you can probably just keep mining while increasing your use of the Directional Scanner. As long as you don't see combat probes or groups of ships nearby, you are likely to be safe. | |
| − | + | The exception to this happens when you mine in a system with only a few belts. Since the belts are always in the same locations, a criminal does not need to scan to find victims. He or she can just warp to each belt in turn and look around. This is why you should start out by mining in systems with lots of belts. | |
| − | + | ==== NPC Pirates and Others ==== | |
| − | + | NPC pirates ("rats") infest most belts. In general, the lower the [[System Security|security level]] of the star system, the more often rats will spawn. Rats in high security space are generally not tough. They usually come in groups of one to three and can be destroyed by drones. | |
| − | |||
| − | |||
| − | You could equip a turret or launcher to kill | + | You could equip a turret or launcher to kill rats, but mining ships typically do not have launcher hardpoints, and you want to fill your turret slots with mining lasers. Thus, drones are the preferred defense. You might also consider using two mining drones and equipping one of your turrets with a gun, but mining drones, especially if you have low level skills, cannot mine enough ore to make up for the loss of a turret. |
| − | + | Rats come in standard types – Serpentis, Angel, Blood Raiders, etc. – and each is susceptible to a particular type of damage. This means that one of the four types of drones will be most effective against the rats in any particular area, and you should check the [[Npc damage|NPC Damage Chart]] and carry [[Using Drones#Drone choice|drones that will work best against that type]]. If you don't know what type of rats you will face, just go out and mine until a few show up. | |
| − | Once an attacking group of | + | Once an attacking group of rats has been destroyed, you will want to [[Guide To Salvaging|Salvage]] their wrecks for useful materials. If you have an extra turret slot in your ship, you can use a [https://wiki.eveonline.com/en/wiki/Salvager_I Salvager I] for this; otherwise, if you have room, you should carry a [https://wiki.eveonline.com/en/wiki/Salvage_Drone_I Salvage Drone]. |
| − | Other dangerous NPCs may appear while you are mining. | + | Other dangerous NPCs may appear while you are mining. Circadian Seekers, are one type; Sleeper Miners are another. While they appear in red on your overview, they are not aggressive. If you do not attack them, you should be safe. |
| − | ===Locating and Targeting Asteroids=== | + | === Locating and Targeting Asteroids === |
[[File:QSG_gislers_asteroids.png|thumb|upright=1.4|<small>Gisleres – Click to Enlarge</small>|alt=gislers star system shown in get info]] | [[File:QSG_gislers_asteroids.png|thumb|upright=1.4|<small>Gisleres – Click to Enlarge</small>|alt=gislers star system shown in get info]] | ||
| − | You will want to take your Venture to a Level 1.0 , 0.9 or 0.8 star system, preferably one that has a good number of asteroid belts ( | + | You will want to take your Venture to a Level 1.0 , 0.9 or 0.8 star system, preferably one that has a good number of asteroid belts (7 or more is nice). You can find these on the [[Star Map|Map]] by using the Get Info window. |
| − | + | If you are in E-Uni and [[Asteroid Belts Near HSC|near the Hisec Campus]], [http://evemaps.dotlan.net/map/Verge_Vendor/Gisleres#sec Gisleres] is a good place to mine. It is a Level 0.8 system with more than 20 asteroid belts. It sometimes has War Targets, though, so you have to keep a good watch. | |
| − | Make sure your ship is fitted out, then undock, go to the system where you want to mine, and select any local | + | Make sure your ship is fitted out, check that you have your drones, then undock, go to the system where you want to mine, and select any local asteroid belt in the Overview's mining Tab. Right-click and select "Warp to within 0 m". |
When you get there: | When you get there: | ||
| − | #Release your drones - there might be | + | # Release your drones - there might be rats about, and your drones might take care of them. |
| − | #In your Overview Window, click on the "Mining" tab, and then click on the "Type" column to sort the asteroids alphabetically and scroll until you find the kind of asteroid that you want to mine. In the example shown here, that type was "Dense Veldspar."[[File:QSG_overview_asteroids_1.png|center|380px|alt=overview sorted by asteroid types]] | + | # In your Overview Window, click on the "Mining" tab, and then click on the "Type" column to sort the asteroids alphabetically and scroll until you find the kind of asteroid that you want to mine. In the example shown here, that type was "Dense Veldspar."[[File:QSG_overview_asteroids_1.png|center|380px|alt=overview sorted by asteroid types]] |
| − | #Click on the upper left icon in the main ship power console.[[File:QSG_tactical_overlay.png|thumb|upright=0.8|<small>Click to Enlarge</small>|alt=tactical overlay button]]This will open your "Tactical Overlay". When this display is active, clicking on a target will cause a thin white line to connect your ship to the target. By clicking on each asteroid that you might want to mine, you can find the ones that lie together in a group. Go there.[[File:QSG_Tactical_Overlay_Asteroids.png|thumb|center|300px|Tactical Overlay Display|alt=tactical overlay showing asteroid targeted]] | + | # Click on the upper left icon in the main ship power console.[[File:QSG_tactical_overlay.png|thumb|upright=0.8|<small>Click to Enlarge</small>|alt=tactical overlay button]]This will open your "Tactical Overlay". When this display is active, clicking on a target will cause a thin white line to connect your ship to the target. By clicking on each asteroid that you might want to mine, you can find the ones that lie together in a group. Go there.[[File:QSG_Tactical_Overlay_Asteroids.png|thumb|center|300px|Tactical Overlay Display|alt=tactical overlay showing asteroid targeted]] |
| − | #While your ship is flying there, lock each of the asteroids as a target. How many you can lock at once depends on your ship's capabilities, and your skills. You only ''need'' one at a time, but things go a little faster with two or three.[[File:QSG_overview_asteroids_2.png|center|400px|alt=target locking an asteroid]] | + | # While your ship is flying there, lock each of the asteroids as a target. How many you can lock at once depends on your ship's capabilities, and your skills. You only ''need'' one at a time, but things go a little faster with two or three.[[File:QSG_overview_asteroids_2.png|center|400px|alt=target locking an asteroid]] |
| − | #Mining lasers need to be within 15 | + | # Mining lasers need to be within 15 km of an asteroid before they can begin to mine. As soon as you are close enough, click on the locked target to select it, and then click on your laser. |
| − | Since your Venture has two lasers, you can mine two asteroids at once. This is why you try to locate them in groups. Do not put both lasers on the same asteroid | + | Since your Venture has two lasers, you can mine two asteroids at once. This is why you try to locate them in groups. Do not put both lasers on the same asteroid: mining lasers empty their load into your ship on a cycle, and having two on the same target can waste cycle time. |
| − | If | + | If rats show up, keep mining. Let the drones take care of them. Should the drones be killed, just return to your base. (And consider your drone skills.) |
| − | That's the process. When your ship's ore bay is full, retrieve your drones and head home. Move the ore to your hangar, head back to the | + | That's the process. When your ship's ore bay is full, retrieve your drones and head home. Move the ore to your hangar, head back to the belt and repeat. |
| − | == | + | == Further Notes == |
=== Ores, Minerals and Processing === | === Ores, Minerals and Processing === | ||
| − | Whether you sell the ores that you mine, or process them into minerals for sale and/or your own use, you will need to know about the various [[Reprocessing|categories of ores and what they contain]]. | + | Whether you sell the ores that you mine, or process them into minerals for sale and/or your own use, you will need to know about the various [[Reprocessing|categories of ores and what they contain]]. It shouldn't surprise you to learn that there are additional skills involved in ore processing. |
Veldspar is a good ore for beginners because: | Veldspar is a good ore for beginners because: | ||
| − | *it is found in Level 1.0 star systems, | + | * it is found in Level 1.0 (and lower) star systems, |
| − | *it is abundant in nearly all Asteroid Belts, | + | * it is abundant in nearly all Asteroid Belts, |
| − | *it is widely used in [[Industry]] and so it maintains a fairly stable price in the market, | + | * it is widely used in [[Industry]] and so it maintains a fairly stable price in the market, |
| − | *it can be mined fairly efficiently with a Venture. | + | * it can be mined fairly efficiently with a Venture. |
| − | The following table shows the ores that can be mined in high security systems, where they can be found, and the minerals that they yield when processed. The numbers indicate the amount of mineral that you will get from 100 units of ore | + | The following table shows the ores that can be mined in high security systems, where they can be found, and the minerals that they yield when processed. The numbers indicate the amount of mineral that you will get from 100 units of ore--approximately, at least: this will vary depending on your processing abilities. |
Notice that unlike Veldspar and Scordite, most ores are not available in all systems. | Notice that unlike Veldspar and Scordite, most ores are not available in all systems. | ||
| Line 233: | Line 228: | ||
|} | |} | ||
| − | As you can see, Veldspar and Scordite are available everywhere. They are also relatively less valuable. Pyroxes and Plagioclase are next, containing some more rare | + | As you can see, Veldspar and Scordite are available everywhere. They are also relatively less valuable. Pyroxes and Plagioclase are next, containing some more rare--and therefore more valuable--minerals. But you cannot find these in 1.0 Security systems, and Pyroxes is only found in Amarr and Caldari systems, while Plagioclase is never found in Amarr systems. |
| − | And so on. You need to find a 0.7 level system to mine Omber or Kernite, but they also give a higher percentage of more valuable minerals. Be aware, though, that | + | And so on. You need to find a 0.7 level system to mine Omber or Kernite, but they also give a higher percentage of more valuable minerals. Be aware, though, that criminals know this. You are much more likely to be attacked in a 0.7 Security system than in a 1.0 Security system. |
| − | You can find the full table of [[ | + | You can find the full table of [[Asteroids and ore#Asteroid distribution|all EVE ores here]]; and a thorough discussion of [[Reprocessing|ore processing here]]. |
=== Lost Drones === | === Lost Drones === | ||
| − | Sooner or later you will forget your drones. If you saved the spot where you were mining as a Location, then you can warp back there and pick them up. They will probably be confused and not respond to your commands, but you can use the "scoop to cargo bay" command to retrieve them. They may be damaged by this process, so be sure to check with the repair shop when you get back to base. | + | Sooner or later you will [[Using Drones#Abandoned drones|forget your drones]]. If you saved the spot where you were mining as a Location, then you can warp back there and pick them up. They will probably be confused and not respond to your commands, but you can use the "scoop to cargo bay" command to retrieve them. They may be damaged by this process, so be sure to check with the repair shop when you get back to base. Note that abandoned drones can be picked up by anyone. |
=== Jaspet === | === Jaspet === | ||
| − | After a few sessions mining Veldspar in a high security system, you may feel like trying your hand at Jaspet. | + | After a few sessions mining Veldspar in a high security system, you may feel like trying your hand at Jaspet. |
{| class="wikitable" style="text-align:center; margin: 1em auto 1em auto;" | {| class="wikitable" style="text-align:center; margin: 1em auto 1em auto;" | ||
| Line 259: | Line 254: | ||
|} | |} | ||
| − | Jaspet contains good quantities of rare minerals. However, it is only available in | + | Jaspet contains good quantities of rare minerals. However, it is only available in 0.4 Security or lower systems (low-security space) in Amarr and Gallente regions. Consequently, it attracts PVP Criminals. This is not to say that you shouldn't try to mine it. But you will need to maintain good situational awareness, and factor in the cost of time spend running and hiding in your calculations. |
=== Mining Missions === | === Mining Missions === | ||
| − | Various agents offer Mining Missions. These are all basically the same: | + | Various agents offer Mining Missions. These are all basically the same: |
| − | #the agent asks you to go mine some ore, | + | # the agent asks you to go mine some unusual, non-standard ore, |
| − | #the ore is either one large or about ten small asteroids, | + | # the ore is either one large or about ten small asteroids, |
| − | #the only Mission danger is from NPC Belt Pirates (but keep watch for WTs), | + | # the only Mission danger is from NPC Belt Pirates (but keep watch for WTs), |
| − | #when the asteroids are depleted, you bring the ore back to the same agent. | + | # when the asteroids are depleted, you bring the ore back to the same agent. |
| − | The loyalty point payoffs are low relative to Security | + | The loyalty point payoffs are low relative to Security missions, but the agents' loyalty stores have some useful [[Implant|augmentation plug-ins]] for sale. And an occasional mission can break up the boredom of regular mining. (If you have a Mining Barge or larger, you can complete the mission and still have enough room to mine some ore before you return.) |
=== E-Uni Mining Fleets === | === E-Uni Mining Fleets === | ||
| − | If you plan to make a career out of | + | If you plan to make a career out of mining, then you need to look into mining fleets. These may: |
| − | *Give the protection of mining in a group, | + | * Give the protection of mining in a group, |
| − | *Give | + | * Give fleet-wide bonuses to skills that improve mining efficiency, |
| − | *May let you push your ore out in containers for others to pick up, saving you trips to base to dump ore, | + | * May let you push your ore out in containers for others to pick up, saving you trips to base to dump ore, |
| − | *Provide scout or combat protection from | + | * Provide scout or combat protection from rats and criminals |
| + | |||
| + | [[Mining#Cooperative mining|Mining fleets]] form for various purposes and different fleet leaders will organize differently and have different rules. If you are located at our headquarters or [[Communities]], you should be able to find nearby fleets led by E-Uni members, sometimes set up specifically to help new miners learn the ropes. The best way to find these is to ask in E-Uni chat, HSC chat, or on Discord. If a fleet is up and accepting members, they will help you find and join it. | ||
| − | + | In the longer term, you might want to consider E-Uni's [[Averon Mining Campus]]. | |
=== Moving the Overview and Locked Target Windows === | === Moving the Overview and Locked Target Windows === | ||
| + | If you ask about it in chat, you will find that nearly every player has a different opinion about where the Overview Window and Locked Targets should be placed on their screen. Where you put them is up to you, but they are easy to move. | ||
| − | |||
| − | |||
The Overview Window has a moving bar all along its top edge. Just click there and drag the window to a spot that works for you. | The Overview Window has a moving bar all along its top edge. Just click there and drag the window to a spot that works for you. | ||
| + | |||
When you have targets up, if you look really close you will see a little circle-with-a-target-in-it icon somewhere near the set of locked target displays. There is only one icon, and when you click on it and drag, you move all of the locked target displays. | When you have targets up, if you look really close you will see a little circle-with-a-target-in-it icon somewhere near the set of locked target displays. There is only one icon, and when you click on it and drag, you move all of the locked target displays. | ||
[[File:QSG_overview_station_3.png|center|300px|alt=locked target showing "move me" icon]] | [[File:QSG_overview_station_3.png|center|300px|alt=locked target showing "move me" icon]] | ||
| − | ==Next Steps== | + | == Next Steps == |
| − | + | If you plan to make mining a career, your first goal should be to improve your mining and processing skills, and to move up to Mining Barges and then Exhumers. You can also greatly increase your yield by joining a mining fleet. | |
| − | |||
There are a number of pathways available to miners: | There are a number of pathways available to miners: | ||
| − | *stay in high security systems and make ISK by volume, | + | * stay in high security systems and make ISK by volume, |
| − | *move to lowsec and/or nulsec systems and mine rare, high profit ores and gases, | + | * move to lowsec and/or nulsec systems and mine rare, high profit ores and gases, |
| − | *mine ice | + | * mine ice |
| − | *focus on | + | * focus on industry and only mine what you need to support your manufacturing |
Or, of course, some mixture of these. But that is for later. Right now, you want to focus on smoothly mining and processing as much Veldspar as you can, while learning the skills you need to move up. Here are some links that might help. | Or, of course, some mixture of these. But that is for later. Right now, you want to focus on smoothly mining and processing as much Veldspar as you can, while learning the skills you need to move up. Here are some links that might help. | ||
| − | + | ||
'''Mining in General''' | '''Mining in General''' | ||
| − | + | ||
| − | + | * [[Mining]] – in depth article covers the entire field | |
| − | + | * [[Mining#Skills|List of Skills Related to Mining]] | |
| − | *[[Mining]] – in depth article covers the entire field | + | * [[Reprocessing|Processing Ore]] – Includes details about advanced processing |
| − | *[[Mining#Skills|List of Skills Related to Mining]] | + | |
| − | *[[Reprocessing|Processing Ore]] – Includes details about advanced processing | ||
| − | |||
'''E-UNI Mining''' | '''E-UNI Mining''' | ||
| − | *[[HSC|HiSec Campus]] – specifically set up for beginners, HSC offers free gear for and opportunities to learn the mining profession | + | * [[HSC|HiSec Campus]] – specifically set up for beginners, HSC offers free gear for and opportunities to learn the mining profession |
| − | *[[ | + | * [[Asteroid Belts Near HSC|Asteroid Belts near the Hisec Campus]] |
| − | *[[Mining Missions at HSC]] | + | * [[Mining Missions at HSC]] |
| − | *[[ | + | * [[Averon Mining Campus]] – an advanced mining operation; read about them and apply when you feel ready |
'''Asteroids, Gases and Ice''' | '''Asteroids, Gases and Ice''' | ||
| − | *[[Reprocessing# | + | * [[Reprocessing#Simplified ore chart for in-game notebook|Asteroid/Ore Chart for In-game Notebook]] – Copy/Paste for quick reference |
| − | *[[ | + | * [[Asteroids and ore]] |
| − | *[[ | + | * [[Gas cloud harvesting]] |
| − | *[[ | + | * [[Ice Mining|Mining Ice]] |
'''Ships, Fitting and Fleets''' | '''Ships, Fitting and Fleets''' | ||
| − | *[[ | + | * [[ORE Basic Ship and Skill Guide|ORE Ship Guide]] – shows all of the mining ships |
| − | *[[ | + | * [[ORE Basic Ship and Skill Guide#Fitting strategies and mining modules|Mining Fitting Guide]] |
| − | *[[ | + | * [[Mining Fleet#Cooperative mining|Mining Fleets]] – general information on Mining Fleets |
| − | *[[ | + | * [[Mining Op|Mining Operations Guide]] – gives the rules and generally accepted procedures for fleet mining |
| + | |||
| + | {{GettingStartedNav}} | ||
| − | [[Category: | + | [[Category:Getting Started]] |
[[Category:Guides]] | [[Category:Guides]] | ||
[[Category:Mining]] | [[Category:Mining]] | ||
Latest revision as of 15:41, 8 April 2024
- This is a step-by-step beginner tutorial for mining, aimed at players who may have done EVE's introductory tutorial but not much else. For a more in-depth explanation of mining mechanics, see mining.
This guide covers everything you need to do to set up an entry-level mining frigate and take it out to mine ore. There is much more to learn, but this is a start.
Contents
Getting Ready
Mining in EVE is not complicated, and in high security systems it is relatively safe. Some players mine while doing other things on their computers, though it is not clear that mining is that safe, even in 1.0 System Security. But more on that later.
To mine you need at least:
- A ship
- Mining lasers for the ship
- Certain gear to improve your ship's mining and defensive abilities
- The skills to make use of the ship, the lasers, and the gear
If your long term goal is to efficiently mine ore for your own use and/or for profit, then you probably want to follow a career path that goes something like this:
- Start with Veldspar, Scordite, Pyroxeres and Plagioclase ore in high security systems,
- Improve your refining skills with Simple Ore Processing to at least Level IV,
- Acquire the skills you need to operate a Mining Barge,
- Improve your refining skills to at least level III with Coherent Ore Processing for Omber and/or Kernite processing
At that point, you will be able to mine the basic ores profitably with relative safety. Then it will be time to think about mining for ice, gas, and high value ores in more dangerous places, such as low security systems, null security systems, and wormholes.
This guide assumes that you are starting at step 1. It will put you in a mining frigate fitted out for basic mining and show you the skills needed for refining the ore. It will also show you some of the paths you can follow as your mining skills develop.
First, Get a Ship
Although the process you go through for picking a ship is extensive, and you will need to read more about it as you improve your mining skills, for now there is really only one ship you can use: the
Venture
|
Venture
Mining Frigates Venture Class
|
. You should have received a Venture when you did the EVE Industry "career" mission. If you didn't do the mission, or no longer have the ship, you need to purchase one now.
The Venture is well suited for a beginning miner. Its abilities include a bonus to mining speed as well as an attribute that makes it harder for other players to attack you. On the other hand, it does not hold nearly as much ore as the larger Mining Barges do, and so you will find yourself making frequent trips back to a station to drop off your load.
Each mining ship needs skill training for its primary task, and also to improve its power grid and CPU abilities. In addition, a certain amount of defensive weaponry is needed to kill the NPC pirates ("rats") who guard the asteroid belts. Here are some necessary skills that you need to use a mining frigate.
Resource Processing:
- Mining – faster mining speed
- Mining Upgrades – install mining improvement gear
- Reprocessing – better mineral processing in general
- Reprocessing Efficiency – even better mineral processing
- Salvaging – faster salvaging speed
Drones:
- Drones – control more drones
- Drone Interfacing – drones do more damage
- Light Drone Operation – damage bonus to light drones
- Salvage Drone Operation – use salvage drones
Space Ship Command:
- Spaceship Command – quicker spaceship movement
- Mining Frigate – use mining frigates
Engineering:
- Power Grid Management – more ship power
- CPU Management – more ship CPU processing
- Capacitor Systems Operation – more ship capacitor
These are the minimum. Even trained to III, they will only give you the basic skills. To be an expert miner, you need a much wider range of abilities. So, when you have time, first look at this list of Mining Skills, and then look at the E-Uni full list of basic skills for more information.
Second, Fit the Ship
Now that you have a ship, you will need to equip it. Mining lasers are your first concern, of course, but you also need drones for defense, an afterburner, and other gear to improve your mining abilities. A "fit" is a set of lasers, drones and gear that fits your ship that is, a set that does not use more power or CPU than your ship can supply.
Devising fittings can be a complicated, time-consuming process. You can, and should, read all the details about how to fit a ship, one day. But for now, you just need a fit that works.
For mining in high-sec systems (Level 1.0-0.8), here is a good fit. The large text is the name of the item; the small print describes what the item does.
- Two of EP-S Gaussian Scoped Mining Laser - mines an asteroid for ore
- Salvager I - salvages stuff from dead pirate ships
- 1MN Y-S8 Compact Afterburner - gives the ship a quick burst of speed
- Medium Azeotropic Restrained Shield Extender - increases shield strength
- Small Azeotropic Restrained Shield Extender - increases shield strength (Note - you won't have enough Powergrid yet to fit 2 Mediums)
- Mining Laser Upgrade I - increases the mining laser's yield
In addition you will need:
- Two drones - defend your ship from NPC rats
Exactly which drones you need depends on the type of rats in the region where you are mining. This will be covered in the "Dangers" section of this guide.
You can buy all of the items in the Regional Market. Or, if you have the E-Uni rank of Freshman, you may be able to find them in the free gear hangar. Once you have the gear in your own hangar, just open the "Fitting" window and drag each piece of gear onto your ship.
Notice how as you install each piece of gear, the "CPU" and "Powergrid" meters change their values. Each piece of gear uses some power and/or cpu capacity. All of your gear must fit on the ship without overloading either of these meters.
Here, for example are the fitting requirements for a particular mining laser. Each item that you want to fit will show this data in its Get Info window.

Important: Some skills reduce the amount of powergrid and CPU needed for some of the equipment, and this lets you fit more powerful gear. (Look, for example, at Power Grid Management, CPU Management or Mining Upgrades.) If you find that you cannot fit all suggested items into your ship, you may need to improve some of these skills before you can fly. (While it's not something a skilled miner would do, you could also turn off some of your equipement. If you take the Afterburner offline, for example, you will gain cpu and power for use elsewhere ... but you will not have a burst of emergency speed anymore. Or you could turn the Salvager I off and just not salvage wrecks.) Similarly, if you have CPU and powergrid to spare, you can look at better lasers that mine ore faster.
Next, Where Is the Ore?
The Overview Window that comes up automatically whenever you undock your ship shows every item that your ship's scanners can locate, and it gives you information about each item. You will use your Overview Window in conjunction with your ship's built-in Tactical Display to find the asteroids you want to mine.
The process goes like this – each step will be covered in detail below:
- Fly to an Asteroid Belt
- Release your Drones (safety first!)
- Set the Overview Window Tab to Mining and sort on Type
- Turn on the Tactical Display
- Select asteroids in the Overview and check them out in the Tactical Display
- Fly to a place where you are in range of the asteroids that you need
- Mine until your ship is full
- Collect your drones ... DO NOT FORGET ... they will not come automatically
- Return to base, dump the ore, repeat from Step 1
So, before you can start mining, you need to set up your Overview Window to "see" the kinds of things you care about in an asteroid belt.
To make a mining overview tab, you will take the E-Uni "PvP" tab and modify it a bit:
- Right-click on the "white bars" icon at the top left of your Overview and select "Open Overview Settings" from the pull down menu
- Click on one of your tabs ... preferably not the first or last one
- Right click and select "Load Preset to Tab > 1 - pvp"
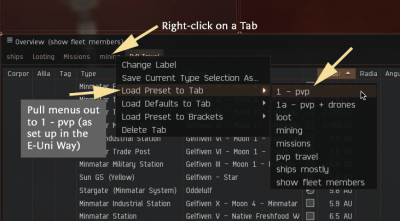

At this point you have loaded the standard "PvP" settings. Next you make some changes to those settings to add the things you want to see while mining; then you save those settings as "Mining".
In the Overview Settings window click "Tab Presets" at the top. And then click "Types". And then:
- Right-click on "Asteroid" and choose "Select All"
- Under "Celestial" check "Asteroid Belt" and "Cargo Container" and "Wreck"
- Under "Entity" check "Scatter Container" and "Spawn Container"
- Under "NPC" check "Pirate NPC"
- Click the "Save" button, name the preset "Mining", and save it
If all has gone well, this Overview tab will now show asteroid belts, and when you fly to a belt, it will show individual asteroids. If you are attacked by NPC pirates ("rats"), they will show up, and if you kill them, you will see their wrecks. Also, any containers that drop from salvaged wrecks will appear, as will any containers that you drop yourself.
(If things don't seem to be working properly, you may have to go back through the set-up process and verify it. I did it three times, myself, before I got it right. If it still seems confusing, ask in chat or on Discord and someone will help you out.)
Now you're all set up to locate asteroids, but first, a word about security.
Dangers
There are six ways to die in mining:
- War Targets
- Professional criminals
- Amateur criminals
- Idiot ciminals
- NPC pirates ("rats")
- Other NPC entities
War Targets and Criminals
War Targets ("WTs") are players who are at war with E-UNI and want to kill you. They will show up on your Overview Window in blinking red, but by that time they will probably be close enough to start shooting at you, so you want to see them sooner. The same goes for criminals, who will show up in blinking yellow, or sometimes just unblinking yellow (for amateurs, especially).
There are two ways to spot these dangers:
- Set your local system Local chat window large enough to let you see everyone in it. You do not care about the text of the messages, you only need to see the names of the people. War Targets will be tagged with a blinking red icon, and criminals with yellow icons.
- Keep your Directional Scanner window open and hit the Scan button once every few minutes. Open the d-scanner by clicking on the "Scanners" tab of your Main Console and selecting the option to the right. When the window opens, check the "Use Overview Preset" box and select the "1 - PvP" preset tab from the pull down menu. This preset will show ships and probes, but it will not clutter up the display with asteroids.

You are especially looking for "combat probes". Combat probes can locate your ship exactly, so if you see them, pull up stakes immediately and dock. Also, groups of light ships fitted out for combat--frigates and cruisers--may be a gang of people forming up to attack miners and haulers in the system. Or they may not; be vigilant and use your judgment.
War Targets are especially dangerous, because, if you can see them, then they can see you, and they will probably be motivated to come look for you. If you see a WT, you probably should call in your drones, stop your lasers and dock at a nearby station. This is inconvenient, but a Venture will not hold up against a serious combat ship. You will, at this stage of the game, probably lose more money by losing your Venture than you give up by docking up.
Professional criminals make a living from the loot they collect by killing ships. Since you have a small mining frigate, your loot is probably not worth the effort. Amateur criminals, on the other hand, are looking to practise their skills, and these may attack you. They will have smaller ships, though, and you may be able to escape. Idiot criminals are players in powerful ships who are either too angry or too stupid to realize that attacking small ships in secure systems is a losing proposition. They are infrequent, but there's no way to predict them.
If you see a single criminal in the Chat list, you can probably just keep mining while increasing your use of the Directional Scanner. As long as you don't see combat probes or groups of ships nearby, you are likely to be safe.
The exception to this happens when you mine in a system with only a few belts. Since the belts are always in the same locations, a criminal does not need to scan to find victims. He or she can just warp to each belt in turn and look around. This is why you should start out by mining in systems with lots of belts.
NPC Pirates and Others
NPC pirates ("rats") infest most belts. In general, the lower the security level of the star system, the more often rats will spawn. Rats in high security space are generally not tough. They usually come in groups of one to three and can be destroyed by drones.
You could equip a turret or launcher to kill rats, but mining ships typically do not have launcher hardpoints, and you want to fill your turret slots with mining lasers. Thus, drones are the preferred defense. You might also consider using two mining drones and equipping one of your turrets with a gun, but mining drones, especially if you have low level skills, cannot mine enough ore to make up for the loss of a turret.
Rats come in standard types – Serpentis, Angel, Blood Raiders, etc. – and each is susceptible to a particular type of damage. This means that one of the four types of drones will be most effective against the rats in any particular area, and you should check the NPC Damage Chart and carry drones that will work best against that type. If you don't know what type of rats you will face, just go out and mine until a few show up.
Once an attacking group of rats has been destroyed, you will want to Salvage their wrecks for useful materials. If you have an extra turret slot in your ship, you can use a Salvager I for this; otherwise, if you have room, you should carry a Salvage Drone.
Other dangerous NPCs may appear while you are mining. Circadian Seekers, are one type; Sleeper Miners are another. While they appear in red on your overview, they are not aggressive. If you do not attack them, you should be safe.
Locating and Targeting Asteroids

You will want to take your Venture to a Level 1.0 , 0.9 or 0.8 star system, preferably one that has a good number of asteroid belts (7 or more is nice). You can find these on the Map by using the Get Info window.
If you are in E-Uni and near the Hisec Campus, Gisleres is a good place to mine. It is a Level 0.8 system with more than 20 asteroid belts. It sometimes has War Targets, though, so you have to keep a good watch.
Make sure your ship is fitted out, check that you have your drones, then undock, go to the system where you want to mine, and select any local asteroid belt in the Overview's mining Tab. Right-click and select "Warp to within 0 m".
When you get there:
- Release your drones - there might be rats about, and your drones might take care of them.
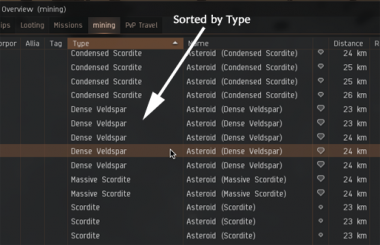
- In your Overview Window, click on the "Mining" tab, and then click on the "Type" column to sort the asteroids alphabetically and scroll until you find the kind of asteroid that you want to mine. In the example shown here, that type was "Dense Veldspar."
- Click on the upper left icon in the main ship power console.This will open your "Tactical Overlay". When this display is active, clicking on a target will cause a thin white line to connect your ship to the target. By clicking on each asteroid that you might want to mine, you can find the ones that lie together in a group. Go there.
- While your ship is flying there, lock each of the asteroids as a target. How many you can lock at once depends on your ship's capabilities, and your skills. You only need one at a time, but things go a little faster with two or three.
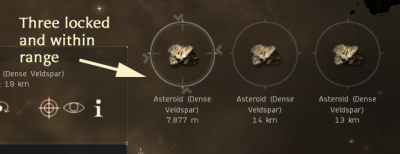
- Mining lasers need to be within 15 km of an asteroid before they can begin to mine. As soon as you are close enough, click on the locked target to select it, and then click on your laser.


Since your Venture has two lasers, you can mine two asteroids at once. This is why you try to locate them in groups. Do not put both lasers on the same asteroid: mining lasers empty their load into your ship on a cycle, and having two on the same target can waste cycle time.
If rats show up, keep mining. Let the drones take care of them. Should the drones be killed, just return to your base. (And consider your drone skills.)
That's the process. When your ship's ore bay is full, retrieve your drones and head home. Move the ore to your hangar, head back to the belt and repeat.
Further Notes
Ores, Minerals and Processing
Whether you sell the ores that you mine, or process them into minerals for sale and/or your own use, you will need to know about the various categories of ores and what they contain. It shouldn't surprise you to learn that there are additional skills involved in ore processing.
Veldspar is a good ore for beginners because:
- it is found in Level 1.0 (and lower) star systems,
- it is abundant in nearly all Asteroid Belts,
- it is widely used in Industry and so it maintains a fairly stable price in the market,
- it can be mined fairly efficiently with a Venture.
The following table shows the ores that can be mined in high security systems, where they can be found, and the minerals that they yield when processed. The numbers indicate the amount of mineral that you will get from 100 units of ore--approximately, at least: this will vary depending on your processing abilities.
Notice that unlike Veldspar and Scordite, most ores are not available in all systems.
| ORE | Tritanium | Pyrite | Isogen | Mexallaon | Nocxium | WHERE |
|---|---|---|---|---|---|---|
| Veldspar | 415 (per 100) | 1.0 All systems | ||||
| Scordite | 346 | 173 | 1.0 All systems | |||
| Pyroxes | 351 | 25 | 50 | 5 | 0.9 Amarr, Caldari | |
| Plagioclase | 107 | 213 | 107 | 0.9 Gallante, Minmatar; 0.7 Caldari | ||
| Omber | 85 | 34 | 85 | 0.7 Gallente, Minmatar | ||
| Kernite | 134 | 267 | 14 | 0.7 Amarr; 0.4 Caldari |
As you can see, Veldspar and Scordite are available everywhere. They are also relatively less valuable. Pyroxes and Plagioclase are next, containing some more rare--and therefore more valuable--minerals. But you cannot find these in 1.0 Security systems, and Pyroxes is only found in Amarr and Caldari systems, while Plagioclase is never found in Amarr systems.
And so on. You need to find a 0.7 level system to mine Omber or Kernite, but they also give a higher percentage of more valuable minerals. Be aware, though, that criminals know this. You are much more likely to be attacked in a 0.7 Security system than in a 1.0 Security system.
You can find the full table of all EVE ores here; and a thorough discussion of ore processing here.
Lost Drones
Sooner or later you will forget your drones. If you saved the spot where you were mining as a Location, then you can warp back there and pick them up. They will probably be confused and not respond to your commands, but you can use the "scoop to cargo bay" command to retrieve them. They may be damaged by this process, so be sure to check with the repair shop when you get back to base. Note that abandoned drones can be picked up by anyone.
Jaspet
After a few sessions mining Veldspar in a high security system, you may feel like trying your hand at Jaspet.
| ORE | Tritanium | Pyrite | Isogen | Mexallaon | Nocxium | Megacite | Zydrine | WHERE |
|---|---|---|---|---|---|---|---|---|
| Jaspet | 72 (per 100) | 121 | 144 | 72 | 3 | 0.4 Amarr, Gallente |
Jaspet contains good quantities of rare minerals. However, it is only available in 0.4 Security or lower systems (low-security space) in Amarr and Gallente regions. Consequently, it attracts PVP Criminals. This is not to say that you shouldn't try to mine it. But you will need to maintain good situational awareness, and factor in the cost of time spend running and hiding in your calculations.
Mining Missions
Various agents offer Mining Missions. These are all basically the same:
- the agent asks you to go mine some unusual, non-standard ore,
- the ore is either one large or about ten small asteroids,
- the only Mission danger is from NPC Belt Pirates (but keep watch for WTs),
- when the asteroids are depleted, you bring the ore back to the same agent.
The loyalty point payoffs are low relative to Security missions, but the agents' loyalty stores have some useful augmentation plug-ins for sale. And an occasional mission can break up the boredom of regular mining. (If you have a Mining Barge or larger, you can complete the mission and still have enough room to mine some ore before you return.)
E-Uni Mining Fleets
If you plan to make a career out of mining, then you need to look into mining fleets. These may:
- Give the protection of mining in a group,
- Give fleet-wide bonuses to skills that improve mining efficiency,
- May let you push your ore out in containers for others to pick up, saving you trips to base to dump ore,
- Provide scout or combat protection from rats and criminals
Mining fleets form for various purposes and different fleet leaders will organize differently and have different rules. If you are located at our headquarters or Communities, you should be able to find nearby fleets led by E-Uni members, sometimes set up specifically to help new miners learn the ropes. The best way to find these is to ask in E-Uni chat, HSC chat, or on Discord. If a fleet is up and accepting members, they will help you find and join it.
In the longer term, you might want to consider E-Uni's Averon Mining Campus.
Moving the Overview and Locked Target Windows
If you ask about it in chat, you will find that nearly every player has a different opinion about where the Overview Window and Locked Targets should be placed on their screen. Where you put them is up to you, but they are easy to move.
The Overview Window has a moving bar all along its top edge. Just click there and drag the window to a spot that works for you.
When you have targets up, if you look really close you will see a little circle-with-a-target-in-it icon somewhere near the set of locked target displays. There is only one icon, and when you click on it and drag, you move all of the locked target displays.

Next Steps
If you plan to make mining a career, your first goal should be to improve your mining and processing skills, and to move up to Mining Barges and then Exhumers. You can also greatly increase your yield by joining a mining fleet.
There are a number of pathways available to miners:
- stay in high security systems and make ISK by volume,
- move to lowsec and/or nulsec systems and mine rare, high profit ores and gases,
- mine ice
- focus on industry and only mine what you need to support your manufacturing
Or, of course, some mixture of these. But that is for later. Right now, you want to focus on smoothly mining and processing as much Veldspar as you can, while learning the skills you need to move up. Here are some links that might help.
Mining in General
- Mining – in depth article covers the entire field
- List of Skills Related to Mining
- Processing Ore – Includes details about advanced processing
E-UNI Mining
- HiSec Campus – specifically set up for beginners, HSC offers free gear for and opportunities to learn the mining profession
- Asteroid Belts near the Hisec Campus
- Mining Missions at HSC
- Averon Mining Campus – an advanced mining operation; read about them and apply when you feel ready
Asteroids, Gases and Ice
- Asteroid/Ore Chart for In-game Notebook – Copy/Paste for quick reference
- Asteroids and ore
- Gas cloud harvesting
- Mining Ice
Ships, Fitting and Fleets
- ORE Ship Guide – shows all of the mining ships
- Mining Fitting Guide
- Mining Fleets – general information on Mining Fleets
- Mining Operations Guide – gives the rules and generally accepted procedures for fleet mining