More actions
Change background color to design-token. Rework heading levels. Replace deprecated html with CSS. Implement flex container. |
|||
| (33 intermediate revisions by 11 users not shown) | |||
| Line 1: | Line 1: | ||
{{incursions sites}} | |||
== Objectives == | |||
= | === Force required === | ||
{{incursion sites|vanguards}} | |||
=Military | === Military information === | ||
Your objective is to destroy the | {| | ||
| [[File:incursions_sansha_transmission.png]] | |||
| Your objective is to destroy the Sansha's Nation fleet amassing here. They will be making use of logistics arrays, so disabling them may be advisable. | |||
|} | |||
=== Background information === | |||
One of the most significant evolutions in the Nation's strategy has been the move away from abducting planetary populations. Their new tactical doctrine, which relies in part upon system-wide capsule interference, is clearly focused on limiting the power and influence of the capsuleer class. | |||
The technology underlying the system-wide capsule overrides is not dissimilar to CONCORD's own Tracking and Response System (TRS). Where it veers into new territory is in the application of new technologies designed to override local resources in ways previously thought impossible. Intelligence gathered by DED operatives strongly suggests that this facility is chiefly responsible for establishing these overrides. | |||
''Synopsis from ISHAEKA-0095. DED Special Operations.''<br>''Authorized for Capsuleer dissemination.'' | |||
= | == Enemies == | ||
Below is a list of enemies that spawn in this site. See [[Sansha's Manual]] for a full list of the incursion rats. | |||
{{incursion rats|Start}} | |||
{{incursion rats|Auga Hypophysis}} | |||
{{incursion rats|Deltole Tegmentum}} | |||
{{incursion rats|Eystur Rhomben}} | |||
{{incursion rats|Niarja Myelen}} | |||
{{incursion rats|Tama Cerebellum}} | |||
{{incursion rats|End}} | |||
=== Priorities === | |||
This is a generic kill order that works no matter what fleet you're running. Certain special doctrines or fleet compositions could change some things in order to optimize their fleet efficiency, so this isn't necessarily the only kill order, but it works. | |||
As a general rule of thumb, if you cannot shoot the highest priority target due to low damage projection, move on to the next target you can actually hit. Just remember to switch back to a higher priority target if it moves into range later on. | |||
{| class="wikitable" | |||
|- style="background-color: var(--background-color-warning-subtle);" | |||
! colspan="2" rowspan="2" | # | |||
! colspan="2" | Targets for the entire fleet | |||
! style="text-align: center" rowspan="2" nowrap | Reason | |||
|- style="background-color: var(--background-color-warning-subtle); white-space: nowrap;" | |||
! Regular targets<small> <ref>These targets are usually larger, cruisers or battleships and suitable for ships with good damage projection, lower tracking, like battleships with large guns.</ref></small> | |||
! Small targets<small> <ref>Smaller targets, like frigates or extremely fast or small cruisers. Ideally the primary targets for '''strategic cruisers''', [[Vindicator]]s or the [[Roles in Incursions#Dronebunny|dronebunny]] as a last resort.</ref></small> | |||
|- style="vertical-align: top;" | |||
| 1 | |||
| style="background-color: Red;" | | |||
| style="text-align: center; padding: 5px;" colspan="2" | '''Niarja Myelen''' [[File:Icon_target_max.png|24px|link=|Jamming]][[File:icon_energy_neutralizer_i.png|24px|link=|Energy neutralizing]] | |||
| style="padding:5px;" | Because the '''Niarja Myelen''' jams and neuts. | |||
|- style="vertical-align: top;" | |||
| 2 | |||
| style="background-color: OrangeRed;" | | |||
| style="text-align :center; padding: 5px;" colspan="2" nowrap | '''Tama Cerebellum''' [[File:icon_warp_disruptor_i.png|24px|link=|Warp disrupting]]<br>'''Auga Hypophysis''' [[File:icon_warp_disruptor_i.png|24px|link=|Warp disrupting]][[File:icon_stasis_webifier_i.png|24px|link=|Webbing]]<br>'''Deltole Tegmentum''' [[File:icon_warp_disruptor_i.png|24px|link=|Warp disrupting]][[File:icon_energy_neutralizer_i.png|24px|link=|Energy neutralizing]][[File:icon_target_painter_i.png|24px|link=|Target painting]] | |||
| style="padding: 5px;" | The '''Tama''' warp disrupts and you remove a lot of damage quickly by shooting them first. | |||
= | The '''Auga''' warp disrupts, webs and while it does less damage than the '''Deltole''' it closes the distance faster and is easier to kill. | ||
[[File: | |- style="vertical-align :top;" | ||
= | | 3 | ||
| style="background-color: Green;" | | |||
| style="background-color: var(--background-color-destructive-subtle); text-align: center; padding: 5px;" colspan="2" | [[File:icon_large_red_x.png|24px|Do not shoot!]]'''Eystur Rhomben''' | |||
| style="padding: 5px; background-color: var(--background-color-destructive-subtle);" | '''Eysturs''' are to be ignored, they will simply respawn when killed and aren't necessary for site completion. | |||
|} | |||
<small><references/></small> | |||
=== Triggers === | |||
With the exception of the '''Eysturs''', the last enemy killed normally triggers the next wave. Sometimes a new wave might be triggered with one or two '''Tamas''' left on grid. If that happens, they will still need to be killed for site completion. | |||
You can completely ignore '''Eysturs''' as they are not part of the wave mechanics nor are they necessary to kill for site completion or extraction. | |||
'' | === Special requirements === | ||
{| | |||
| [[File:Icon data analyzer i.png|48px|link=]] | |||
| Requires the use of '''data analyzer''' modules to hack the logistics control array.<br>''(the logistics control array is roughly 30km away from the spawn point)'' | |||
|} | |||
== | ==== Hacking ==== | ||
Hacking is done by approaching&locking up the logistics control array, activating the data analyzer as soon as you get within range and then completing the [[Hacking|Hacking Minigame]]. Once completed you will get a message saying:'' "Local Sansha logistics systems subverted. Hostile logistics disabled."'' | |||
* This part can usually be skipped as a a grope of paladins can be use to out-dps the reps | |||
* Since failing the minigame carries not further consequences, feel free to (within reason) use more speed and less caution than you would at a regular data site. | |||
* One cycle of your Microwarpdrive should bring you into range to start hacking, it is adviced to 'Turn off Auto-Repeat' so you don't overshoot and move out of the max range of your Data Analyzer. | |||
* Once hacked the tower will stop repairing for about six minutes, which is usually more than enough for a decent fleet to finish the site. The control array to hack will be available in a clockwise pattern, starting at exactly 90° to your left when you warp in, see the image below. | |||
= | <div style="display: flex; flex-wrap: wrap> | ||
<div> | |||
[[File:Incursions_hacker_array.png|thumb| If you look down the direction your ship is warping in, the first tower to hack will be on your left.]] | |||
</div> | |||
<div> | |||
[[File:incursions_logistics_control_array.png|thumb| The active control array will turn into an interactive object, much like a mission loot container. Simply lock it up and activate your data analyzer on it to start hacking.]] | |||
</div> | |||
<div> | |||
[[File:incursions_remote_logistics_station.png|thumb| When the '''remote logistics station''' is hacked it'll have this easily identifiable mist- or cloud-like effect around it. The graphics may be slightly different depending on your shader settings, potentially much greener. But the nebulae effect, regardless of colour, is a dead give-away.]] | |||
</div> | |||
<div> | |||
[[File:incursions_ota_order.png|thumb| Normally we only need one hack, but in the case we need multiple hacks the control array to hack will be available clockwise; Control array to your left, then the one to the right closest to the repair station, then the one to the right furthest away from the repair station.]] | |||
</div> | |||
</div> | |||
== | == Hints & tips == | ||
* | * There are three waves in this site, more or less identical in terms of ship composition but they spawn in different positions. | ||
* | ** Waves spawn roughly 70 km off, with the exception of the third wave that spawns 35 - 40 km away from the beacon. The Sansha will then rapidly close the distance to their preferred orbit. The '''Eystur Rhombens''' will spawn, as well as respawn if killed, right in front of the remote logistics station. | ||
*Deltole | *** The first wave spawns on the right side of the remote logistics station. | ||
* | *** The second wave spawns on the left side of the remote logistics station. | ||
*** The third one above or below the remote logistics station. | |||
** The different waves are slightly randomised. The same type of ships will spawn in each wave, but the number of each is randomised. So you will encounter the same type of ships in each site, but the number of ships per type in each individual wave will be slightly different. There will only be one '''Deltole Tegmentum''' per wave however. | |||
* Focusing fire is really important at the start of this site to overcome the repairs. Tagging '''Niarjas''', '''Tamas''' and '''Augas''' as quickly as possible helps ensure that the fleet knows in what order they are to hit their primary targets. This is due to the logistics tower hack, as noted below. | |||
* Hacking is preferably done by the [[Roles in Incursions#Hacker.2FScout|Scout]]. This is usually a newbie or cheap alt character attached to the fleet. They will be flying a cheap [[Vanguard Incursion fits#Heron|Heron]] fit with a data analyzer. There is rarely a shortage of alts, but it can of course be done by logistics fitting a data analyzer if desperate (at the cost of not having as many remote tracking computers). | |||
** If you hack the tower you probably won't need to continue tagging the '''Niarjas''' and '''Tamas''', but tagging the '''Augas''' is still helpful. | |||
* When run with a hacker, this site is usually the fastest of the Vanguard sites and is typically preferred when possible. Note that other factors can play a role in the site decision, such as contesting fleets and their priorities, as well as warp distance from the current site. | |||
{{Incursions sites horizontal}} | |||
[[Category:Incursions sites]] | |||
[[Category: | |||
Latest revision as of 12:14, 16 June 2025

|
| Incursion sites |
|---|
| Click the title for a summary, or return to Incursions for general information. |
| Staging sites |
| Vanguard sites |
| Assault sites |
| Headquarter sites |
| Mothership sites |
Objectives
Force required
| Fleet of 10 - 12 pilots (up to 15 in low/null) 2 - 3 logistics needed Sites take about 5 - 10 minutes |
Military information

|
Your objective is to destroy the Sansha's Nation fleet amassing here. They will be making use of logistics arrays, so disabling them may be advisable. |
Background information
One of the most significant evolutions in the Nation's strategy has been the move away from abducting planetary populations. Their new tactical doctrine, which relies in part upon system-wide capsule interference, is clearly focused on limiting the power and influence of the capsuleer class.
The technology underlying the system-wide capsule overrides is not dissimilar to CONCORD's own Tracking and Response System (TRS). Where it veers into new territory is in the application of new technologies designed to override local resources in ways previously thought impossible. Intelligence gathered by DED operatives strongly suggests that this facility is chiefly responsible for establishing these overrides.
Synopsis from ISHAEKA-0095. DED Special Operations.
Authorized for Capsuleer dissemination.
Enemies
Below is a list of enemies that spawn in this site. See Sansha's Manual for a full list of the incursion rats.
| Name | Sig [1] | Speed [2] | Orbit / Speed [3] | Damage / Volley [4] | Range [5] | Effective HP [6] | |
|---|---|---|---|---|---|---|---|
| 6 km |
480 dps |
12 - 20 km |
52k ehp |
||||
| 12 km |
818 dps |
< 45 km |
179k ehp |
||||
Eystur Rhomben |
11 km |
120 dps |
10 - 12 km |
9k ehp |
|||
| 15 km |
(no weapons) | (no weapons) | 4k ehp |
||||
| 12 km |
300 dps |
< 70 km |
8k ehp |
- ^ While using their propulsion module, they suffer the same signature bloom as players.
- ^ This is the speed of the ship while they try to get within orbit or as they try to chase after you, suffering the same signature bloom as players do with the propulsion module on. They will turn off any propulsion modules once they get close to their preferred orbit.
- ^ Preferred orbit range and regular speed while orbiting, which is their regular speed without the propulsion module turned on.
- ^ Damage per second as well as damage per volley. Unless stated otherwise, turrets do an equal amount of EM and thermal damage while torpedoes do an equal amount of kinetic and explosive damage.
- ^ This is the effective range of this ship, presented with two values for turrets, optimal and optimal + double falloff, as well as a single range for torpedoes.
- ^ This is the amount of damage this ship can take, taking into account their resists. All ships, except the Lirsautton Parichaya have omni tanks. Hover over the icon for information about raw hitpoints.
Priorities
This is a generic kill order that works no matter what fleet you're running. Certain special doctrines or fleet compositions could change some things in order to optimize their fleet efficiency, so this isn't necessarily the only kill order, but it works.
As a general rule of thumb, if you cannot shoot the highest priority target due to low damage projection, move on to the next target you can actually hit. Just remember to switch back to a higher priority target if it moves into range later on.
| # | Targets for the entire fleet | Reason | ||
|---|---|---|---|---|
| Regular targets [1] | Small targets [2] | |||
| 1 | Niarja Myelen |
Because the Niarja Myelen jams and neuts. | ||
| 2 | Tama Cerebellum Auga Hypophysis Deltole Tegmentum |
The Tama warp disrupts and you remove a lot of damage quickly by shooting them first.
The Auga warp disrupts, webs and while it does less damage than the Deltole it closes the distance faster and is easier to kill. | ||
| 3 | Eysturs are to be ignored, they will simply respawn when killed and aren't necessary for site completion. | |||
- ^ These targets are usually larger, cruisers or battleships and suitable for ships with good damage projection, lower tracking, like battleships with large guns.
- ^ Smaller targets, like frigates or extremely fast or small cruisers. Ideally the primary targets for strategic cruisers, Vindicators or the dronebunny as a last resort.
Triggers
With the exception of the Eysturs, the last enemy killed normally triggers the next wave. Sometimes a new wave might be triggered with one or two Tamas left on grid. If that happens, they will still need to be killed for site completion.
You can completely ignore Eysturs as they are not part of the wave mechanics nor are they necessary to kill for site completion or extraction.
Special requirements
| Requires the use of data analyzer modules to hack the logistics control array. (the logistics control array is roughly 30km away from the spawn point) |
Hacking
Hacking is done by approaching&locking up the logistics control array, activating the data analyzer as soon as you get within range and then completing the Hacking Minigame. Once completed you will get a message saying: "Local Sansha logistics systems subverted. Hostile logistics disabled."
- This part can usually be skipped as a a grope of paladins can be use to out-dps the reps
- Since failing the minigame carries not further consequences, feel free to (within reason) use more speed and less caution than you would at a regular data site.
- One cycle of your Microwarpdrive should bring you into range to start hacking, it is adviced to 'Turn off Auto-Repeat' so you don't overshoot and move out of the max range of your Data Analyzer.
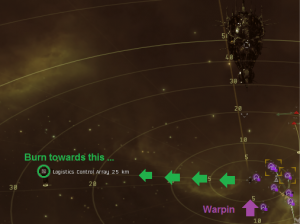
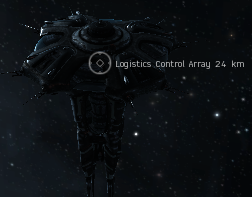
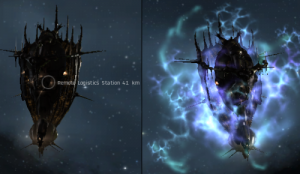
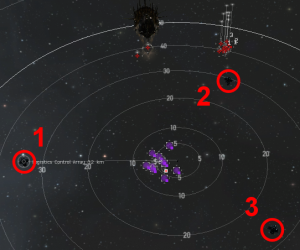
- Once hacked the tower will stop repairing for about six minutes, which is usually more than enough for a decent fleet to finish the site. The control array to hack will be available in a clockwise pattern, starting at exactly 90° to your left when you warp in, see the image below.


Hints & tips
- There are three waves in this site, more or less identical in terms of ship composition but they spawn in different positions.
- Waves spawn roughly 70 km off, with the exception of the third wave that spawns 35 - 40 km away from the beacon. The Sansha will then rapidly close the distance to their preferred orbit. The Eystur Rhombens will spawn, as well as respawn if killed, right in front of the remote logistics station.
- The first wave spawns on the right side of the remote logistics station.
- The second wave spawns on the left side of the remote logistics station.
- The third one above or below the remote logistics station.
- The different waves are slightly randomised. The same type of ships will spawn in each wave, but the number of each is randomised. So you will encounter the same type of ships in each site, but the number of ships per type in each individual wave will be slightly different. There will only be one Deltole Tegmentum per wave however.
- Waves spawn roughly 70 km off, with the exception of the third wave that spawns 35 - 40 km away from the beacon. The Sansha will then rapidly close the distance to their preferred orbit. The Eystur Rhombens will spawn, as well as respawn if killed, right in front of the remote logistics station.
- Focusing fire is really important at the start of this site to overcome the repairs. Tagging Niarjas, Tamas and Augas as quickly as possible helps ensure that the fleet knows in what order they are to hit their primary targets. This is due to the logistics tower hack, as noted below.
- Hacking is preferably done by the Scout. This is usually a newbie or cheap alt character attached to the fleet. They will be flying a cheap Heron fit with a data analyzer. There is rarely a shortage of alts, but it can of course be done by logistics fitting a data analyzer if desperate (at the cost of not having as many remote tracking computers).
- If you hack the tower you probably won't need to continue tagging the Niarjas and Tamas, but tagging the Augas is still helpful.
- When run with a hacker, this site is usually the fastest of the Vanguard sites and is typically preferred when possible. Note that other factors can play a role in the site decision, such as contesting fleets and their priorities, as well as warp distance from the current site.
| ||||||||||||||||||||


